General Information
- Item Name : WPBookit Plugin
- Author : Iqonic Design
- Support Ticket: https://iqonic.desky.support/
Thank you for choosing our plugin. We hope you enjoy building your project with us. It is a powerhouse of great features and powerful functionalities that would take months to develop. The plugin is fully responsive and be rest assured your project looks absolutely stunning on any types of screens.
Installation & Setup Guide
Please follow the steps below to install the WPBookit WordPress booking plugin:
- Introduction
-
Pre-Requirements:To install and use WPBookit effectively, your server should meet certain requirements. It is essential to ensure that the server has fullfill the below requirements.
PHP version Minimum required PHP version for this plugin is 7.4 MySQL version Minimum required MySQL version for this plugin is 5.6 MySQL user permission CREATE TABLE permission required cURL PHP cURL extension must be installed and enabled.
-
- Downloading the Plugin
- Step 1: Log in to your Codecanyon account.
- Step 2: Navigate to your downloads section.
- Step 3: Find WPBookit Plugin in your list of purchased items and click the download button.
- Step 4: Select "Installable WordPress file only" to download the ZIP file.
- Installing the Plugin
- Step 1: Log in to your WordPress admin dashboard.
- Step 2: Go to Plugins > Add New.
- Step 3: Click on the "Upload Plugin" button.
- Step 4: Click "Choose File" and select the WPBookit ZIP file you downloaded.
- Step 5: Click "Install Now".
- Step 6: Once installed, click "Activate Plugin".
Note:Upon activating the plugin, you will receive new pages for Login, Register, and User Profile.
Create a Profile Page (Exclusive to Registered Bookings):
If you want to enable your customers to manage their appointments and edit their profiles, creating a dedicated profile page is essential. You can skip this step if you intend to use WPBookit in "Guest Booking" mode.
Follow These Steps
- Create a new page and assign it a title; "Profile" is a suitable default, but feel free to choose any title you prefer.
- Insert the [wpb-profile] shortcode into the page to allow users to log in and access their profiles.
- Consider redirecting users to this Profile page after they make a booking. Navigate to the Settings panel and set the "Profile Page URL" in the Appointment Booking Redirect section.
- IMPORTANT: Ensure registration is enabled by going to the WordPress Settings > General page. Check the box next to Membership that says "Anyone can register".
- Congratulations, you're all set!"
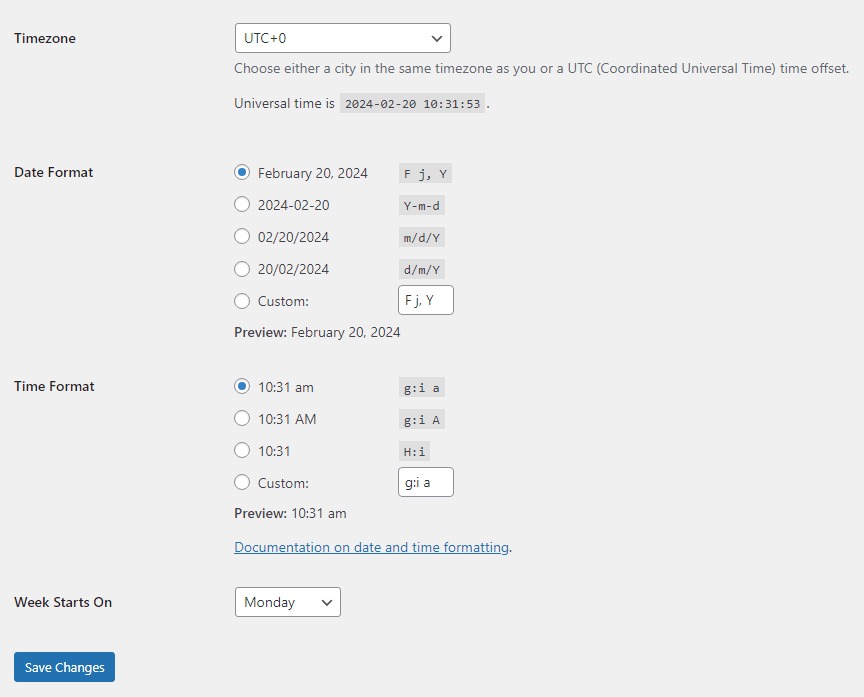
WordPress Date/Time Settings
One of the initial tasks you should address is setting up your Date/Time preferences within WordPress. These settings influence various aspects of WPBookit. Navigate to Settings > General to configure your Timezone, Date Format, Time Format, and the Week Starts On preferences. WPBookit relies on all of these settings.
Dashboard Panel
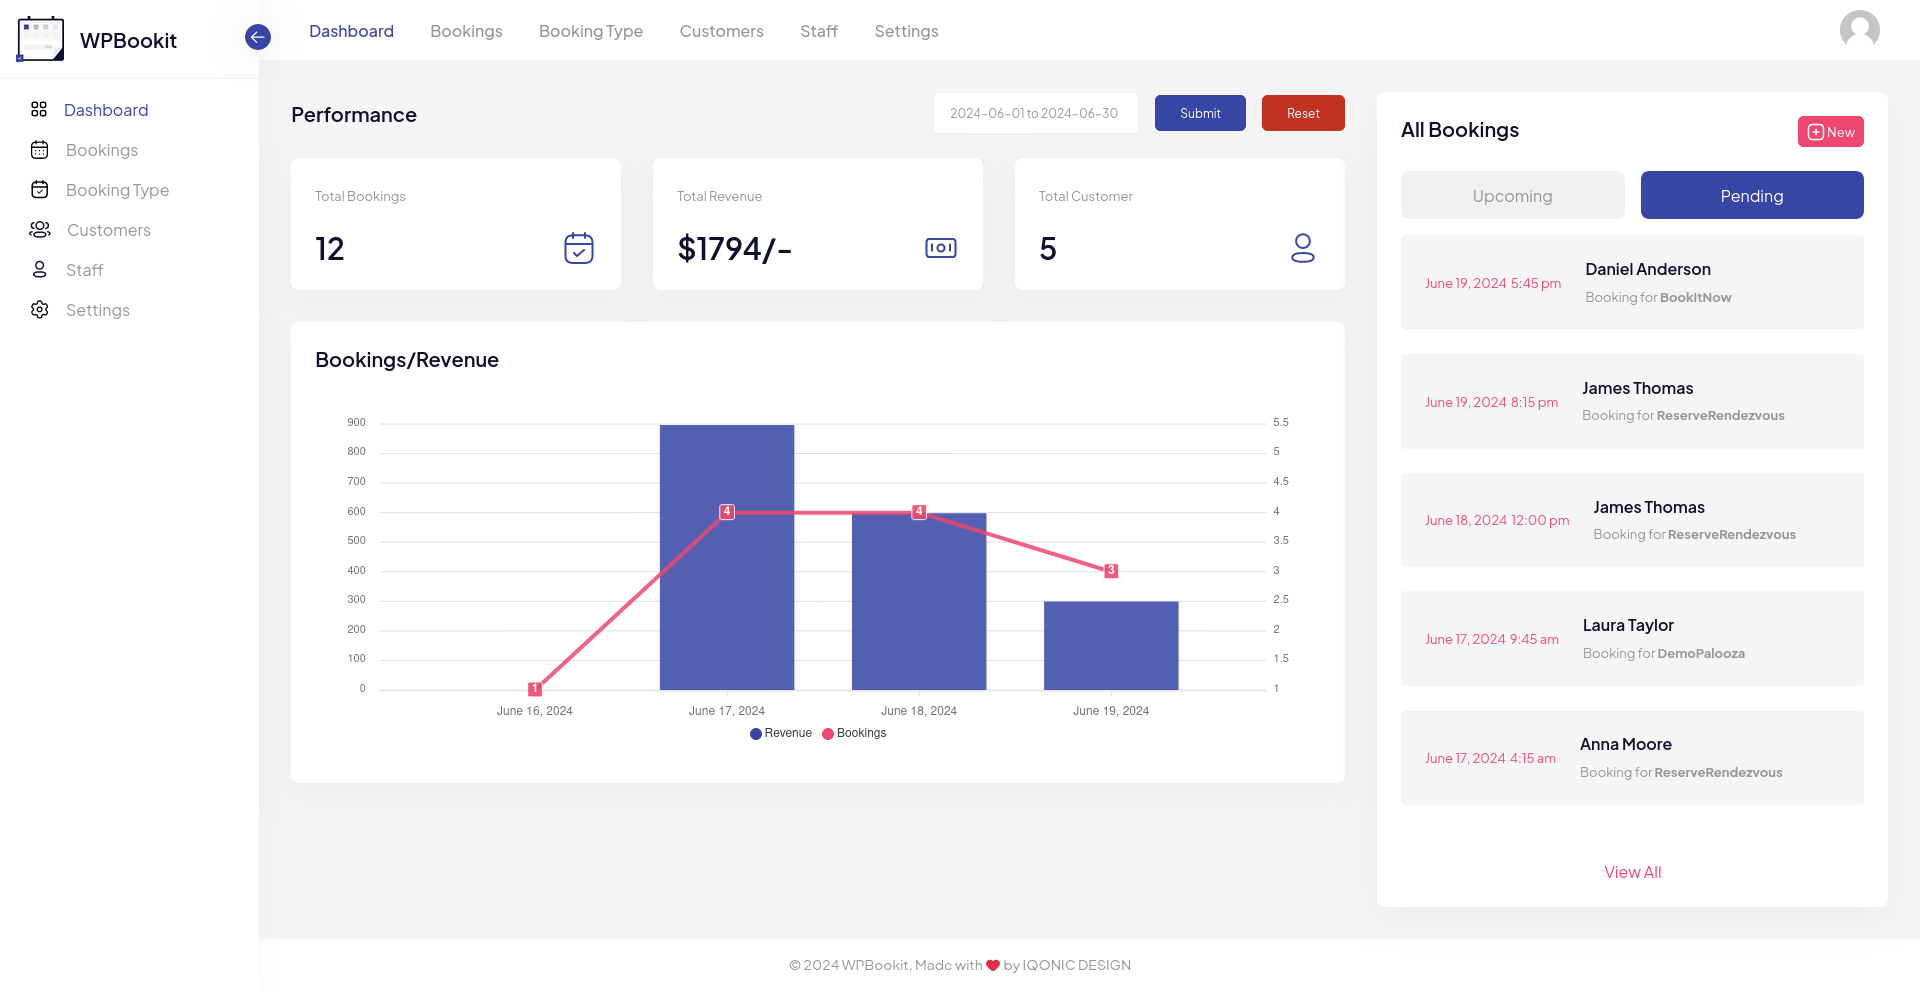
Dashboard Tab
The Dashboard Tab provides a comprehensive overview of the booking system's performance. It includes reports on Total Bookings, Total Revenue, and Total Customers. Additionally, a mixed chart displays the correlation between Revenue and the number of Bookings, which can be filtered by date to extract specific data for a given period.
On the right-hand side, there are links to manage appointments, with tabs to sort them by upcoming, pending, and completed statuses. This layout ensures that all critical metrics and functions are easily accessible for efficient management.
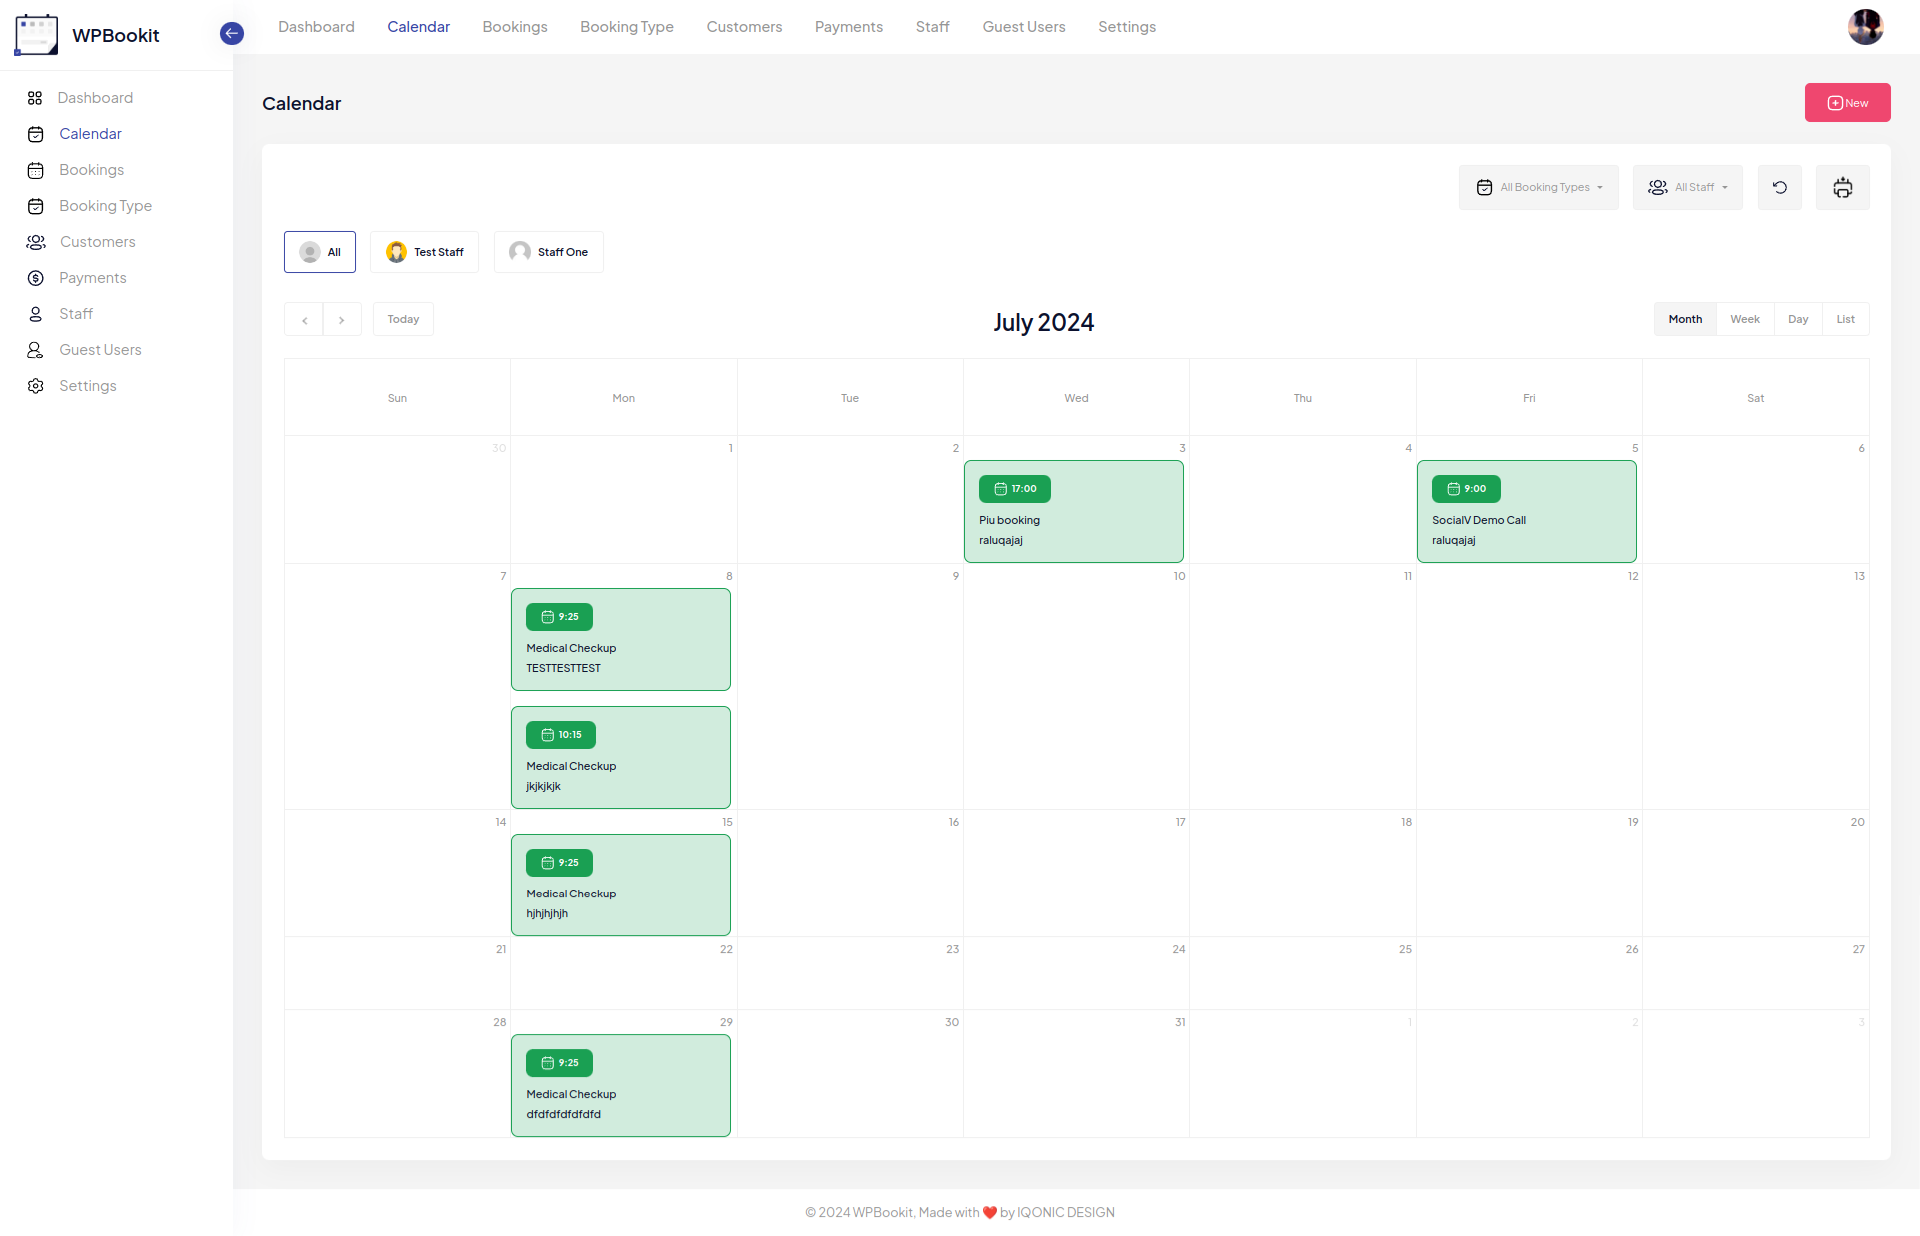
Calender Tab
The Calendar Tab offers an overview of all bookings, categorized by dates created by users. It includes various filters for sorting bookings by specific staff members and booking types. Additionally, users can print a comprehensive list of all bookings.
The Calendar Tab also allows users to efficiently create new bookings and also edit existing bookings to make desired modifications.
Booking Tab
In Booking Tab you will allow to manage all the bookings. Also you are allow to get booking list with Advanced Filters.
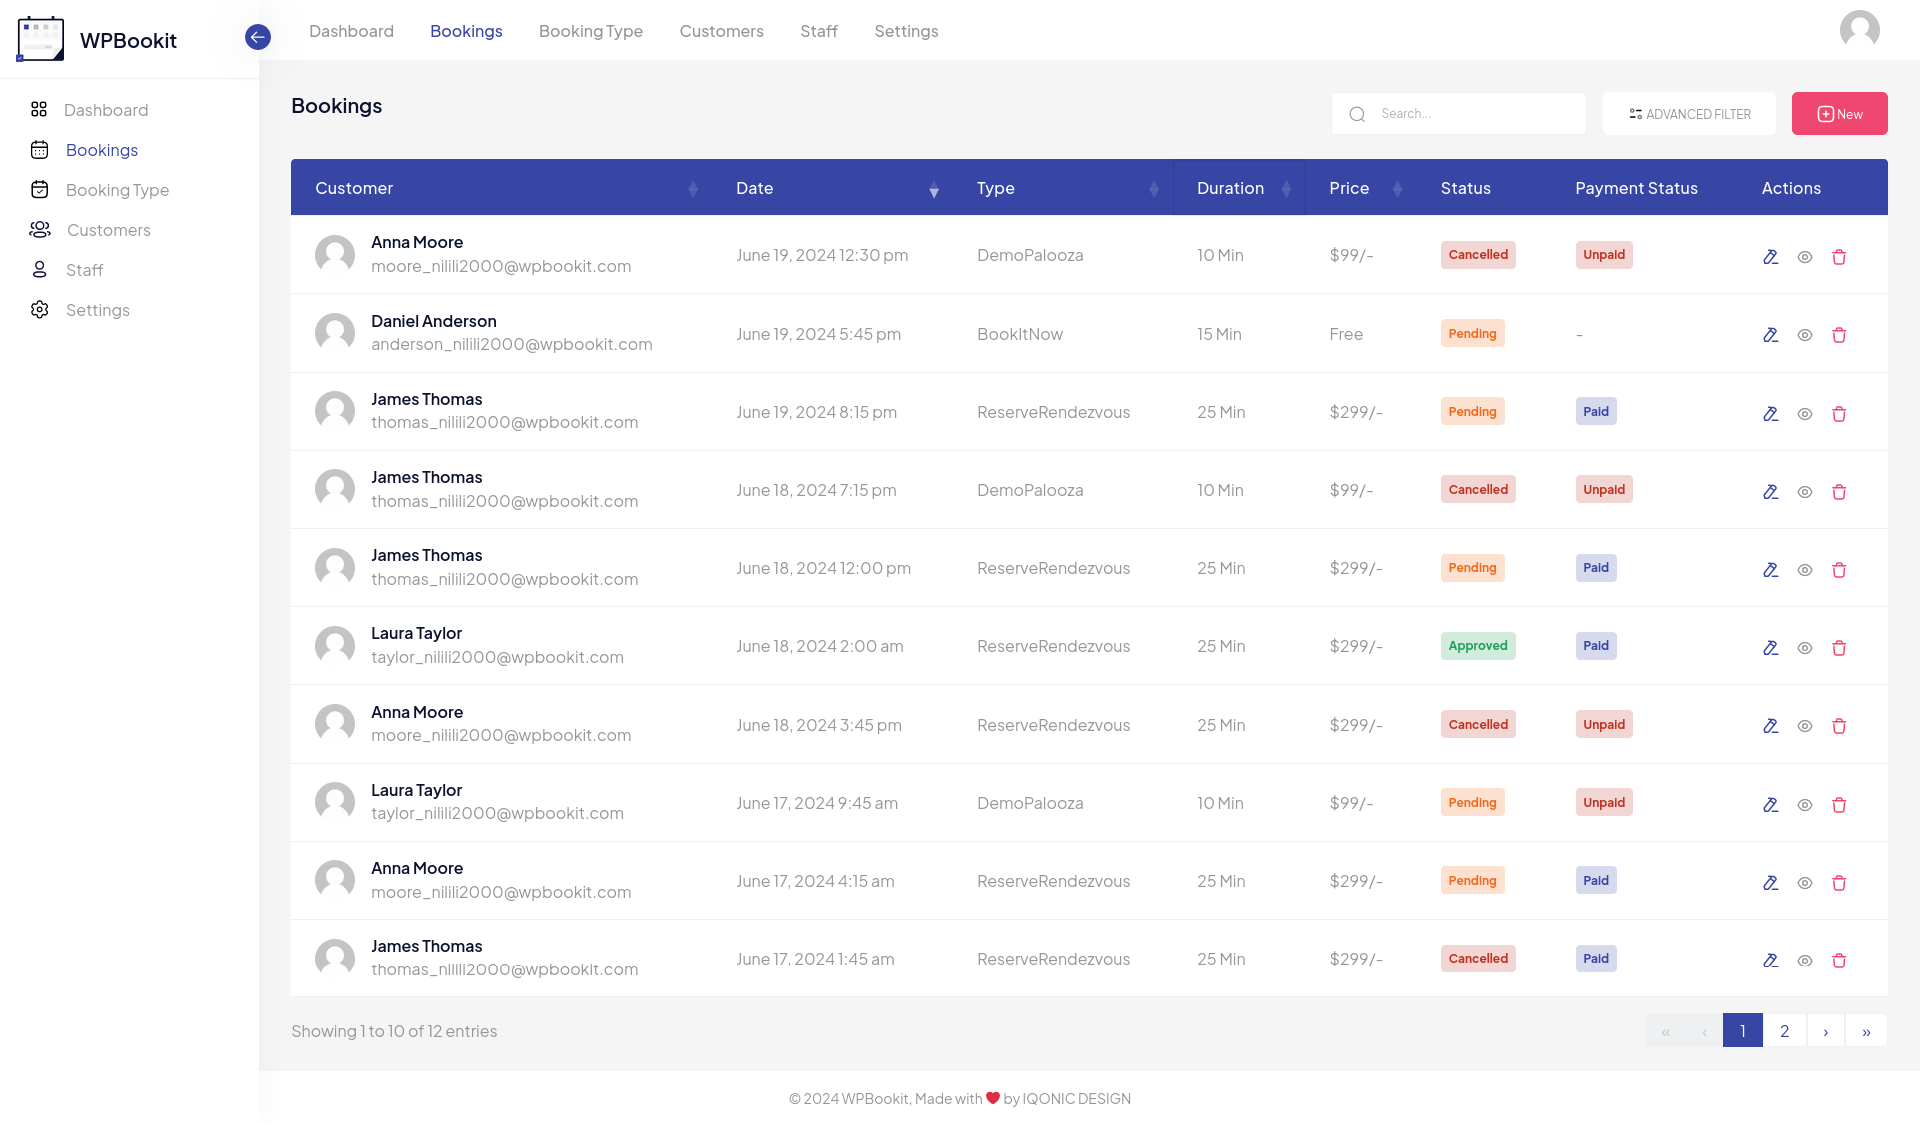
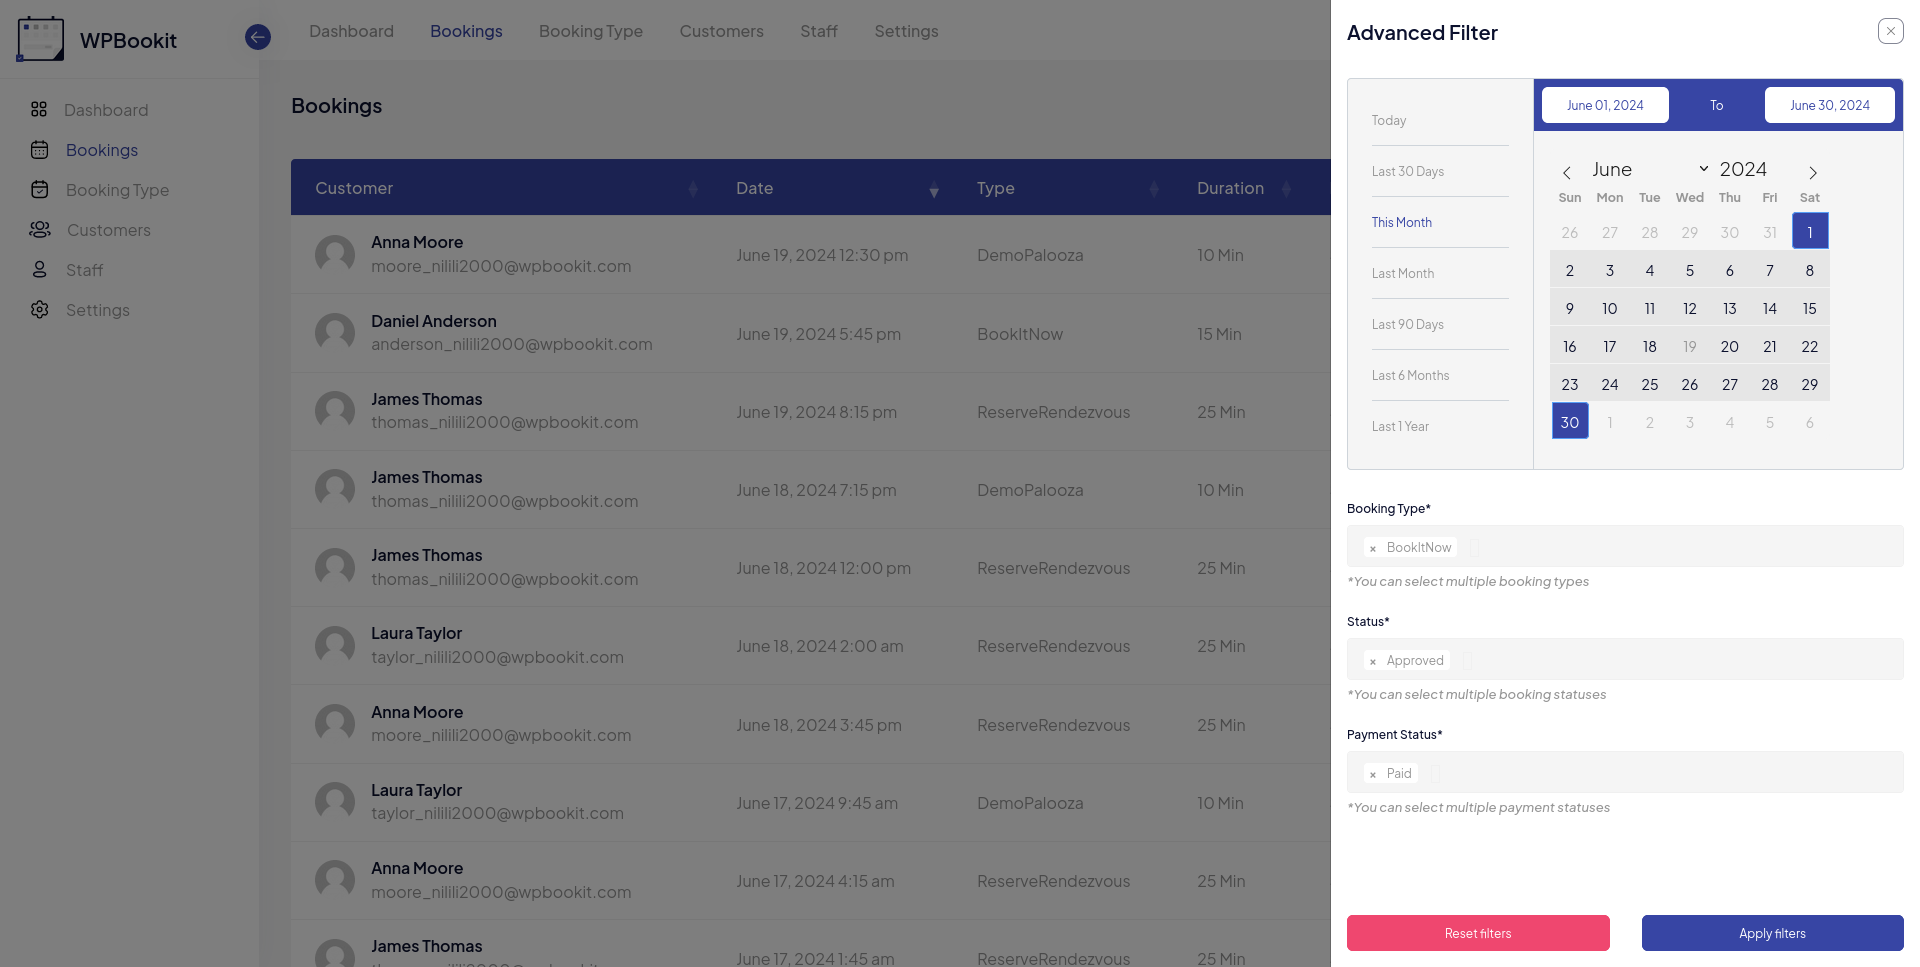
Booking Advanced Filter
Here we provide feature to get booking between date-range, booking type, status and customer name.
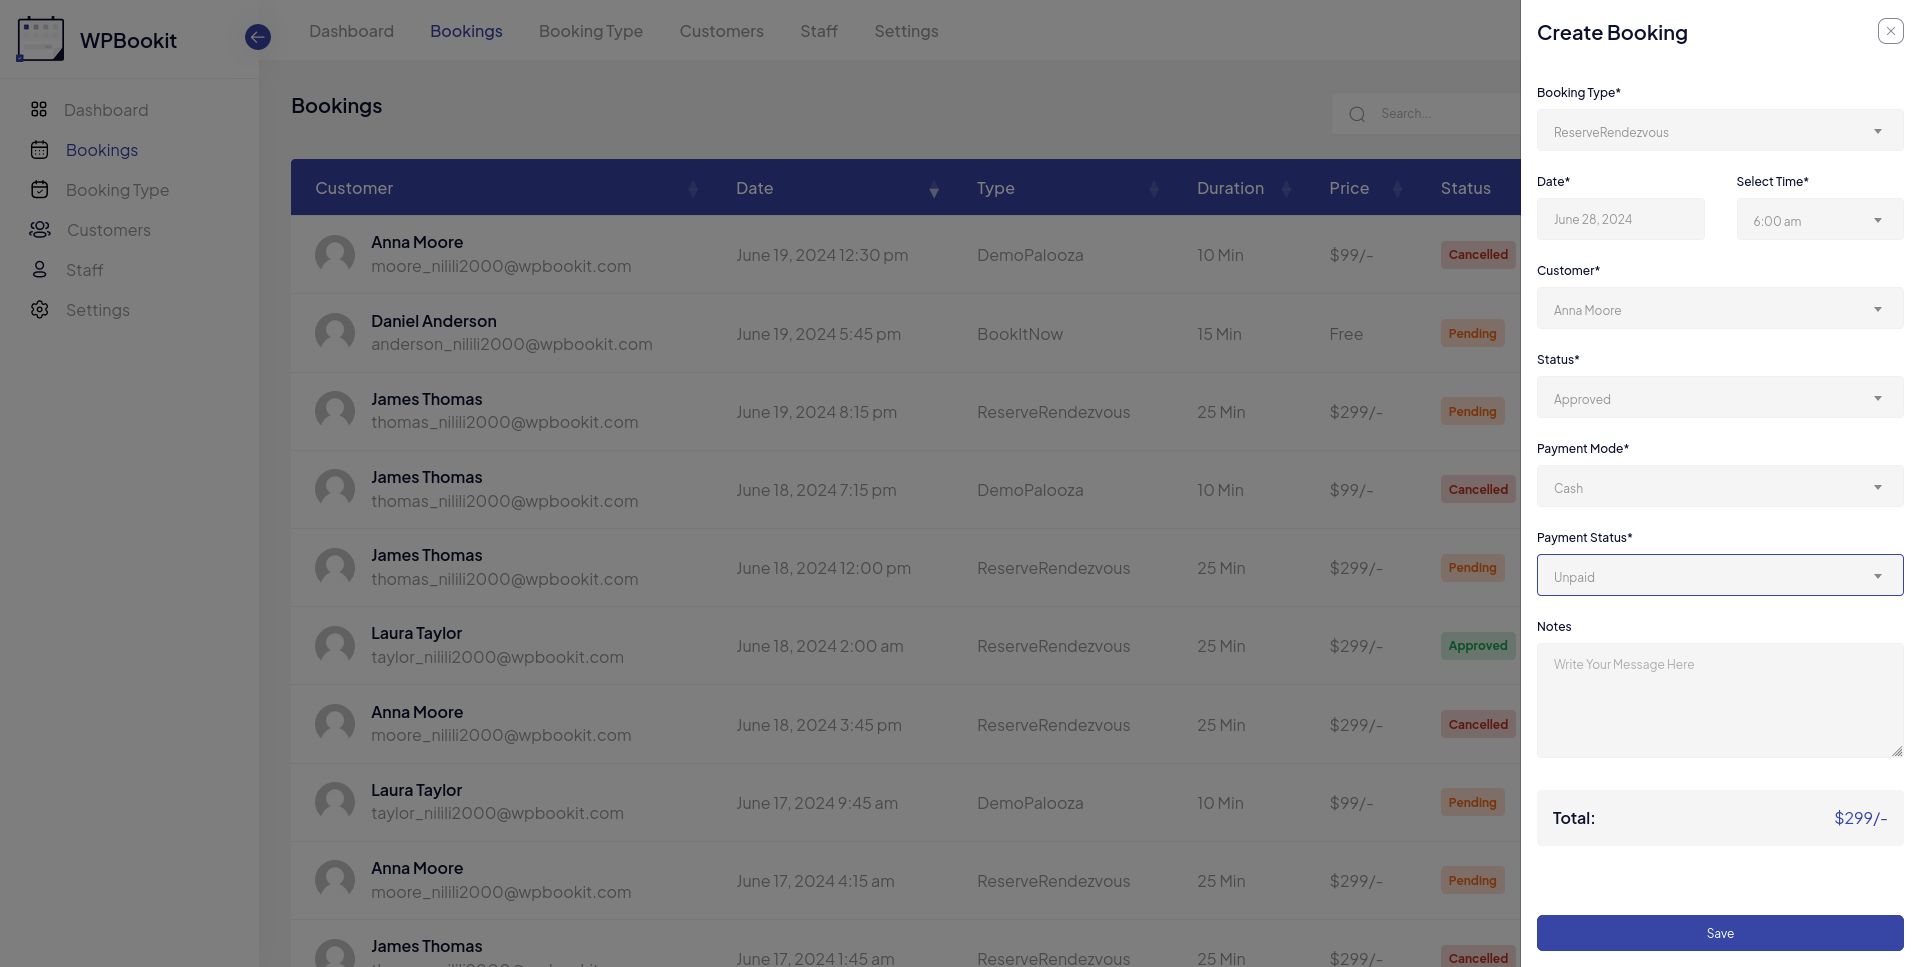
Add New Booking
To create a New Booking, simply fill in all the required fields, choose the booking type, and select an available date. Based on the chosen date, you can then pick an available time slot. As an administrator, you have the ability to select a registered customer, set the default status, choose the payment mode, and determine it's status. This streamlined process ensures that managing bookings is efficient and user-friendly.
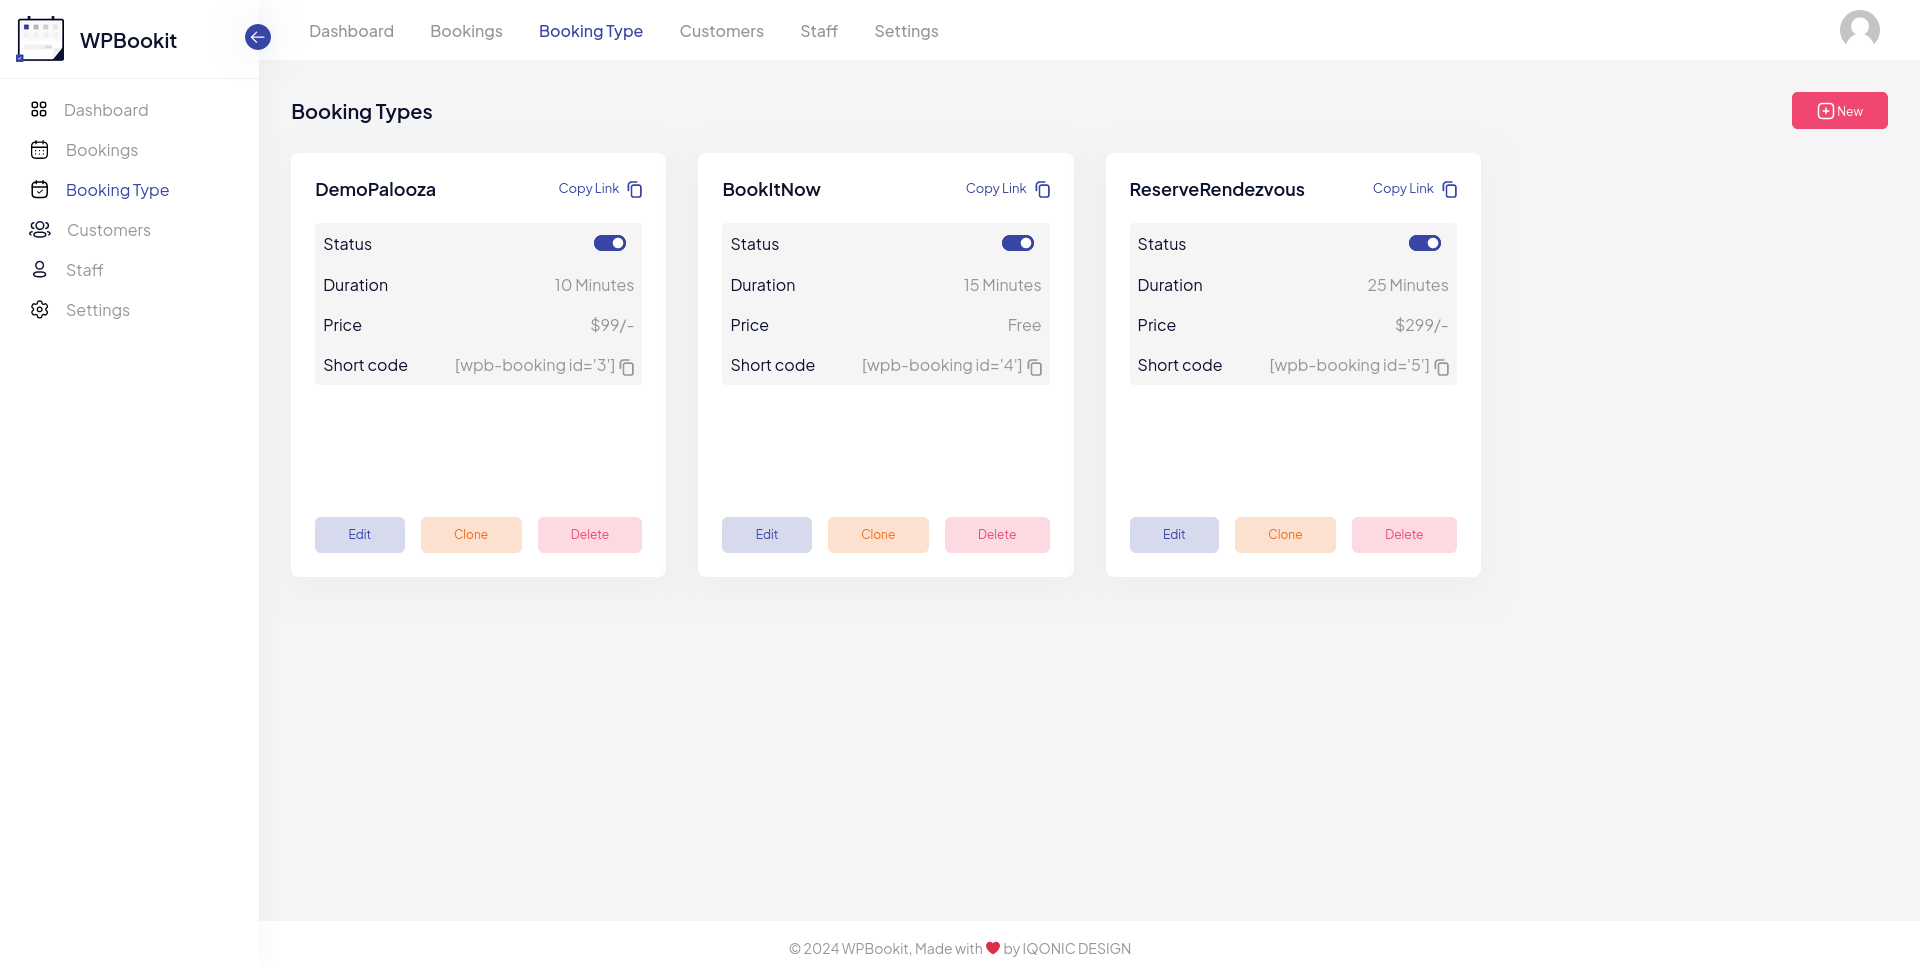
Booking Type Tab
The Booking Type Tab is name like service module. Here you can see all your booking types and easily manage them.
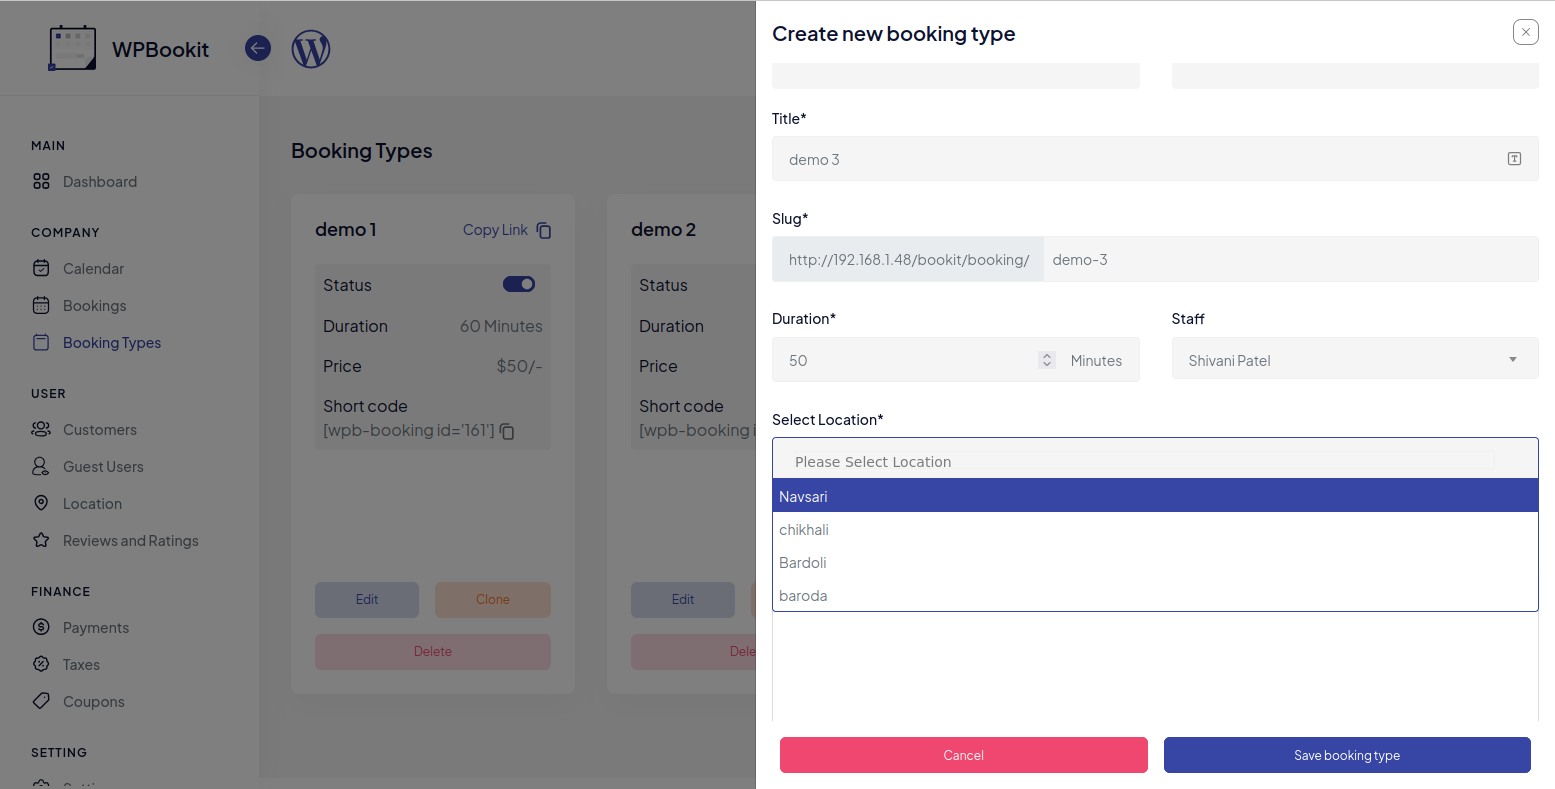
Booking Type Creation Form
By clicking the Add Booking Type module, you'll see all required fields which are show in the below screenshot:
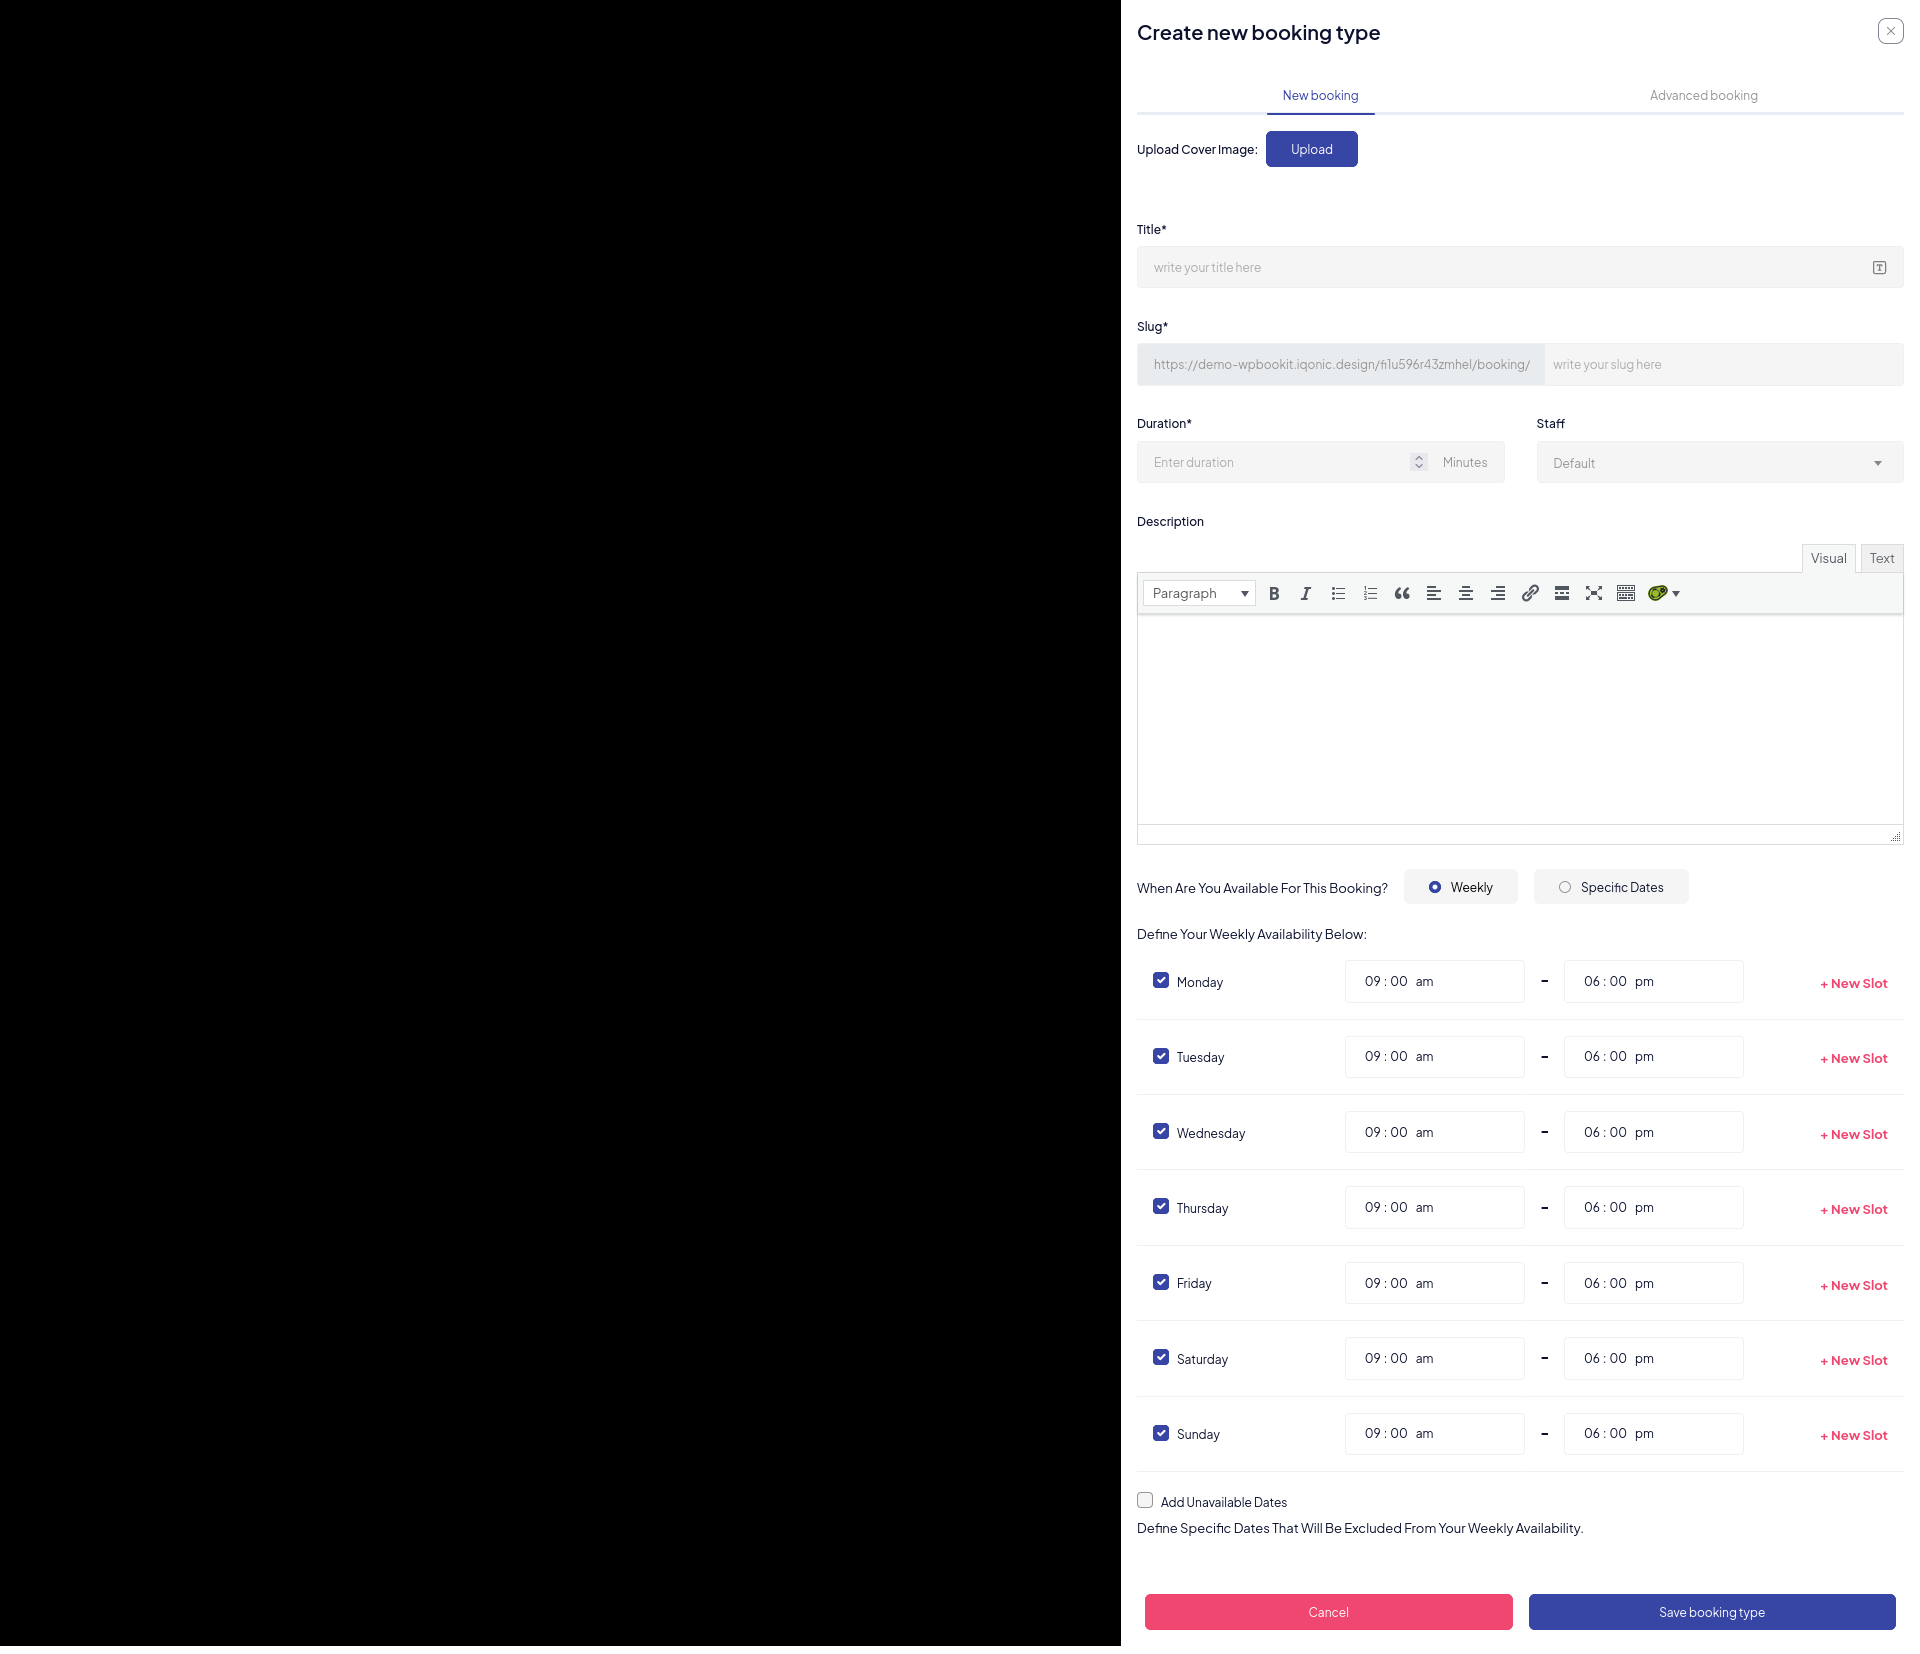
This form allows users to create a new booking type, specifying various details such as title, duration, staff, description, availability, and unavailable dates.
Form Fields and Options
Cover Image
- Browse: click to upload an image that will be used as the cover image for this booking type.
Title
- Title: enter the title for the booking type. This field is required.
Duration
- Duration: select the duration for the booking from the dropdown menu. Options might include various predefined time slots such as 20 minutes, 60 minutes, 1 hour, etc.
Staff
- Staff: select the staff member responsible for this booking type from the dropdown menu.
Description
- Description: enter a detailed description of the booking type. The text editor allows basic formatting such as bold, italic, block quote, lists, and code.
Availability
When are this Booking Types available?
- Weekly: Choose this option if the availability is based on a weekly recurring schedule.
- Specific Dates: Choose this option if the availability is based on specific dates.
Define your Weekly Availability as follows:
- Day Selection:
- Monday - Sunday: Check the box next to the day to make it available.
- Time Slot: Specify the start and end times for availability on the selected day. Multiple time slots can be added by clicking the "+ Add New" button.
- Example Entries:
- Monday: 05:00 am - 08:00 am
- Sunday: 12:00 pm - 03:00 pm
Define Your Specific Dates Availability Below:
- Date Selection:
- Select Specific Available Date.
- Time Slot: Specify the start and end times for availability on the selected day. Multiple time slots can be added by clicking the "+ Add New" button.
- Example Entries:
- 27/10/2025: 05:00 am - 08:00 am
- 28/10/2025: 12:00 pm - 03:00 pm
Unavailable Dates
- Add Unavailable Dates: check this option to specify dates that should be excluded from the weekly availability.
- Define Specific Dates That Will Be Excluded From Your Weekly
Availability:
- Date Field: select the date to be marked as unavailable.
- Time Slot: specify the start and end times for unavailability on the selected date.
- Duplicate: quickly duplicate the unavailable date entry for adding more unavailable slots.
- Add New Date: add a new row for additional unavailable dates.
Actions
- Save Booking Type: click this button to save the new Booking Types with all the specified details.
Advanced Booking Type Option
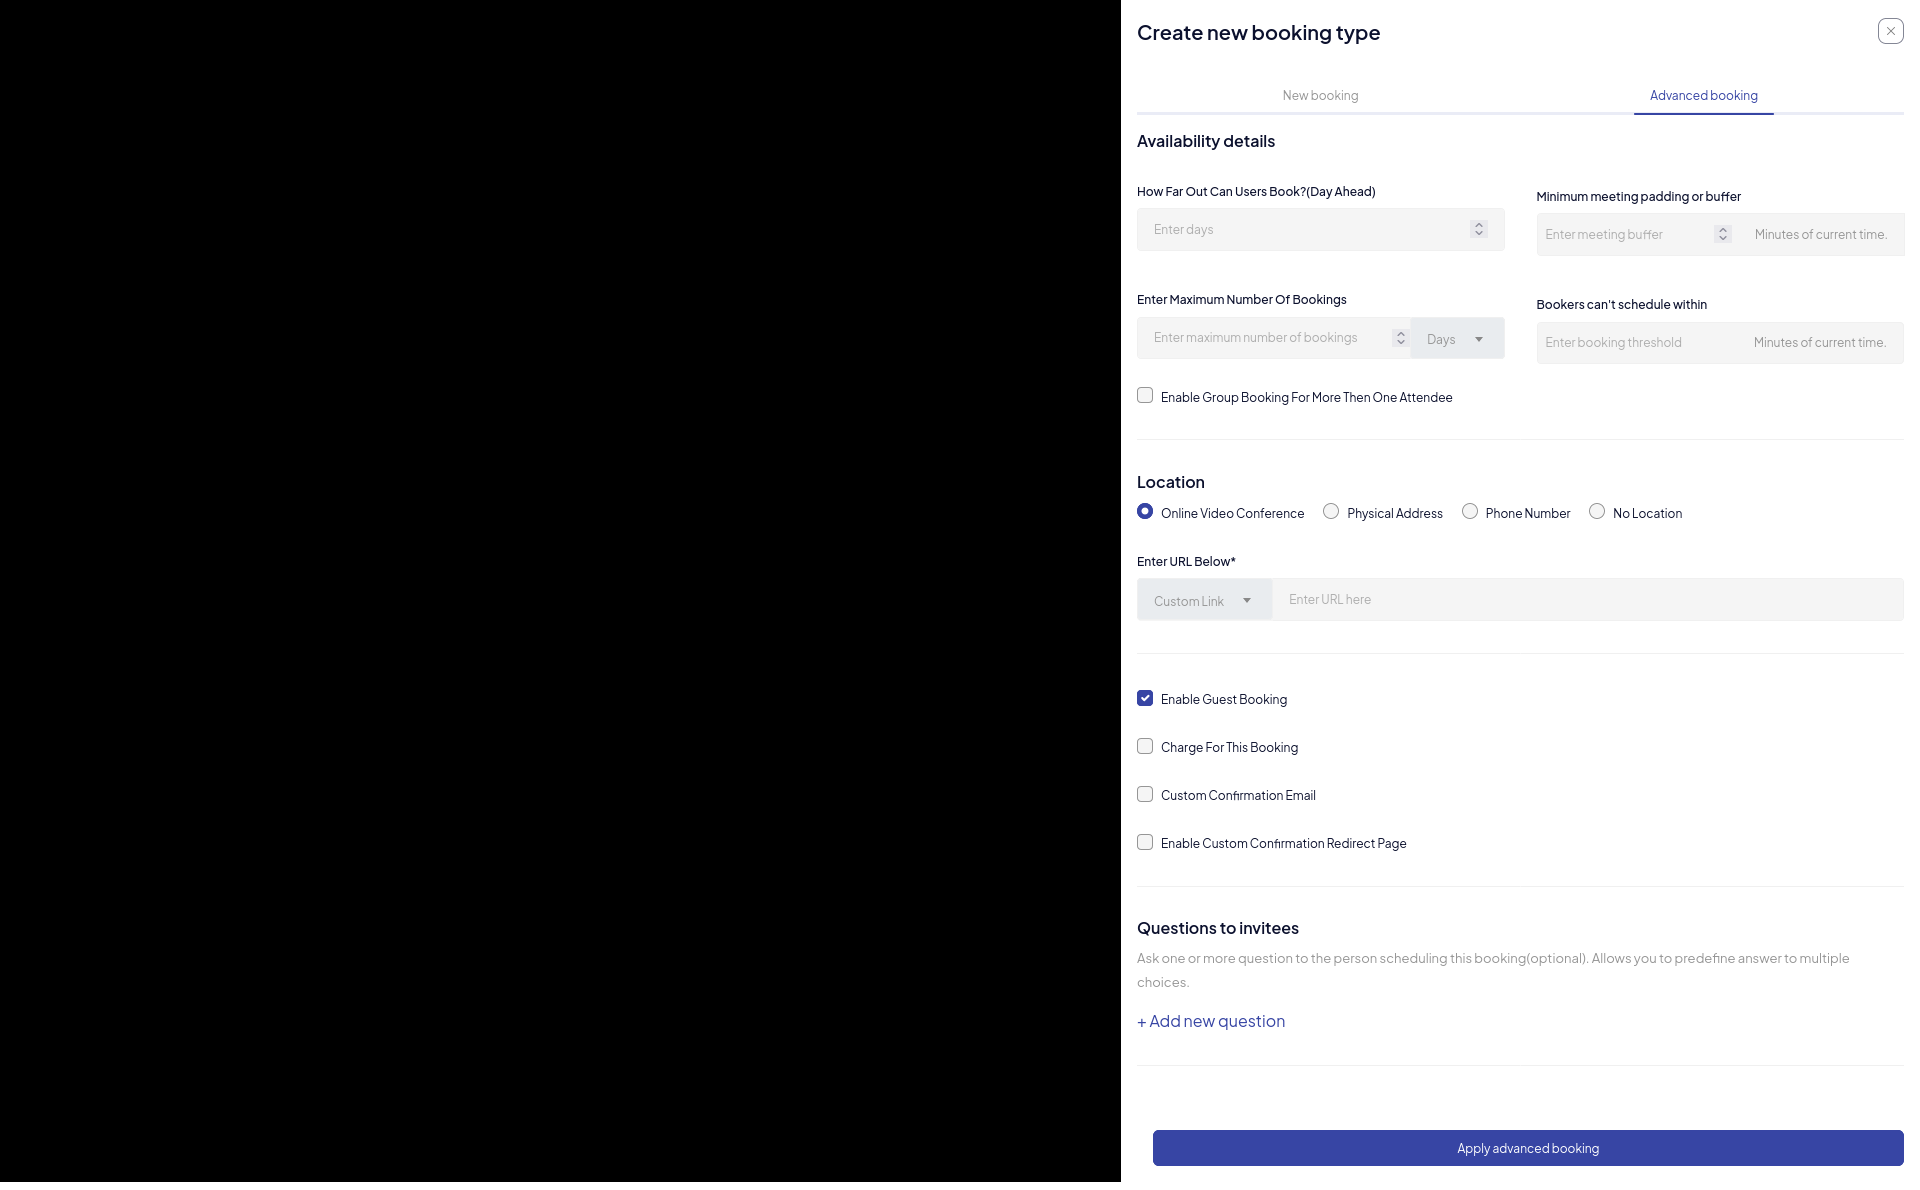
Availability Details
- How Far Out Can Users Book?: select the number of days ahead users can book.
- Minimum Meeting Padding (Or Buffer): select the amount of time to pad between meetings.
- Enter Maximum Number Of Bookings: enter the number of maximum bookings.
- Enter Minimum Number Of Bookings: enter the number of minimum bookings.
- Set Slots Per Booking: check this box to set the number of slots
per booking.
- Enter Number Of Slots Per Booking: enter the number of slots.
Location
- Online Video Conference: select this option if the meeting is to be held via an online video conference.
- Physical Address: select this option if the meeting is to be held at a physical address.
- Phone Number: select this option if the meeting will be via phone call.
- No Location: select this option if no location is needed.
- Enter URL Below: if "Online Video Conference" is selected, enter the URL for the video conference.
Enable Guest Booking
- Enable Guest Booking: check this box to allow guest booking.
Charge For This Booking
- Price: enter the price for this booking.
Custom Confirmation Email
- Custom Confirmation Email: check this box to enable custom
confirmation emails.
- Add Media: click to add media to the email.
- Email Content: enter the custom email content. The text editor allows basic formatting such as bold, italic, block quote, lists, and code.
Enable Custom Confirmation Redirect Page
- Redirect URL: enter the URL to which users will be redirected after booking confirmation.
Enable Private Mode
- Enable Private Mode: check this box to enable private mode for this booking type.
Questions to Invitees
- Add New Question: click this button to add a new question for the
invitees.
- Question 1: enter the first question.
- Select Type: choose the type of response expected (e.g., phone number, text).
- Delete: Click to delete the question.
Actions
- Cancel: click this button to cancel the booking creation.
- Apply Advanced Booking: click this button to save the new booking type with all the specified details.
Customer Management
Overview
The "Customer" section in WPBookit allows you to view and manage customer's information. You can add new customers, edit existing customer details, and delete customers. This section also provides an option to export the customer list.
Customer List
The main customer list displays the following information for each customer:
- ID: a unique identifier for the customer.
- Names: the name of the customer.
- Email: the email address of the customer.
- Date of Birth: the customer's date of birth.
- Phone: the customer's phone number.
- Gender: the gender of the customer.
- Created: the date and time when the customer record was created.
- Action: options to edit or delete the customer record.
Actions
- Export Customer: click this button to export the customer's list. This can be useful for backup purposes or for use in other applications.
- Add New Customer: click this button to add a new customer to the list.
Edit Customer
- Edit Icon: click the edit icon (pencil) in the "Action" column to edit the details of an existing customer.
Delete Customer
- Delete Icon: click the delete icon (trash bin) in the "Action" column to delete an existing customer.
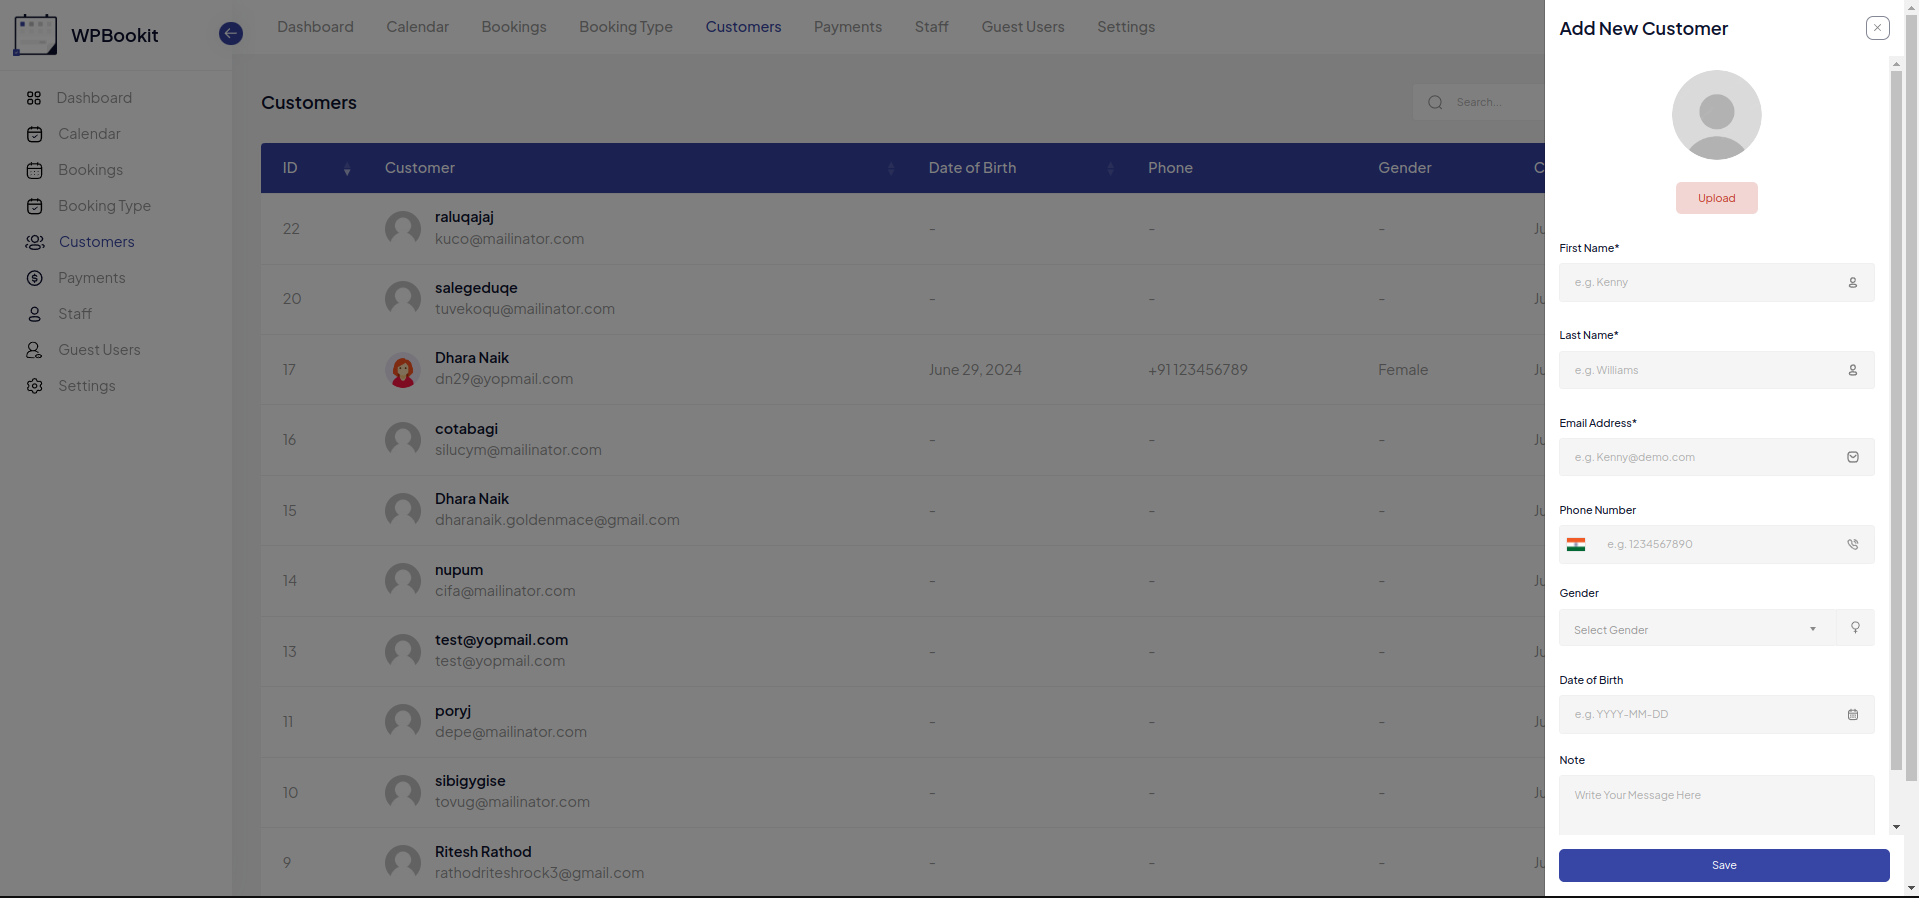
Add New Customer
Form Fields and Options
- Profile Image: click to upload an image that will be used as the profile image for this customer.
- First Name: enter User First Name.
- Last Name: enter User Last Name.
- Email Address: enter User Email Address.
- Phone Number: enter User Phone Number.
- Gender: enter User Gender.
- Date Of Birth: enter User Date Of Birth.
- Note: enter User Note.
Action
- Save Form: click the Save icon to create New Customer.
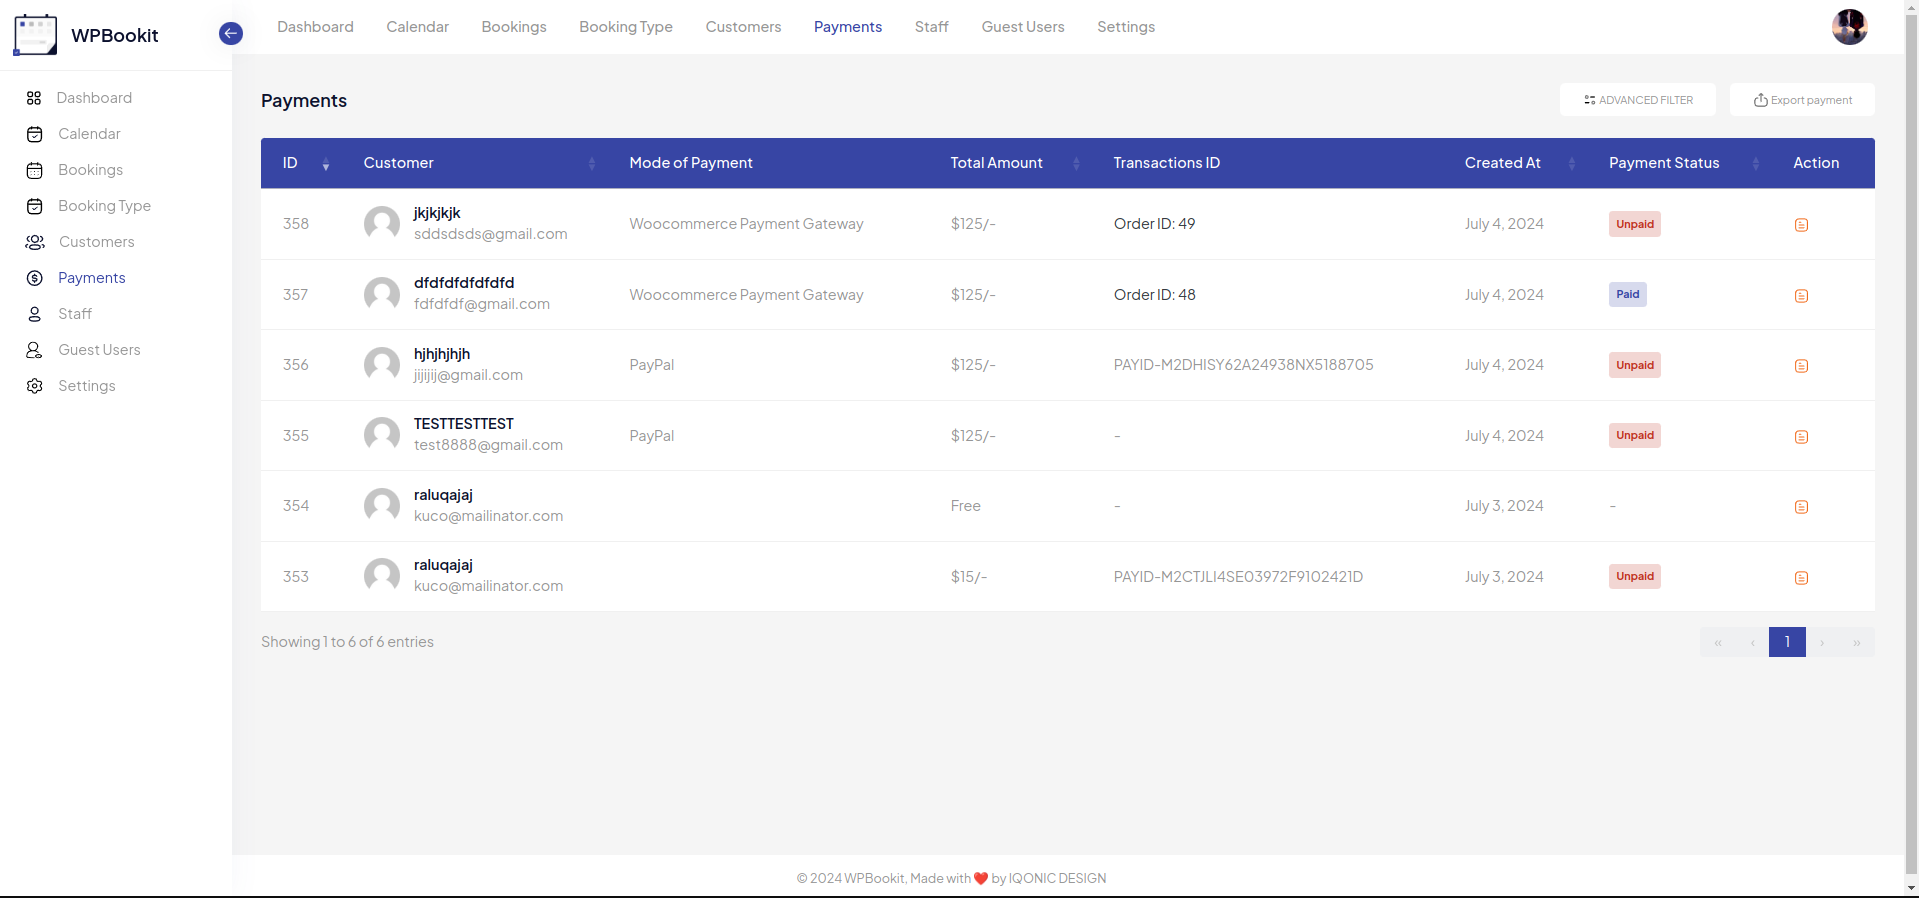
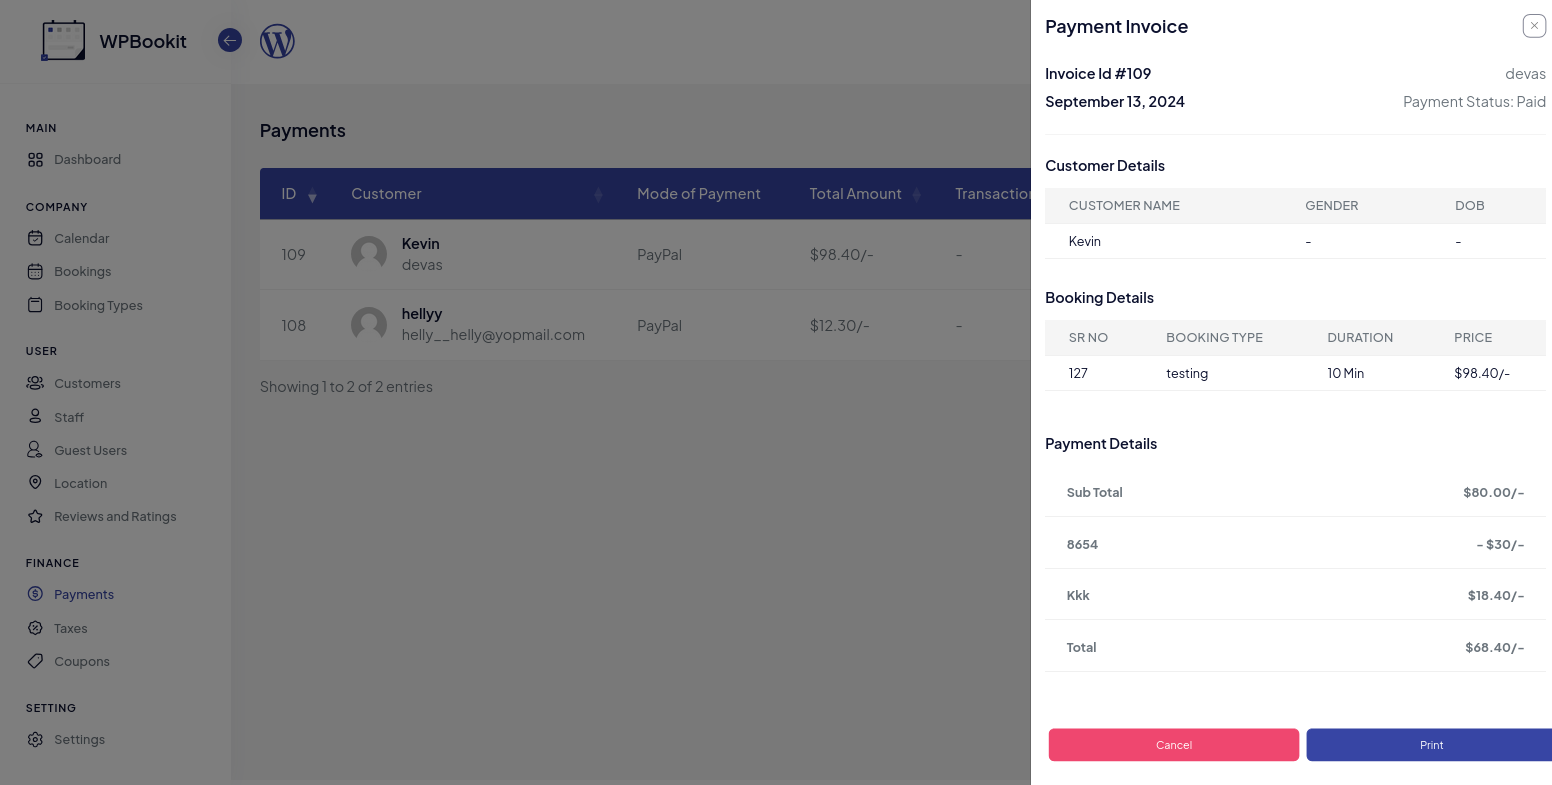
Payment Tab
The Payment Tab provides an overview of all user payments, listing each transaction. It also includes a feature to print payment invoices.
Staff Management

Overview
The "Staff" section in WPBookit allows you to view and manage staff information. You can add new staffs, edit existing staff details, and delete staffs. This section also provides an option to export the staff list.
Staff List
The main staff list displays the following information for each staff:
- ID: a unique identifier for the staff.
- Names: the name of the staff.
- Email: the email address of the staff.
- Date of Birth: Date of Birth of the staff.
- Phone: the staff's phone number.
- Gender: the gender of the staff.
- Created: the date and time when the staff record was created.
- Action: options to edit or delete the staff record.
Actions
- Export Staff: click this button to export the staff list. This can be useful for backup purposes or for use in other applications.
- Add New Staff: click this button to add a new staff to the list.
Edit Staff
- Edit Icon: click the edit icon (pencil) in the "Action" column to edit the details of an existing staff.
Delete Staff
- Delete Icon: click the delete icon (trash bin) in the "Action" column to delete an existing staff.
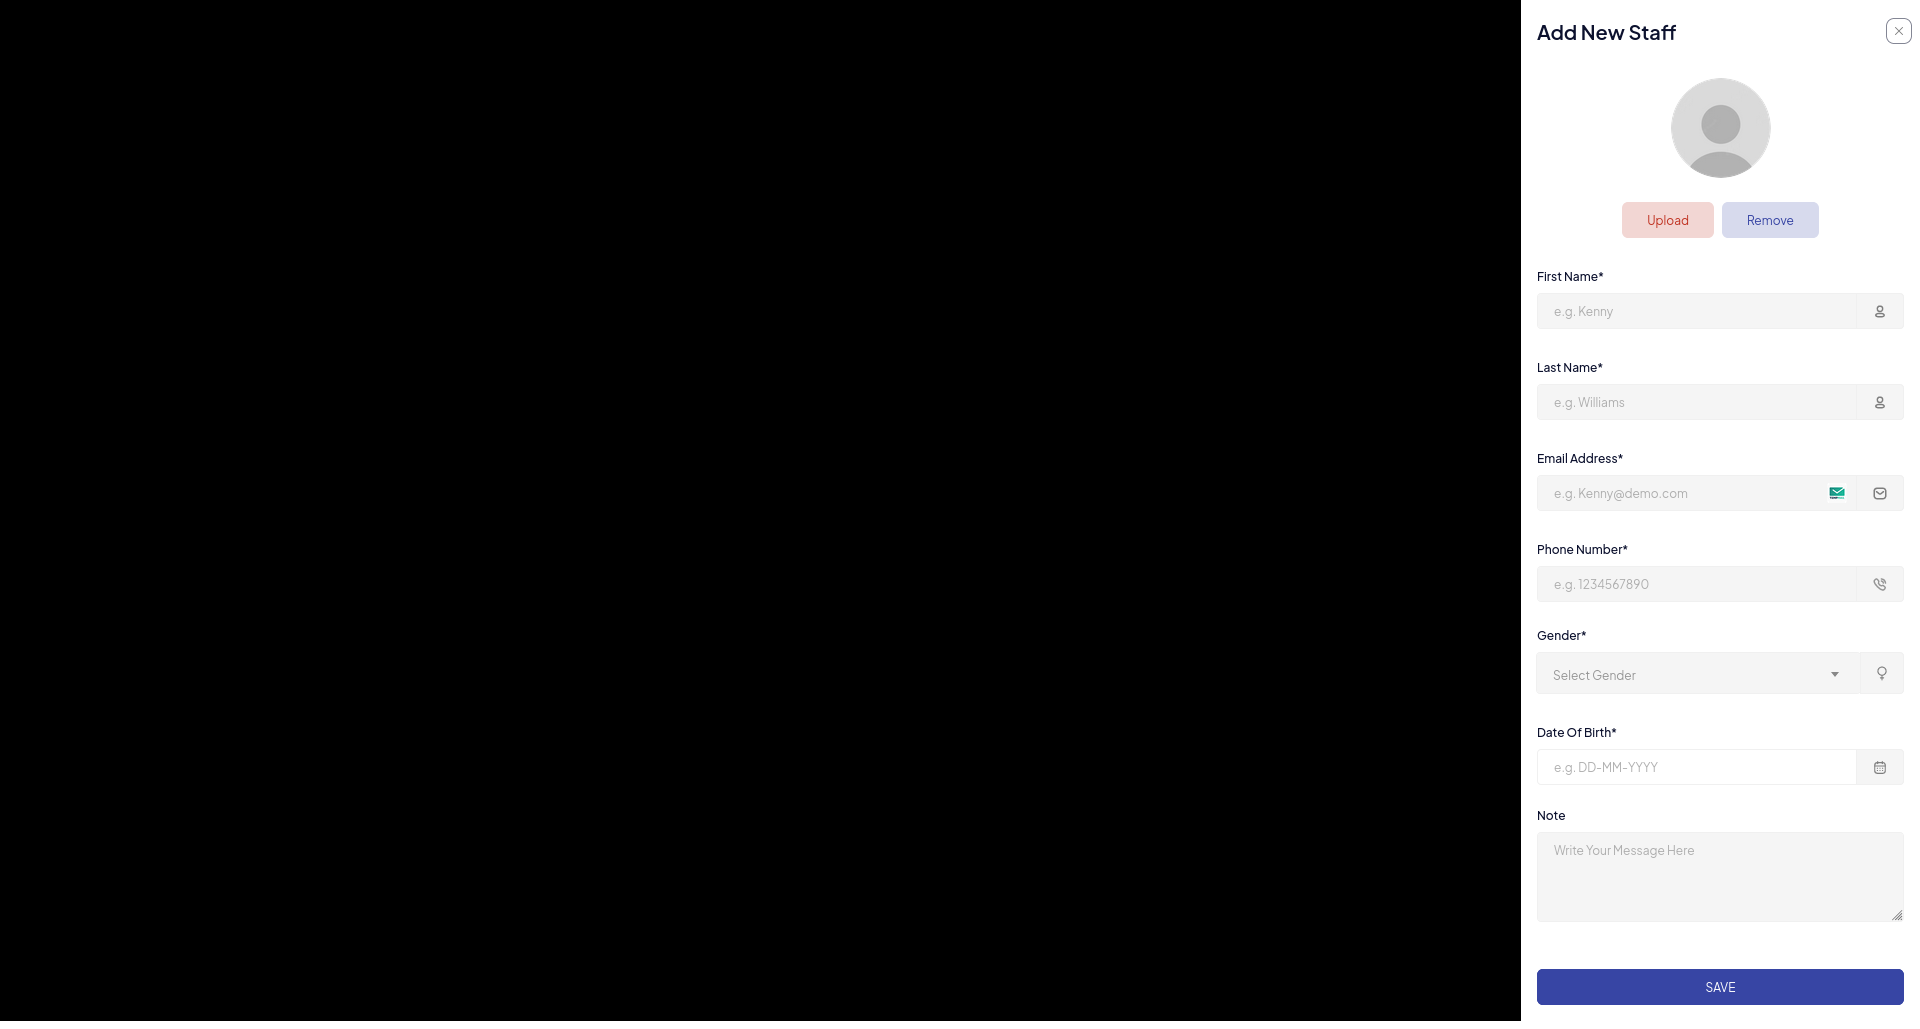
Add New Staff
Form Fields and Options
- Profile Image: click to upload an image that will be used as the profile image for this staff.
- First Name: enter User First Name.
- Last Name: enter User Last Name.
- Email Address: enter User Email Address.
- Phone Number: enter User Phone Number.
- Gender: enter User Gender.
- Date Of Birth: enter User Date Of Birth.
- Note: enter User Note.
Action
- Save Form: click the Save icon to create New Staff.
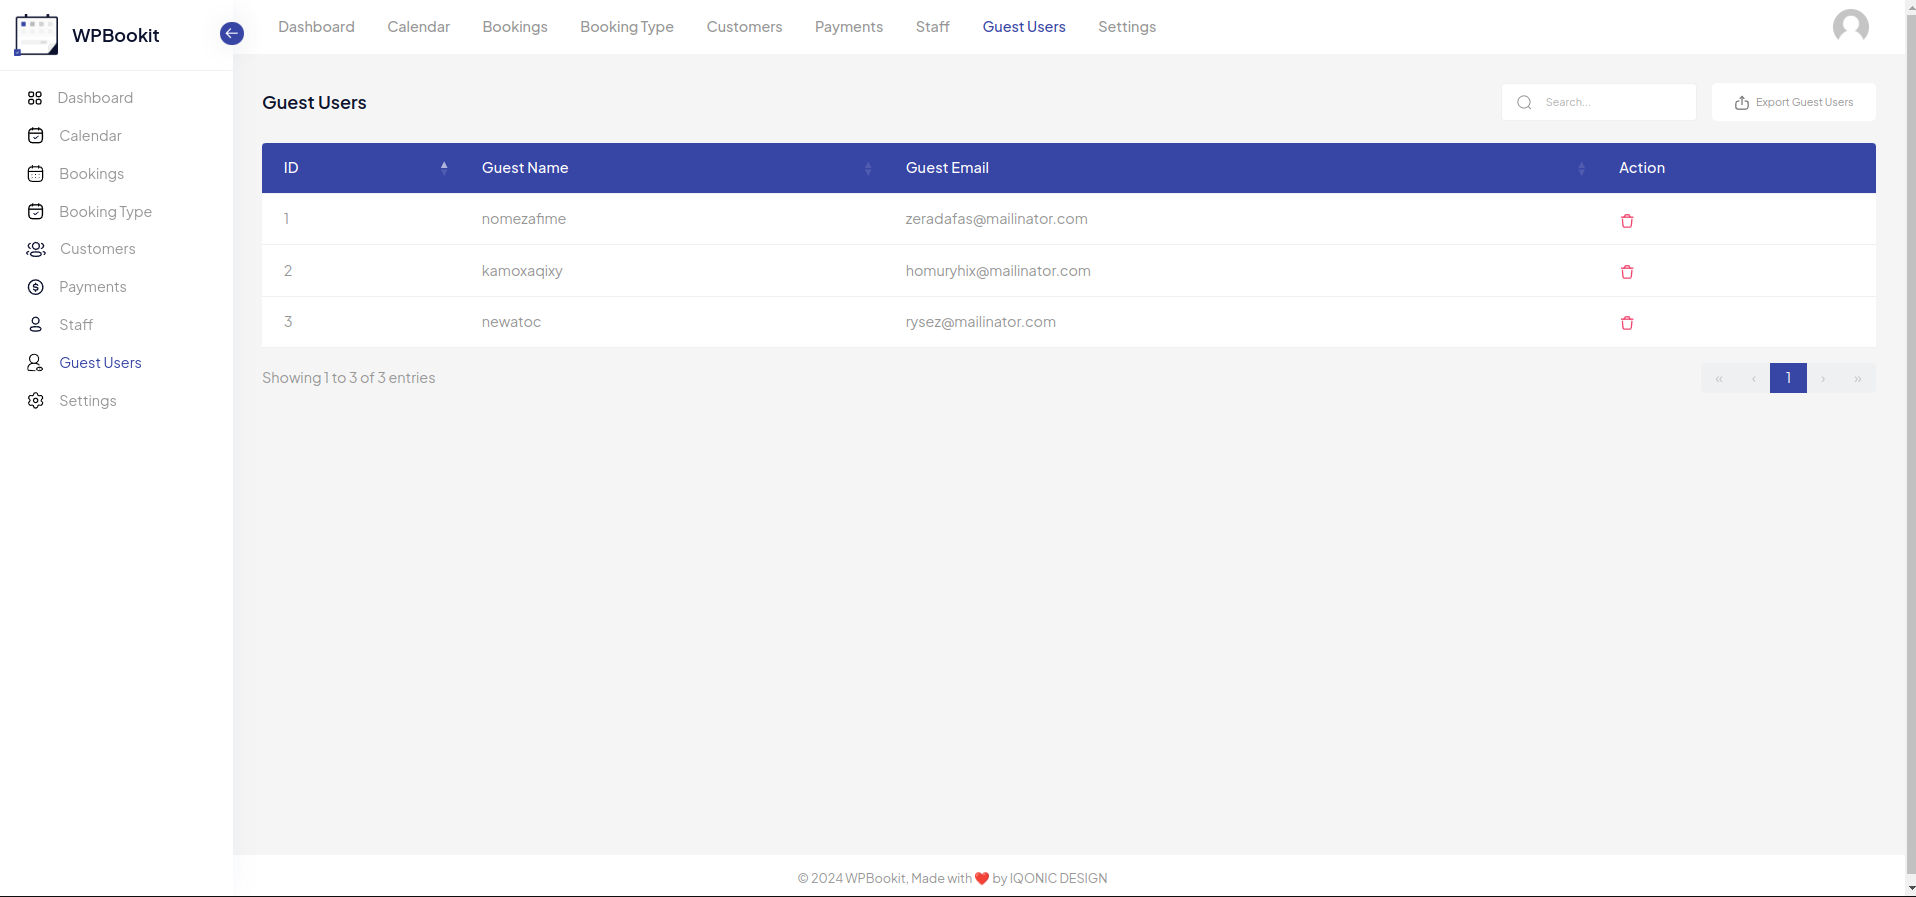
Guest Tab
The Guest Tab provides an overview of all booking information created by guest users who haven't logged-in or registered. The Guest Tab displays details such as the emails and names of guest users. It also includes a feature to delete bookings made by these users.
General Settings
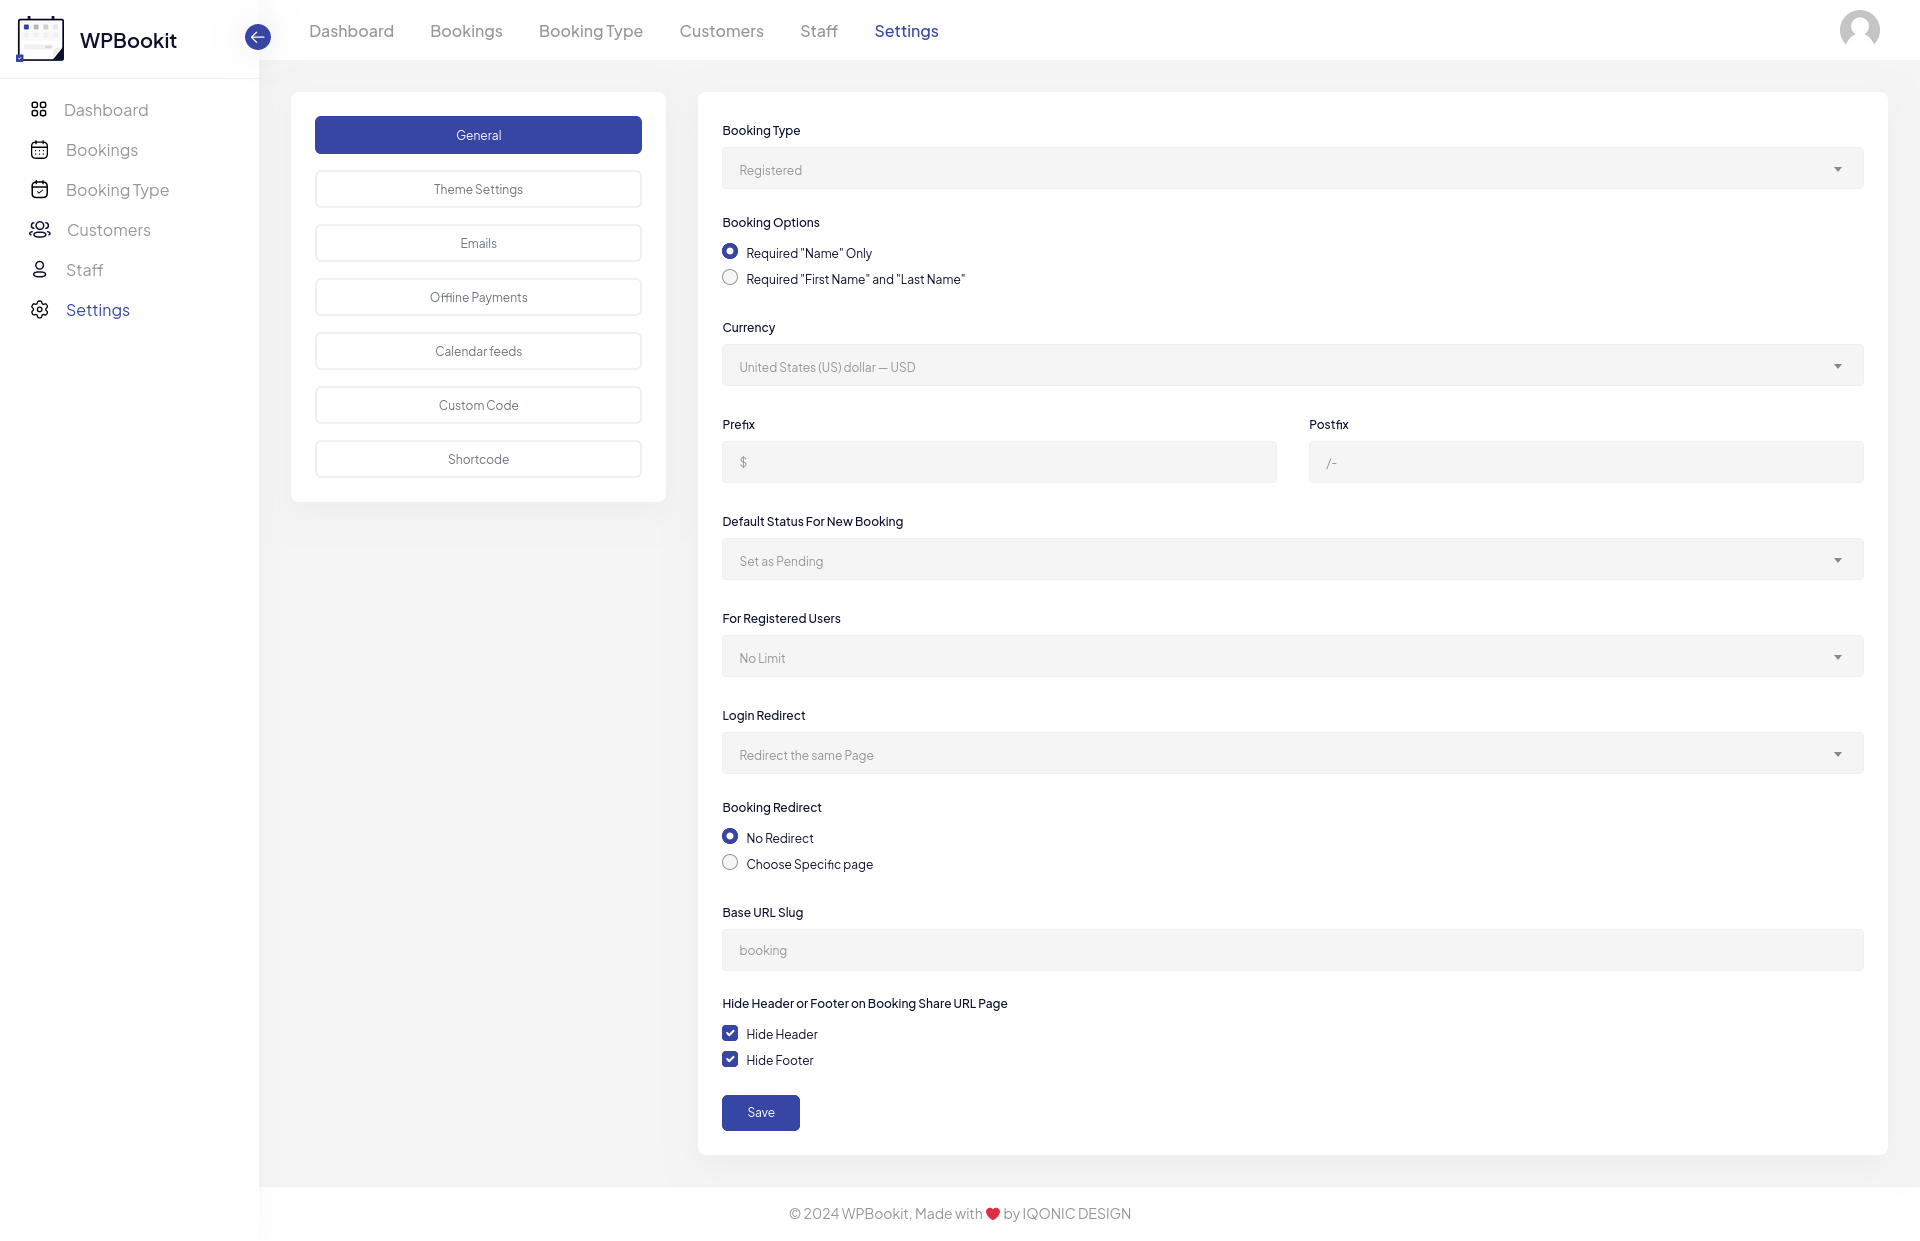
Overview
The General Settings module allows you to configure various aspects of WPBookit to suit your business needs. It provides options to customize the booking process, staff management, currency, email notifications, and other functionalities.
- Booking Type
- Allow users to book their appointments by either registering on your site or using guest mode.
- Booking Options
- This section likely controls General Settings related to the booking process. In the image, you can see options for:
- Requiring customer's name during booking.
- Specifying whether "First Name" and "Last Name" are required separately.
- Set Currency For Payment Gateway.
- Set post and prefix symbols for currency display.x
- Setting a default booking status (e.g., Pending, Approved).
- Choosing how to redirect users after logging in (same page, booking page, or a custom page).
- Choosing how to redirect users after booking (no redirect, automatic profile detection, or a custom page).
- Set Base URL Slug: For Booking Type link.
- Login Redirect
- This section likely controls where users are redirected after logging in to WPBookit. The image shows options to redirect to the same page, the booking page, or a custom page of your choosing.
- Booking Redirect
- This section likely controls where users are redirected after completing a booking. The image shows options for no redirection, automatic profile detection, or a custom page of your choosing.
Theme Setting
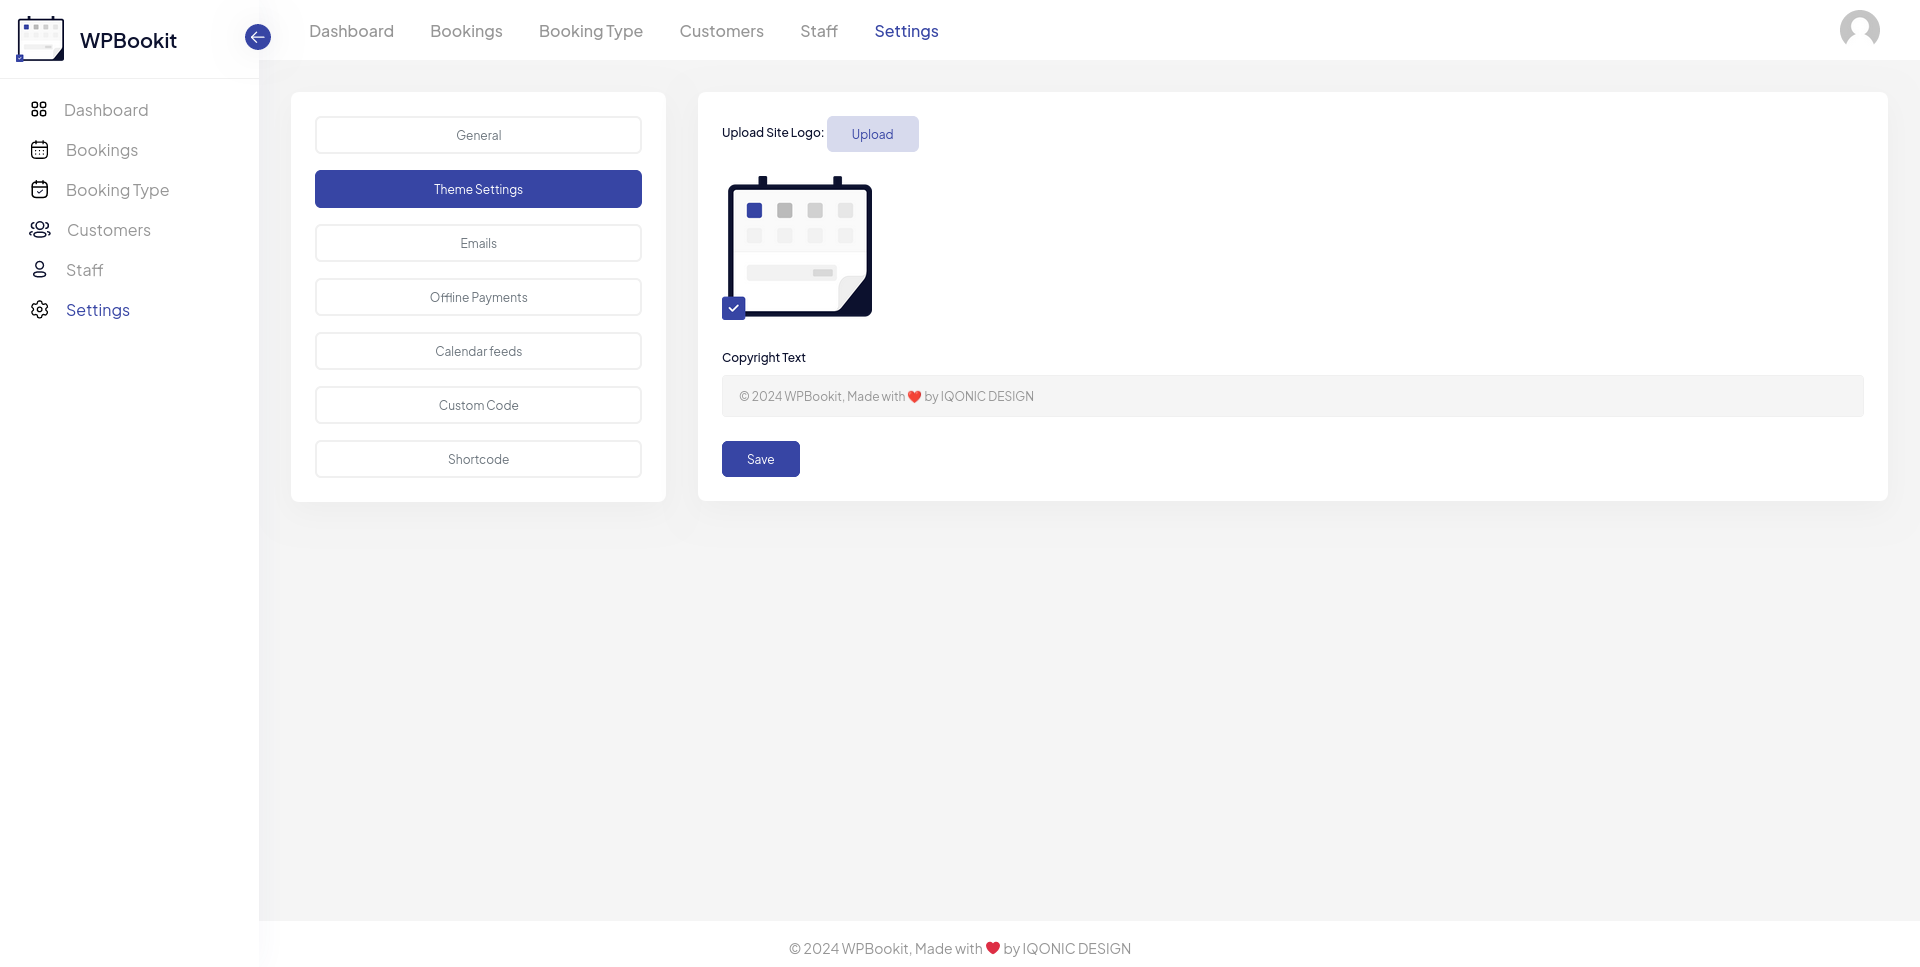
Overview
The Theme Settings module allows you to configure your dashboard logo and footer copyright text.
- Upload Logo:
- Allow the admin to set a custom WPBookit dashboard logo.
- Copyright Text
- Allow the admin to set custom copyright text.
Offline Payments
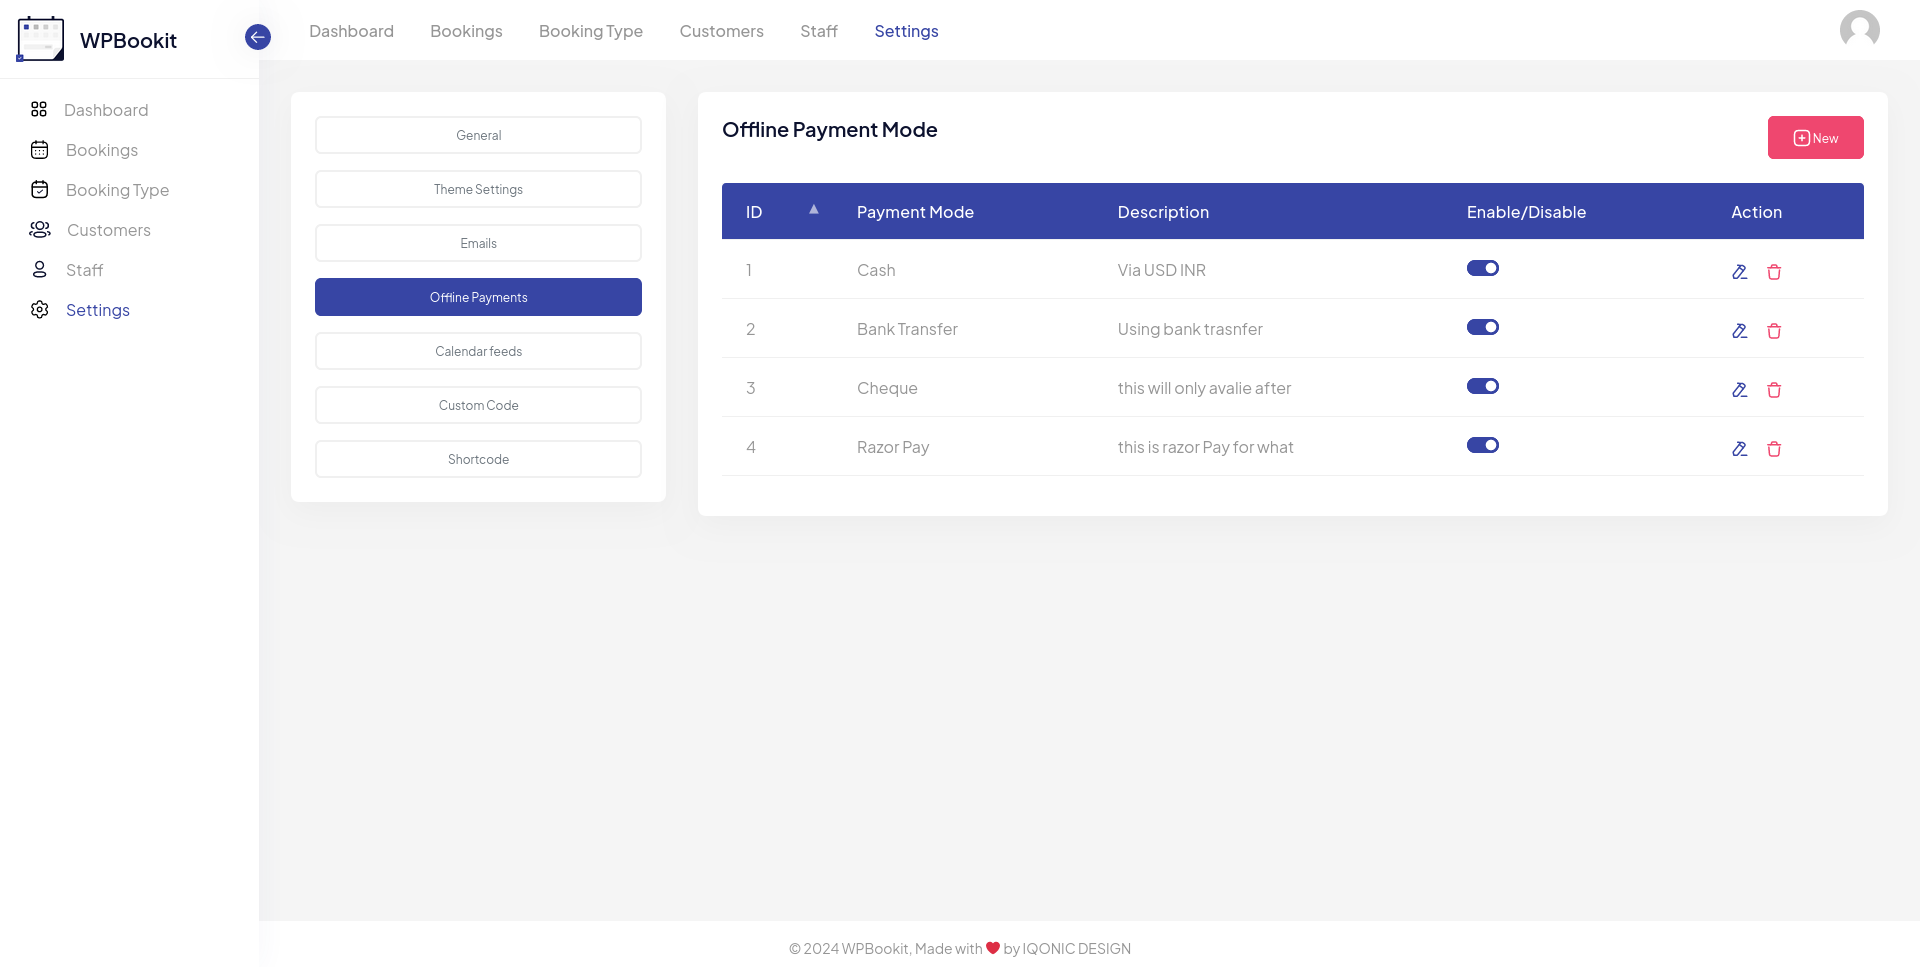
Overview
The Offline Payment Mode settings module allows you to add custom Offline Payment option in booking module.
- Method And Descriptions
- Allow the admin to add a his Offline Payment Method.
Online Payments
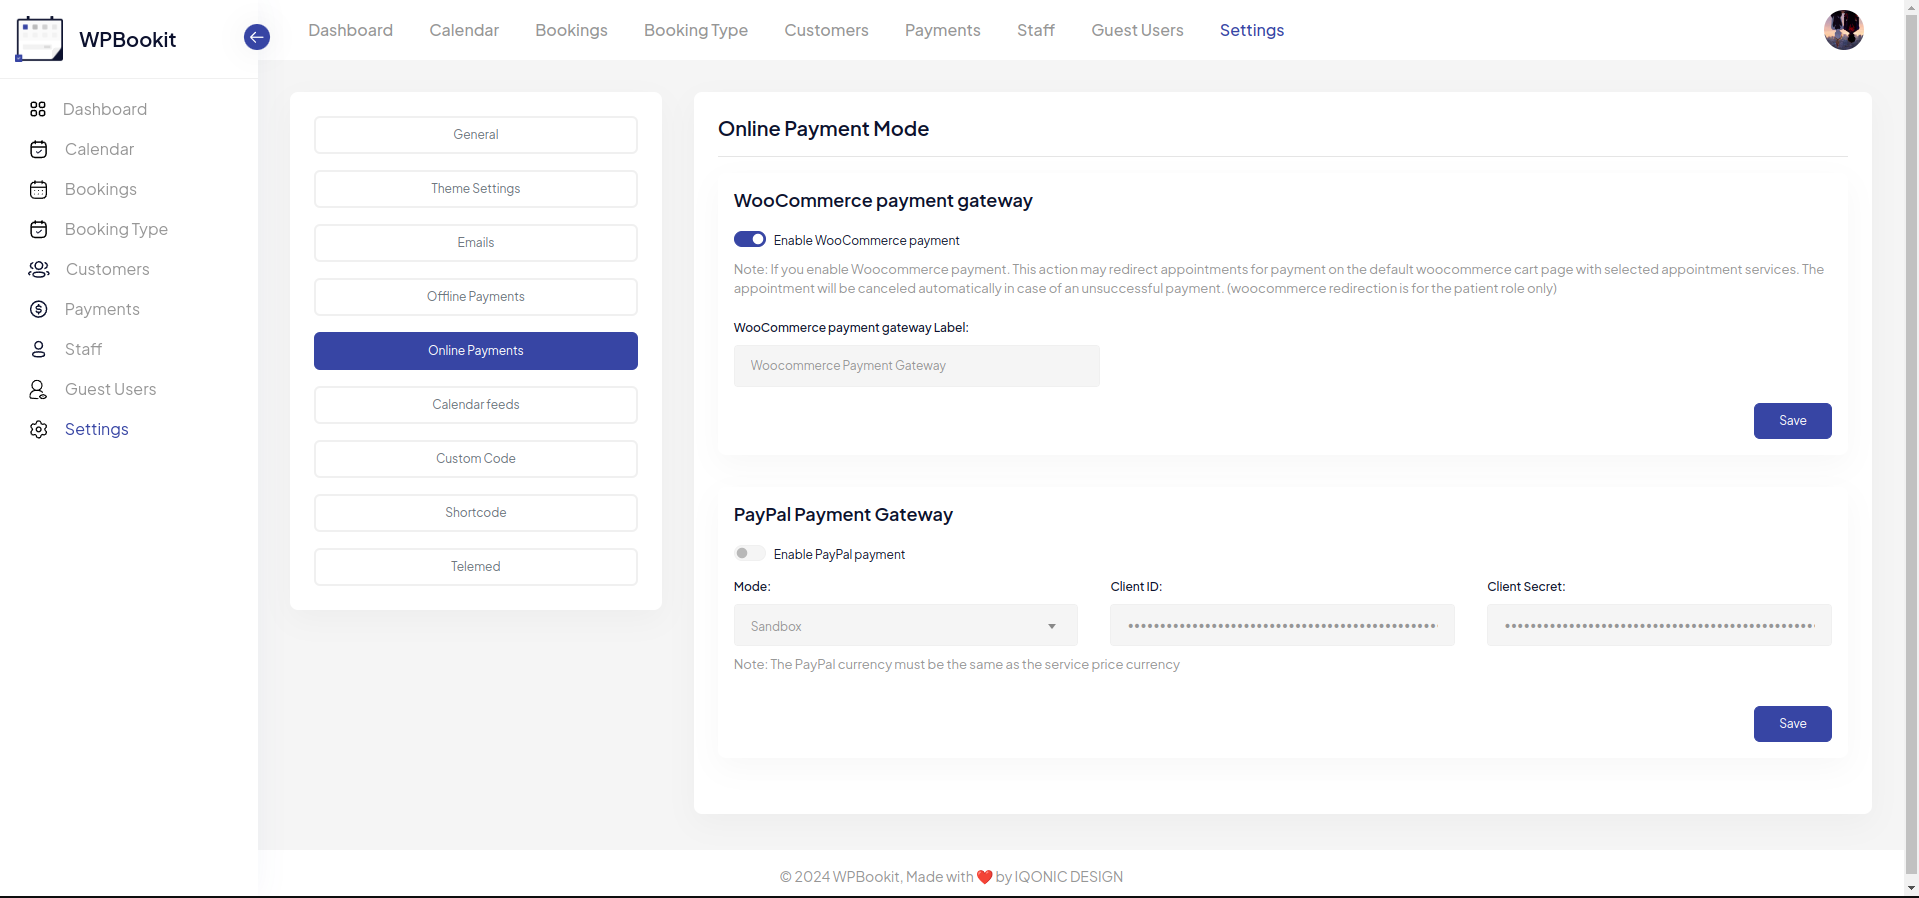
Overview
The Online Payment Mode settings module allows you to add custom Online Payment option in booking module.
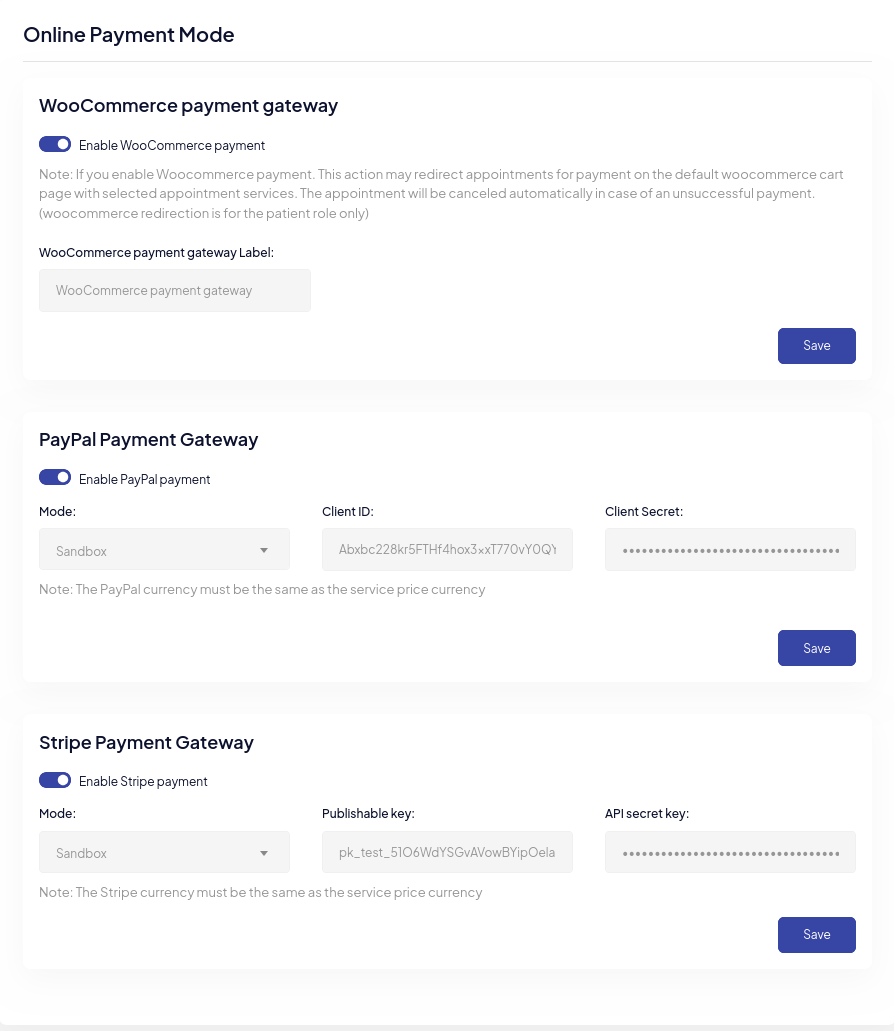
- WooCommerce Payment Gateway
- Step 1: Install and activate the WooCommerce plugin.
- Step 2: Navigate to WooCommerce > Settings > Payments.
- Step 3: Choose your desired payment method.
- Step 4: Add your preferred label and click save.
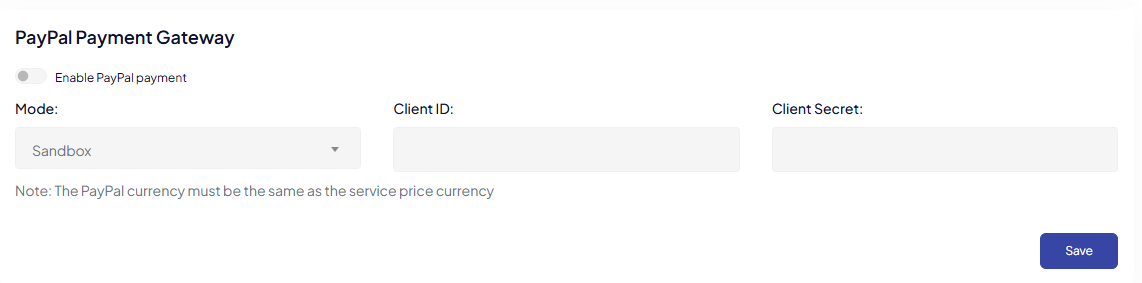
- Paypal Payment Gateway
- Step 1: Set the mode to your preferred option.
- Step 2: Refer to the documentation for the Client ID and Client Secret.
- Step 3: Finally, click save.
Custom Code
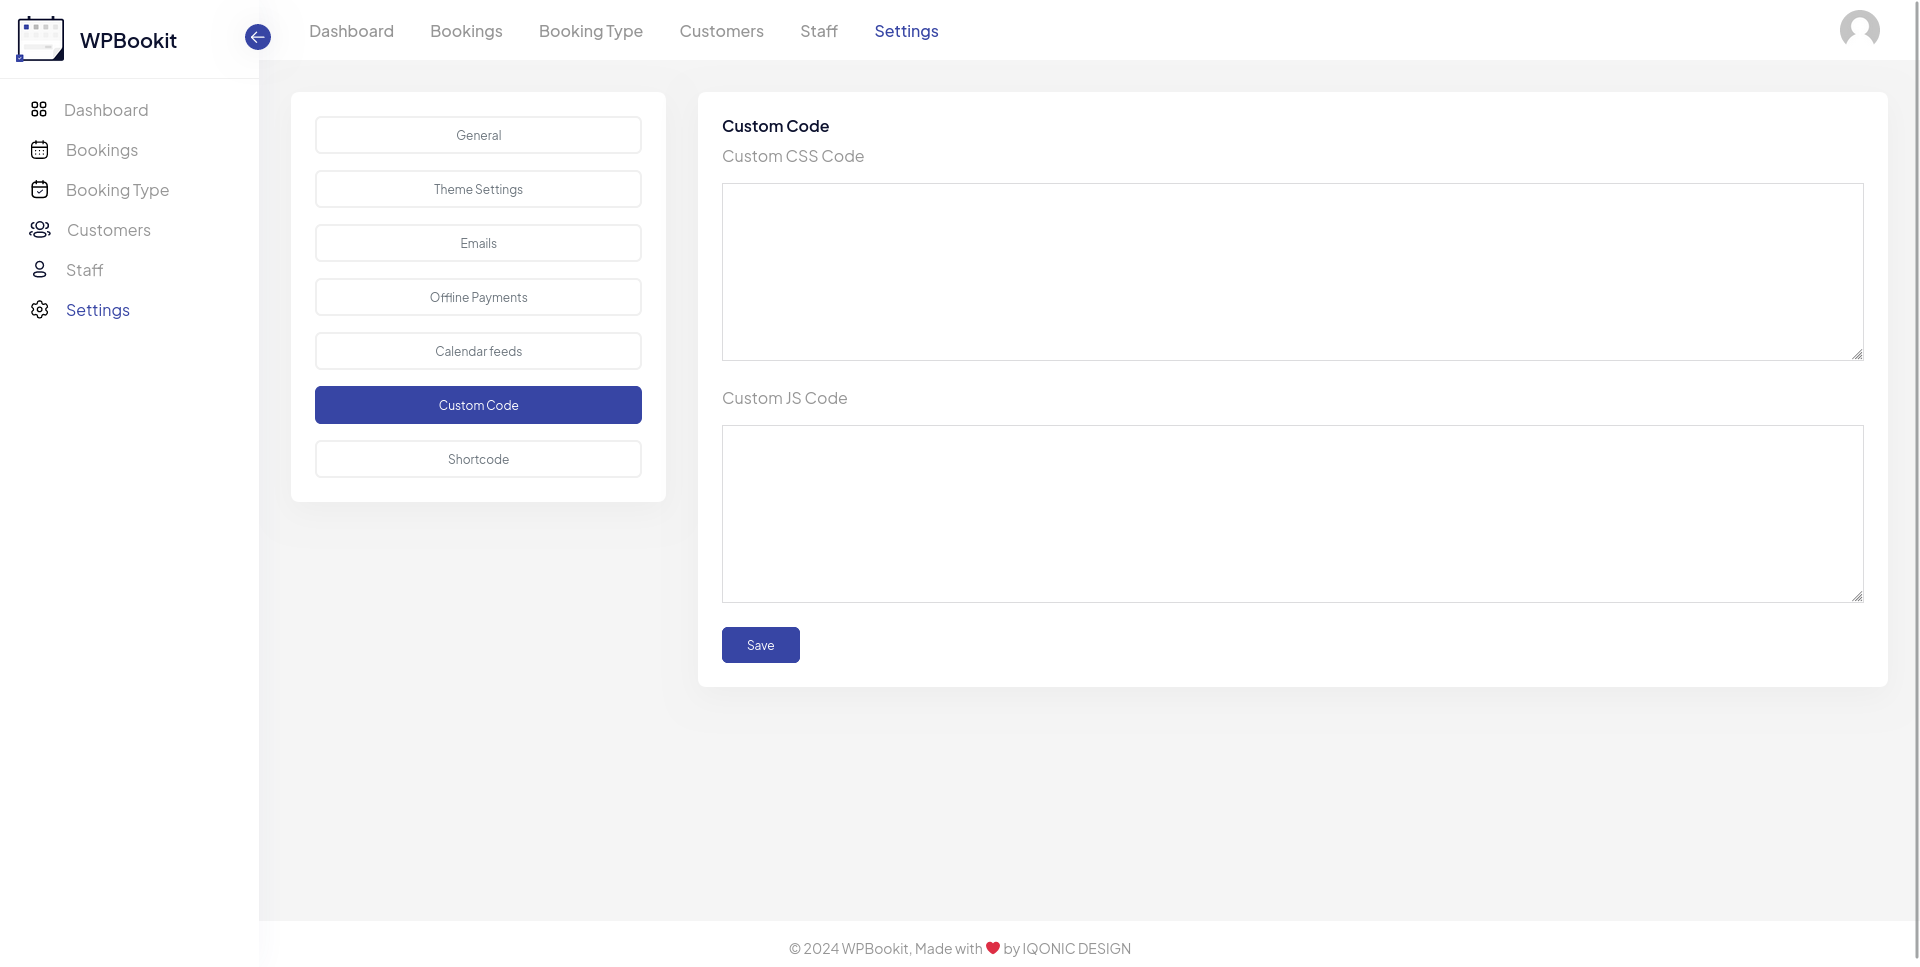
Overview
The Custom Code settings module allows you to add Custom CSS style and JS script.
- Custom CSS Code
- Allow the admin to add custom CSS style into dashboard as well as in WPBookit shortcodes.
- Custom JS Code
- Allow the admin to add custom JS script in to dashboard as well WPBookit shortcodes
Zoom Integration
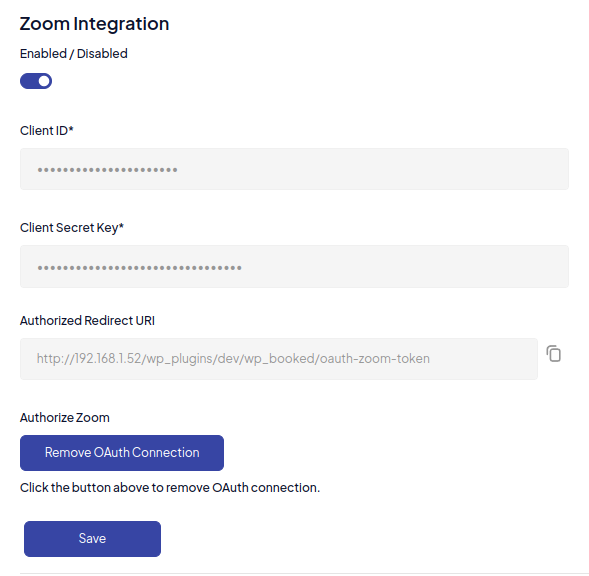
Overview
WP Zoom Integration seamlessly integrates Zoom with WPBookit, making it easy to schedule and manage virtual meetings directly from your dashboard. Enhance your user experience with automated meeting links and calendar sync.
How To Configure:
- Step 1: Sign in to the Zoom Developer Website - https://marketplace.zoom.us.
- Step 2: In the header, select "Build App" and choose the OAuth type.
- Step 3: Fill in your application information.
- Step 4: Retrieve your developer keys: Client ID and Client Secret.
- Step 5: Select the scope "Create meeting scope" from the scope section.
- Step 6: Paste the Client ID and Client Secret in the WPBookit Telemed section.
- Step 7: Click on the authorize button.
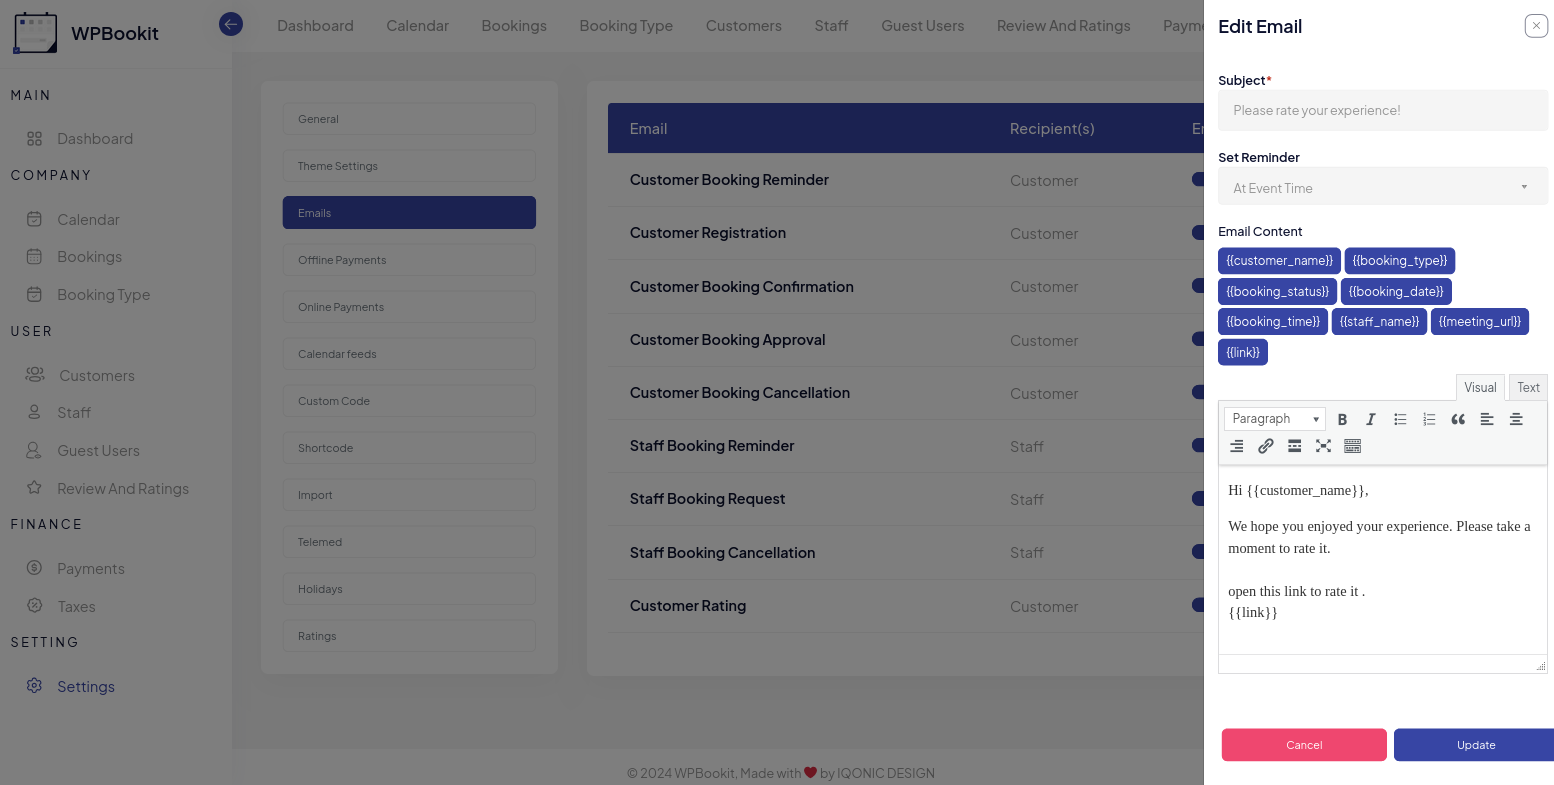
Emails
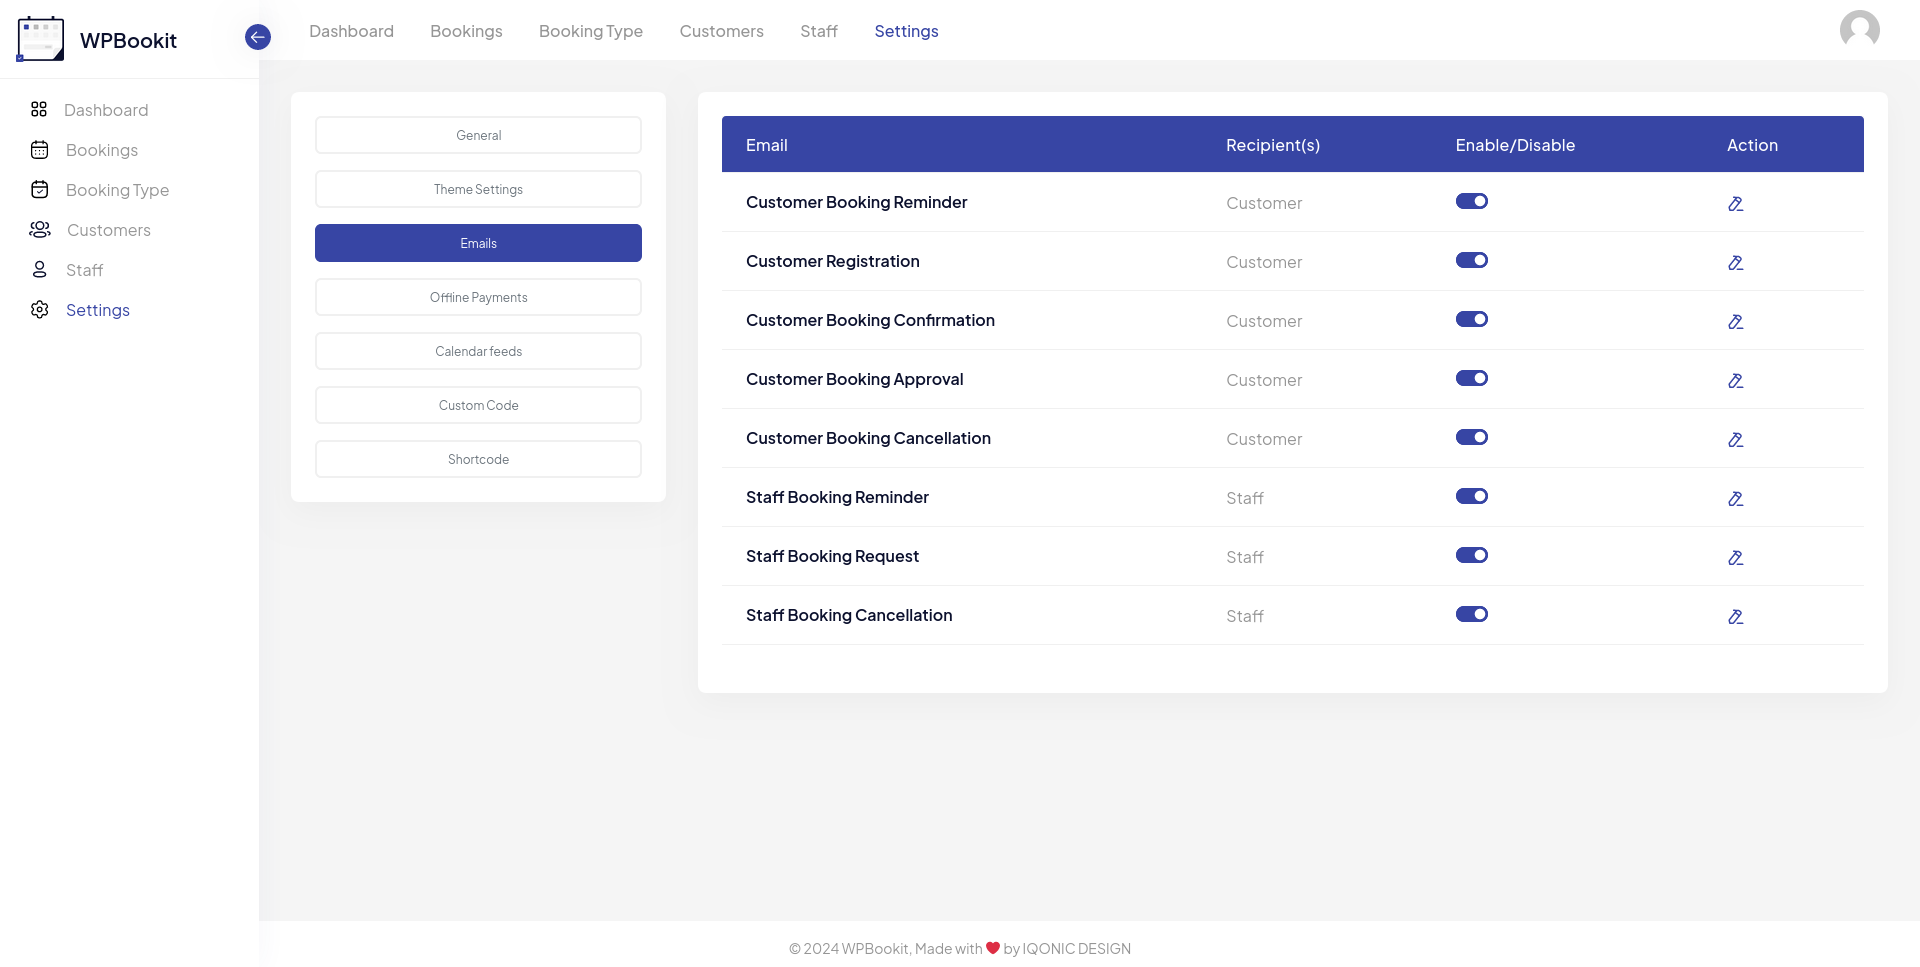
Overview
Here is the default email template available in our plugin, which triggers based on the user's role. We implemented this email template feature to allow users to fully customize it by overwriting the template in their parent theme or child theme, whose path is also shown in the action tab.
When you click on "edit template," there are options to change the email settings:
- Email Status: this option enables you to enable or disable the email.
- Subject: this field sets the email subject.
- Set Reminder: some templates offer the option to set reminders, specifying the interval time before the appointment.
- Email Content: this field allows you to enter your email content with a dynamic key.
Calendar Feeds
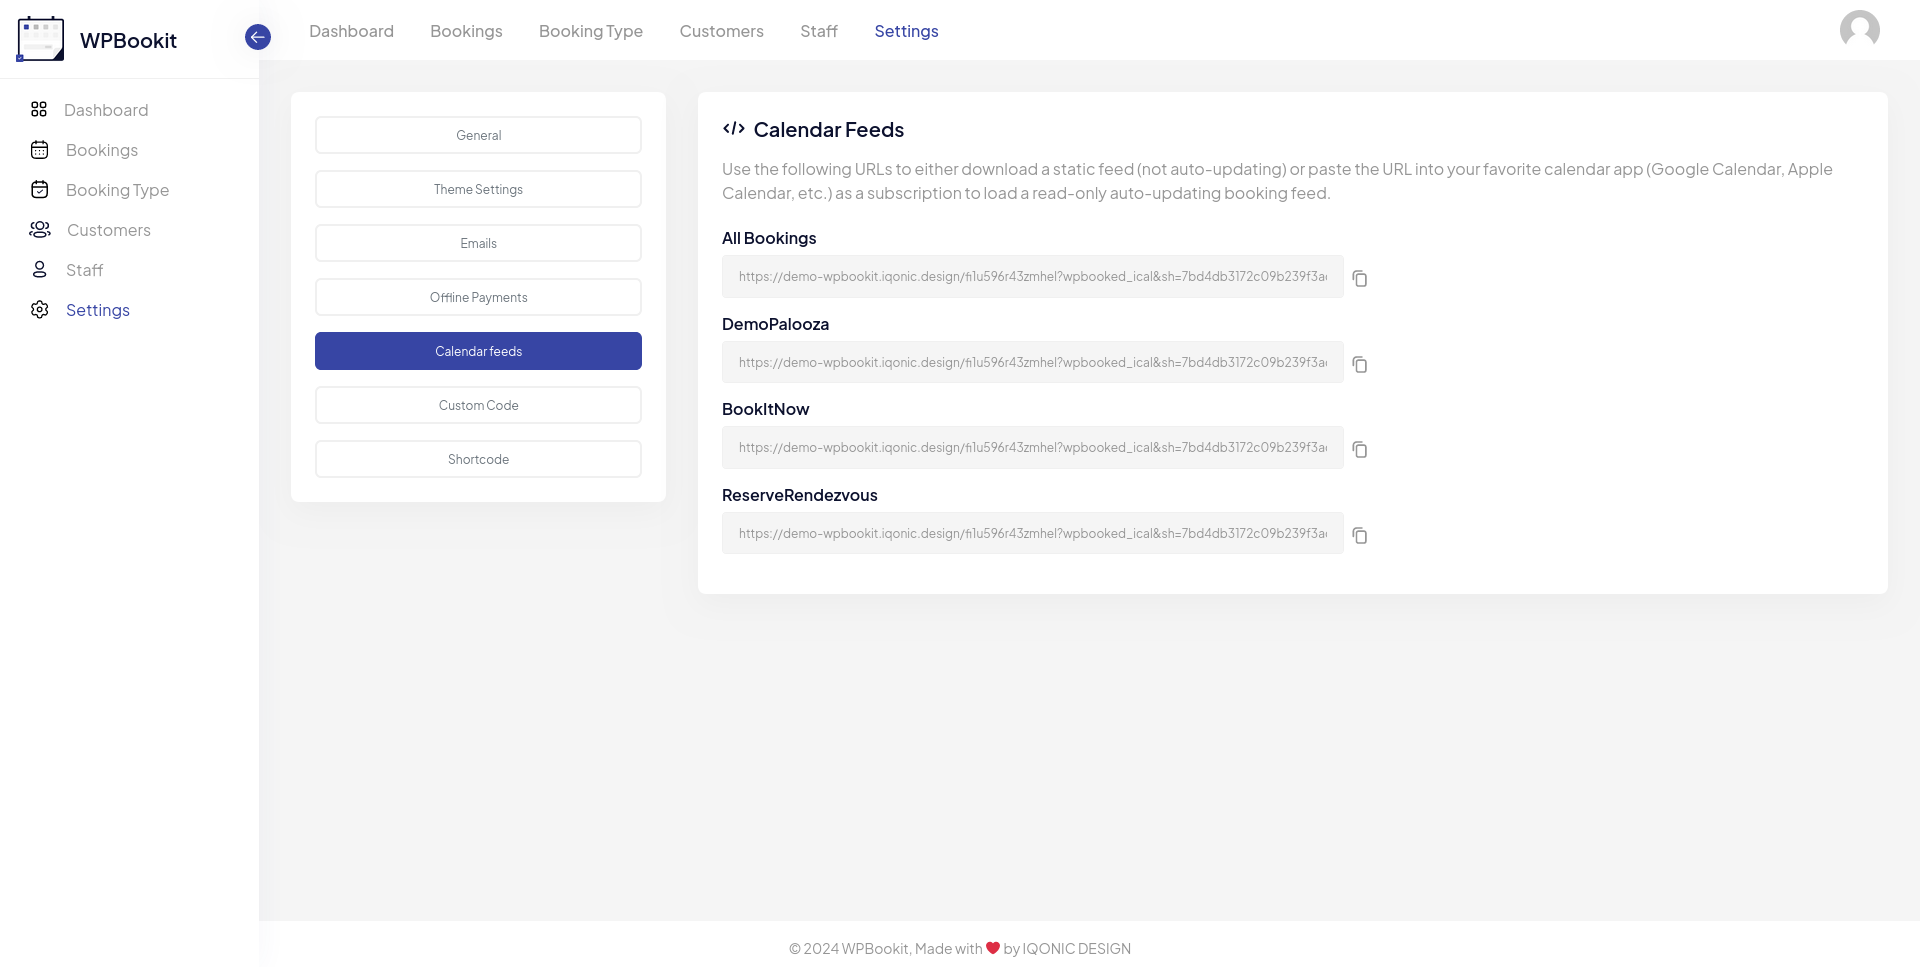
Overview
Use the following URLs to either download a static feed (not auto-updating) or paste the URL into your favorite calendar app (Google Calendar, Apple Calendar, etc.) as a subscription to load a read-only auto-updating booking feed.
Migrate WPBookit To Pro
How to Migrate from WPBookit 1.6.5 to WPBookit Pro 1.6.6
In version 1.6.6, we have rebranded the plugin from WPBookit to WPBookit Pro. Follow these steps to migrate:
- Deactivate the previous version of the plugin (WPBookit 1.6.5) from your WordPress admin dashboard.
- Download and install the latest version of the plugin (WPBookit Pro 1.6.6).
- Activate WPBookit Pro after installation.
Note: To facilitate this transition, we have launched the WPBookit Lite version on WordPress.org with minimal features, while the full-featured version is available as WPBookit Pro on CodeCanyon.
Shortcode
Overview
In our plugin we provide pre build shortcodes which you can utilize on front end pages which is shown as follows:
Here Below is Shortcode List
- [wpb-login]: allow Users To Register and Login into Your Site.
- [wpb-profile]: registered Users can manage their Profile and see his all appointments.
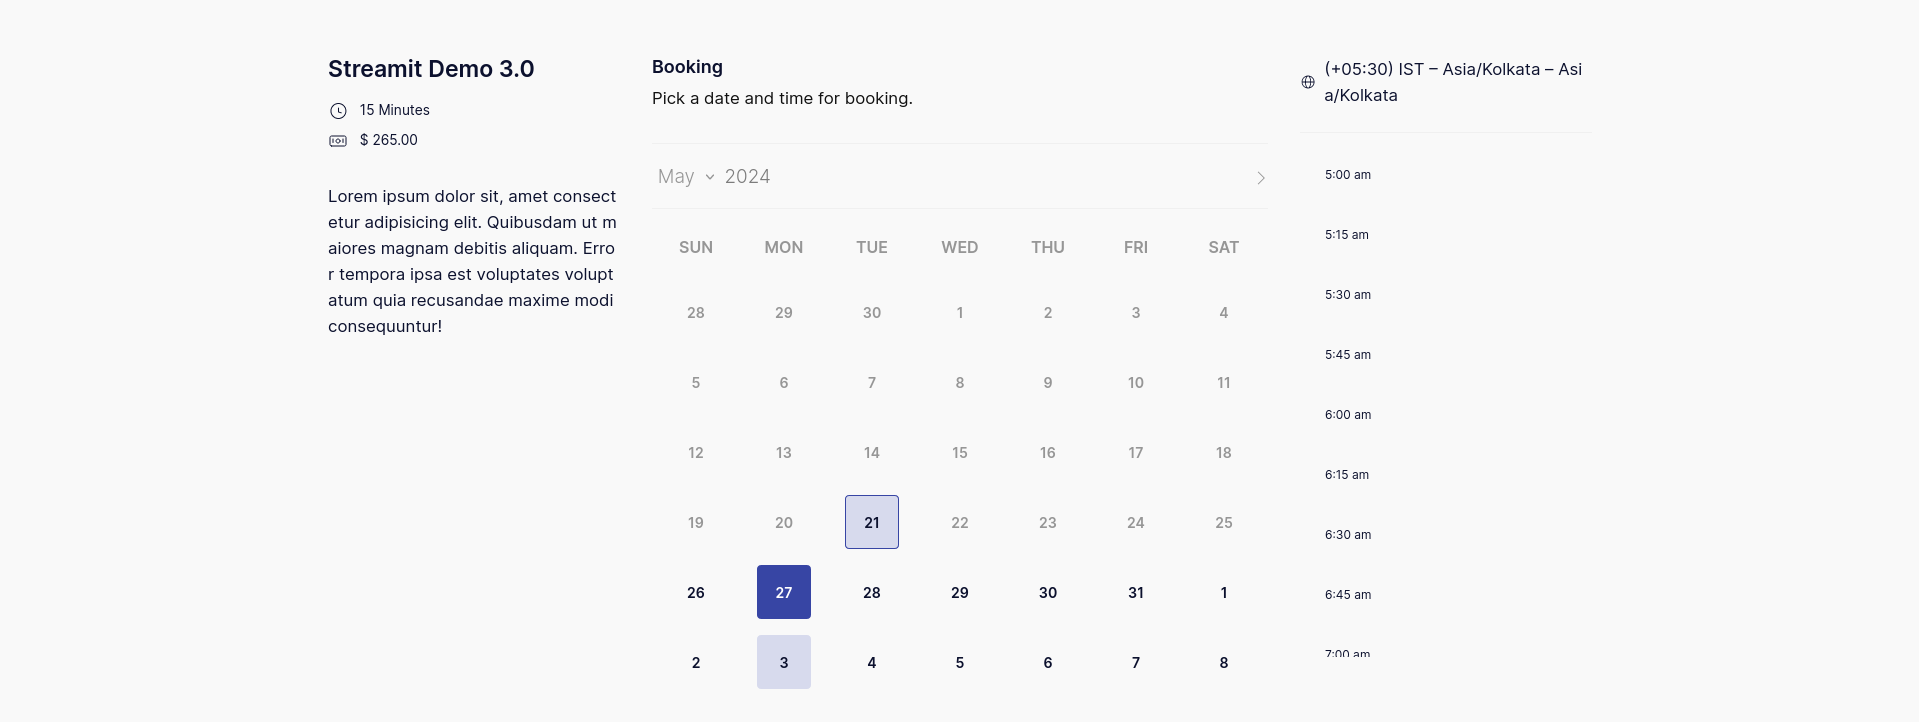
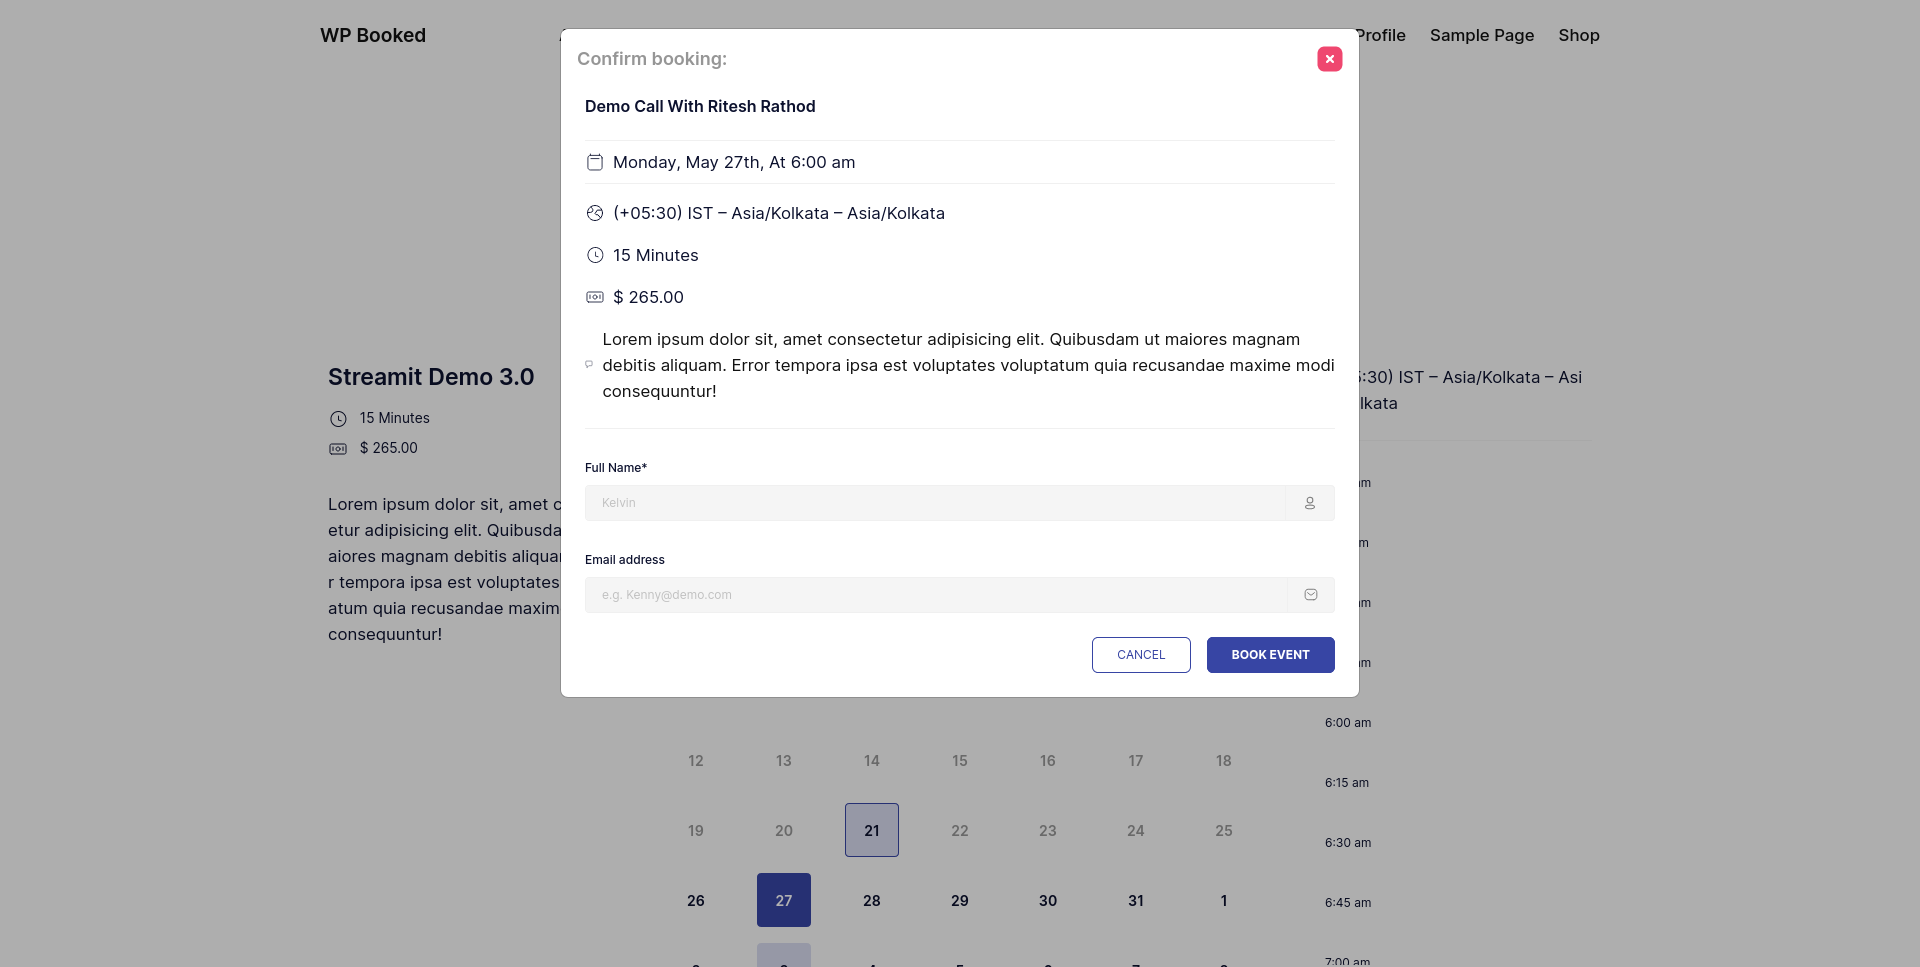
- [wpb-booking id='1'] Allow Users To Book Appointment With Specifi Booking Type.
Screenshot of
[wpb-booking]
Shortcode
Add-Ons
WhatsApp Meta Notification Addon

WPBookit Whatsapp-meta-notification Addon seamlessly integrates Whatsapp-meta-notification with WPBookit, enabling you to send real-time notifications directly through WhatsApp's messaging platform. This integration enhances communication with your users by delivering instant updates and alerts, ensuring that important information reaches your audience efficiently and securely.
How To Configure:
- Create a Meta Developer Account
- Step 1: Go to the Meta for Developers site Meta .
- Step 2: Create a Developer Account "If you don't have one, follow the prompts to set up your developer account".
- Step 3: Create a New App Click on "My Apps" in the top right corner and select "Create App". Choose "Business" as the app type and click "Continue."
- Step 4: Fill in App DetailsEnter the app name, contact email, and purpose of the app, then click "Create App ID"
- Set Up WhatsApp Business API
- Step 1: Configure WhatsApp Business Profile:Navigate to the WhatsApp section in your Meta Developer dashboard.
- Step 2: Generate Access Token:"Go to "WhatsApp > Getting Started."
- Step 3: Follow the steps to generate a temporary access token. You’ll need to configure webhooks and set up a callback URL.
- Create a Facebook App Integration
- Step 1: Go to the Facebook App Dashboard:Select your app from the Meta Developer dashboard.
- Step 2: Add WhatsApp Product: "In the app dashboard, click on "Add a Product" in the left sidebar." Find "WhatsApp" and click "Set Up."
- Step 3: Configure the consent screen and set up the OAuth 2.0 Client ID.
- Step 3: Generate Access Token: Go to "WhatsApp > API > Token Generation" in the dashboard.Generate a token and note it down for use in your WordPress plugin.
- Configure WPBookit Plugin for WhatsApp Integration
- Step 1 : Install and Activate WPBookit Plugin: Ensure that the WPBookit plugin is installed and activated on your WordPress site.
- Step 2 : Access WPBookit Settings: Navigate to WPBookit > Settings in the WordPress admin dashboard.
- Step 3 : Add WhatsApp Configuration: Look for the section related to notifications or integrations.Enter the WhatsApp Access Token you generated earlier.
- Step 4 : Save Changes: Click “Save Changes” to apply the WhatsApp integration settings.
WPBookit Whatsapp-meta-notification Addon change log
Version 1.0.0
20/08/2024- Initial Releases
WhatsApp Meta Notifications Template
WPBookit WhatsApp Meta Notifications Template Addon provides seamless integration with WPBookit, allowing you to manage and send customized notification templates via WhatsApp. This addon enables you to define specific templates for different booking events, such as confirmations or approvals, ensuring consistent and timely communication with your customers. By leveraging pre-approved WhatsApp templates, this integration ensures that your messages are delivered instantly and professionally, enhancing customer satisfaction and streamlining your booking process.
How To Configure:
- Install and Activate the Addon
- Step 1: Activate the Addon:Go to Plugins > Installed Plugins in your WordPress admin dashboard. Locate the WhatsApp Meta Notifications Template addon and click "Activate."
- Access the WhatsApp Meta Notifications Settings
- Step 1: Navigate to WPBookit Settings:In the WordPress admin dashboard, go to WPBookit > Settings.
- Step 2: Open the WhatsApp Meta Notifications Section:"Within the WPBookit settings, find and click on the WhatsApp Meta Notifications tab."
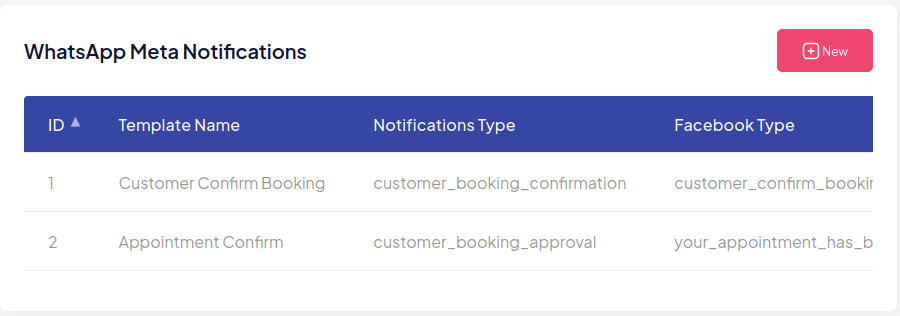
- Step 3: View and Manage Templates: You will see a table similar to the one in the provided image, listing existing WhatsApp templates with columns like ID, Template Name, Notifications Type, and Facebook Type.
- Create or Edit WhatsApp Notification Templates
- Step 1: Add a New Template: Click the + New button (visible in the top right corner of the section).Enter the following details: Template Name , Notifications Type , Facebook Type
- Step 2: Edit an Existing Template: Click on an existing template from the list to modify its settings. Adjust the Template Name, Notifications Type, or Facebook Type as needed.
- Step 3: Map Data Placeholders: Ensure that placeholders in the WhatsApp template (e.g., {{1}} for customer name) are correctly mapped to WPBookit data fields such as booking details, customer name, or appointment time.
- Configure Notification Triggers
- Step 1 : Set Up Trigger Events: Determine when each WhatsApp template should be sent (e.g., on booking confirmation, approval, or cancellation).Go to WPBookit > Notifications and link the corresponding WhatsApp templates to specific events.
- Step 2 : Test the Configuration: Perform a test booking to ensure the WhatsApp notification is triggered and sent as expected.
WhatsApp Meta Notifications Template Addon change log
Version 1.0.0
22/08/2024- Initial Releases
Goggle Calender Addon
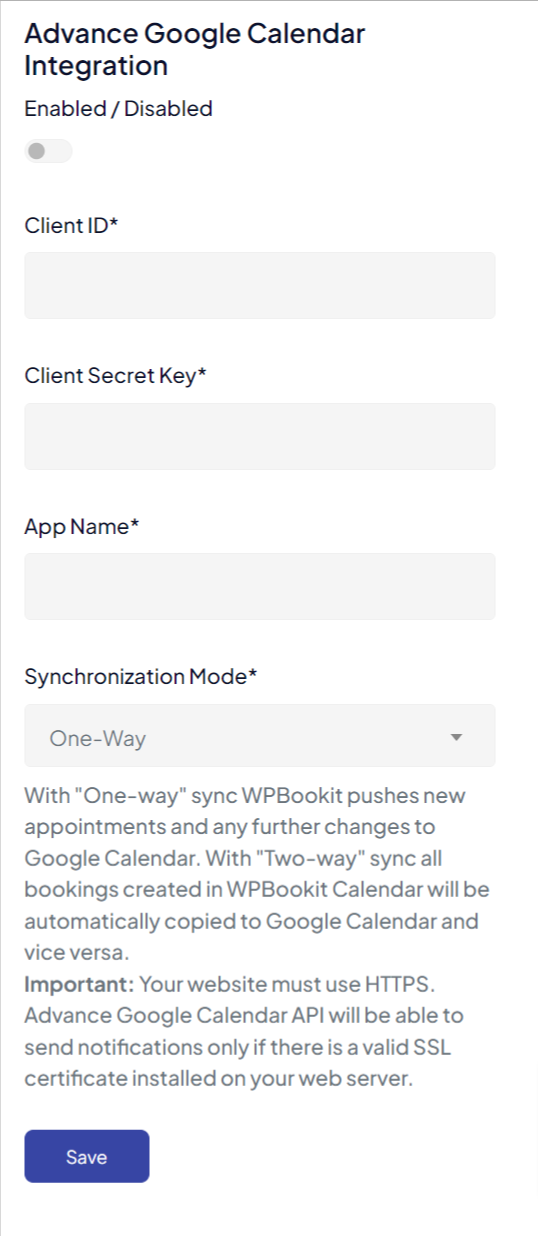
WPBookit google-calender Addon seamlessly integrates Google-calender with WPBookit.
How To Configure:
- Create a Project
- Step 1: Go to Google Cloud Console.
- Step 2: Click the project drop-down and select "New Project".
- Step 3: Enter the project name and click "Create".
- Enable Google Calendar API
- Step 1: In the Cloud Console, go to APIs & Services > Library.
- Step 2: Search for "Google Meet API" (or "Google Calendar API").
- Step 3: Click the API and then click "Enable".
- Create OAuth Credentials
- Step 1: Go to APIs & Services > Credentials.
- Step 2: Click "Create Credentials" and select "OAuth 2.0 Client IDs".
- step 3: Select "Web Application"and Enter Application Name.
- Step 4: For "Authorized JavaScript origins URI" enter the following url: https://demo-wpbookit.iqonic.design/knlhp97bxq5j38w. Click create.
- Click the OAuth consent screen and create app with neccessary information.
- Use Credentials in Your Application
- Use Client ID and Client Secret in the WPBookit Telemed section.
WPBookit google-calender Addon change log
Version 1.0.0
06/08/2024- Initial Releases
WPBookit Google Meet Addon
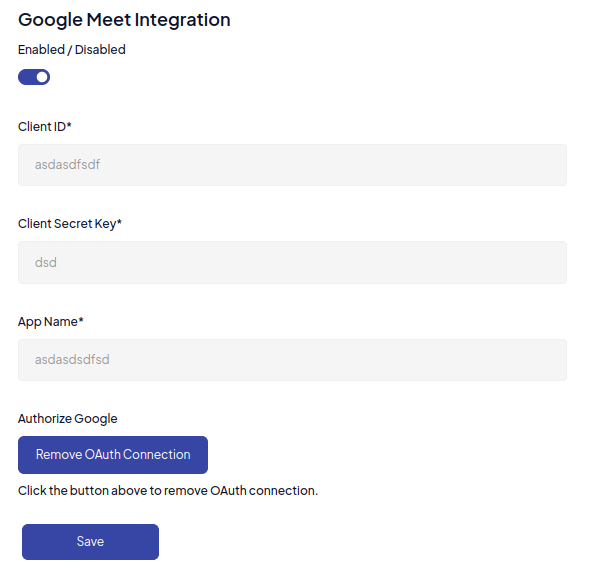
WPBookit Google Meet Addon seamlessly integrates Google Meet with WPBookit, making it easy to schedule and manage virtual meetings directly from your dashboard. Enhance your user experience with automated meeting links and calendar sync.
How To Configure:
- Create a Project
- Step 1: Go to Google Cloud Console.
- Step 2: Click the project drop-down and select "New Project".
- Step 3: Enter the project name and click "Create".
- Enable Google Meet API
- Step 1: In the Cloud Console, go to APIs & Services > Library.
- Step 2: Search for "Google Meet API" (or "Google Calendar API").
- Step 3: Click the API and then click "Enable".
- Create OAuth Credentials
- Step 1: Go to APIs & Services > Credentials.
- Step 2: Click "Create Credentials" and select "OAuth 2.0 Client IDs".
- Step 3: Configure the consent screen and set up the OAuth 2.0 Client ID.
- Use Credentials in Your Application
- Use Client ID and Client Secret in the WPBookit Telemed section.
WPBookit Google Meet Addon - Change Log
Version 1.0.1
30/07/2024- Stability update.
Version 1.0.0
27/06/2024- Initial Releases
Add-Ons
Microsoft Team Addon
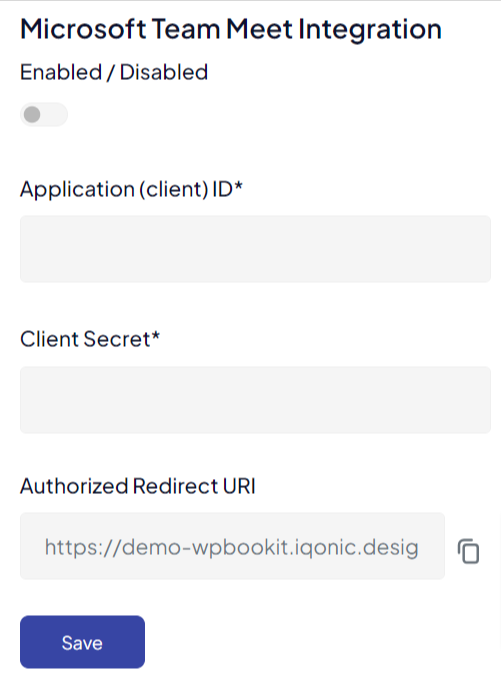
WPBookit Microsoft Team Addon seamlessly integrates Microsoft Team Addon with WPBookit, .
How To Configure:
- Sign in to the Azure portal
- You must have an Work or School account.
- Step 1: Go to Azure Portal. .
- Regester new account
- Step 1: Navigate to Azure Active Directory > App registrations > New registration..
- Step 2: Name your application(e.g., "Calendar and Teams Integration").
- Step 3:Supported account types: Select the "Accounts in any organizational directory" account type(e.g., "Multitenant").
- Configure API permissions
- Step 1:After registering, navigate to API permissions > Add a permission.
- Step 2: Select "Microsoft Graph".
- Step 3: Configure the consent screen and set up the OAuth 2.0 Client ID.
- Step 3: Choose "Delegated permissions" and add the following
permissions:
- Calendars.ReadWrite
- OnlineMeetingArtifact.Read.Al
- OnlineMeetingRecording.Read.All
- OnlineMeetings.Read
- OnlineMeetings.ReadWrite
- OnlineMeetingTranscript.Read.All
- User.Read
- offline_access
- Step 4: Choose "Application permissions" and add the following permissions:Calendars.ReadWrite
- step 5: Grant admin consent for the permissions
- Generate client secret
- Step 1 : Go to Certificates & secrets > New client secret.
- Step 2 : Provide a description and set an expiration period.
- Step 3 : Save the generated secret value.
- Configure Application for Authentication
- Step 1 : Navigate to Authentication under your app registration.
- Step 2 : Add the redirect URIs used in your "Redirect URI" field.
- Step 3 : Set up the platform: Under "Platform configurations", add a "Web" platform.
- step 4 : Configure the redirect URIs and enable "ID tokens".
- Use credentials in your application
- Step 1 : Use Client ID and Client Secret in the WPBookit Telemed > Microsoft Team Meet Integration.
WPBookit Microsoft-team Addon change log
Version 1.0.0
06/08/2024- Initial Releases
WPBookit Razorpay Payment Gateway Addon
WPBookit Razorpay Payment Gateway Addon seamlessly integrates Razorpay Payment Gateway with WPBookit, enabling secure and efficient payment management directly from your dashboard. Enhance your user experience with automated payment processing and real-time transaction tracking.
How To Configure:
- Generate Api Keys
- Step 1: Log in to your Dashboardwith the appropriate credentials.
- Step 2: Select the mode (Test or Live)for which you want to generate the API key.
- Test Mode:The test mode is a simulation mode that you can use to test your integration flow.Your customers will not be able to make payments in this mode.
- Live Mode: When your integration is complete, switch to live mode and generate live mode API keys. In the integration, replace test mode keys with live mode keys to accept customer payments.
- Step 3:Navigate to Account & Settings → API Keys (under Website and app settings) → Generate Keyto generate key for the selected mode.
WPBookit Razorpay Payment Gateway - Change Log
Version 1.0.1
20/08/2024- [Improvement] in payment flow.
- [Fixed] Bug
Version 1.0.0
15/07/2024- Initial Releases
WPBookit Stripe Payment Addon
WPBookit Stripe Payment Addon seamlessly integrates Stripe payment processing with WPBookit, enabling secure and efficient payment management directly from your dashboard. Enhance your user experience with automated payment processing and real-time transaction tracking.
How To Configure:
- Configure Stripe Account
- Step 1: Sign up for a Stripe account at Stripe if you don't already have one.
- Step 2: Obtain your Stripe API keys from the Stripe Dashboard:
- Log in to your Stripe account.
- Go to Developers > API keys.
- Note down the "Publishable key" and "Secret key."
- Integrate Stripe with WPBookit
- Step 1: In your WordPress dashboard , go to WPBookit > Settings.
- Step 2: Click on the "Payments" tab.
- Step 3: Select "Stripe" as your payment gateway.
- Step 4: Enter the Stripe API keys (Publishable key and Secret key) you obtained earlier.
- Set Up Payment Options
- Step 1: Configure the payment options as per your requirements
- Set currency type.
- Enable/disable test mode for testing transactions.
- Set up payment descriptions or any other relevant settings.
- Step 1: Configure the payment options as per your requirements
- Test the Configuration
- Step 1: Enable "Test Mode" in the Stripe settings within WPBookit.
- Step 2: Perform a test booking and payment to ensure everything is working correctly.
- Step 3: Once confirmed, disable "Test Mode" to start accepting live payments.
- Customize Payment Experience (Optional)
- Step 1: You can customize the payment form, email notifications, and other related settings within WPBookit.
- Step 2: Go to WPBookit > Settings > Payments to make necessary adjustments.
WPBookit Stripe Payment Addon- Change Log
Version 1.0.1
15/08/2024- Compatibility with TAX module.
Version 1.0.0
27/06/2024- Initial Releases
WPBookit Twilio Notification Addon
WPBookit Twilio Notification Addon seamlessly integrates Twilio's messaging services, enabling automated SMS notificationsfor booking confirmations, reminders, and updates. Enhance your user experience with real-time communication and timely notifications directly from your dashboard.
How To Configure:
- Configure Twilio Account:
- Step 1: Sign up for a Twilio account at Twilio if you don't already have one.
- Step 2: Obtain your Twilio Account SID and Auth
Token from the twilio console.
- Log in to your Twilio account.
- Go to Dashboard to find your Account SID and Auth Token.
- Step 3: Note down your Twilio phone number (the number you'll use to send SMS).
- Integrate Twilio with WPBookit
- Step 1: In your WordPress dashboard, go to WPBookit > Settings.
- Step 2: Click on the "Notifications" tab.
- Step 2: Select "Twilio" as your notification provider.
- Set Up SMS Notifications
- Step 1: Configure the SMS notification settings as per your requirements.
- Set up notification templates for booking confirmations, reminders, and updates.
- Specify the message content and ecipient details.
- Test the Configuration
- Step 1: Perform a test booking to ensure that SMS notifications are sent correctly.
- Verify that the notifications are received as expected.
- Customize Notification Experience (Optional)
- Step 1: You can customize the SMS templates and notification preferenceswithin WPBookit.
- Step 2: Go to WPBookit > Settings > Notifications to make necessary adjustments.
WPBookit Twilio Notification Addon- Change Log
Version 1.0.1
10/09/2024- Stability update.
Version 1.0.0
27/06/2024- Initial Releases
WPBookit Review Ratings Addon

WPBookit Review Ratings Addon allows users to configure how ratings are managed. Users can:
- Select the time period for calculating the average rating, including options such as:
- 1 week
- 2 weeks
- 3 weeks
- 1 month
- 2 months
- 3 months
- 4 months
- 6 months
- 9 months
- 1 year
- 1 year 6 months
- 2 years
- Choose the page where the Ratings shortcode will be displayed.
Changes can be saved by clicking the "Save" button.
Rating Email
Overview
The Ratings Email will be sent to the customer's email when the status of the booking is changed to Completed. This email is used to collect the customer's review and ratings.
Booking Type
Overview
In booking types, the ratings are displayed according to the selected period for calculating the average rating in the Rating settings.
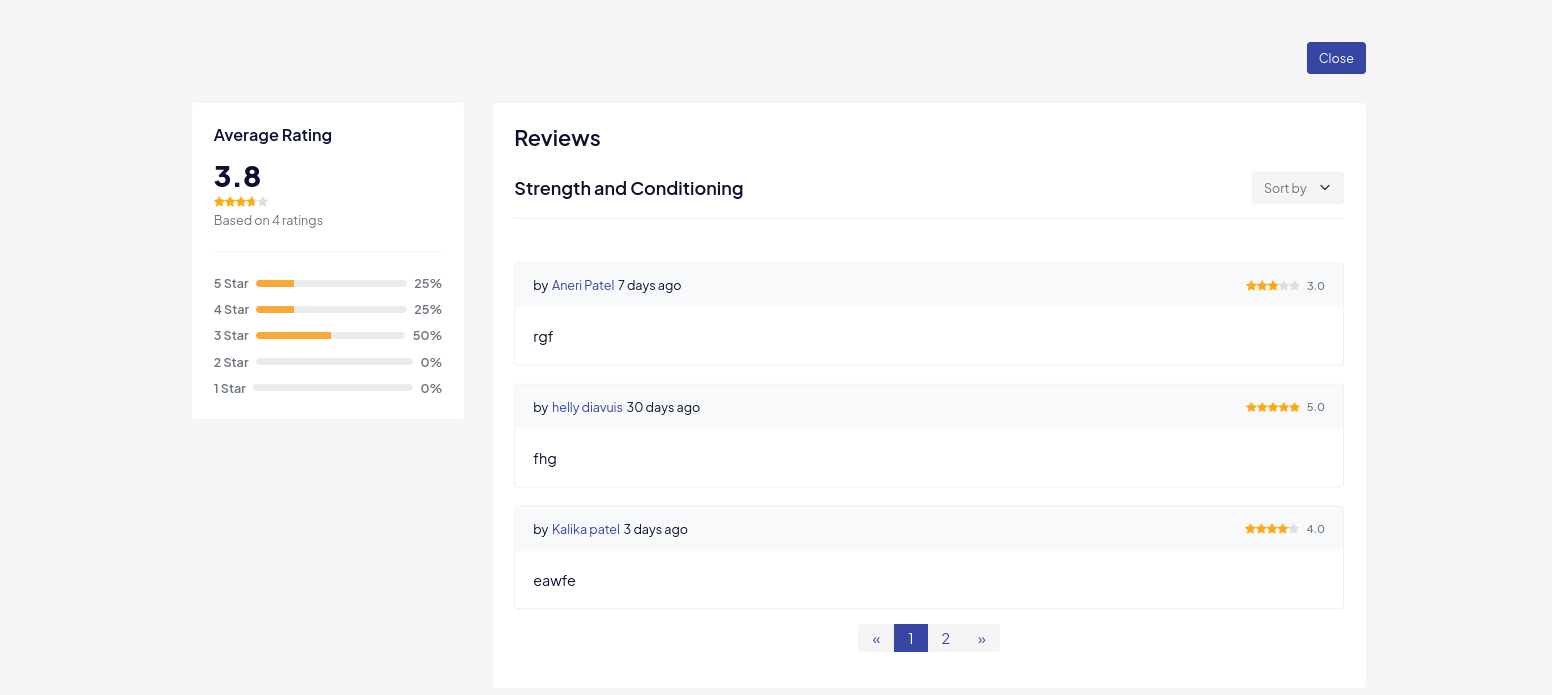
Review And Ratings Page
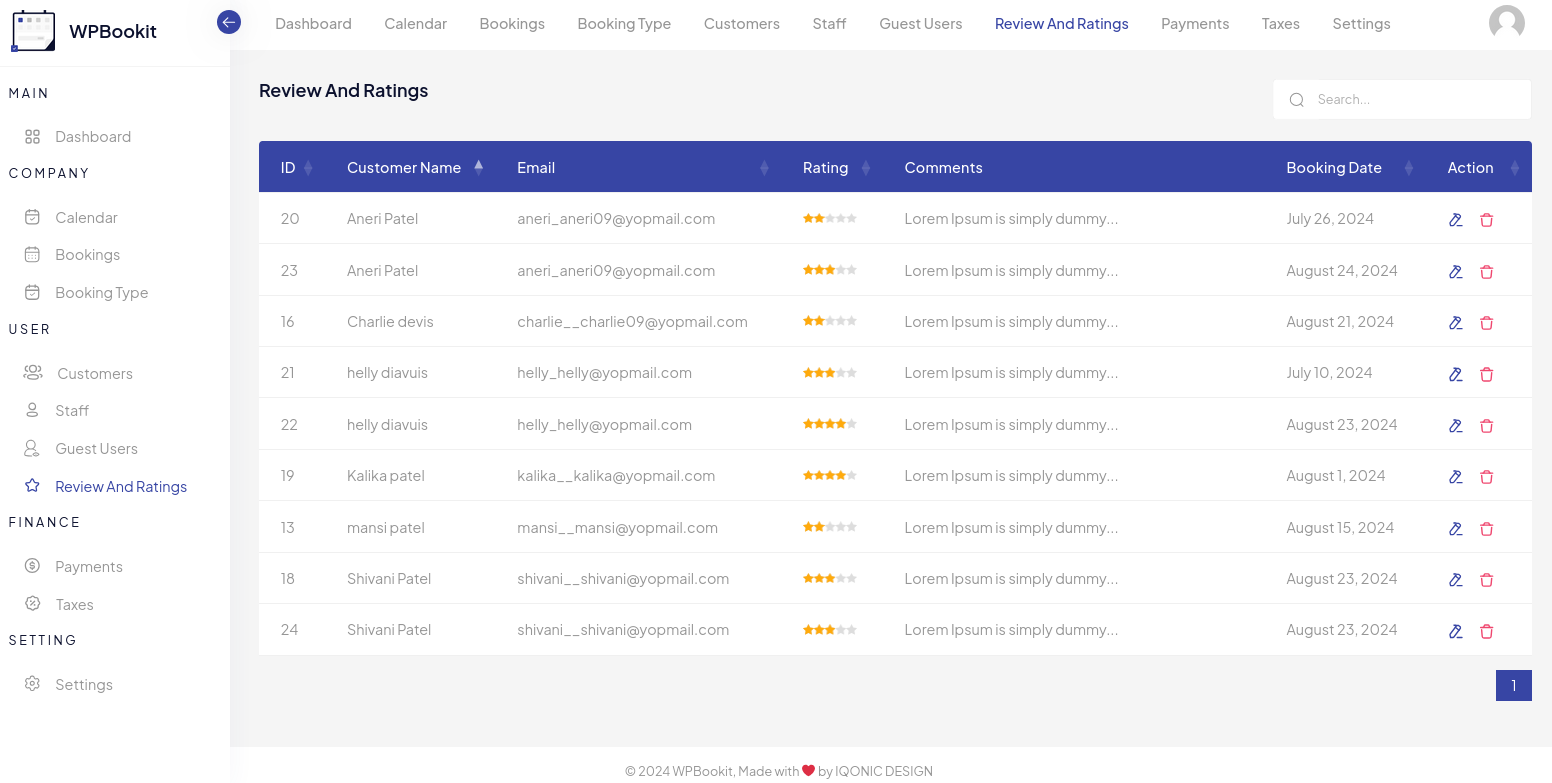
Overview
The "Review And Ratings" section in WPBookit allows you to view and manage Review And Ratings information. You can edit existing Review And Ratings details, and delete Review And Ratings.
Review And Ratings List
The main Review And Ratings list displays the following information for each customer:
- ID: a unique identifier for the customer.
- Customer Name: the name of the customer.
- Email: the email address of the customer.
- Rating: the customer's given rate in the booking.
- Comments: the customer's comments.
- Booking Date: The date when the customer made the booking.
- Action: options to edit or delete the customer's Review And Ratings record.
Edit Customer
- Edit Icon: click the edit icon (pencil) in the "Action" column to edit the details of an existing Review And Ratings .
Delete Customer
- Delete Icon: click the delete icon (trash bin) in the "Action" column to delete an existing Review And Ratings.
Review And Ratings Shorcode
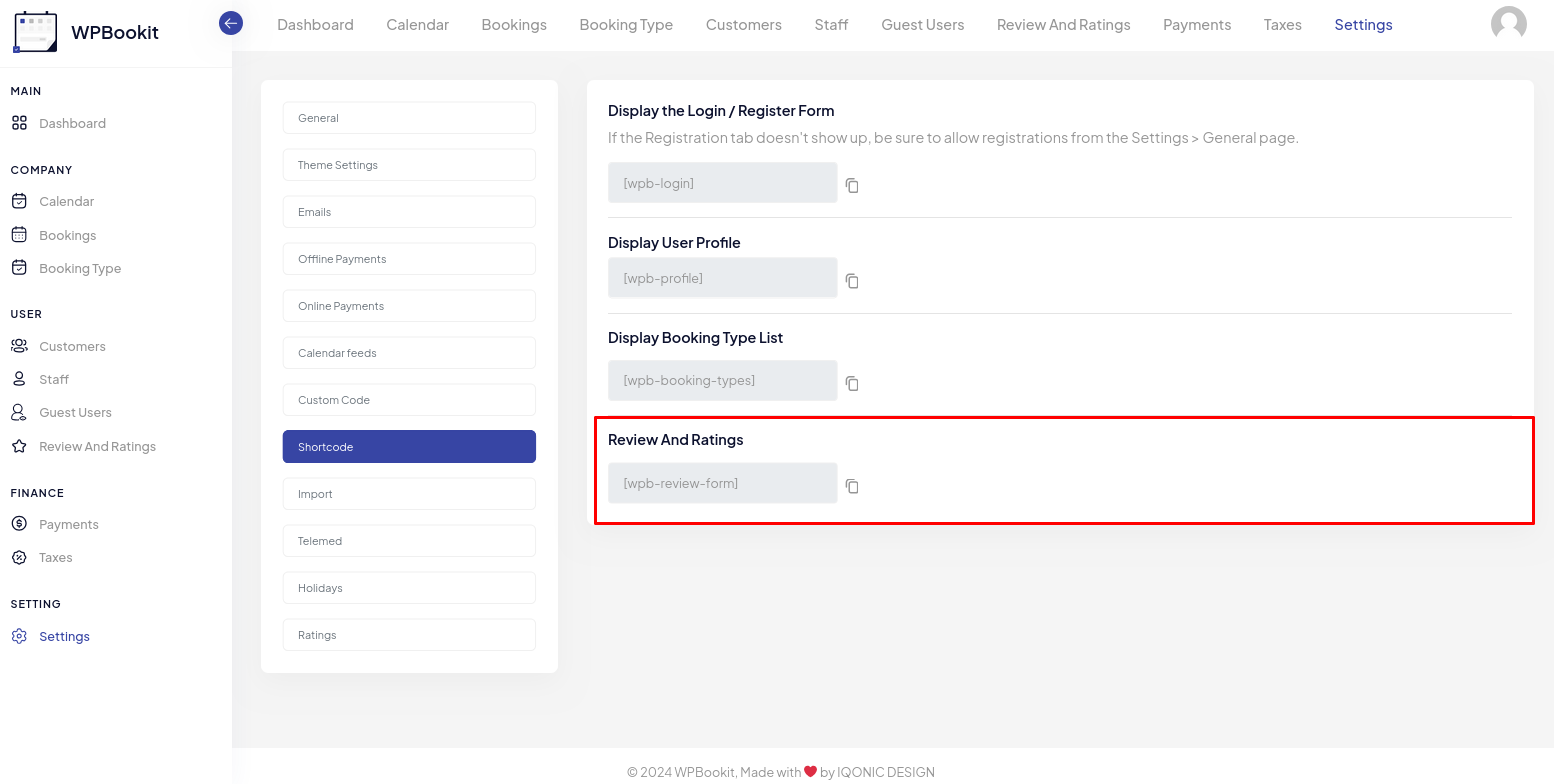
Overview
When the WPBookit Rate and Review plugin is activated, a page named Ratings will be automatically created. If you prefer to create your own custom page, follow these steps:
Create a new page in WordPress.
- Add the Review and Ratings shortcode to the page content.
- Save the page.
- Navigate to the Ratings menu in the WPBookit plugin.
- In the Display Shortcode Page section, select the name of your custom page from the list.
This will allow your custom page to display the review and ratings content.
Review And Ratings Shorcode
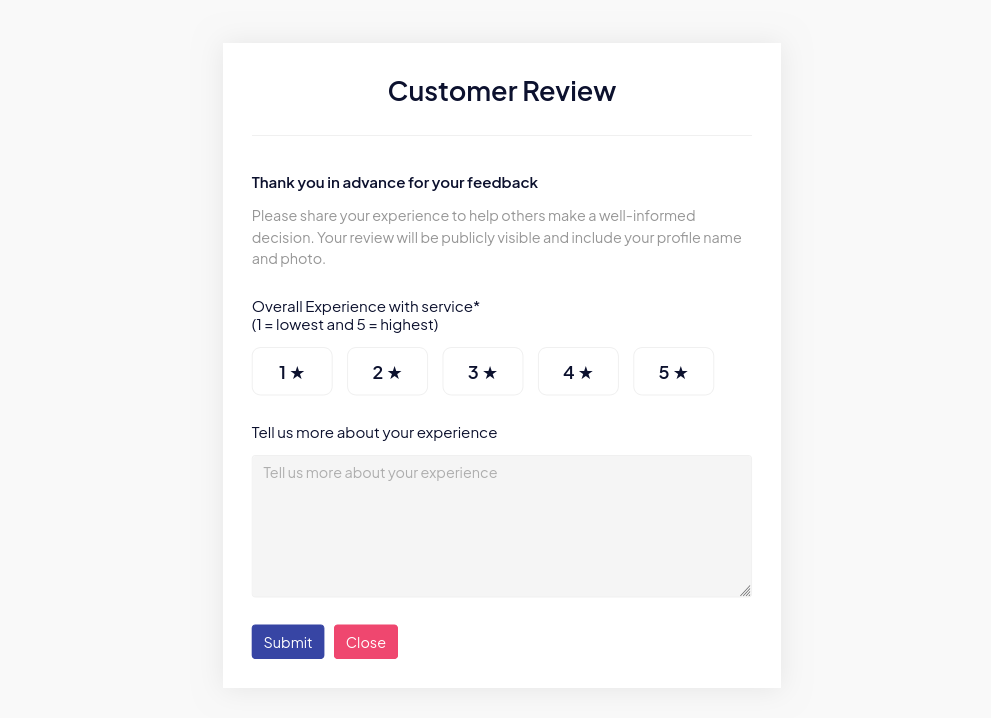
Overview
The Rate and Review shortcode will be displayed when the booking status changes to completed. Once this status is triggered, the customer will receive an email containing a link. By clicking on this link, the customer can provide a review and rating for their booking. Additionally, customers can give ratings through their profile by clicking on the Rate your experience button, which opens a modal for submitting their review.
Note: The customer can only submit their rating and review once.
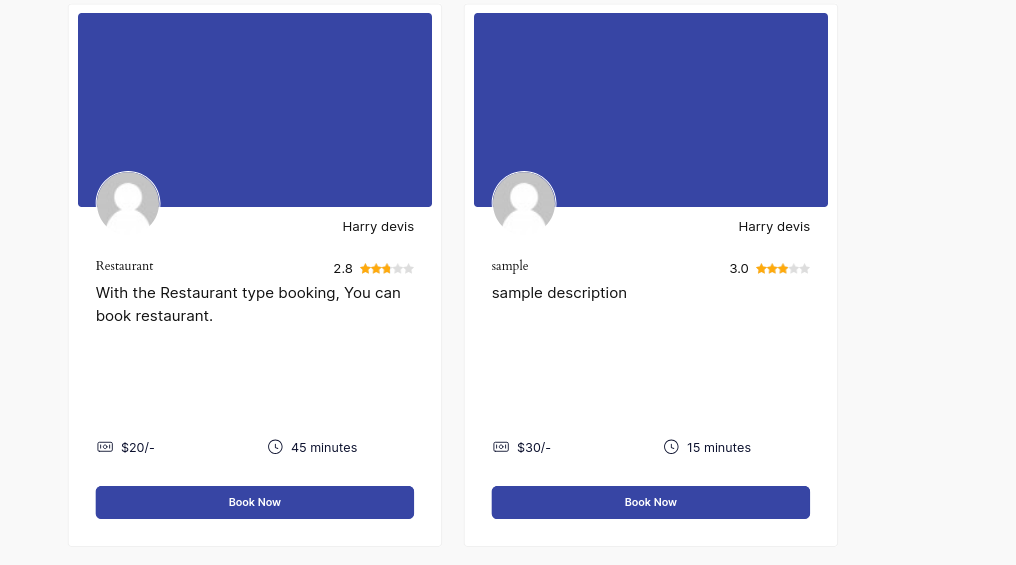
Booking Type review
Overview
In the WPBookit booking type, the average customer rating for a specific booking type will be displayed. By clicking on the Review button, a modal will open where all reviews and comments will be shown, and sorting functionality will be available
WPBookit Review Ratings Addon
Version 1.1.1
29/08/2024- [Fixed] Form submission message issues.
- [Fixed] Ratings pagination issues fixed.
- [Fixed] Sorting issue fixed.
- [Fixed] Bug
Version 1.1.0
23/08/2024- [Added] Show Reviews on Booking page
- [Fixed] Bug
Version 1.0.0
14/08/2024- Initial Releases
Add Coupon
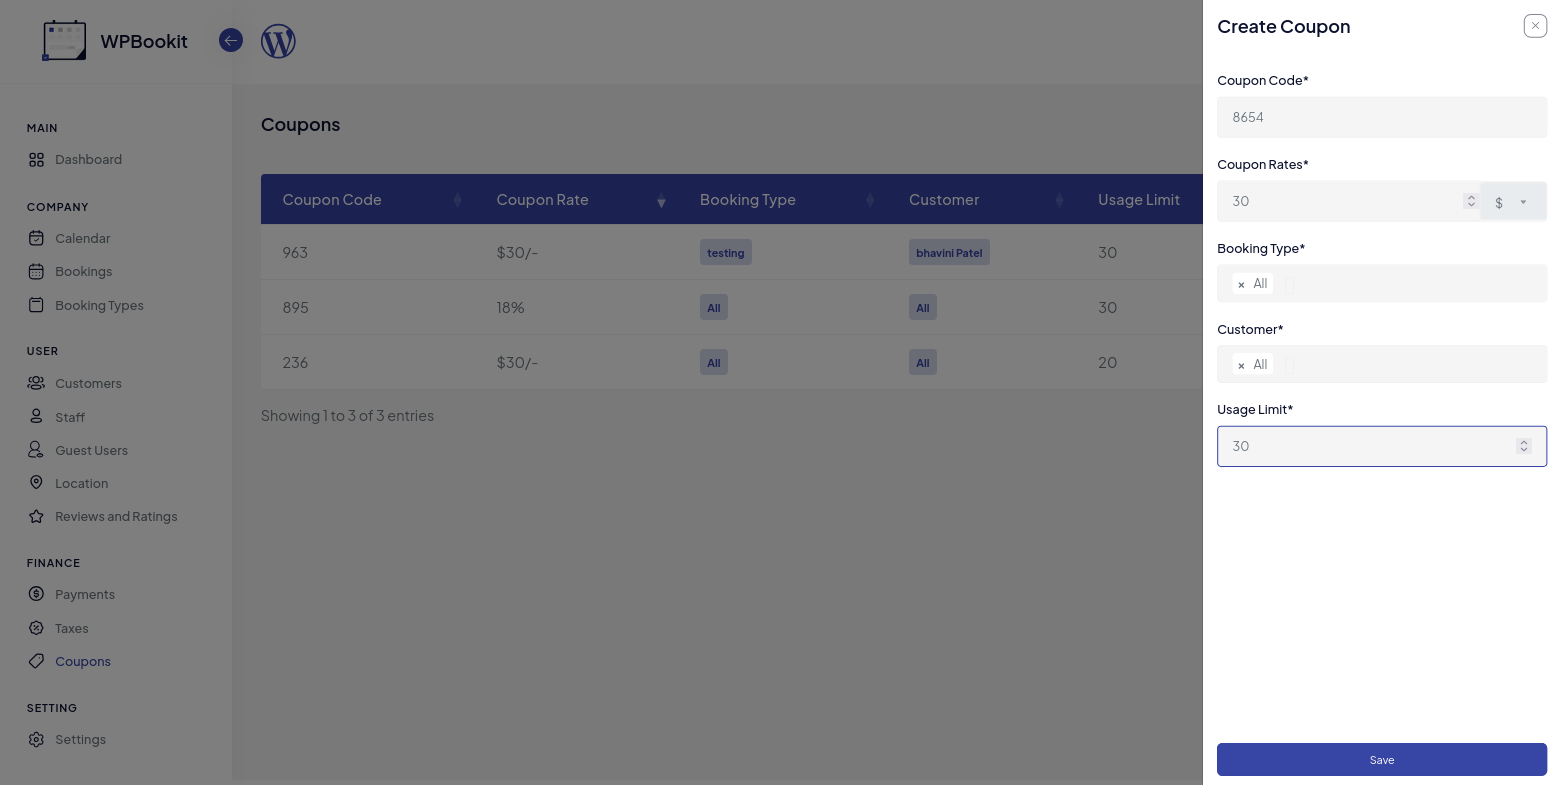
Overview
In the WPBookit Coupon Addon, you can create a new coupon by filling in all the required details. Specify a unique Coupon Code, and set the Coupon Rate either as a percentage (%) or in dollars ($). Select the Booking Types to which the coupon applies, and specify Customer Names if the coupon is to be applied to particular customers only. Additionally, set a Usage Limit for the minimum number of times the coupon can be used.
Apply Coupon
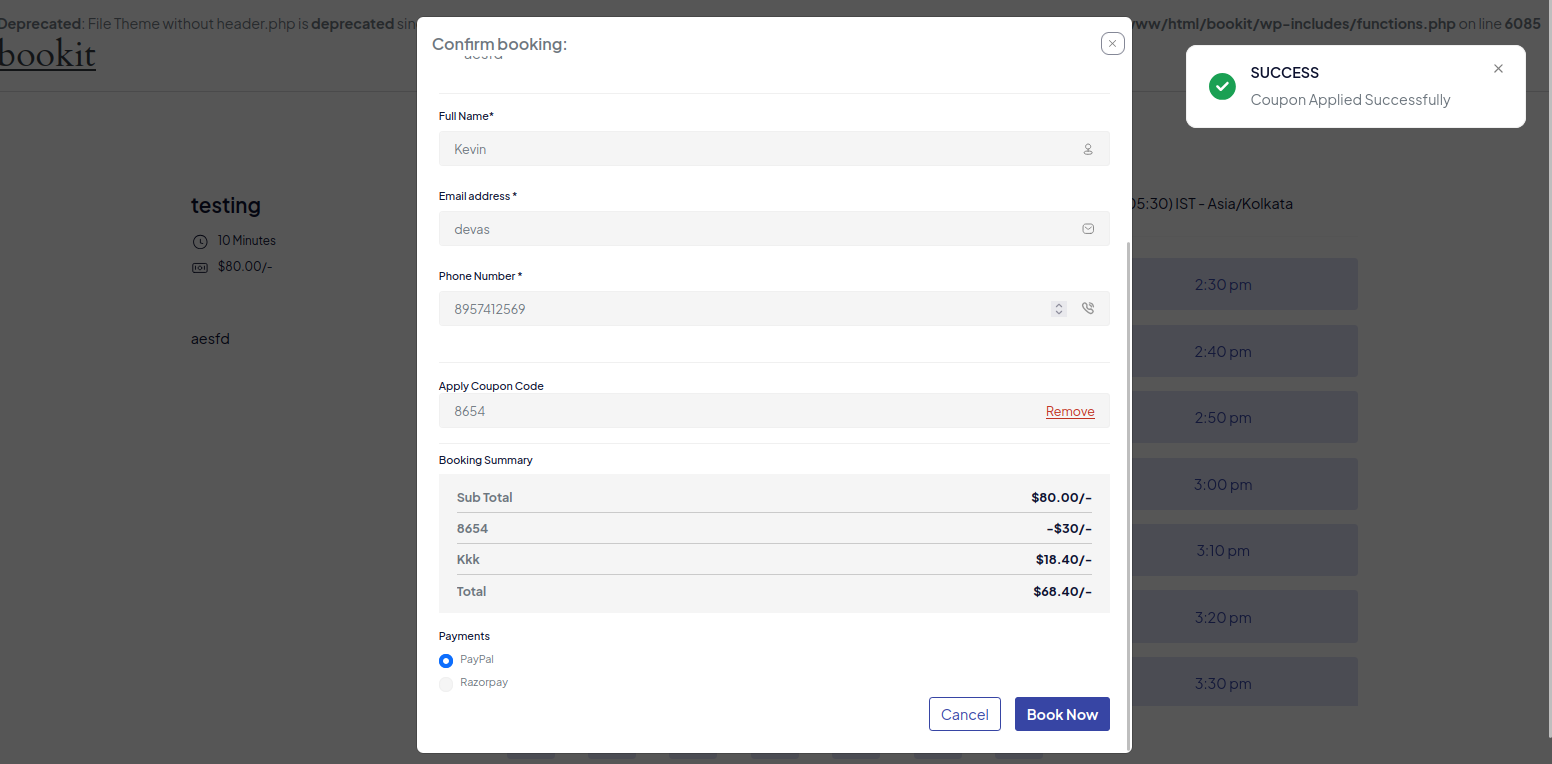
Overview
In the WPBookit Coupon Addon, to apply a coupon, open the booking shortcode, where you'll find the Apply Coupon Code field. Enter the coupon code and click on Apply Coupon to use it. You can also remove the coupon by clicking on Remove.
List of Coupons
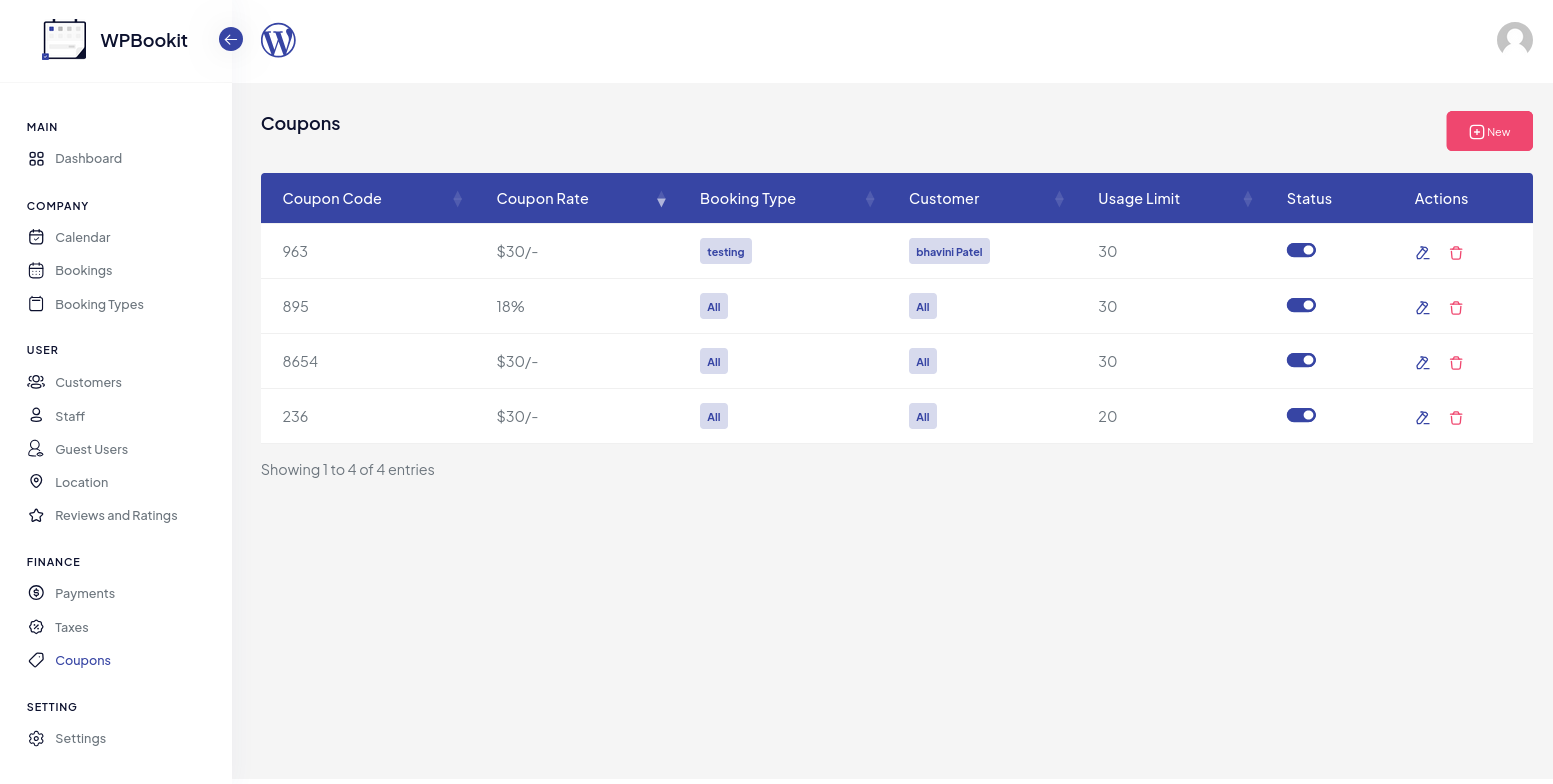
Overview
In the WPBookit Coupon Addon, the Coupon Tab allows you to manage all coupons.
Display Coupon
Overview
In the WPBookit Coupon Addon, the applied coupon will display in customer Booking, Payment, and Invoice.
WPBookit Coupon Addon
Version 1.0.2
28/12/2024- [Fixes] Tax Caluation On Issue on Coupon Apply.
Version 1.0.1
05/08/2024- [Fixes] Bug
Version 1.0.0
03/10/2024- Initial Releases
Add Location
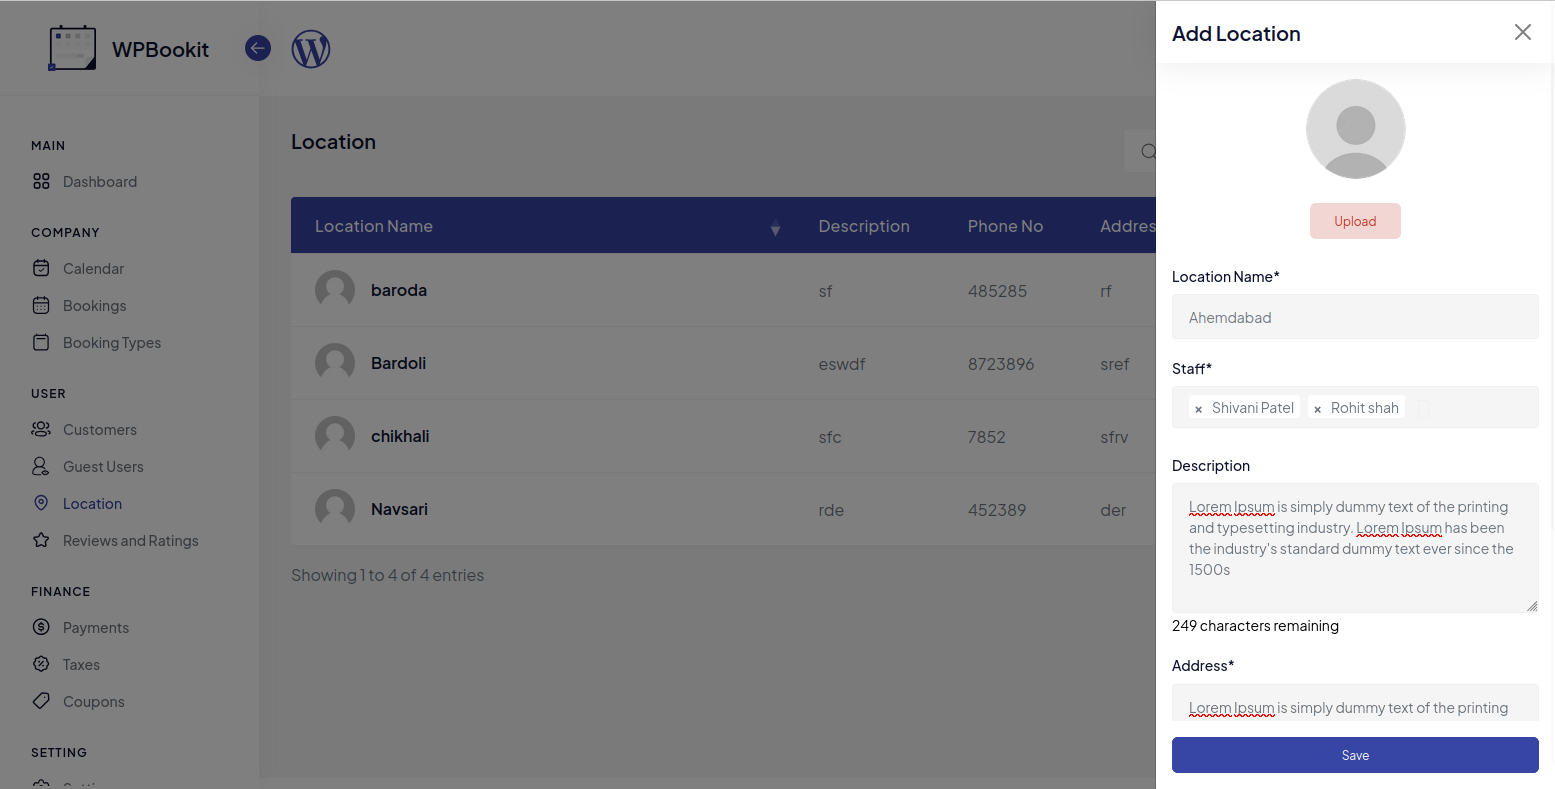
Overview
In the WPBookit Location Addon, you can add a new location by providing all the necessary details. Enter a unique Location Name, assign the Staff for this Location, and include a description, address, and phone number to complete the setup.
List of Location

Overview
In the WPBookit Location Addon, the Location tab allow you to manage all location. When a staff member deletes a location from their dashboard, it will only be removed from their view and not from the admin dashboard.
Booking Type Location
Overview
In the WPBookit Location Addon, the location name assigned to each booking type will be displayed in a dropdown, based on the selected staff member.
Booking Location in Admin
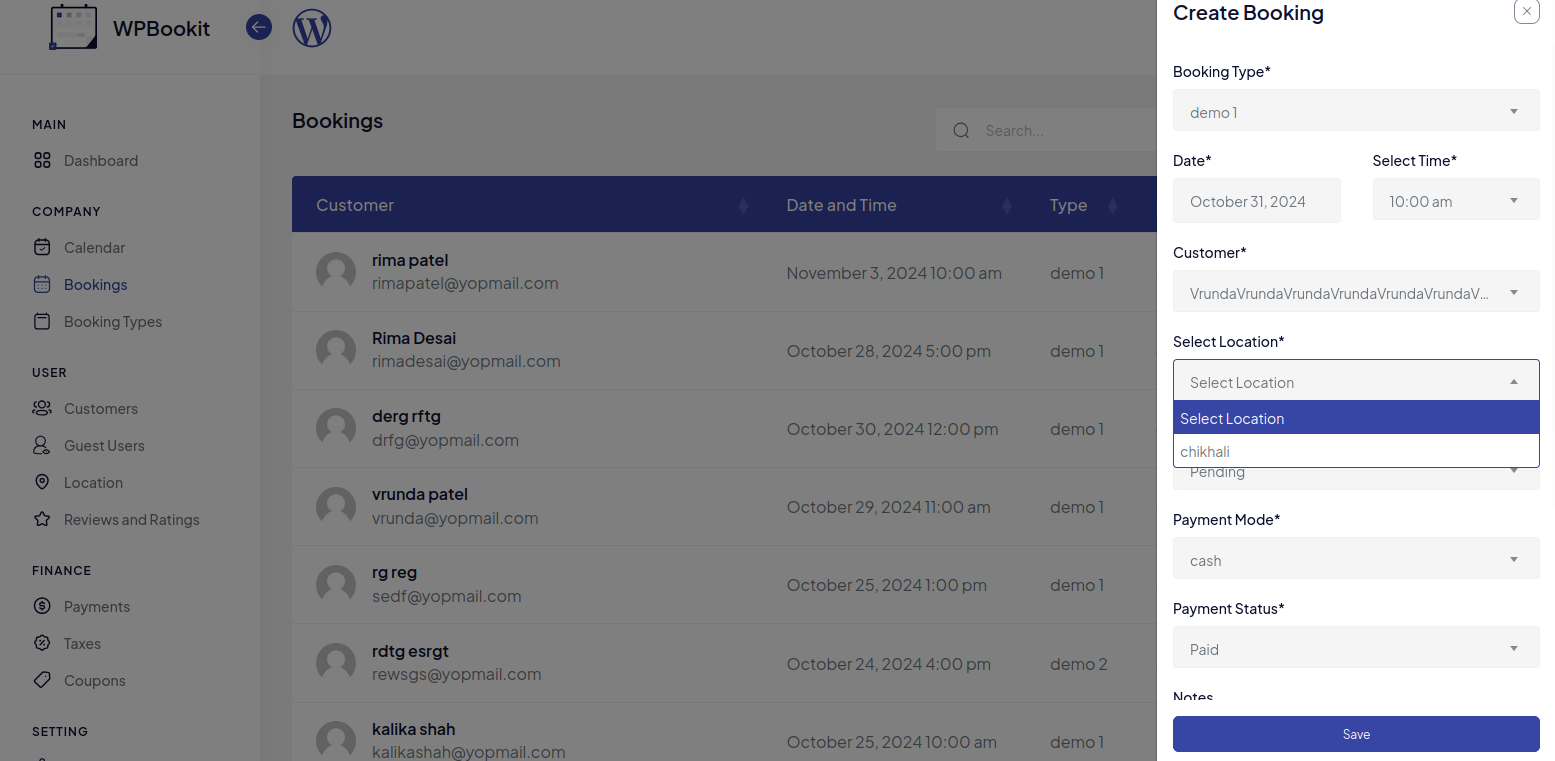
Overview
In the WPBookit Location Addon, when booking based on a selected booking type, the available locations will be displayed in a dropdown, allowing users to choose a location specific to that booking type.
Booking Shortcode location
Overview
In the WPBookit Location Addon, when a user selects a booking type, a dropdown will display the available locations specific to that type, allowing them to choose a location directly within the booking shortcode.
Booking Confirmation
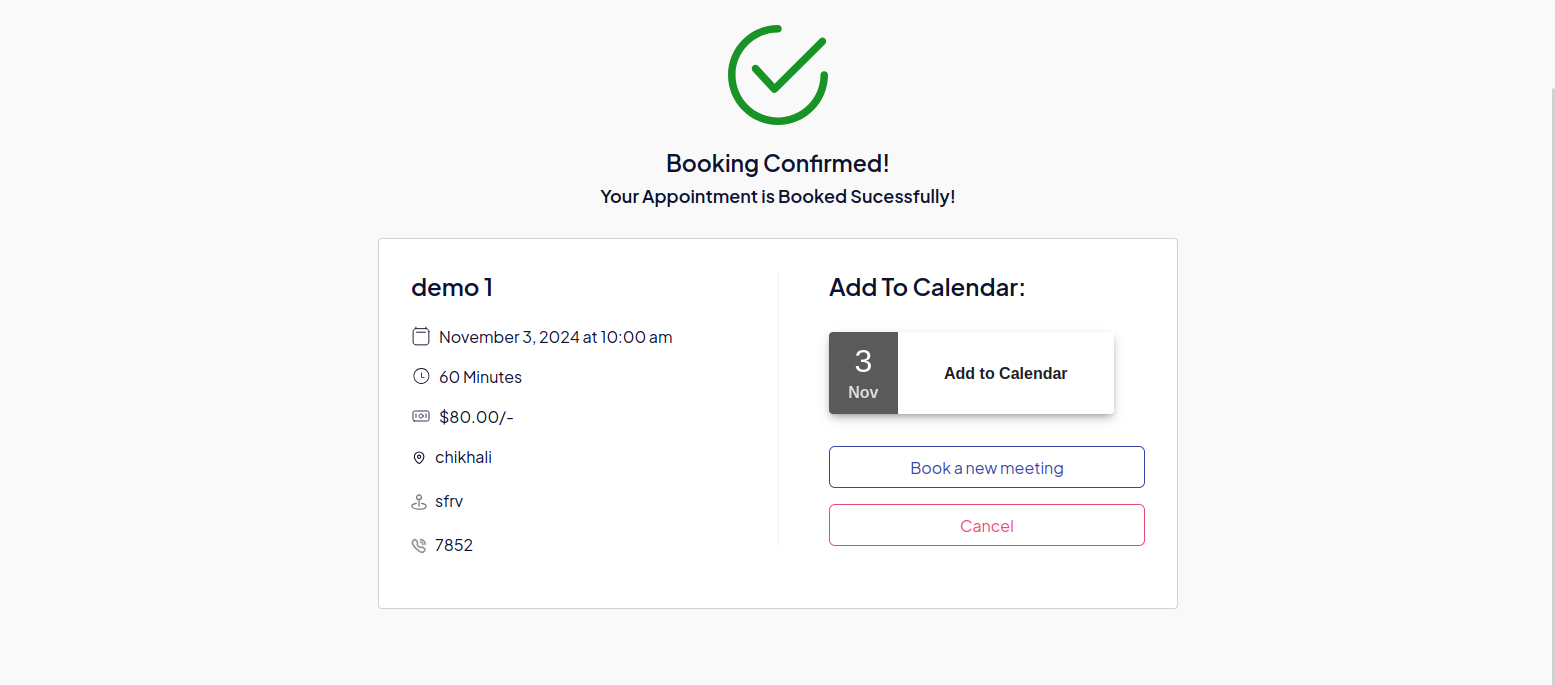
Overview
In the WPBookit Location Addon, once a booking is successfully completed, the booking confirmation page will display the location's name, address, and phone number.
WPBookit Location Addon Change Log
Version 1.0.0
07/11/2024- Initial Releases
WPBookit Group Booking Addon Change Log
Overview
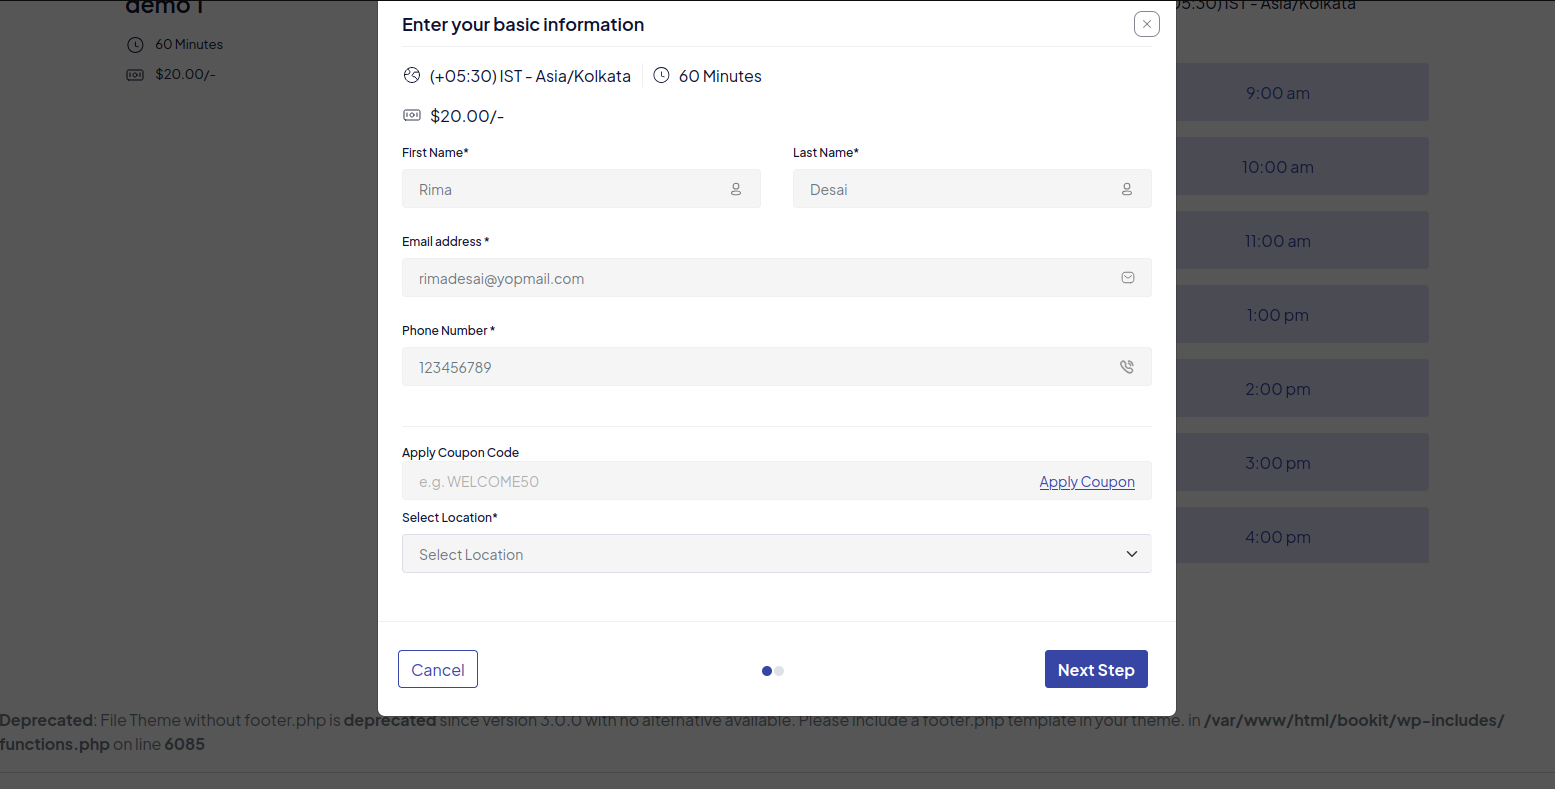
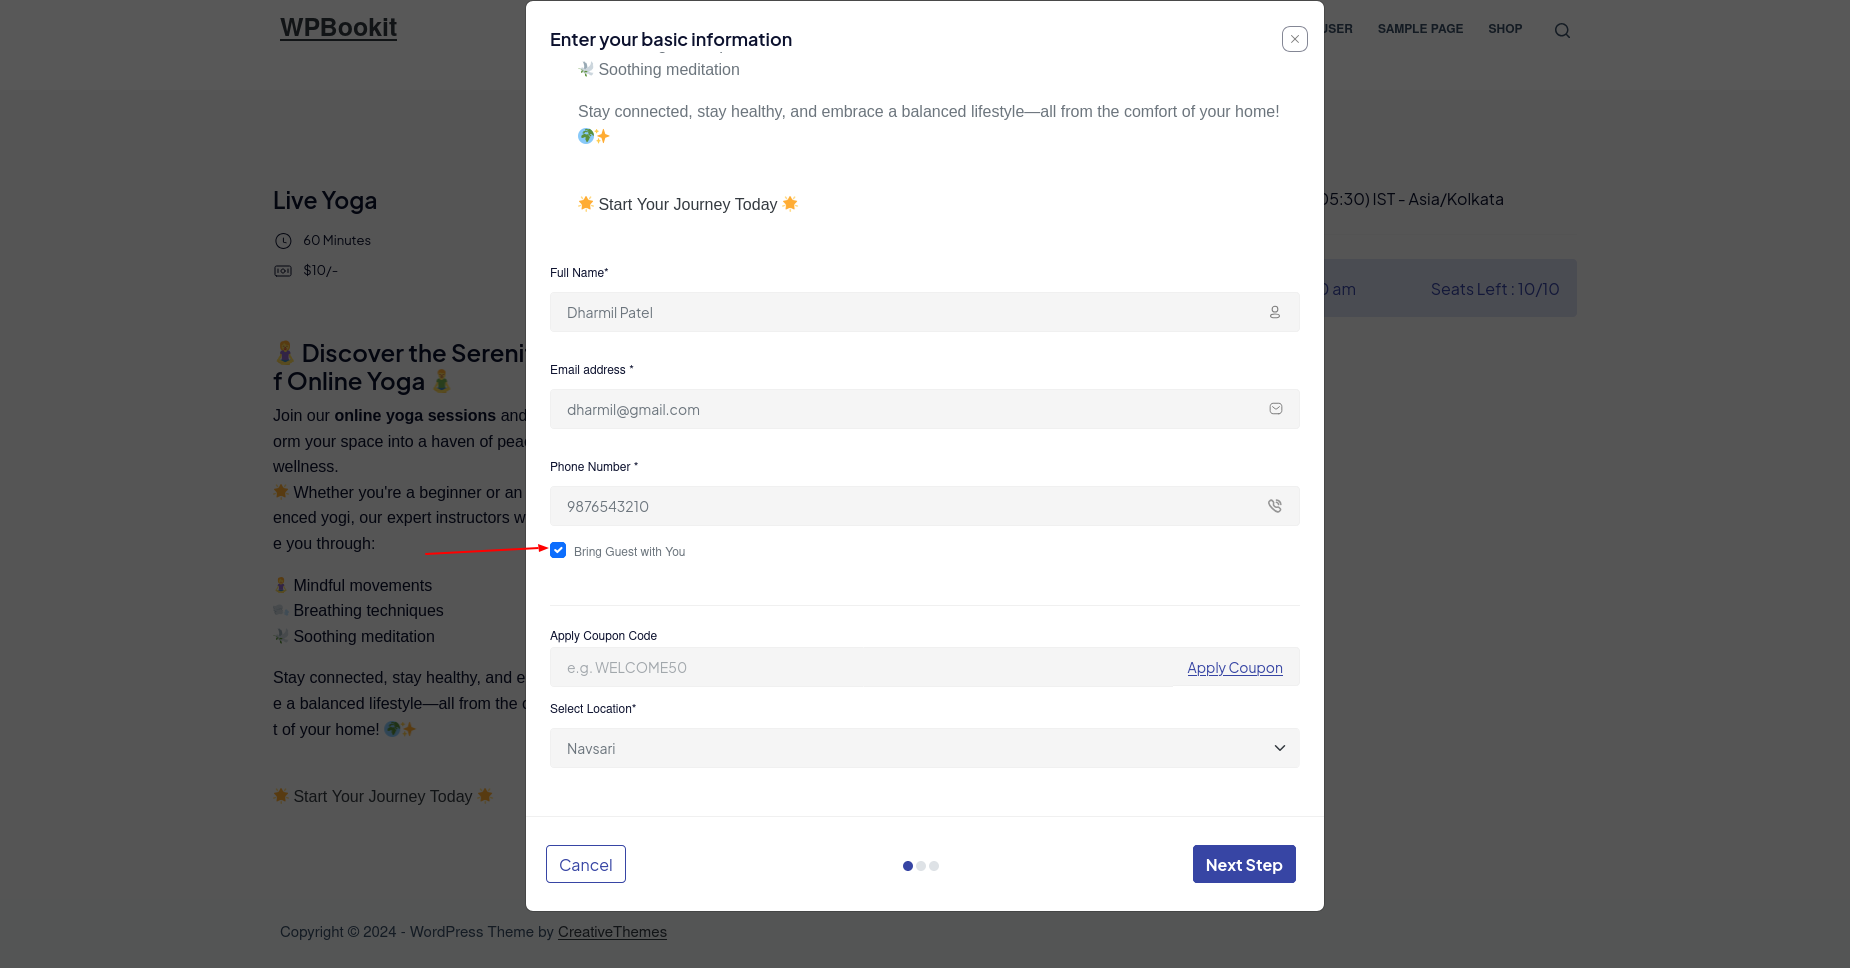
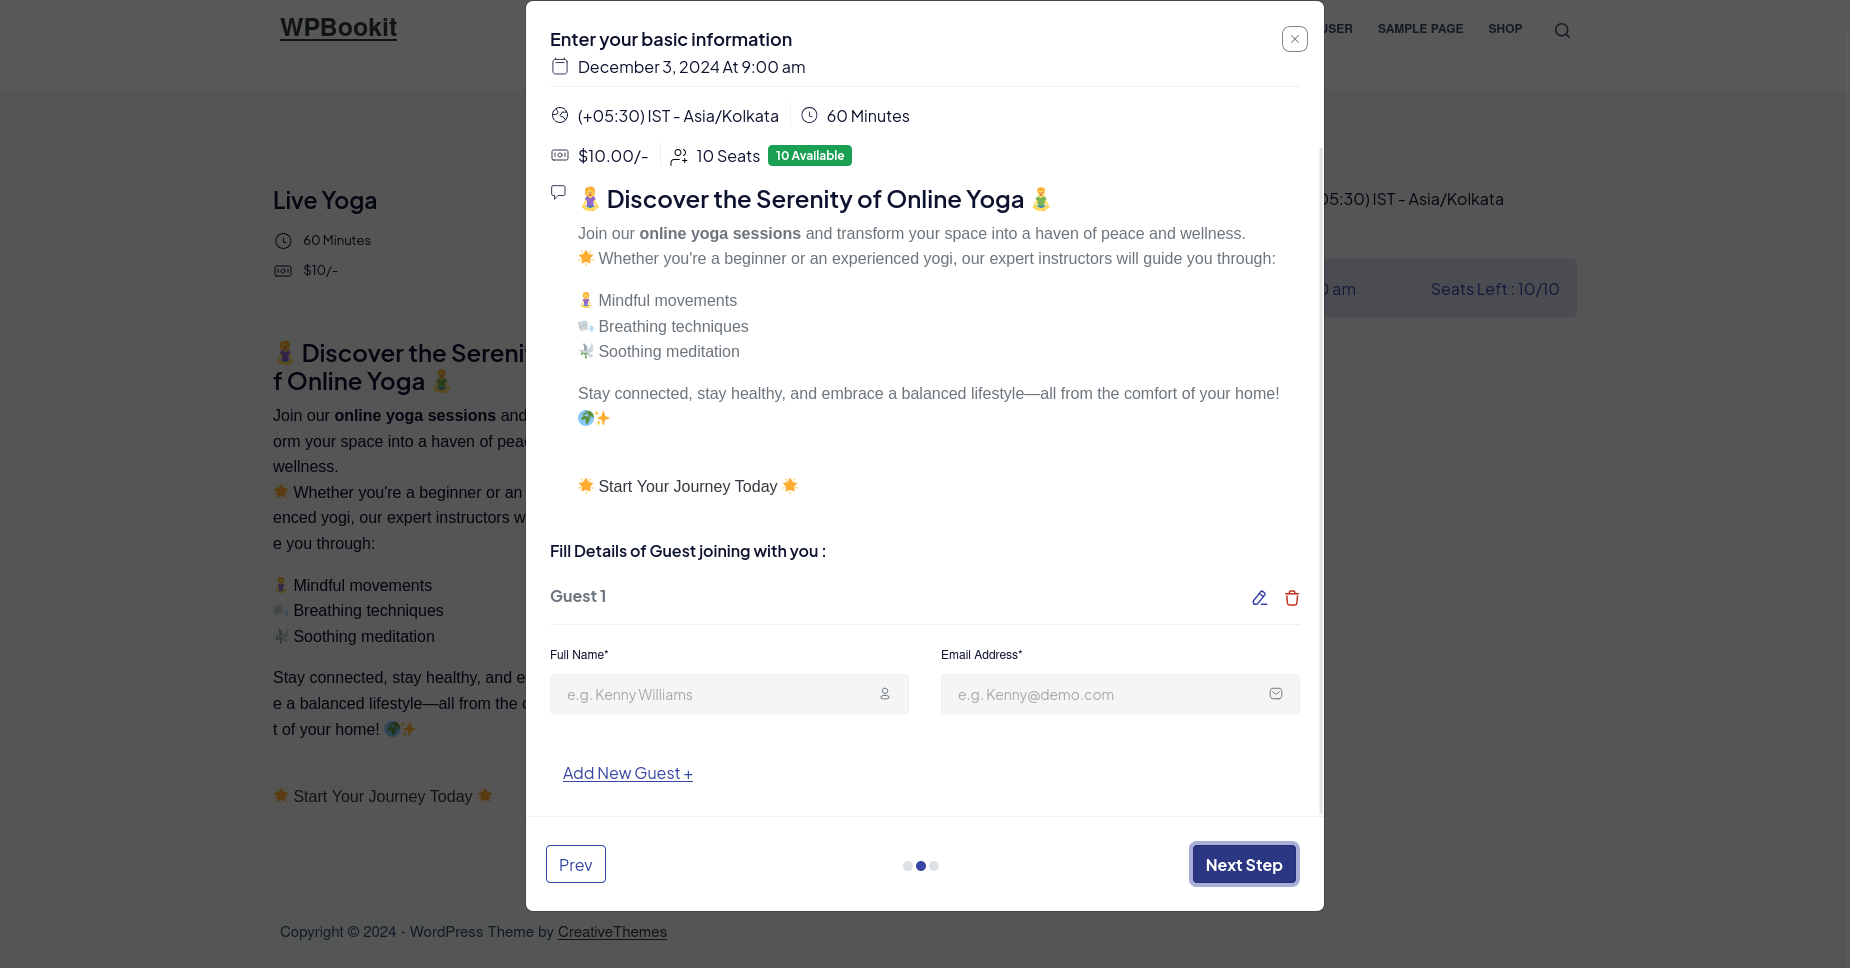
The Group Booking feature in WPBookit enables admins to configure booking types that allow multiple attendees to book the same time slot. This is ideal for activities such as group classes, workshops, or shared sessions.
Frontend: Booking Process for Group Bookings
Once Group Booking is enabled, users can book multiple seats in a single session.
- Add "Bring Guest with You" Checkbox in Step 1:
On the frontend, Users should see a checkbox labeled "Bring Guest with You" during the initial booking step.
If the user selects this option, the system will enable the next step to collect guest details.
-
Guest Details Collection in Step 2:
users will see details of Available seats (if Show Remaining Seats is enabled)
If the checkbox is checked, the user proceeds to the next step to enter details for one or more guests.
Admin Setup: Enabling Group Booking
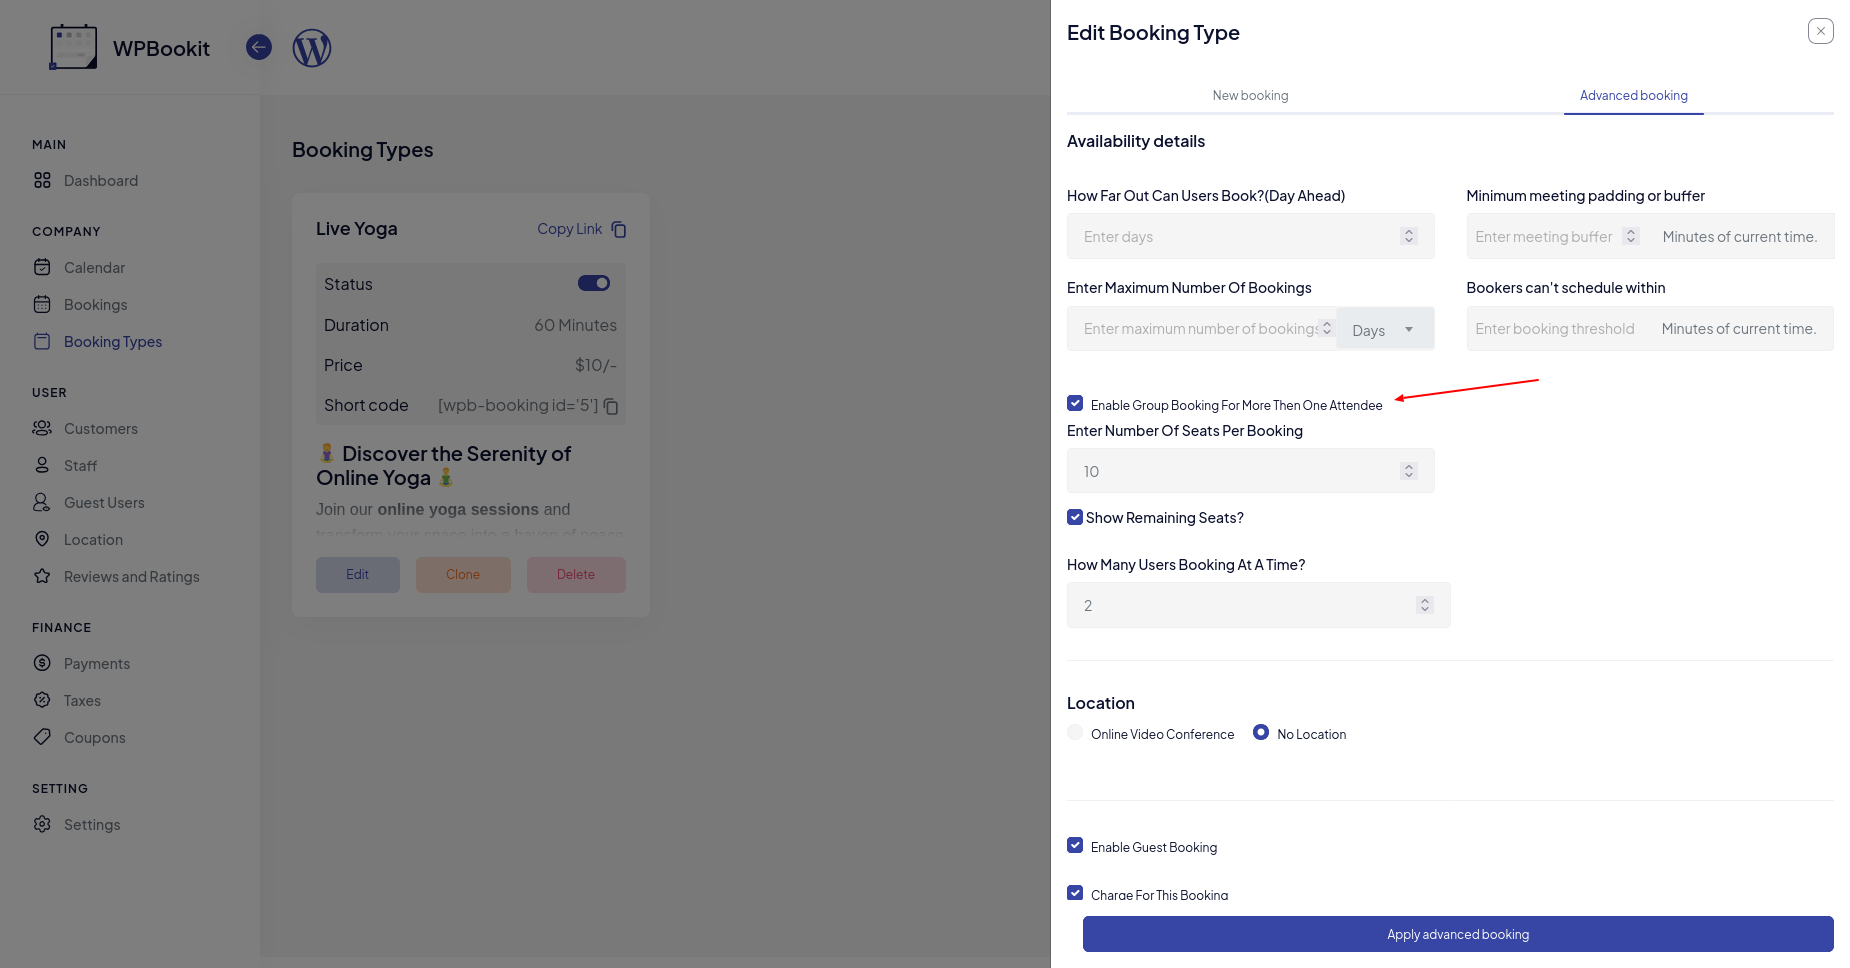
Key Features
- Enable Group Booking: Admins can activate group booking for a booking type from the "Advanced Booking" settings.
- Set Attendee Limits: Configure the maximum number of attendees allowed per booking slot.
- Front-End Booking: Users can see available seats and add guest details while booking.
- Real-Time Availability: Display remaining seats dynamically to users.
WPBookit Group Booking Addon
Version 1.0.0
10/12/2024- Initial Releases
WPBookit Change log
Version 1.6.6
28/12/2024- [Update] Plugin Code Base To Pro (Steps to migrate)
- [Fixed] Bug Fixing
Version 1.6.5
10/12/2024- [Added] support for group booking addon.
Version 1.6.4
04/12/2024- [Fixed] Booking Type Validation issue.
Version 1.6.3
27/11/2024- [Added] Support for both specific date and weekly data slots in booking types.
- [Fixed] Issue where the timeslot modal did not display for specific dates if the available date was not in the current month.
Version 1.6.2
23/11/2024- [Fixed] Specific Dates Timeslot issue.
Version 1.6.1
21/11/2024- [Added] Disable WooCommerce tax option.
- [Fixed] Missing staff menu issue.
- [Fixed] Coupon amount not being applied during payment processing.
Version 1.6.0
29/10/2024- [Update] structure Multi stack wise booking
- [Added] Unavailable dates and group booking implemented in the admin side.
- [Fixed]Price Calculation fix
- [Fixed]Bug Fixing
- [Fixed] Fixes booking type validaion
- [Fixed] Booking Type clone issue
Version 1.5.5
03/10/2024- [Improved] WPBookit admin UI/UX.
- [Added] support for webhook addon & coupon addon.
- [Fixed] Already Booked Timeslot
- [Fixed] invoice UI issue.
- [Fixed] dashboard summary pricing bug.
Version 1.5.4
30/09/2024- [Fixed] Bug
- Stable updates
Version 1.5.3
16/09/2024- [Fixed] Bug
- Stable updates
Version 1.5.2
29/08/2024- [Improve] Sidebar UI & display group-wise menu items.
- [Added] Success notification message after booking completion.
- [Added] Holiday Calendar with day names.
- [Added] Translation support for the calendar.
- [Added] Mobile number field for guest booking to support WhatsApp notifications.
- [Fixed] Infinite reload issue with the PayPal Payment Gateway.
- [Fixed] Issues with the tax table functionality.
- [Fixed] Auto refresh in calendar view.
- [Fixed] Issue with guest bookings.
- [Fixed] Pricing issue when editing bookings on the calendar page.
- [Fixed] Advanced booking filters.
- [Fixed] CSV export issue for guest users.
- [Fixed] Calendar page edit booking pricing issue fixed.
- [Fixed] Booking advanced filter issue fix.
- [Fixed] Guest user export CSV issue fix.
Version 1.5.1
23/08/2024- [Improve] Sidebar UI & display group wise menu item.
- [Added] Show Reviews on Booking page
- [Added] Day name added in holiday calendar
Version 1.5.0
21/08/2024- [Added] Holiday Calendar
- [Added] Auto refresh in calendar view
- [Fixed] Bug
Version 1.4.4
13/08/2024- [Fixed] Translation in Calendar
Version 1.4.3
06/08/2024- [Added] Success notification message after successful booking
- [Fixed] Infinite reload issue with PayPal Payment Gateway
- [Fixed] Issue with the tax table
- [Fixed] Calendar refresh issue
- [Fixed] Guest B4ooking issue
Version 1.4.2
29/07/2024- [Fixed] guest user issues.
- [Fixed] telemed setting disappearance issue.
- [Fixed] Bug
Version 1.4.1
25/07/2024- [Fixed] Guest User Issues
- [Fixed] Telemed Setting Disappearance Issue
Version 1.4.0
22/07/2024- [New] Tax module
- [Added] Import content from WPbooked to WPBookit
Version 1.3.1
08/07/2024- [New] Booking Type List
- [Fixes] Stable Updates
Version 1.3.0
04/07/2024- [New] RTL Supports
- [Fixes] Fixes & Stability Updates
Version 1.2.0
03/07/2024- [New] PayPal Payment Gateway
- [New] Guest users list
- [New] Bookings displayed in calendar view
- [New] Filter bookings by staff and booking type in calendar view
- [Added] Edit bookings from the calendar view
- [Added] Payments module added with invoice print
- [Added] WooCommerce Payment Gateway Label changes
- [Added] Manage status of WooCommerce Payment Gateway
Version 1.1.0
26/06/2024- [New] Zoom integration
Version 1.0.0
25/06/2024- Initial Releases