General Information
- Item Name : WPBooked Plugin
- Author : Iqonic Design
- Support Ticket: https://iqonic.desky.support/
Thank you for choosing our theme. We hope you enjoy building your project with us. It is a powerhouse of great features and powerful functionalities that would take months to develop. The theme is fully responsive and be rest assured your project looks absolutely stunning on any types of screens.
Installation & Setup Guide
Install the Booked Plugin:
- First things first, go to Plugins > Add New.
- Upload the booked.zip plugin file and activate the Booked plugin.
Create a Profile Page (Exclusive to Registered Bookings):
If you wish to empower your customers to manage their appointments and edit their profiles, it's essential to create a dedicated profile page. Please note that you can skip this step if you intend to utilize Booked in "Guest Booking" mode.
Follow these steps:
- Create a new page and assign it a title; "Profile" is a suitable default, but feel free to choose any title you prefer.
- Insert the [wpbooked-profile] shortcode into the page to allow users to log in and access their profiles.
- Consider redirecting users to this profile page after they make a booking by navigating to the Settings panel and selecting "Auto-Detect Profile Page" in the Appointment Booking Redirect section.
- IMPORTANT: Ensure registration is enabled by going to the WordPress Settings > General page. Check the box next to Membership that says "Anyone can register.
- Congratulations, you're all set!"
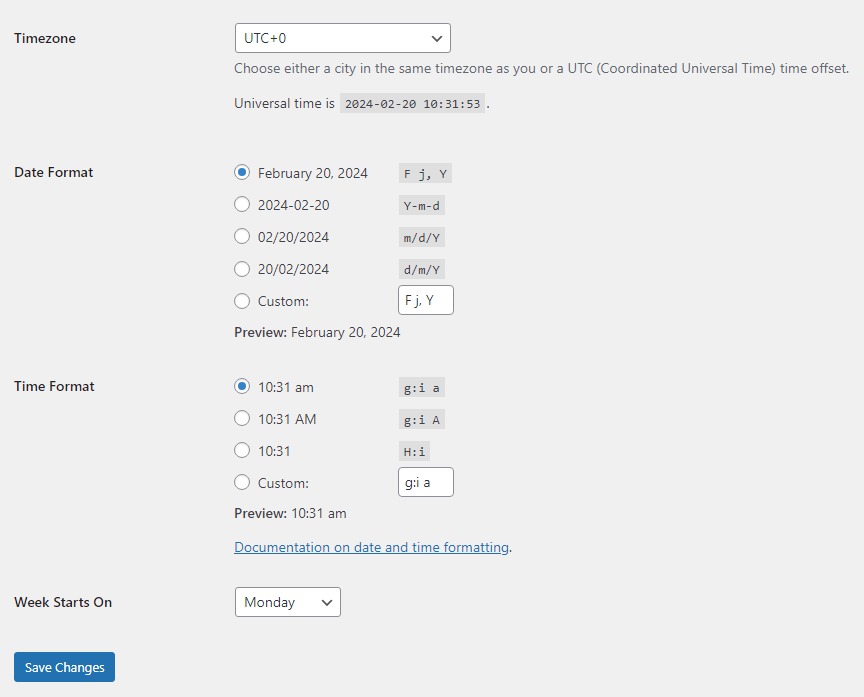
WordPress Date/Time Settings
One of the initial tasks you should address is setting up your Date/Time preferences within WordPress. These settings influence various aspects of Booked. Navigate to Settings > General to configure your Timezone, Date Format, Time Format, and the Week Starts On preferences. Booked relies on all of these settings..
The Booked Settings Panel
Navigate to the Appointments > Settings page to acquaint yourself with the settings panel for Booked.
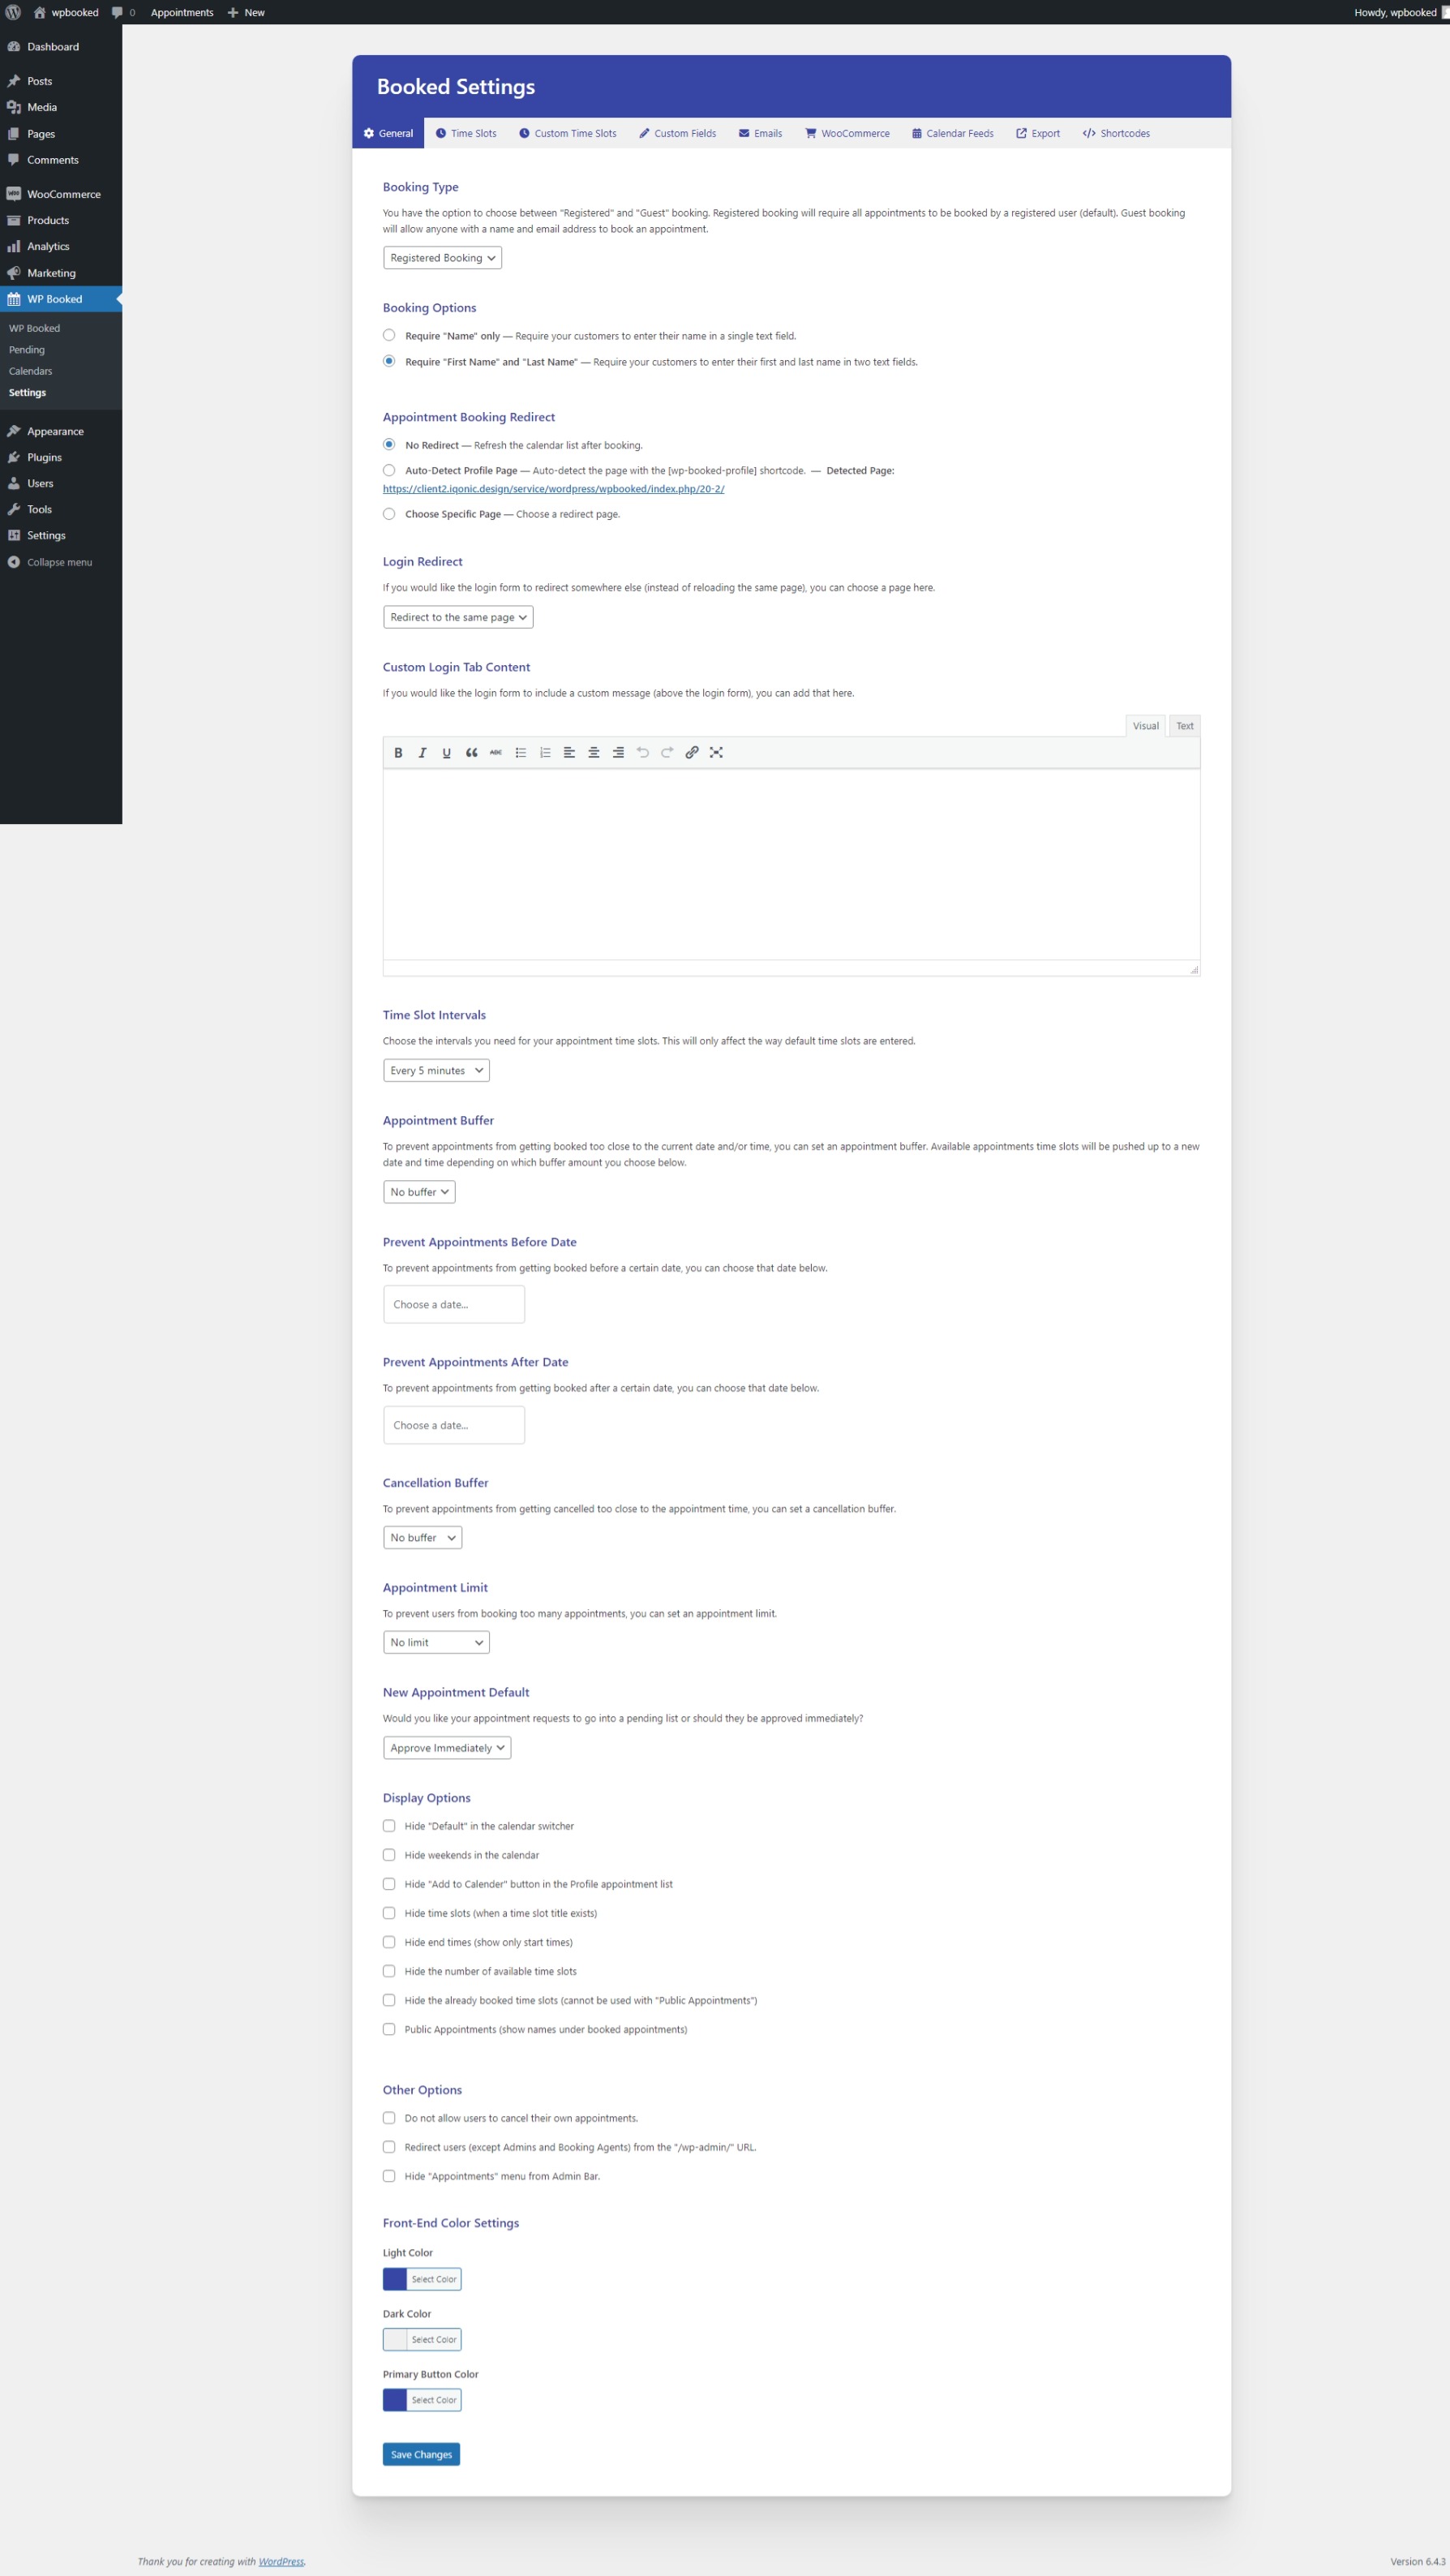
GENERAL SETTINGS
- Booking Type: Choose between "Registered" and "Guest" booking. Registered allows customers to book appointments under their user account, enabling the creation of a Profile page for appointment management. Guest booking requires only a Name and Email Address, with no user account created.
-
Appointment Booking Redirect: Three options available:
- No Redirect: Reloads the appointment list dynamically, leaving users on the current page
- Auto-Detect Profile Page: Redirects to the page with the [wpbooked-profile] shortcode, applicable only for Registered booking.
- Choose a Specific Page: Allows redirection to any specified page, useful for Thank You pages or other post-booking displays.
- Login Redirect: Specifies where to redirect users when using [wpbooked-login] on pages other than the Profile page.
- Custom Login Tab Content: Allows inclusion of text (HTML allowed) above the login form fields, visible only on the login tab.
- Time Slot Intervals: Sets the intervals when creating time slots, affecting administrative forms for adding new time slots.
- Appointment Buffer: Sets a buffer to prevent appointments too close to the current date/time.
- Prevent Appointments Before/After Date: Globally blocks out appointments before, after, or both dates.
- Cancellation Buffer: Sets a buffer to prevent cancellations too close to the current date/time.
- Appointment Limit: Limits the number of active appointments a user can book, excluding past appointments.
- New Appointment Default: Determines whether appointments must be approved or automatically approved upon request.
- Display Options: Allows control over front-end display items with checkboxes.
- Other Options: Additional checkboxes for customization.
- Front-End Color Settings: Color pickers for customizing the appearance of front-end calendars, profiles, and appointment lists.
EMAIL NOTIFICATIONS
You have the flexibility to disable individual emails by removing their content in the respective fields. If a field is left empty, no email will be sent. Each email comes with special tokens that can replace actual content. These tokens are conveniently listed above each email form.
Customer Emails:
- Appointment Reminders: Customize the content and set the reminder interval for emails sent to administrators or booking agents.
- Registration: Welcomes new users to your website.
- Appointment Confirmation: Sent to users upon booking to confirm the submission of the appointment.
- Appointment Approval: Notifies users when their appointment has been approved.
- Appointment Cancellation: Alerts users if their appointment is canceled by the website admin.
Administrative Emails::
- Appointment Reminders: Customize content and set intervals for reminders sent to administrators or booking agents.
- New Appointment Request: Notifies the admin user when a new appointment is created and pending approval.
- Appointment Cancellation: Informs the admin user when a customer cancels an appointment from their profile.
Email Settings:
- Logo Image: Upload your logo or email banner to personalize the appearance of notification emails.
- Default Notification Email: Specifies where emails will be sent if no specific settings are configured on the individual calendar.
TIME SLOTS
Please see the time slots documentation for this part.
CUSTOM TIME SLOTS
Please see the custom time slots documentation for this part.
CUSTOM FIELDS
Please see the custom fields documentation for this part.
EXPORT
You can export your appointment data using this tab. Simply select from the available export options and then click the Export Appointments button to export them all as a CSV file.
Custom Calendars
Booked provides a versatile platform for creating customized calendars tailored to the distinct services offered by your business. Within this system, individual calendars can be configured with unique default time slots, personalized time slots, and specific custom fields. This functionality proves invaluable for businesses operating various services on different days or at different times.
If your business revolves around a single service and doesn't necessitate diverse calendars, you can seamlessly utilize the "Default" calendar. However, for enterprises requiring multiple calendars, navigate to the "Appointments > Calendars" section to add and manage your calendars.
Once your calendars are established, return to the Settings page to define time slots and custom fields for each calendar. It's crucial to note two key considerations:
- If you omit calendar-specific time slots or custom fields, the calendar defaults to using the "Default" settings. To avoid this, either eliminate the default settings or establish specific ones for the calendar.
- Calendars can be assigned to either an Administrator or Booking Agent user. Assigning a calendar to a user ensures that notifications and calendar access are exclusive to that individual. While Administrators can view all calendars, Booking Agents can only access calendars assigned to them.
To illustrate the first point, consider having two services sharing identical time slots but differing custom fields. You can create time slots under the "Default" calendar and leave the calendars blank. Add distinct custom fields to each calendar, ensuring they share the same time slot settings.
When showcasing your calendars, employ the [wpbooked-calendar] shortcode, incorporating the calendar's ID as the "calendar" field. For instance, if your calendar ID is 123, the shortcode would appear as follows:
[wpbooked-calendar calendar="123"]
Default Time Slots
Establishing your default time slots is central to the functionality of the Booked plugin. Each day is allocated predefined time slots. For instance, if your business operates Monday to Friday, from 8:00 am to 4:00 pm, with 2 available employees every hour, you would generate 2 time slots per hour, spanning 8 am to 4 pm, Monday to Friday.
For a more efficient time slot entry process, utilize the Bulk Time Slot Entry option:
- Click "Add..." at the top of the day where you intend to insert time slots.
- Navigate to the "Bulk" tab.
- Optionally, provide a "Title" for these time slots.
- Set the "Start time" to "8:00 am" and the "End time" to "4:00 pm."
- Maintain the "Every 1 hour" selection in the next dropdown to establish hourly time slots.
- Opt for "2 time slots" as the final option, then click "Add."
This will swiftly add your available time slots for that day, enabling your customers to commence booking appointments.
Alternatively, for a more customized approach, employ the Single Time Slot Entry method:
- Click "Add..." at the top of the day where you wish to include time slots.
- Optionally, assign a "Title" for these time slots.
- Choose a specific "Start time" and "End time," then indicate the number of time slots you want to add.
- Click "Add," and the time slot entry will be incorporated as the default for that day.
Custom Time Slots
Adding Custom Time Slots
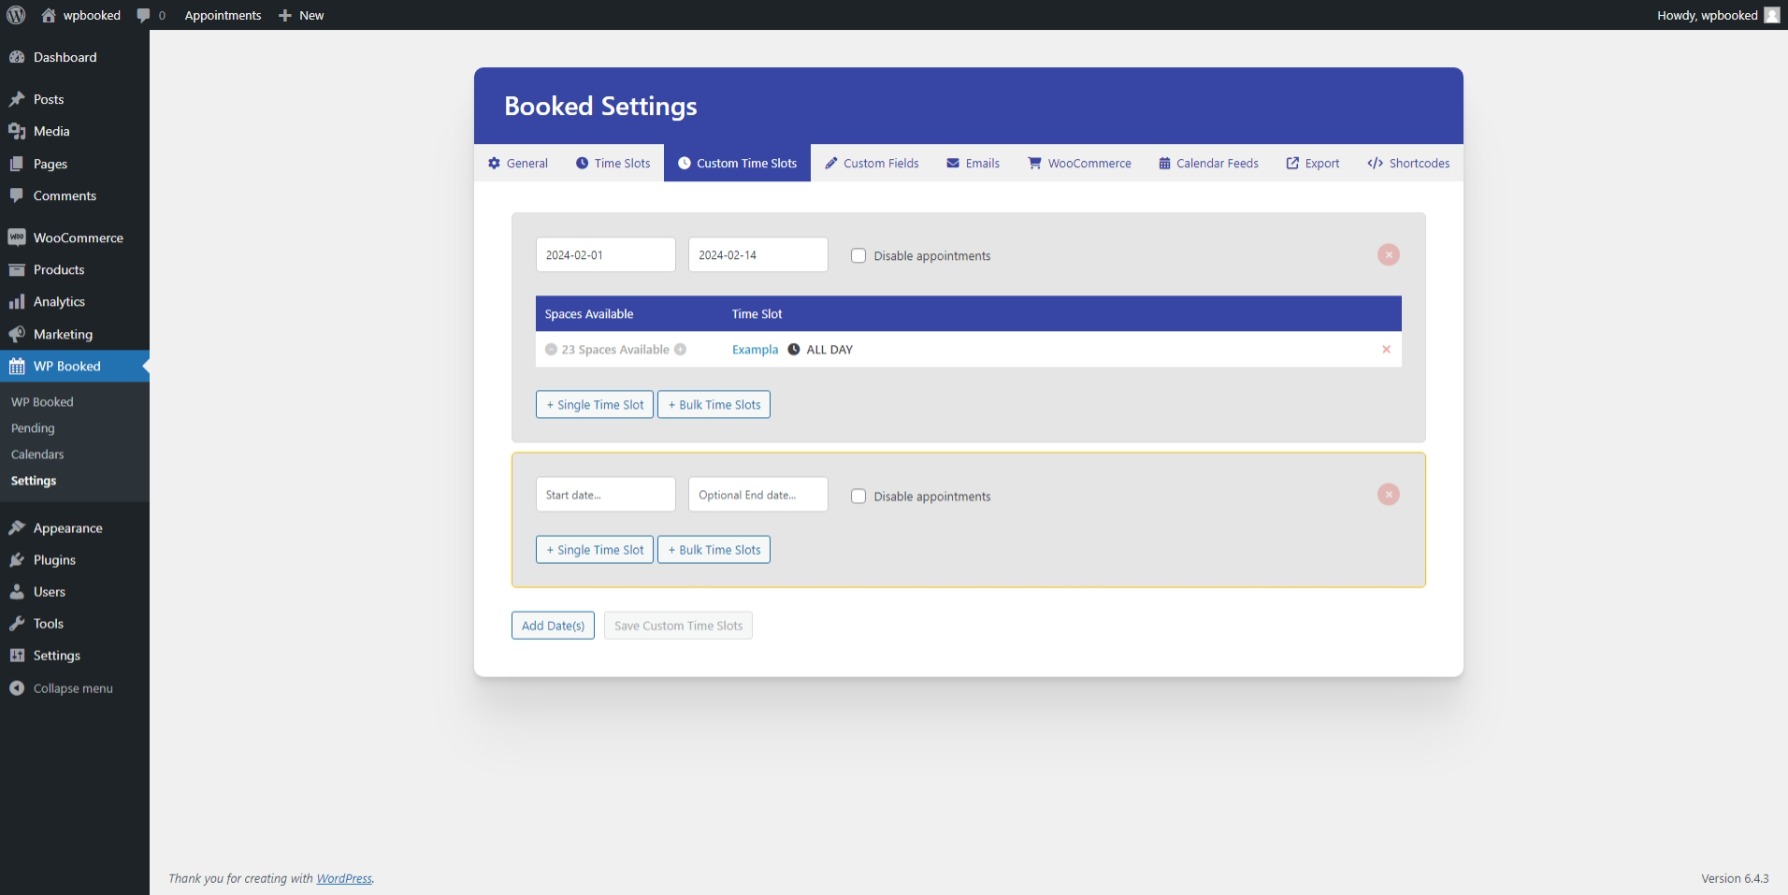
- Navigate to the Booked Settings panel and access the Custom Time Slots tab.
- Click the "Add Date(s)" button.
- Select the applicable calendar, if needed.
- Specify the Start Date.
- If it's a one-day setting, leave the End Date blank. For date ranges, choose the End Date.
For adding time slots:
- For a single time slot, click the "+ Single Time Slot" button. Choose the number of available appointments, and set the start and end times. Optionally, select the "All day" Option for an entire day time slot.
- For bulk time slots, click the "+ Bulk Time Slots" button. Indicate the number of available appointments, set the start and end time for the entire day, and specify the time interval between each slot (e.g., for a 10-minute break). Lastly, choose the interval for entering the time slots.
Adding Vacation/Closed Dates
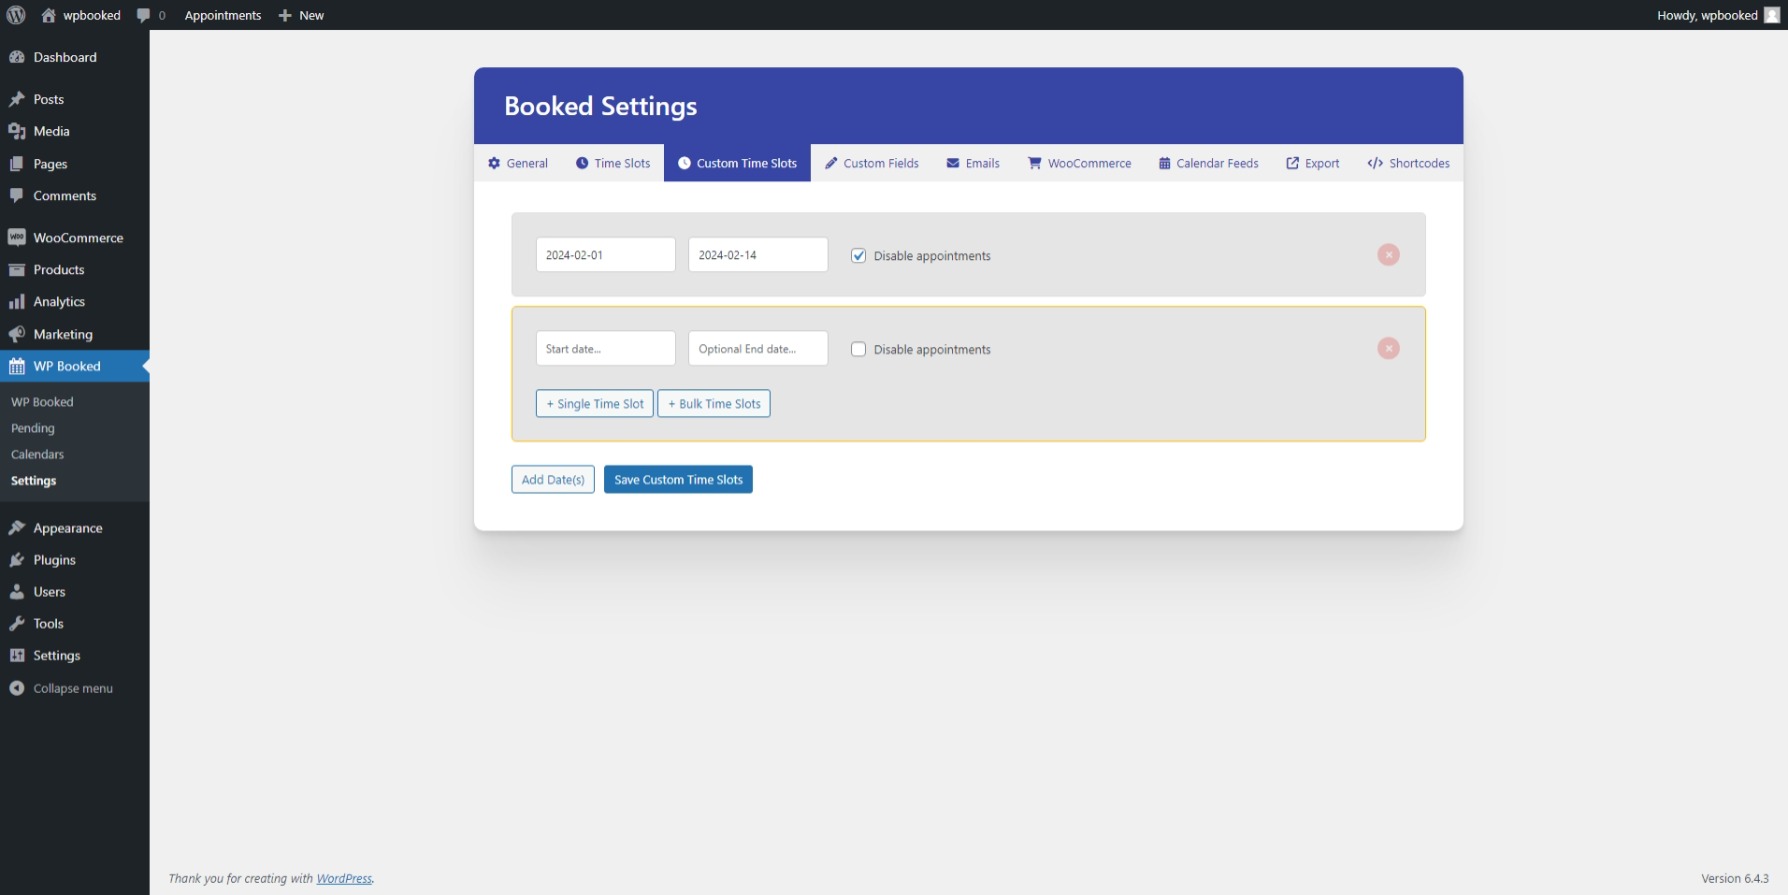
- Go to the Booked Settings panel and then go to the Custom Time Slots tab.
- Click the "Add Date(s)" button.
- Choose the calendar you want to use (if applicable).
- Choose the Start Date.
- If this is a one day setting, you can leave the End Date blank. If this is a date range, choose the End Date.
- Check the "Disable appointments" checkbox to make this a vacation/closed date.
- That's it
Custom Fields
Booked allows you to create any number of Custom Fields to collect additional information when your customers are booking appointments.
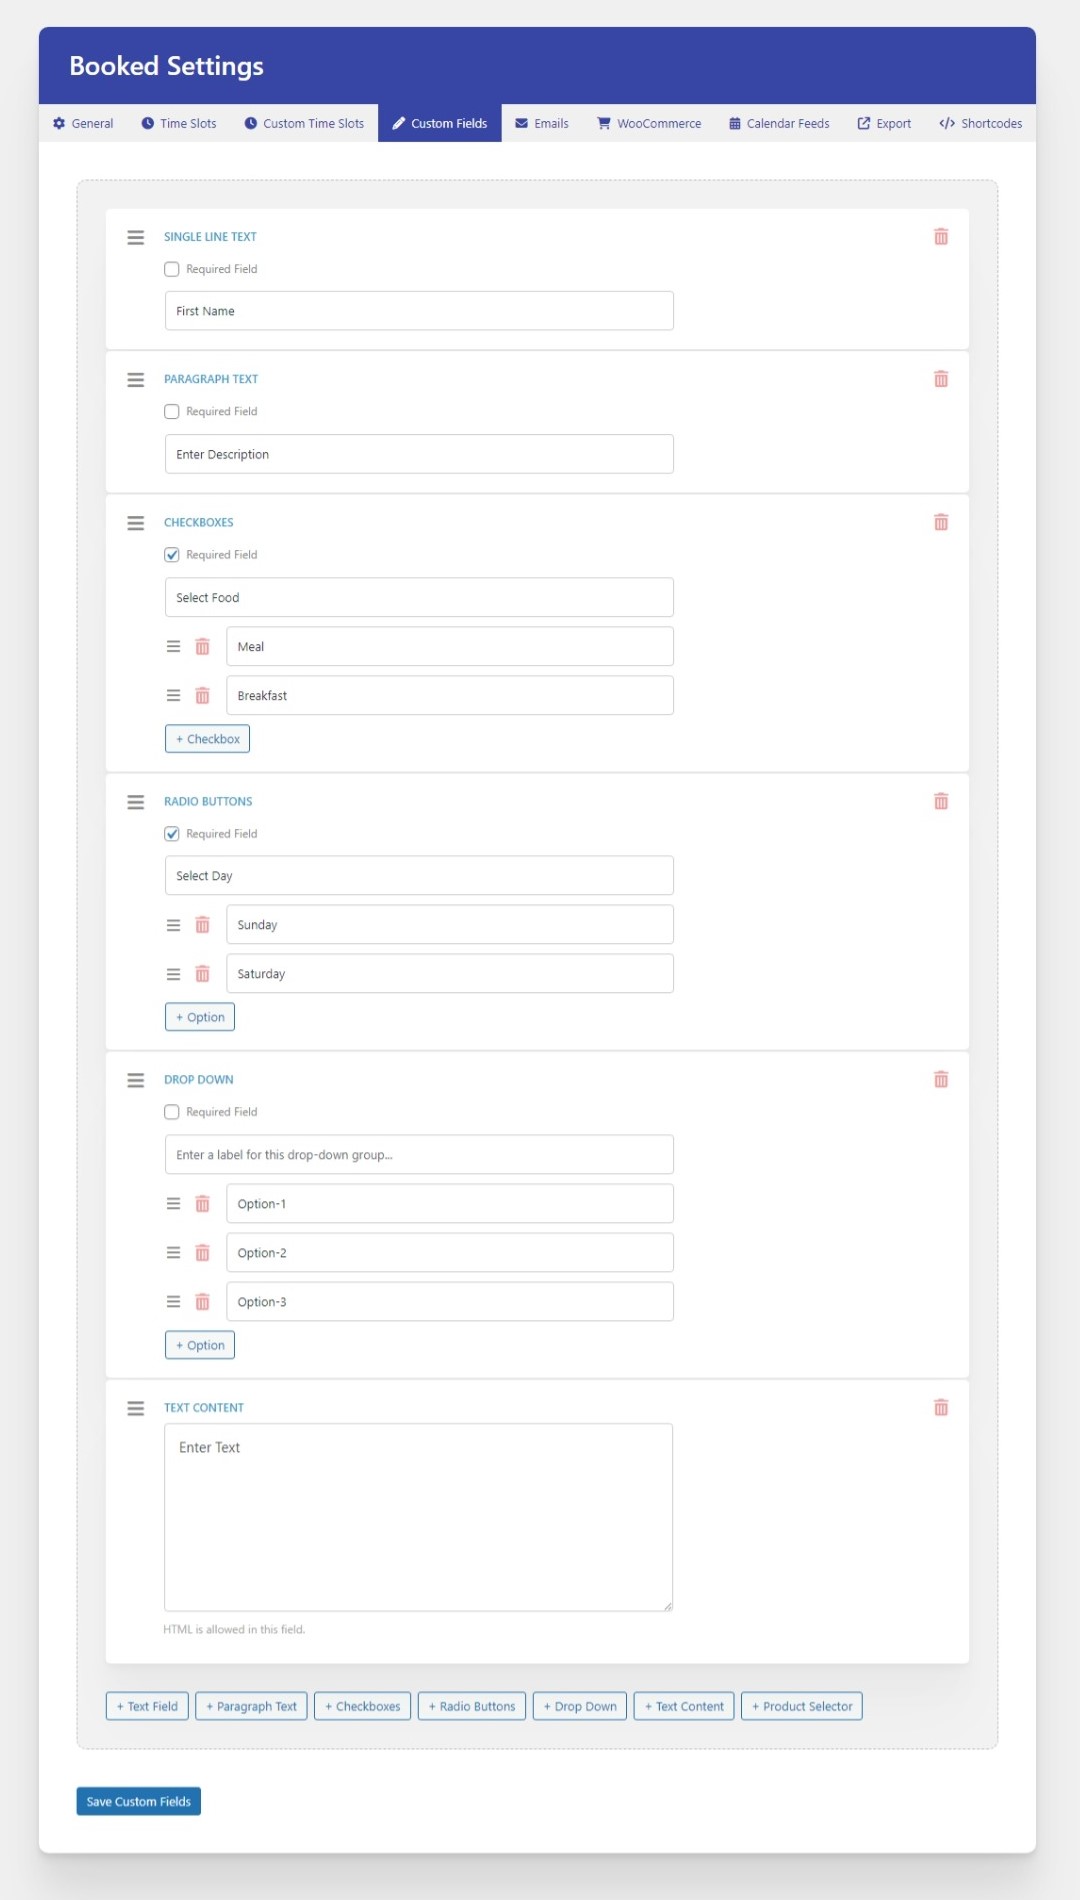
Head over to the Appointments > Settings panel and then click on the Custom Fields tab. You can add custom fields to your custom calendars or just to the "Default" calendar. Each item can also be set as required if needed.
- Single Line Text : A simple text field for collecting text.
- Paragraph Text : A paragraph text field for collecting large chunks of text.
- Checkboxes/Radio Buttons : Add checkboxes and/or radio buttons as single or multiple options.
- Dropdown : Add a select dropdown to choose a single option.
- Text Content : Add custom text/html to your booking form.
Shortcodes
There are a number of shortcodes included to display specific content anywhere on your website. Let's start with the booking calendar/list.
Booked Calendar:
The [wpbooked-calendar] shortcode displays the booking calendar (or single day) for your users to book appointments.
[wpbooked-calendar]
Style:
This attribute let's you choose between the default calendar view or a single day "list" view.
[wpbooked-calendar style="list"]
Switcher:
This attribute let's you display the "switcher" to swith between calendars on the front-end
[wpbooked-calendar switcher="true"]
Year, Month, and/or Day:
Use these attributes to display a specific "year" and/or "month". You can also add a "day" attribute when using the "list" style (see above).
[wpbooked-calendar year="2016" month="3" day="15"]
Calendar:
Use the "calendar" attribute to display a specific calendar (if you have any created). Otherwise, Booked will simply display the default calendar. You must use the Calendar's ID (you can find calendar-specific shortcodes on the Settings screen).
[wpbooked-calendar calendar="2"]
Size:
This attribute let's you change the size from the default full size to the "small" size if needed. This is good for calendars that are displayed in narrow areas.
[wpbooked-calendar size="small"]
Members Only:
This attribute will hide the appointment calendar from non-logged-in users. This is great to use in conjunction with the Profile shortcode (below) to display a login form on a page, and then when the user logs in it will show them the profile page as well as a booking calendar.
[wpbooked-calendar members-only="true"]
Booked Profile:
[wpbooked-profile]
Use this shortcode on the page you're using for the profile view. This only works with "Registered Booking".
Booked Login Form:
[wpbooked-login]
By default, this login form will show up in the profile shortcode for non-logged-in users. However, if you want to display the login form somewhere else, you can use this shortcode to display it.
Booked Appointments:
[wpbooked-appointments]
If the need arises, you can use this shortcode to display the currently logged in user's upcoming appointments in a simple list view. This will only show upcoming appointments and nothing else. Good for sidebar widgets, etc.
Admin Appointment Creation/Cancellation
Creating Appointments
While your customers can independently schedule appointments from the front-end, you have the flexibility to effortlessly add appointments from the administrative side using the appointment calendar on the backend.
Here's a step-by-step guide:
- Go to the Appointments > Settings page.
- On this page, you'll encounter a spacious calendar. Locate and click on the specific day you wish to book the appointment.
- Identify the desired time slot and click the "New Appointment..." button.
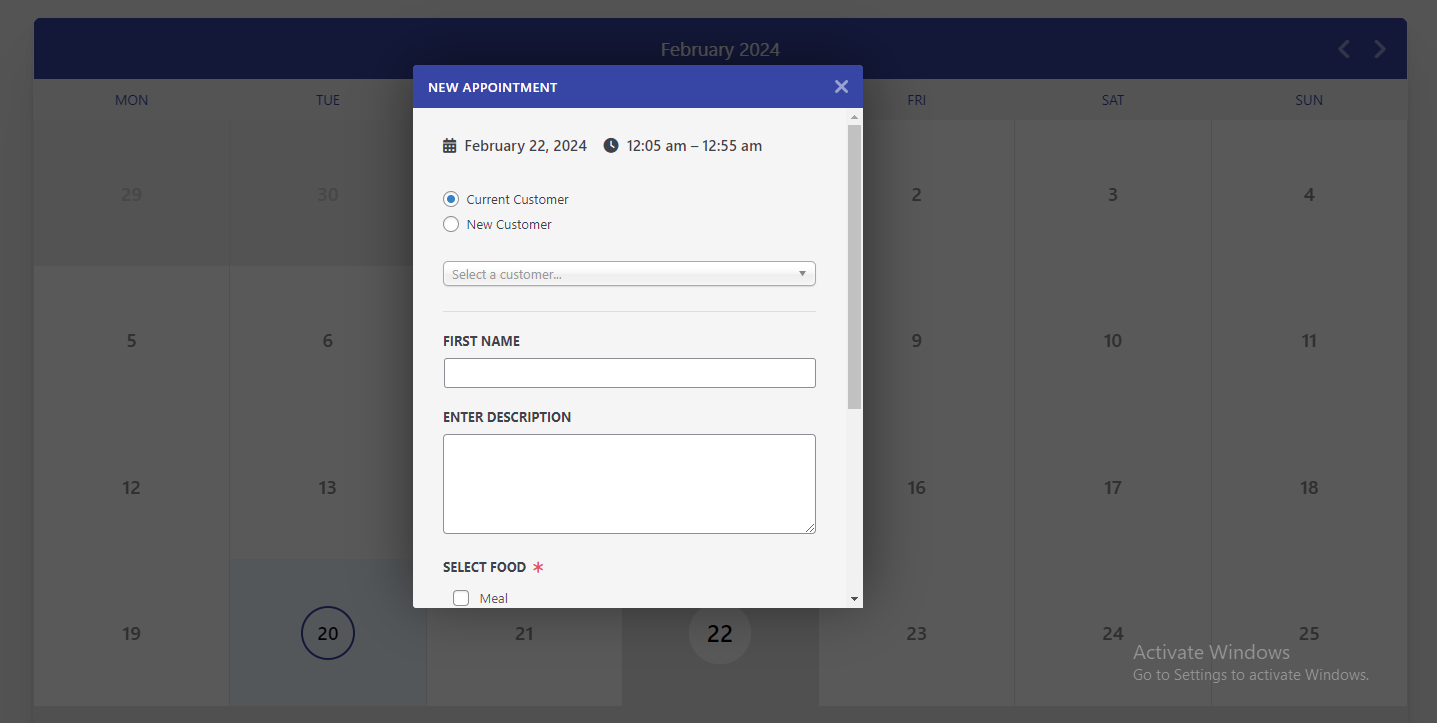
For an existing customer:
- If the appointment is for a current customer, simply search and select their name from the user dropdown.
For a new customer:
- If the appointment is for a new customer, expedite the process by swiftly adding them as a new user through the registration fields. The first name and email are the only mandatory fields.
Once the appointment is booked, the user will receive a welcoming email containing their site login credentials, along with an appointment confirmation email. It's worth noting that these emails can be tailored or deactivated entirely through the customization options available in the Booked Settings panel.
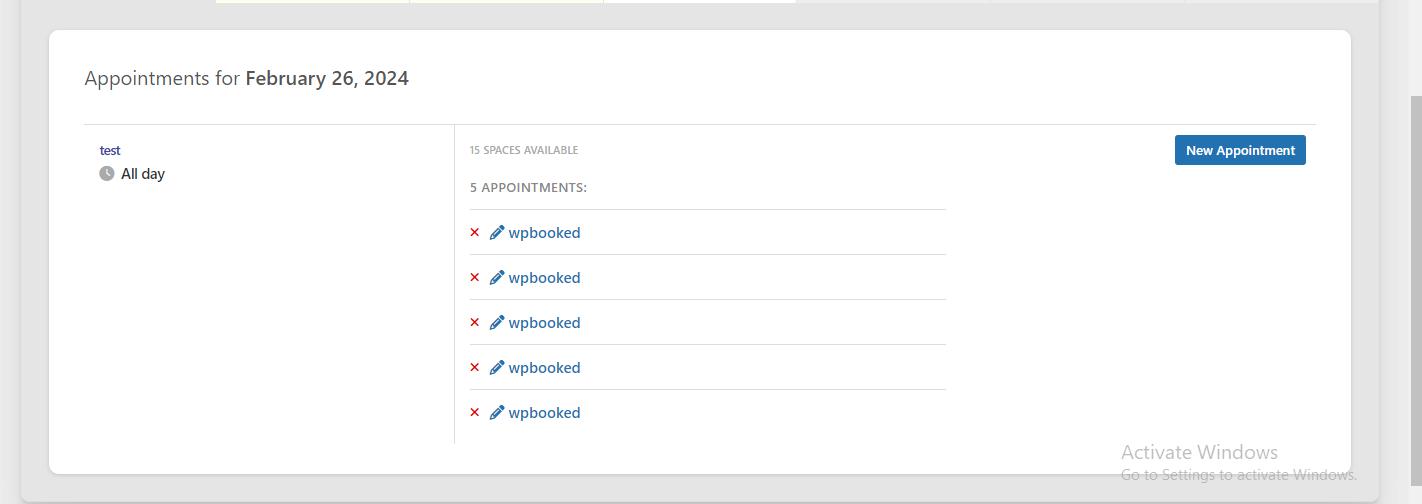
Canceling Appointments
To cancel an appointment, locate the specific booking on the calendar and click the "X" next to the individual's name within the designated time slot that you wish to vacate.
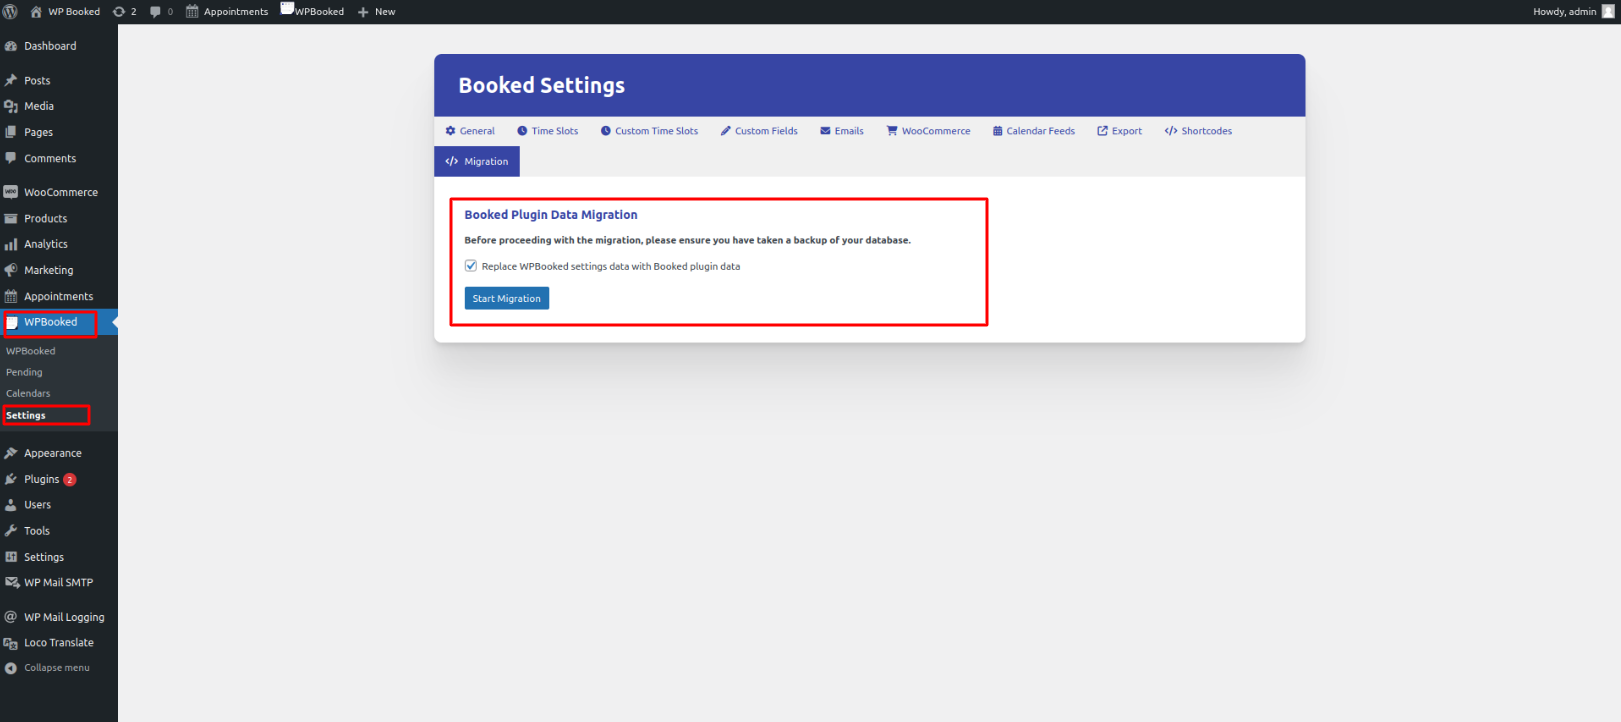
Migration
Introducing WPBooked: A Smooth Migration from Booked.
You can now transfer all your data from Booked to WPBooked.
-
Click on the migration button.
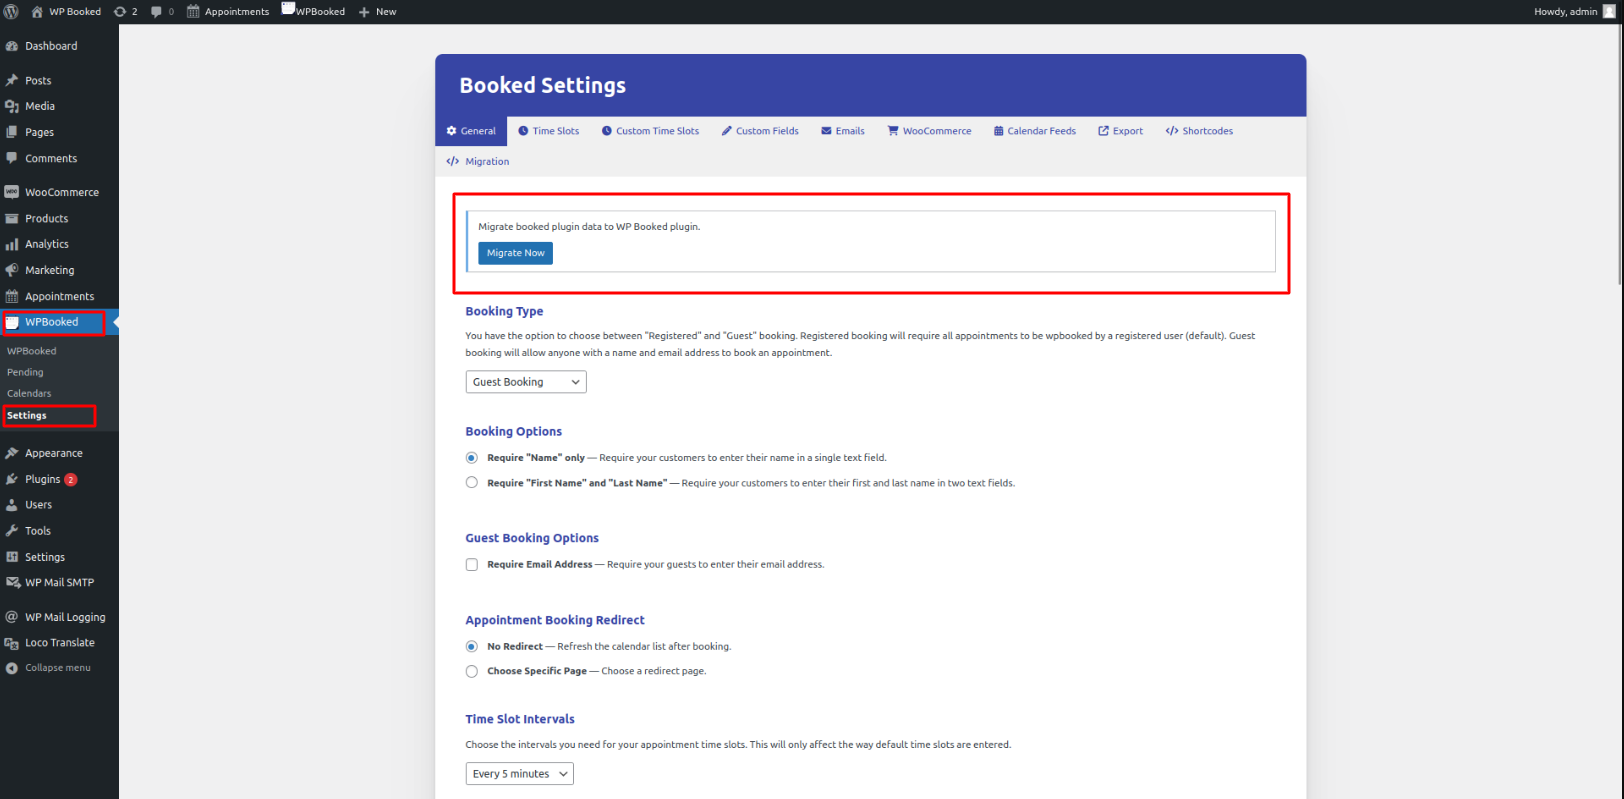
-
Choose WPBooked data from the Booked plugin.
-
Initiate the migration process.

-
Once completed, update the shortcode on your page accordingly.
[booked-calendar calendar=17] => [wpbooked-calendar calendar=17]
Change Log
Version 1.1.0
06/03/2024- [Added] Migration Functionality From Booked.
- [Fixed] Security Update: Patch for sensitive data exposure vulnerability. All calendar feeds have expired. Use new calendar feeds under Settings / Calendar Feeds.
- [Fixed] Security Update: Patch for vulnerable plugin update connection.
Version 1.0.2
28/02/2024- [Fixed] Mail Sending Issue
- [Fixed] Custom Time Slot Not Showing In Custom Calendar
Version 1.0.1
26/02/2024- [Fixed] WooCommerce Payment Gateway: Resolved issue where products were not added to the cart
- [Fixed] Shortcode Escaping: Addressed the shortcode escaping issue
Version 1.1.0
25/02/2024- Initial Releases
Actions & Filters (developers)
Booked Front-End Filters:
- booked_fe_single_date: A filter designed for the presentation of a single date block on the front-end calendar. Located in: /includes/functions.php
- booked_fe_calendar_date_appointment: A filter tailored for the display of a single date's appointment list on the front-end calendar (activated when clicking on a date). Located in: /includes/functions.php
- booked_fe_date_content_query: A filter governing the query arguments for a single date's appointment list on the front-end calendar (triggered when clicking on a date). Located in: /includes/functions.php
Booked Front-End Actions:
- booked_fe_calendar_before: An action that allows you to integrate content before the front-end booking calendar. Located in: /includes/functions.php
- booked_fe_calendar_after: An action that enables you to inject content after the front-end booking calendar. Located in: /includes/functions.php
- booked_fe_calendar_date_before: An action enabling the inclusion of content before the appointment list for a single date on the front-end booking calendar. Located in: /includes/functions.php
- booked_fe_calendar_date_after: An action facilitating the addition of content after the appointment list for a single date on the front-end booking calendar. Located in: /includes/functions.php
Booked Admin Filters:
- booked_single_timeslot_form This filter displays the Single Time Slot form when incorporating Default Time Slots. Utilize this filter to append new fields to the beginning or end of this form. Located in: /includes/admin-functions.php
- booked_bulk_timeslot_form This filter showcases the Bulk Time Slot form when adding Default Time Slots. Apply this filter to append new fields to the beginning or end of this form. Located in: /includes/admin-functions.php
- booked_time_select_field: A filter responsible for displaying the time select dropdown field when adding new time slots. Located in: /includes/admin-functions.php
Booked Admin Actions:
- booked_single_timeslot_before($time): Hook into this action to display content before each single time slot block. It provides a $time array, including the start time and end time. Located in: /includes/admin-functions.php
- booked_single_timeslot_after($time): Hook into this action to display content after each single time slot block. The $time array includes the start time and end time. Located in: /includes/admin-functions.php
Product Customizations
Customizations are not covered under support. This includes code changes, design changes, customization guidance, etc. We also do not provide a customization service at this time. However, we've partnered with the awesome folks over at WP Kraken, who can help get you what you need for sure. Check em' out!

Translation & Text Changes
Our products come with a language file that needs to be translated in order for it to display a different language. The easiest way to translate it is to install a great plugin like Loco Translate and do it via the WordPress admin panel: http://wordpress.org/plugins/loco-translate/
Follow these steps:
- Locate the desired theme or plugin in the list and click it. Then, click the [+ New Language] link positioned above the list.
- If you encounter a "Template Missing" message, simply click "Skip Template."
- Choose the language for this translation from the dropdown.
- IMPORTANT: In the next section, ensure you select the third radio button (System), either for languages/plugins or languages/themes, before initiating the translation by clicking "Start Translating." Failure to do so may result in the loss of your translation file during theme or plugin updates.
- On the subsequent page, proceed to add or edit translations by clicking on each string and providing the translation in the bottom box
- Once finished, click "Save."
Ensure that WordPress is configured to use the translated language by checking Settings > General and confirming the language dropdown at the bottom.
Alternatively, you can employ the POEdit method:
- Utilize software like POEdit (downloadable at http://www.poedit.net/download.php to translate the *.po file included with the theme or plugin.
- Remember to place your translated files into the appropriate folder as indicated above and update your translations when there's a theme or plugin update.
For additional information on translation, refer to
http://codex.wordpress.org/Installing_WordPress_in_Your_Language.
Making Simple Text Changes
There are occasions when you need to modify specific text elements within your WordPress site, and this can be achieved through straightforward adjustments. You have a couple of options: you can create a secondary "English" translation file following the provided guidelines, or alternatively, you can integrate custom code into your theme's functions.php file or establish a single-file plugin for streamlined management.
For instance, the code below showcases a modification that alters the text "Search..." in a search bar to read "Find..." instead:
add_filter( 'gettext', 'my_custom_text_changes', 20, 3 );
   function my_custom_text_changes( $translated_text, $text, $domain ) {
      switch ( $translated_text ) {
         case 'Search...' :
               $translated_text = 'Find...';
               break;
      }
      return $translated_text;
   }
To implement this, you can either insert the code into your theme's functions.php file or, for a more organized approach, create a simple single-file plugin. To create a plugin, navigate to your /wp-content/plugins/ directory on your server and add a file named my-custom-code.php (you can choose any name). Insert the provided code into that file:
<?php
/*
Plugin Name: My Awesome Customizations
*/
add_filter( 'gettext', 'my_custom_text_changes', 20, 3 );
function my_custom_text_changes( $translated_text, $text, $domain ) {
    switch ( $translated_text ) {
        case 'Search...' :
            $translated_text = 'Find...';
            break;
    }
    return $translated_text;
}
?>
After saving the file, access your WordPress admin's plugins page, locate the plugin titled "My Awesome Customizations," and activate it.
Moreover, if you wish to modify multiple translations, you can extend the case/break statements. For example, changing a custom post type named "recipes" to "books" across various instances would involve additional adjustments in the code, possibly requiring the expertise of a developer for more extensive modifications:
function my_custom_text_changes( $translated_text, $text, $domain ) {
   switch ( $translated_text ) {
         case 'Recipe' :
            $translated_text = 'Book';
            break;
         case 'Recipes' :
            $translated_text = 'Books';
            break;
         case 'recipe' :
            $translated_text = 'book';
            break;
         case 'recipes' :
            $translated_text = 'books';
            break;
   }
   return $translated_text;
}