General Information
- Product Name : Streamit - Video Streaming WordPress Theme
- Author : Iqonic Design
- Support Ticket: https://iqonic.desky.support/
- Youtube Link: https://www.youtube.com/playlist?list=PLSPY71mRbPj8HRtfCILwjGKR7DzFoetCl
Thank you for choosing our theme. We hope you enjoy building your project with us. It is a powerhouse of great features and powerful functionalities that would take months to develop. The theme is fully responsive and be rest assured your project looks absolutely stunning on any types of screens.
Regular License
ThemeForest regular license allows an item owner to create one single End Product (the final website customized with client's own content). This end product could be for item owner himself or for one of his client.
What is acceptable in single regular license:
- You are allowed to create 1 website (on a single domain) for yourself or for your client. You can then transfer that website to your client for any fee. Please note that your license also has to be transferred to your client.
- You can install the theme on your test server for testing or for the development purposes (this installation should not be shared to the public).
- You can modify and customize the theme, you can combine it with other works to create the End Product.
What is not acceptable:
- With a single regular license you are not allowed to create multiple websites. For multiple websites you will need multiple regular licenses.
- If you would like to resell the same website (Single End Product) to another client, it is mandatory to purchase an extended license for this purpose.
Bundled Plugins
All the premium plugins that comes with the theme are fully functional without any registration license key. If however, you wish to use the additional features or receive automatic updates and support from the plugin party, you shall purchase the plugin separately.
Getting Started
WordPress Information
For WordPress Installation you can check the Famous 5-Minutes Install here:
- Support System: https://wordpress.org/support/article/how-to-install-wordpress/
Theme Requirements
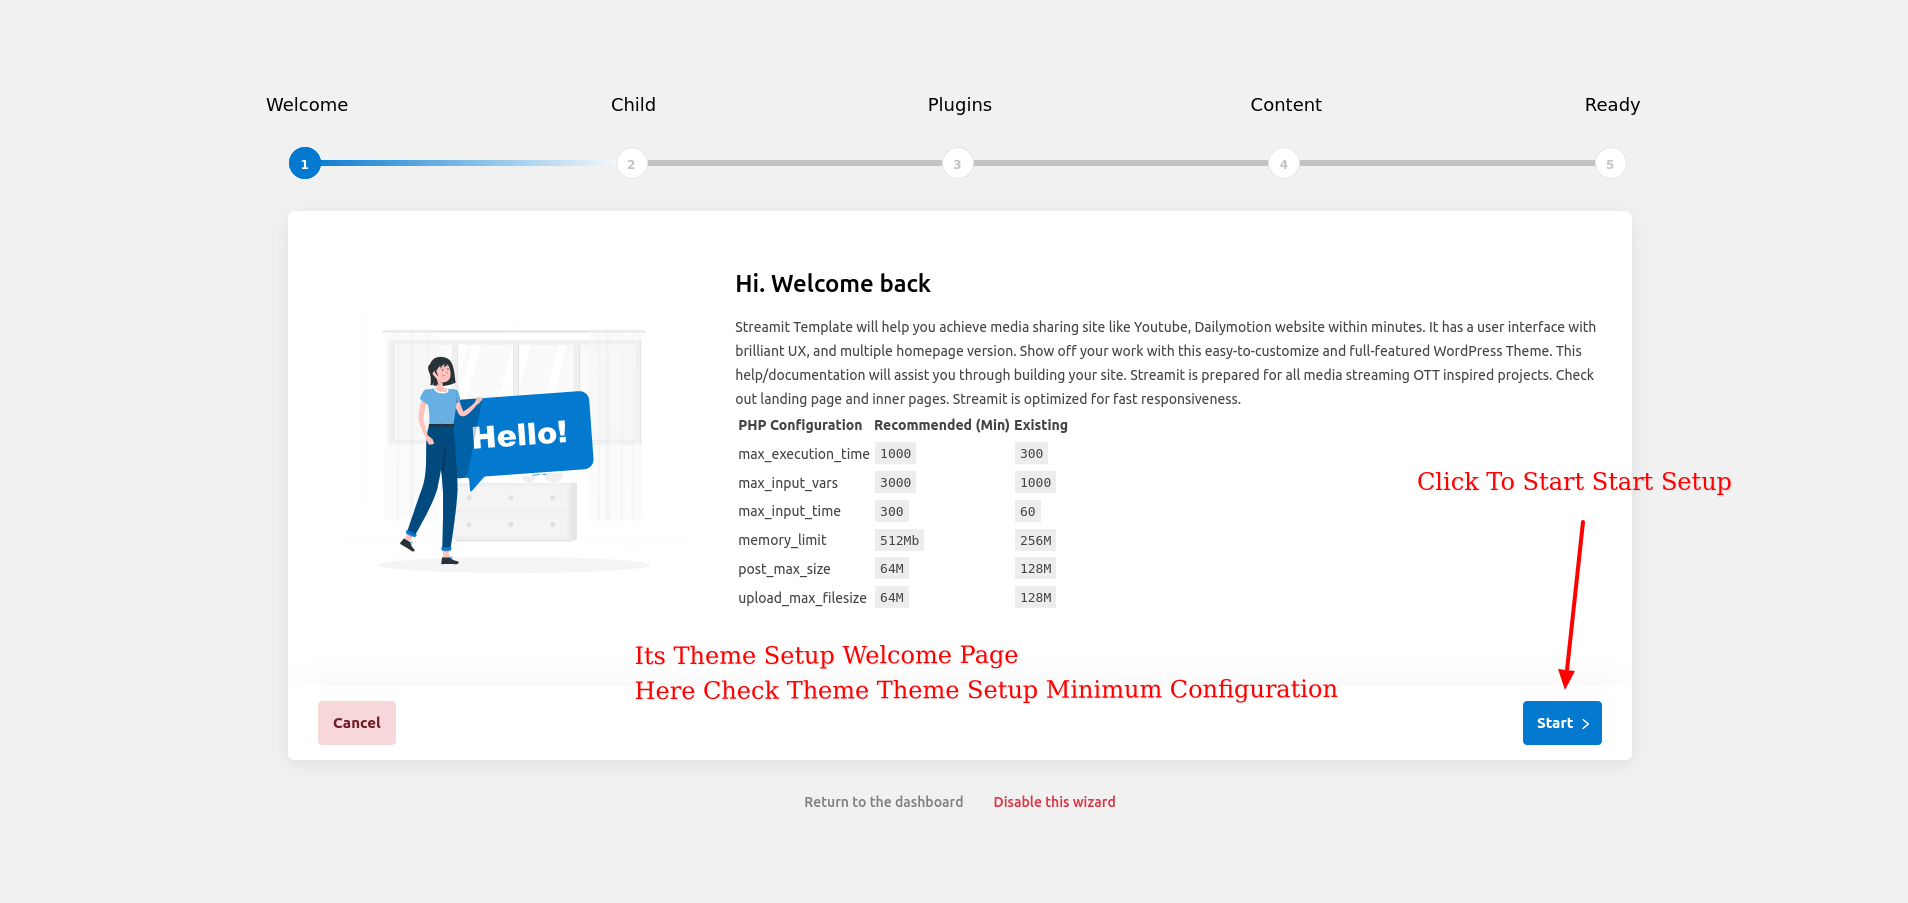
To use Streamit, you must be running WordPress 4.9.1 or higher, PHP 7.1 or higher, and MySQL 5.6 or higher. We have tested it with Mac, Windows and Linux. Below is a list of items you should ensure your host can comply with.
Recommended PHP Configuration Limits
White screen, demo content fails when importing, empty page content and other similar issues are all related to low PHP configuration limits. The solution is to increase the PHP limits. You can do this on your own, or contact your web host and ask them to increase those limits to a minimum as follows:
- max_input_vars = 3000
- memory_limit = 512M
- max_execution_time = 1000
- max_input_time = 300
- upload_max_filesize = 64M
- post_max_size = 64M
Theme Installation
There are 3 ways to install the theme:
Theme Installation via WordPress:
- Login to your WordPress Admin Panel.
- Go to Appearance > Themes. Click the Add New button.
- Click on the Upload Theme button. Locate "streamit.zip" and click Install Now.
Theme Installation via FTP :
- Log into your Hosting server using an FTP client.(Ex: FileZilla)
- Locate "streamit.zip" that you found in your ThemeForest Package and unzip it. Once it is done you'll get a folder named streamit with all theme files in it.
- Locate your WordPress directory and upload streamit folder (unzipped in the previous step) into ../wp-content/themes/
- Click on the Activate button to activate Streamit. Congratulations, you have now activated Streamit! You can now proceed with Streamit's Plugin Installation.
Theme Installation via Envato Market:
- If you already have the "Envato Market Plugin" installed on your site then just go to Admin > Envato Market and install theme from there. If not, than download the plugin by clicking on this link and install the plugin on your site. After installation, you just need to configure it (linking with your ThemeForest account). Click here for step-by-step tutorial.
- Then just go to Admin > Envato Market plugin menu and install the theme. The theme would be available to install so you can easily install it.
- NOTE: Plesae note that the "Iqonic Design for Streamit Theme" is required plugin for this theme. So make sure you install that plugin after you install/activate the theme.
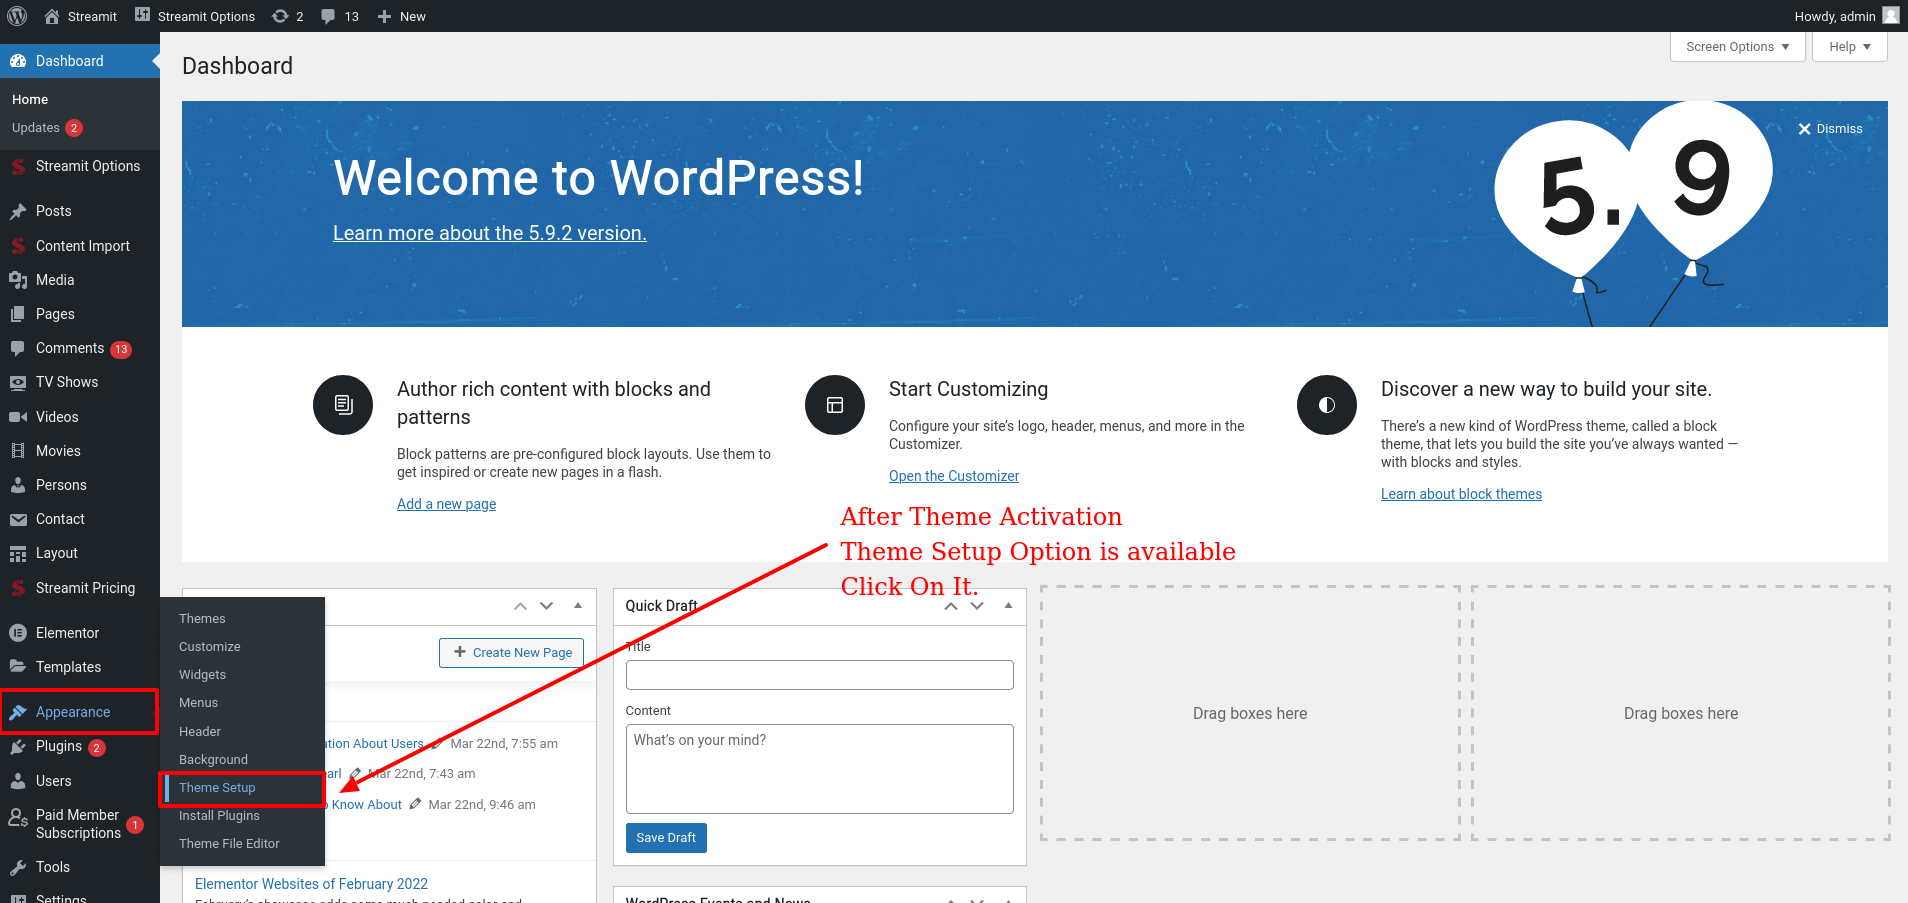
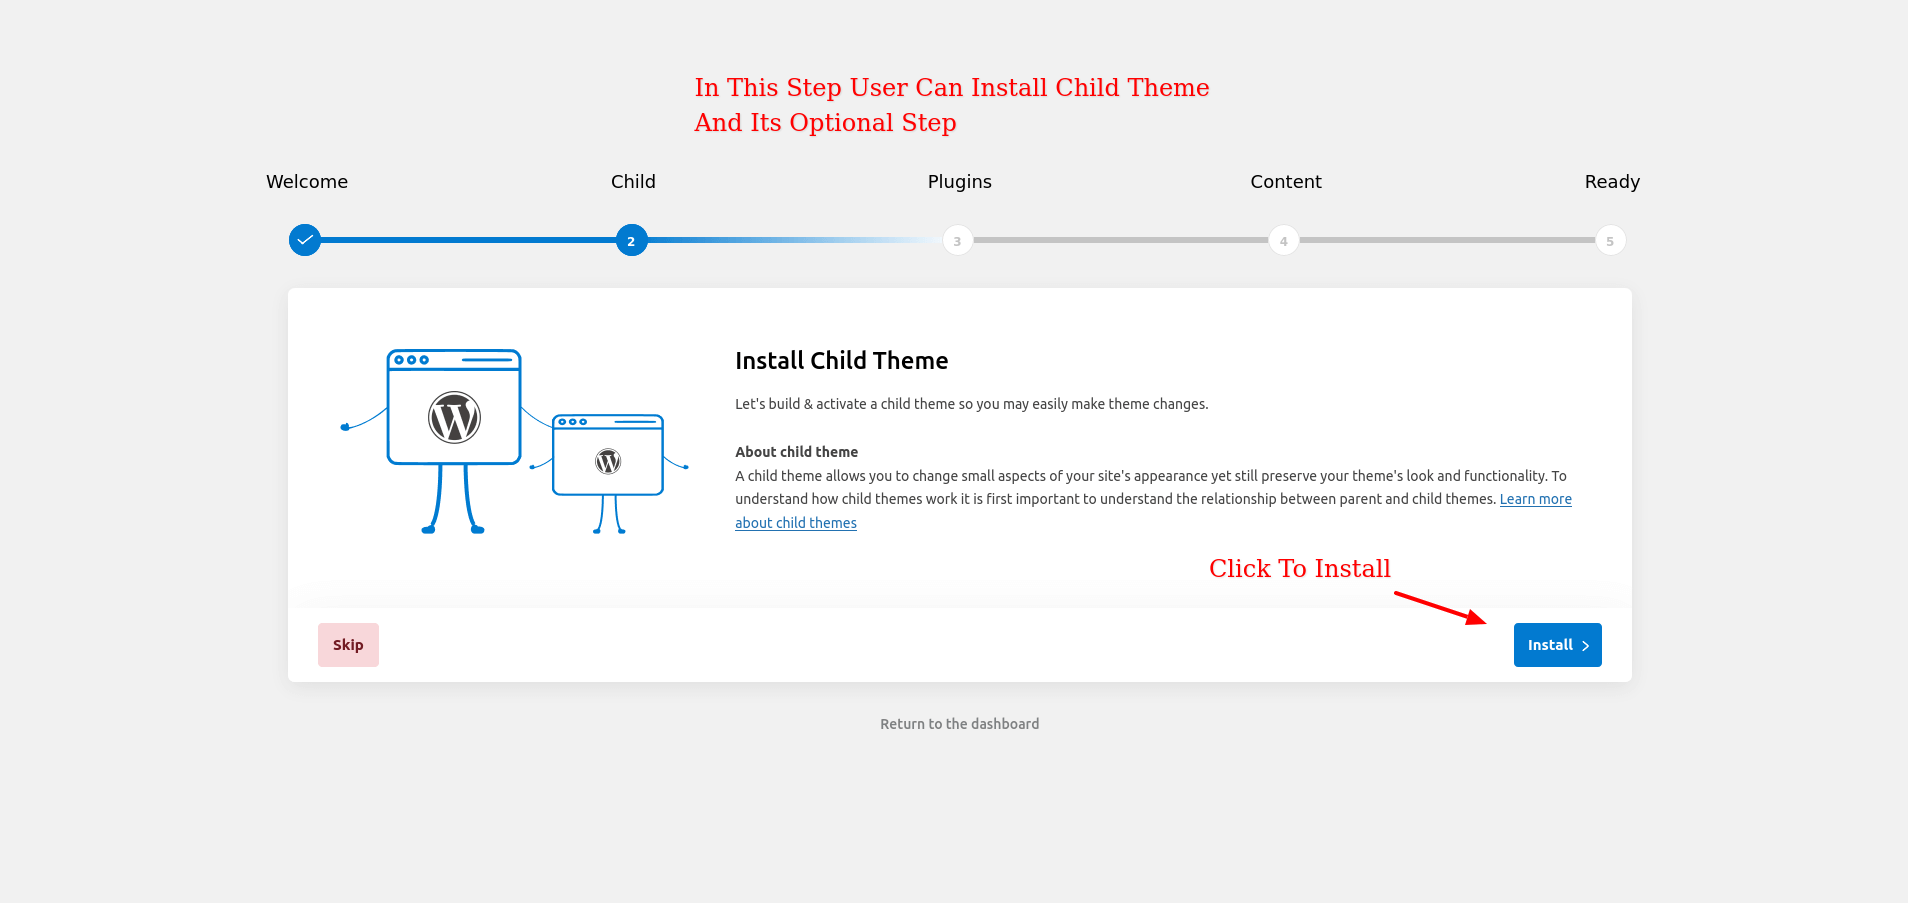
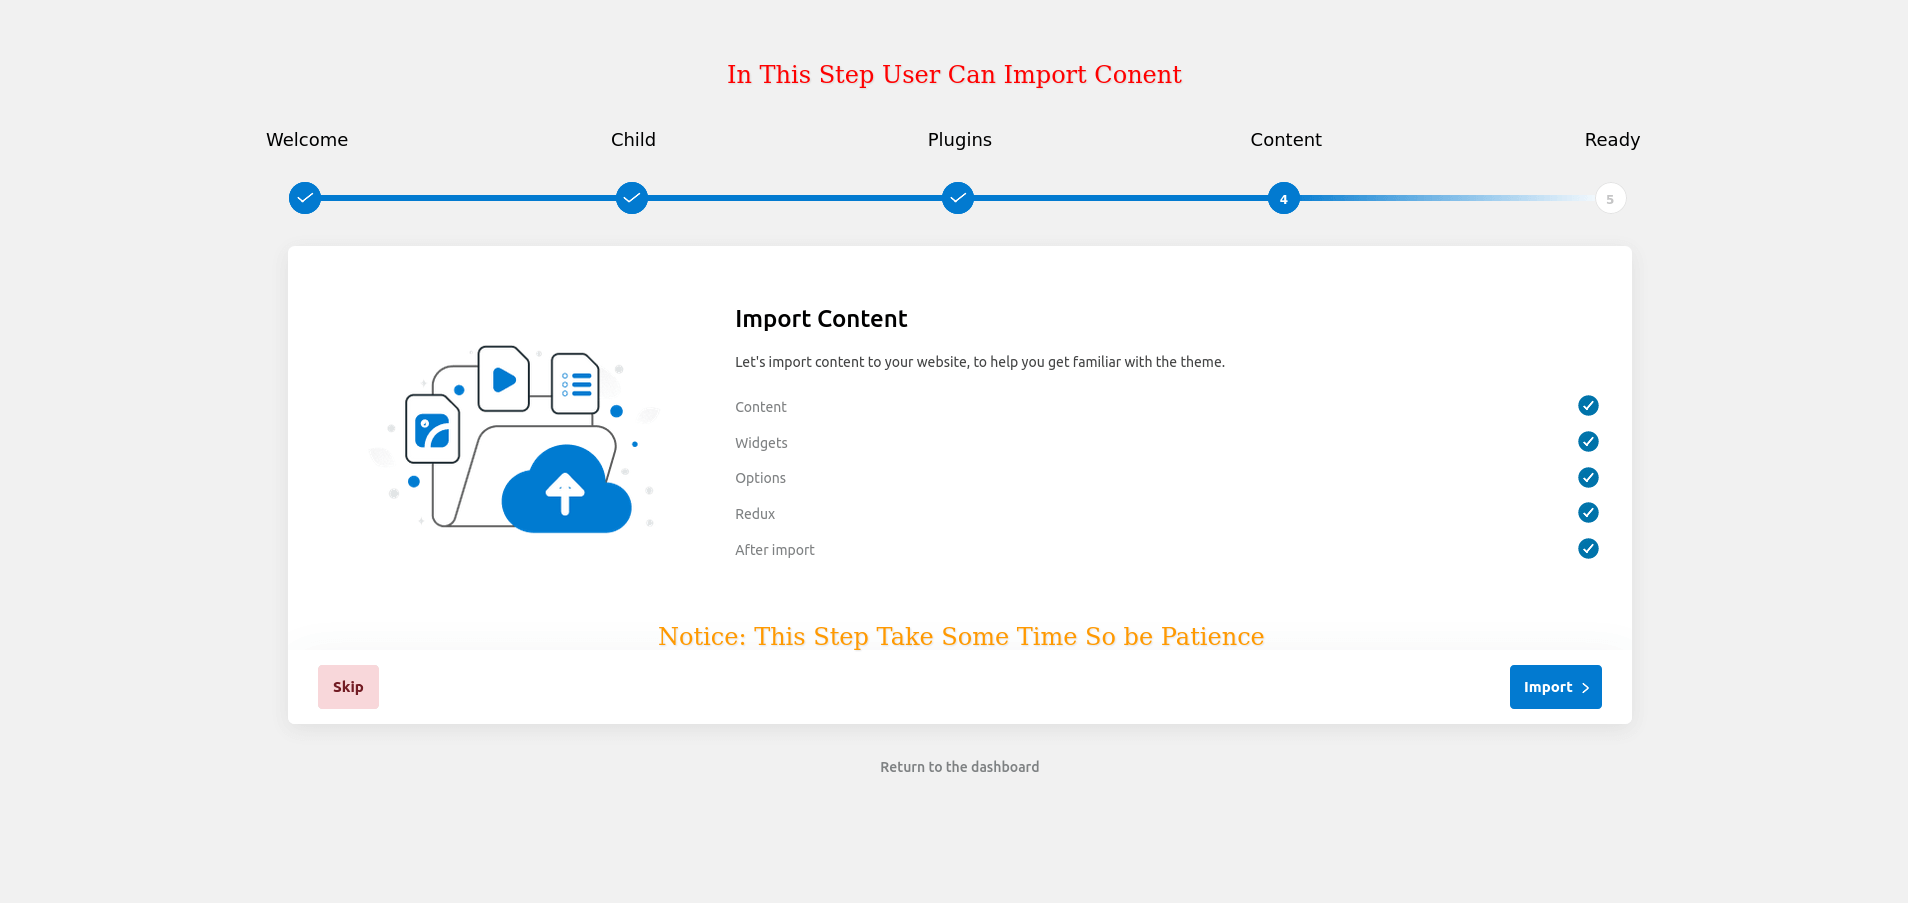
Theme Setup Wizard
Here Iqonic Introduces Theme Setup Wizard to Setup Theme For Easy And Best User Exprienced. Setup Theme Step By Step Way
Go to Appearance > Theme Setup. Then, Click on It.
Step:1 Welcome
Step:2 Child Theme
Step:3 Plugins

Step:4 Content
Step:5 Ready

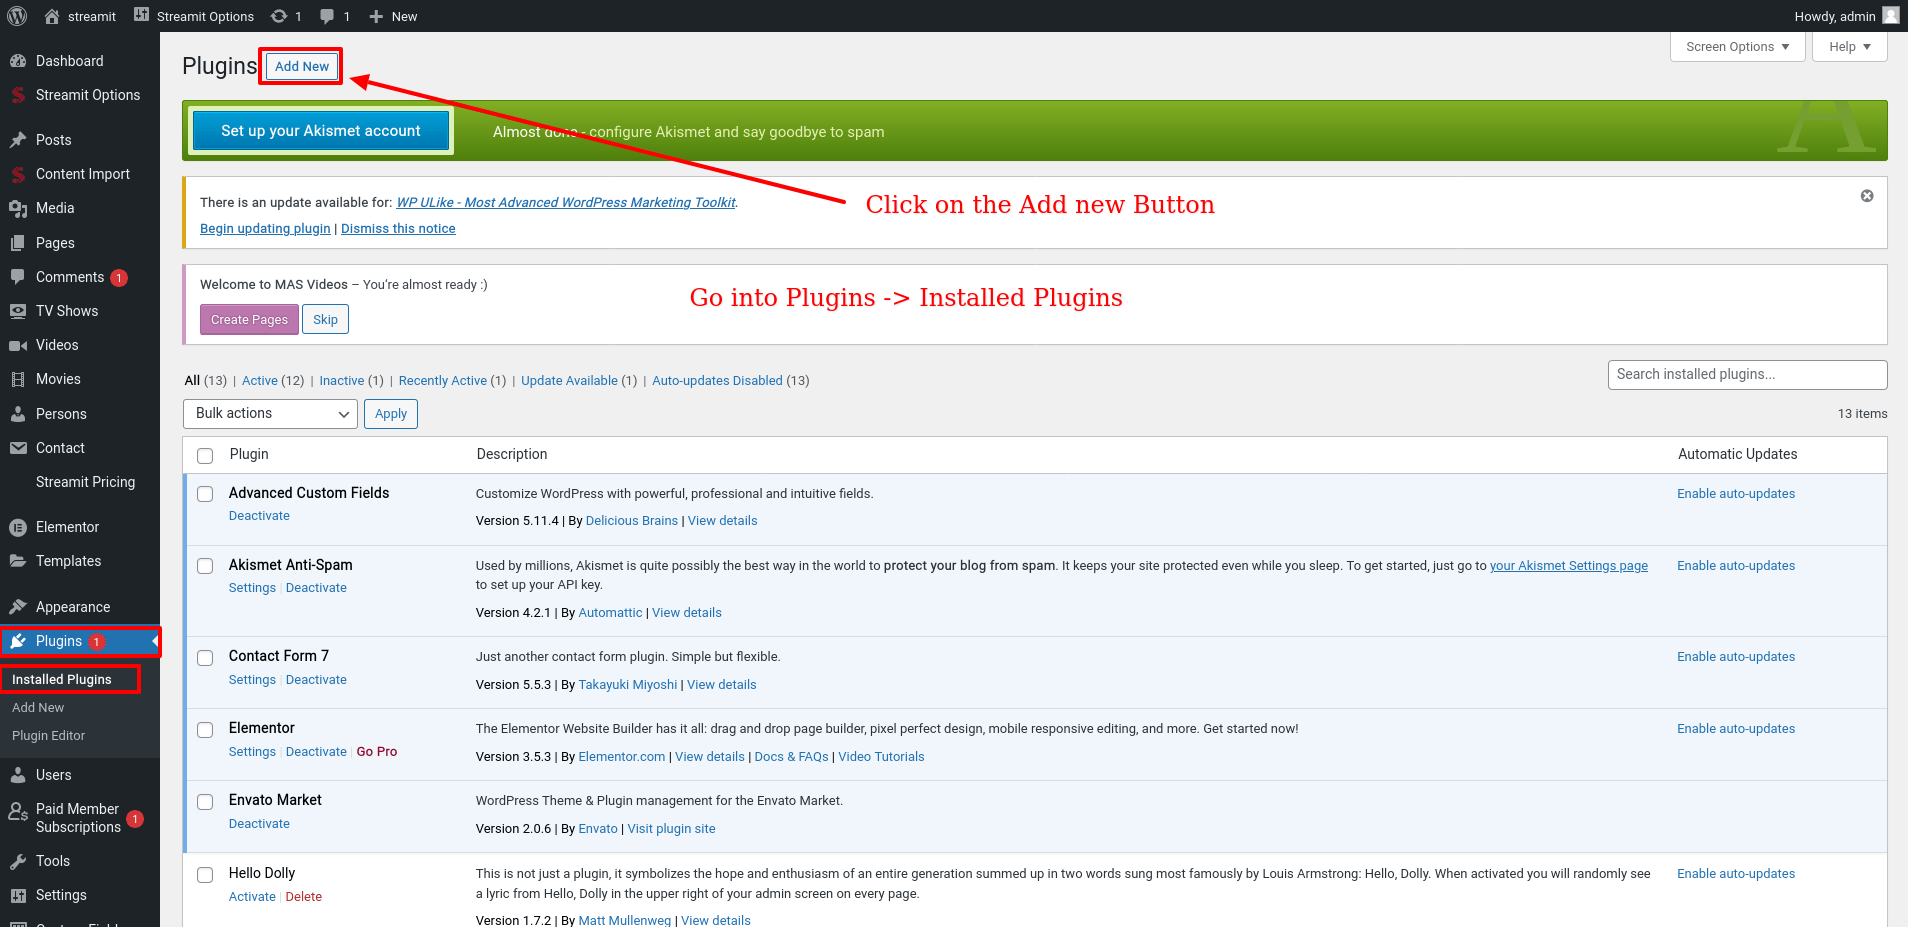
Plugins Installation
All required plugins are already added in your downloaded package.
- After theme installation you should be redirected to Install Required Plugins page, which shows list of plugins:
- Now, Select all "plugins"
- Note - The installation process may take few minutes. Proceed further after successful installation.
- When "All installations have been completed" appears, click on "Return to Required Plugins Installer".
- Now, Select all plugins and choose Activate from drop down box this time.
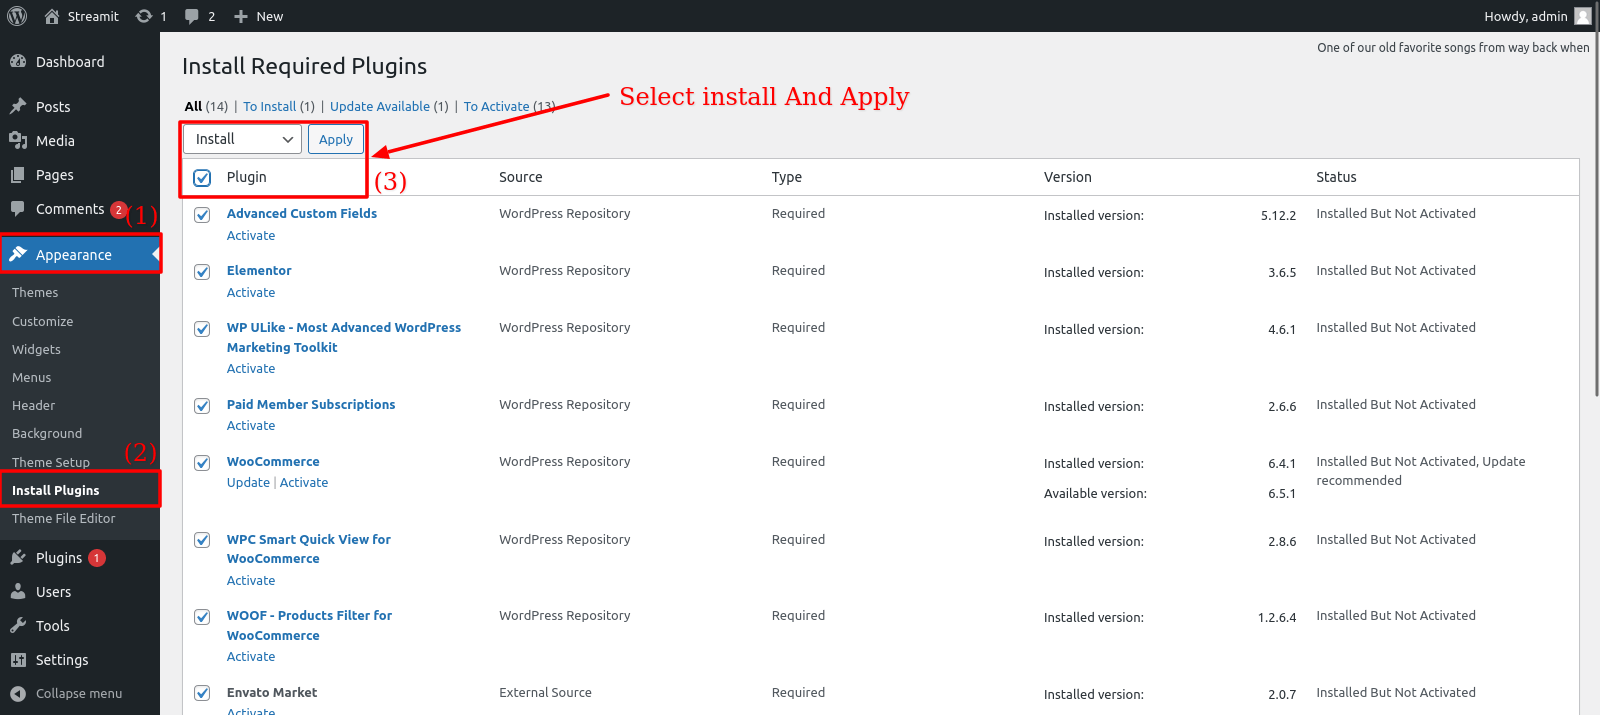
Required Plugins
- Elementor
- Streamit Extensions
- MAS Video
- Iqonic Header Footer Layout
- WooCommerce
- Advanced Custom Fields
- WP ULike
- Paid Memberships Pro
- WPC Smart Quick View for WooCommerce
- WOOF - Products Filter for WooCommerce
- Iqonic Layouts
Update Theme
There are 3 ways to Update the theme:
First of all, do a backup on your local computer. There is a lot of tool and plugins available to help you to do this. Just find one with a good rating and get it set up now, not later: https://wordpress.org/plugins/search.php?q=backup+wp
ALWAYS make a backup of your entire site before you update. Usually. the update installs within seconds and cause zero problems, but it's better to be safe than sorry.
How to upgrade?
The first thing to know is that if you have modified PHP, CSS, JS files into the core theme, the update will overwrite what you did.
The update will NOT affect your content such as your blog post, photos, videos, option theme settings, WordPress settings. Basically, the update replaces the PHP, JavaScript and CSS files of the theme, not your database, and not the WordPress core files.
OPTION 1 - AUTOMATIC UPDATE:
- Download and Install the official Envato Market WordPress plugin here
- Follow the instruction on the Envato Market WordPress plugin official page.
- When the theme update is done, please go to WP-Admin > Appearance > Install Plugin and click "update" for every plugin that requires an update.
- If for some reason you see some code on your front-end website after the theme update, make sure that all the required plugin are activated by going to WP-Admin > Plugins.
OPTION 2 - MANUAL UPDATE:
- Redownload the theme files on ThemeForest (ThemeForest always have the latest version of the theme). So login to your Envato account, then go to Downloads, and download "Installable WordPress file Only" package.
- Go to Wp-Admin > Appearance > Themes and activate another theme such Twenty Fifteen.
- Delete the Theme you want to update. (Yeah, you must delete the theme before re-uploading the same theme).
- Go to WP-Admin > Appearance > Themes > Add New and Upload the theme .ZIP file you've just downloaded from ThemeForest.
- Activate your theme by clicking the "Activate button".
- Make sure to reactivate the plugins by going to WP-Admin > Plugins.
- When the theme update is done, please go to WP-Admin > Appearance > Install Plugin and click "update" for every plugin that requires an update.
- If for some reason you see some code on your front-end website after the theme update, make sure that all the required plugin are activated by going to WP-Admin > Plugins.
- If one of your plugins has not been updated (ex: WPBakery Page Builder), go to WP-Admin > Plugins and delete the plugin then go to WP-Admin > Appearance > Install Plugins and reinstall the plugins. Make sure to "activate" it again.
OPTION 3:
- If deleting a theme makes your nervous, or you have an issue when uploading the theme via the WordPress dashboard, you can upload it manually by FTP.
- Redownload the theme files on ThemeForest (ThemeForest always have the latest version of the theme). So login to your Envato account, then go to Downloads, and download "Installable WordPress file Only" package.
- Unzip the zip file on your computer
- Rename the root folder to something like "themename-new".
- By using an FTP software (such as FileZilla), connect to your FTP.
- Upload the folder to .../wp-content/themes/ (so you should have /wp-content/themes/themename-new/)
- Once everything has been uploaded, go to WP-Admin > Appearance > Themes and activate your new theme.
- Make sure to reactivate the plugins by going to WP-Admin > Plugins. If one of your plugins has not been updated (ex: Visual Composer), go to WP-Admin > Plugins and delete the old plugin.
- Go to WP-Admin > Appearance > Install Plugins and reinstall the plugins. Make sure to "activate" them again.
Update Plugin
Here Is Step To Update Plugin
First of all, do a backup on your local computer. There is a lot of tool and plugins available to help you to do this. Just find one with a good rating and get it set up now, not later: https://wordpress.org/plugins/search.php?q=backup+wp
ALWAYS make a backup of your entire site before you update. Usually. the update installs within seconds and cause zero problems, but it's better to be safe than sorry.
How to Upgrade Plugin ?
The update will NOT affect your content such as your blog post, photos, videos, option theme settings, WordPress settings. Basically, the update replaces the PHP, JavaScript and CSS files of the theme, not your database, and not the WordPress core files.
There Are Two Way to Update Plugins
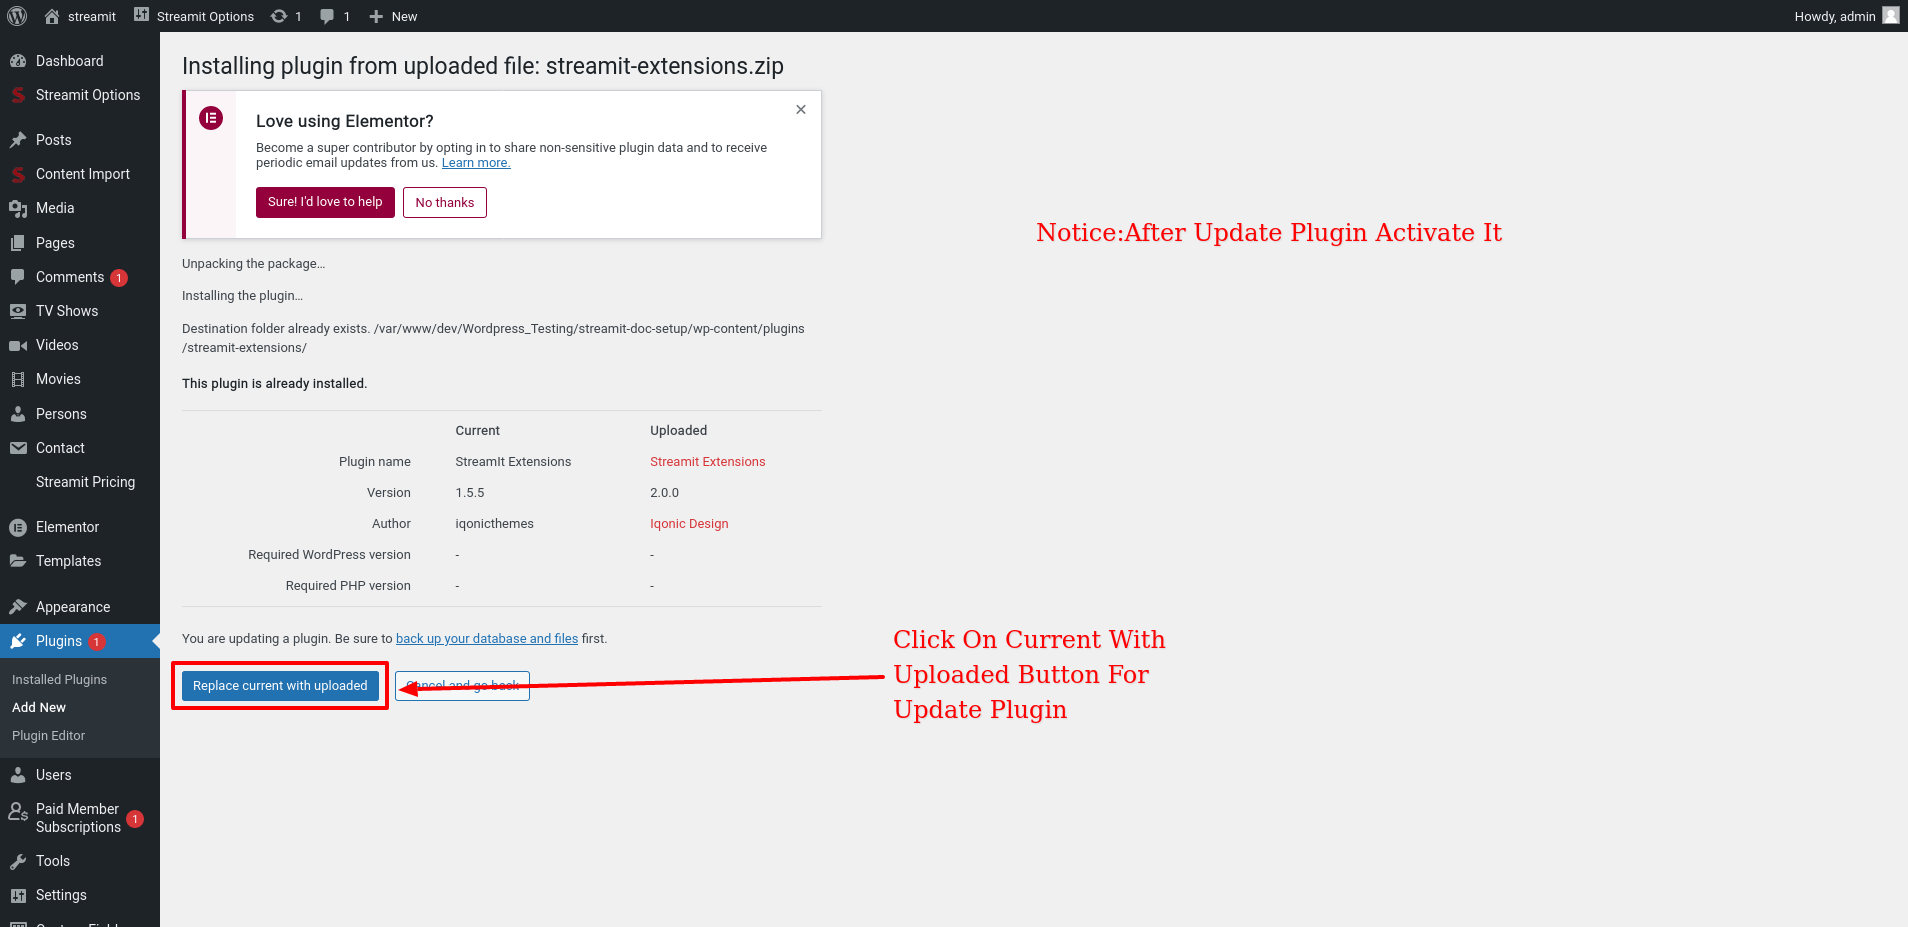
Manually Update Plugin :
-
Backup Plugin Streamit-Extensions in site->wp-content->plugins Folder
-
Extract the Plugin Zip file into the site->wp-content->plugin.
- Replace The Old Streamit-extensions Folder with new Extracted foulder.
Step - 1
Step - 2

Step - 3
Theme Options
By clicking on the "Theme Options" menu, you'll be able to change all template specific settings.
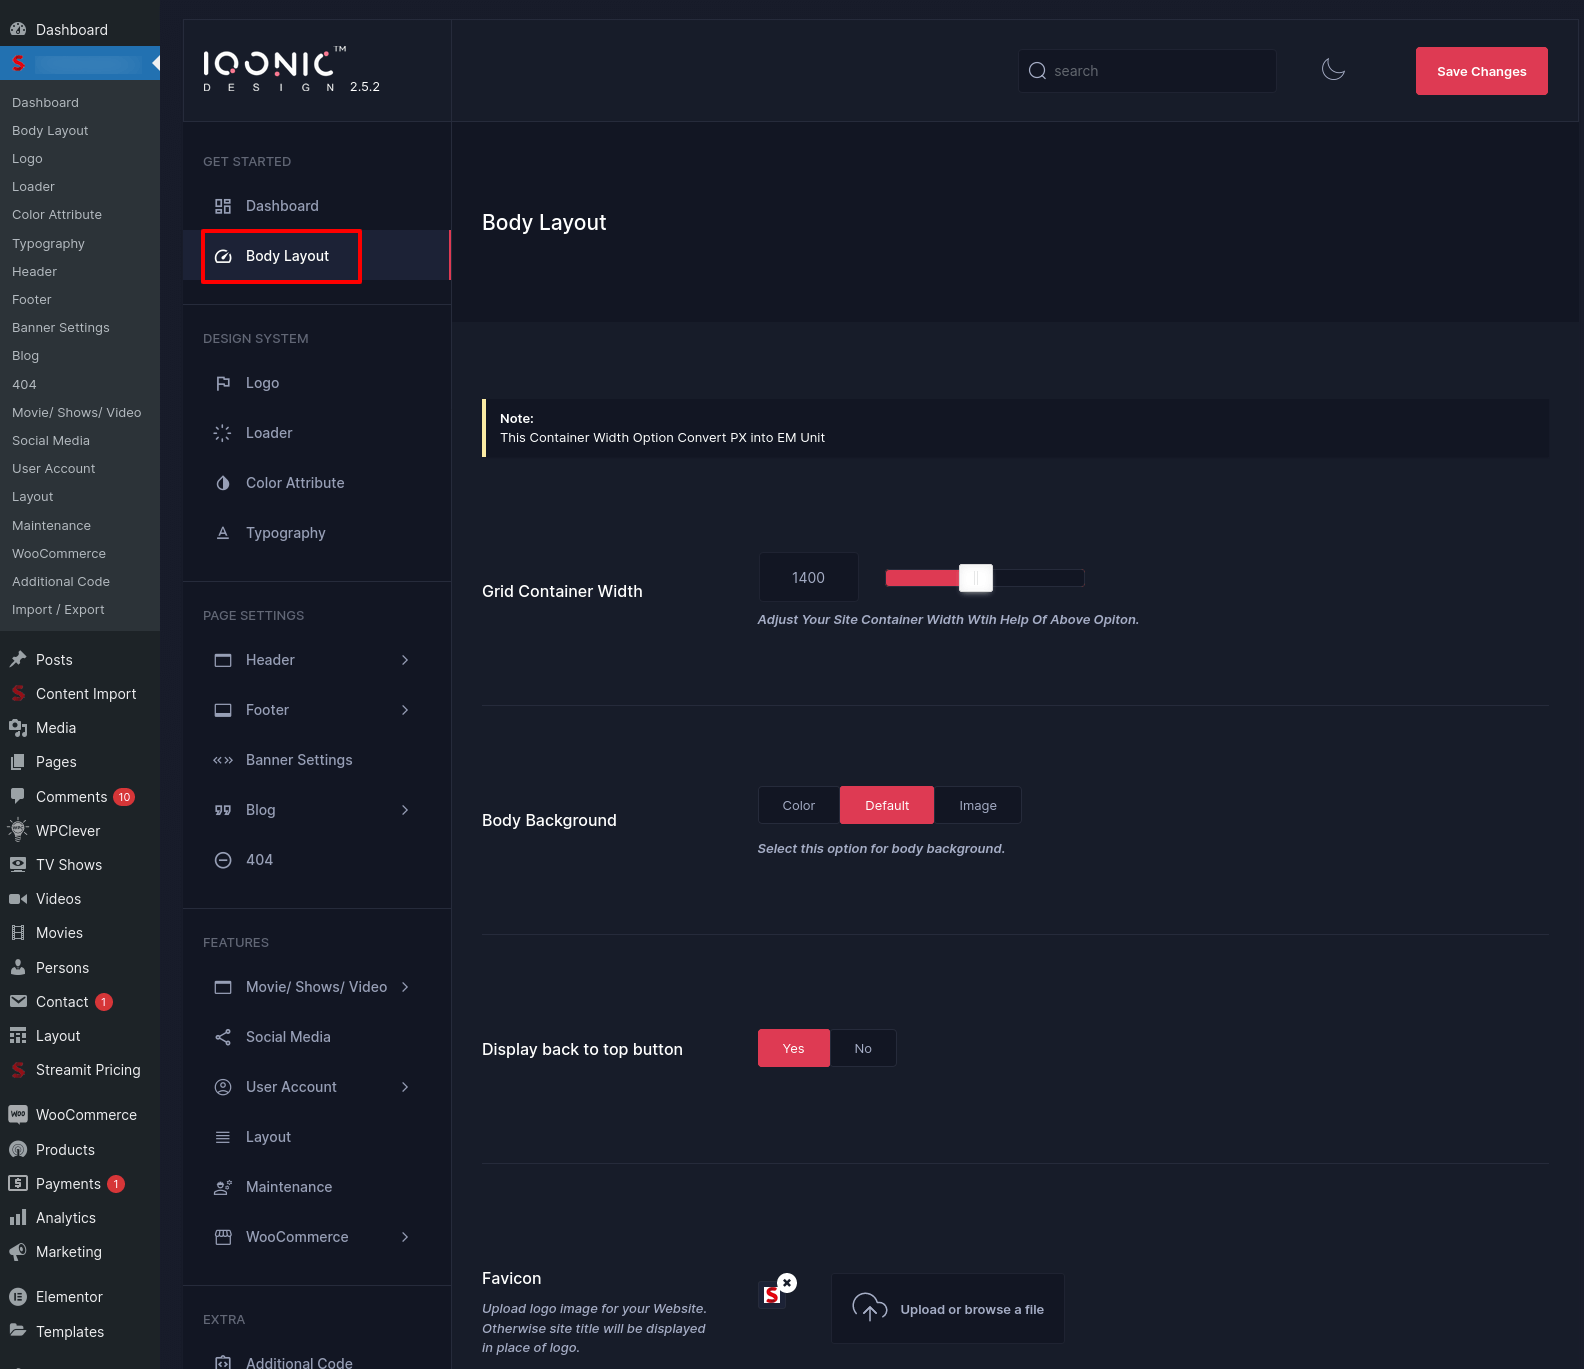
Body Layout Settings
You can change settings for Body Layout Option from here.
Layout Settings
By-default, Layout functions from Theme Options -> Layout Settings for all pages. You can change settings for Layout mode ,Color from here.

In above example, 'LTR' is selected on select layout mode so it can Set the content Left To Right
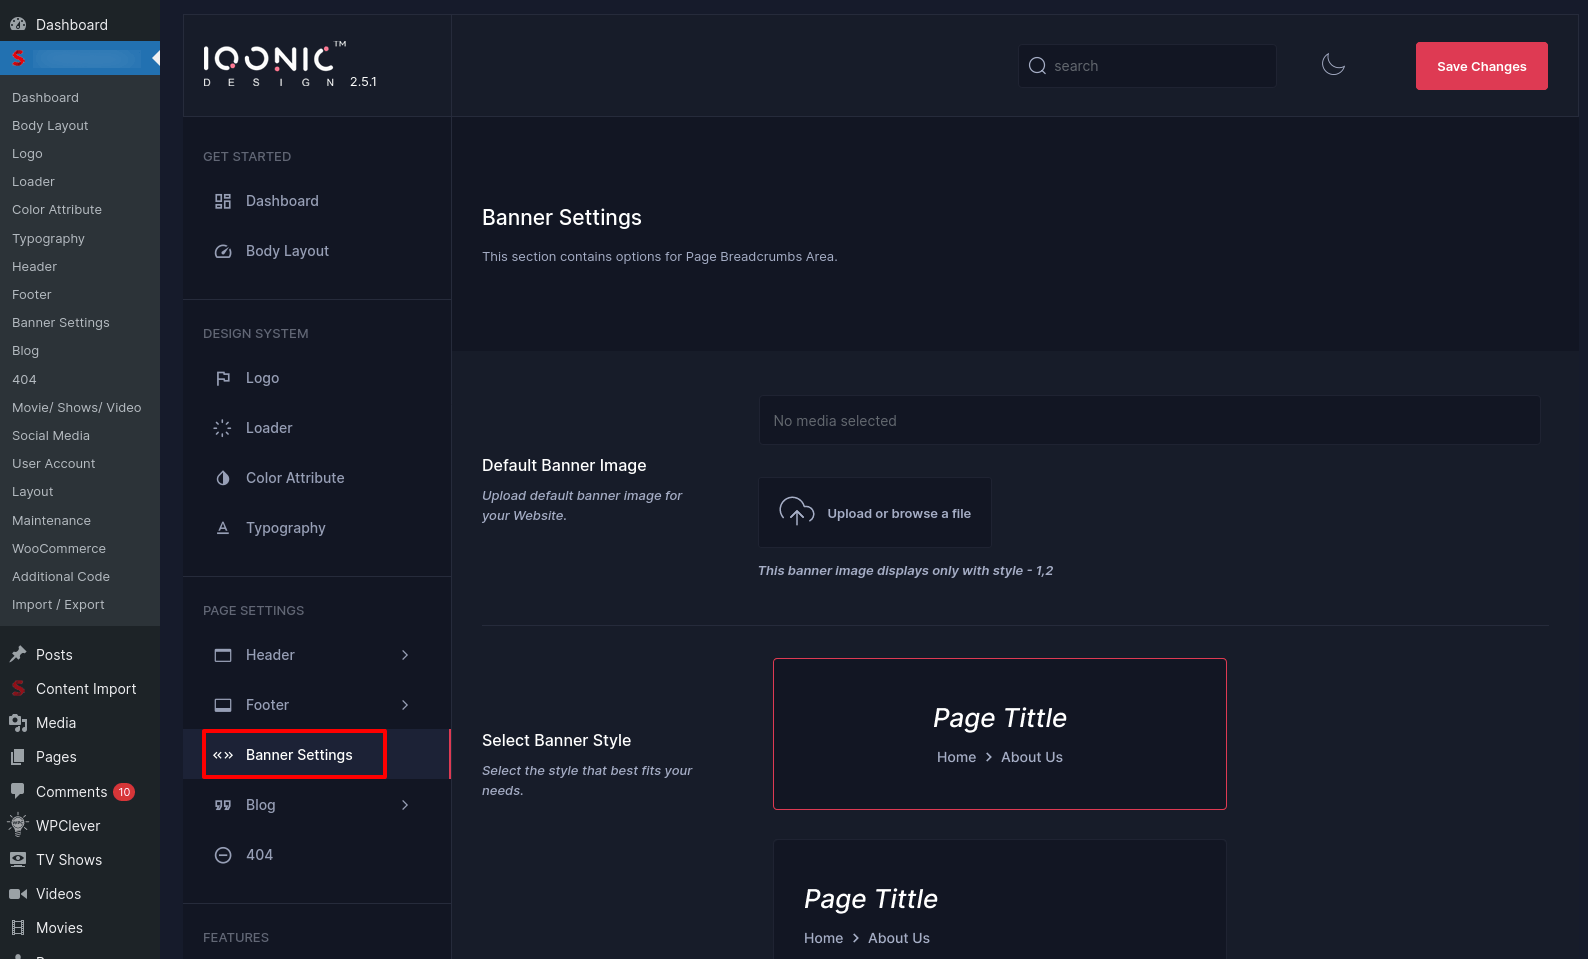
Page Banner Settings
By-default, Page Banner functions from Theme Options -> Page Banner Settings for all pages. You can change settings for Page Banner from here.
Header Settings
By-default, Header functions from Theme Options -> Header Settings for all pages. You can change settings for Header from here.

In above example, 'Header Style 1' was selected. This means Header Setting would appear on ALL PAGES of your site.
Now, sometimes we receive requests from buyers where they want to show different Header style (for menu or appearance) for different pages. So we have come up with this option where you can display a different Header style for a particular page.
For example, if you want to display a different Header style for about page then go to Pages -> Select a page ->Edit . In below example about page was chosen.

On next screen, scroll down a bit and you'll see a section to choose Page settings styles. Refer to the screenshot below. You can now select any Header settings and save the page. Now, you have a new Header settings for your about page. You can do same for other pages also.

Logo Settings
You can change settings for Logo from here.
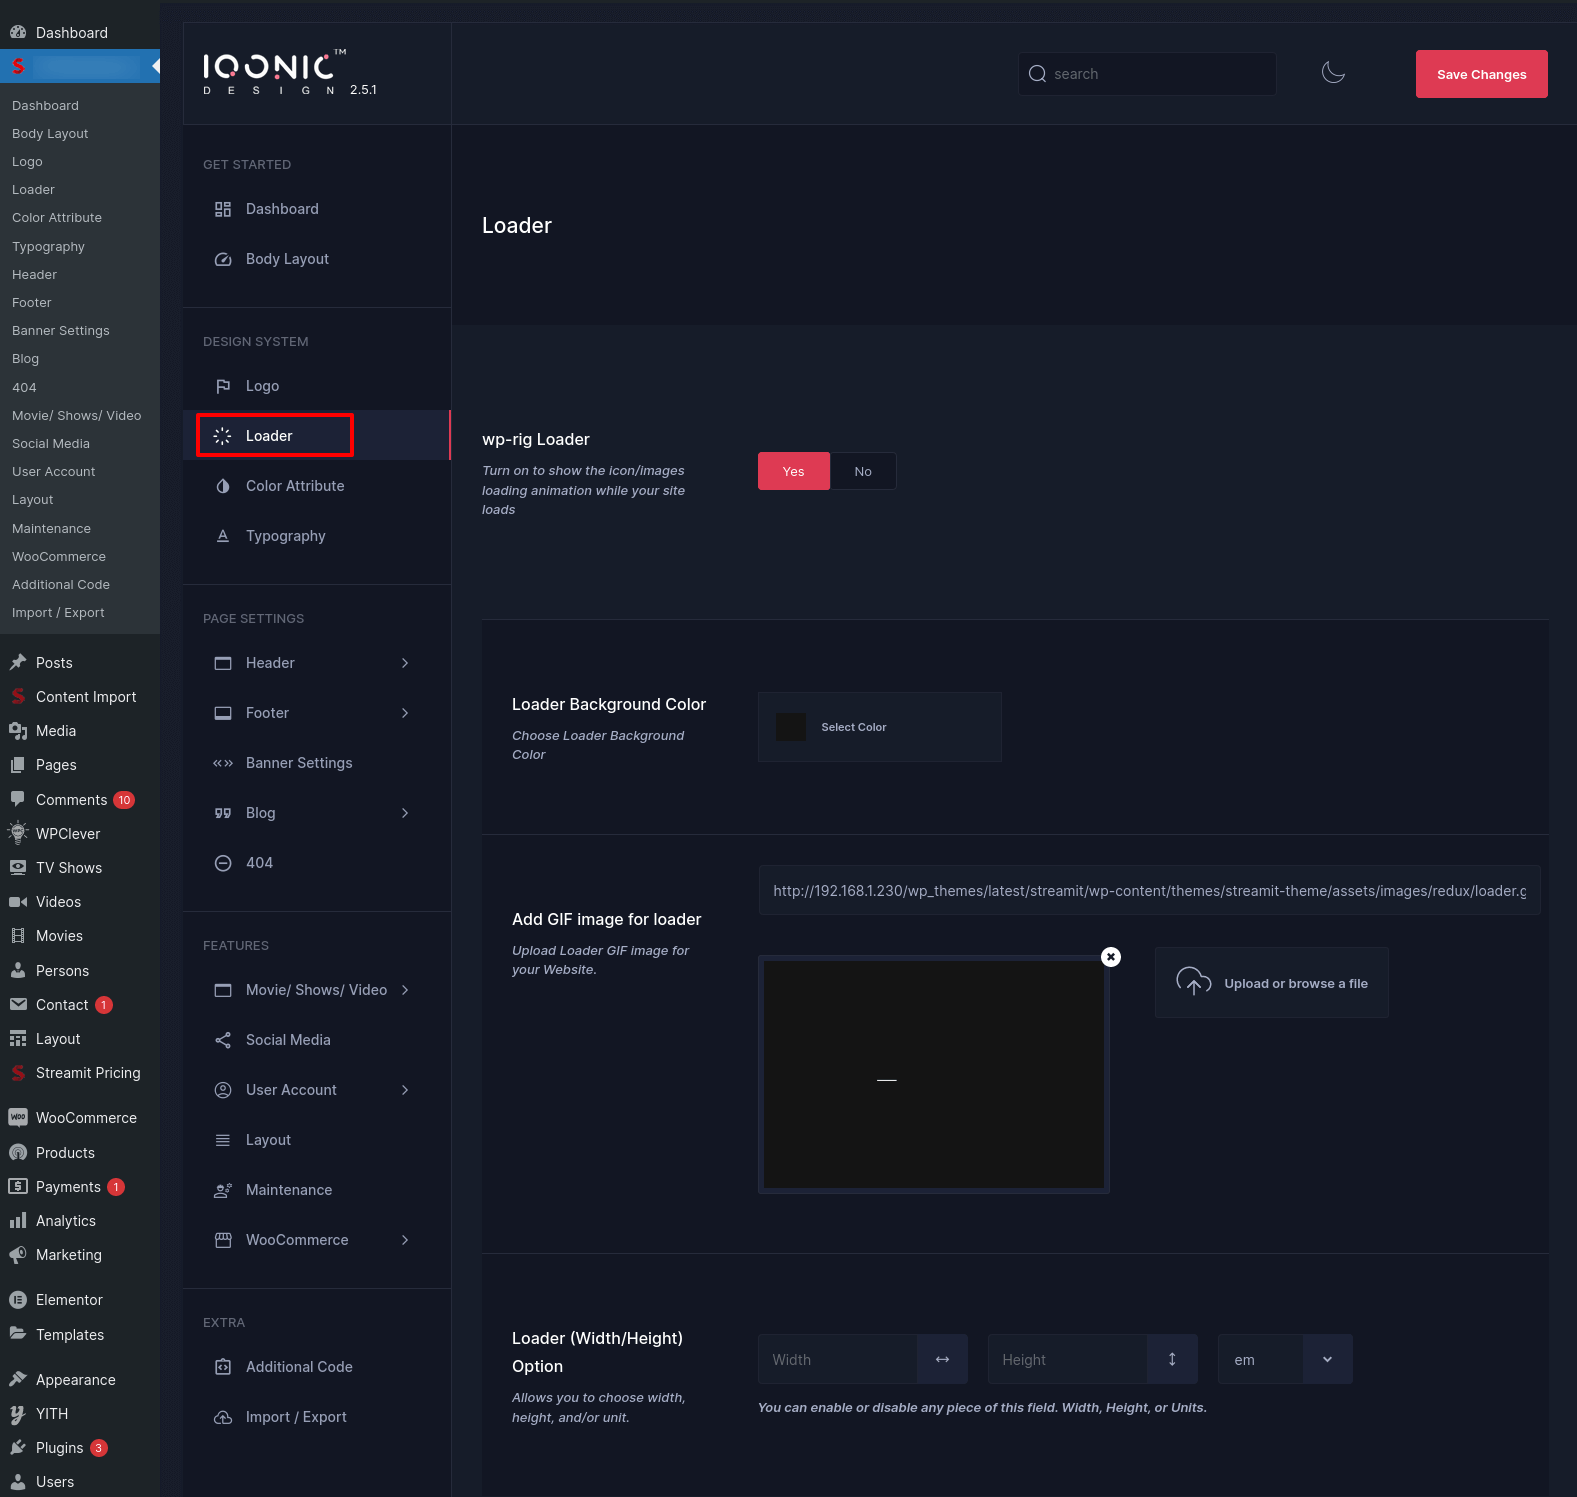
Loader Settings
You can change settings for Loader from here.
Page Settings
You can change settings for Page section from here.
Trailer Link

here trailer above image can show to customize the trailer link in single item page for Movies , Trailer , Tv show, Video ,Episode
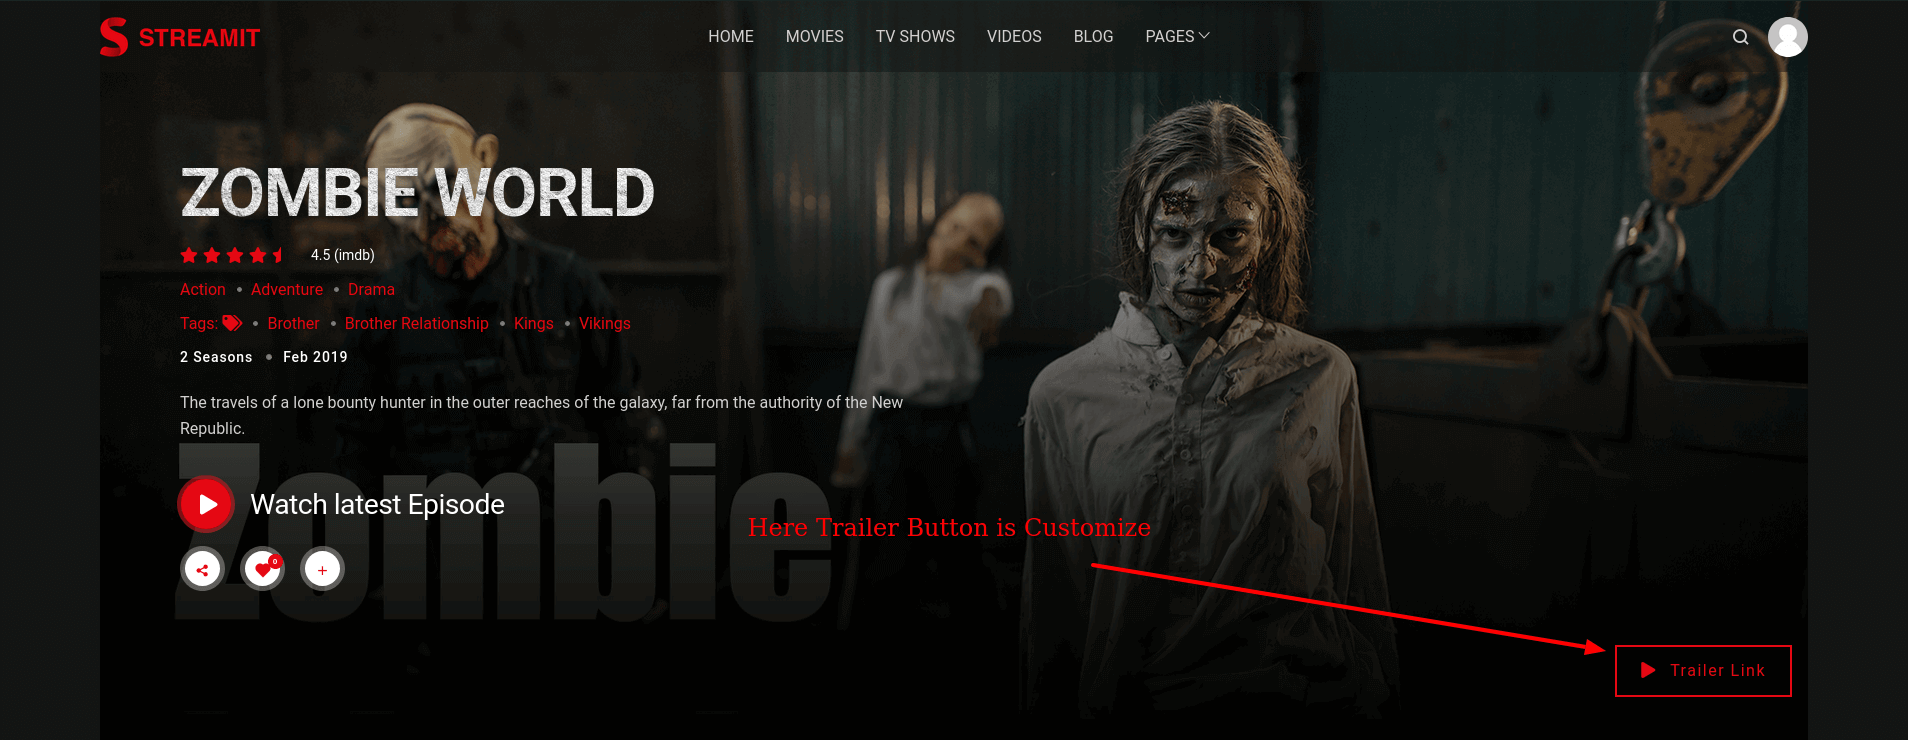
In You Select Thumbnail In Theme Option -> Page Setting -> Trailer Link -> Style -> Thumbnail
Thumbnail Image Show From User select in Trailer Image for Movie,Tv Show , Video ,

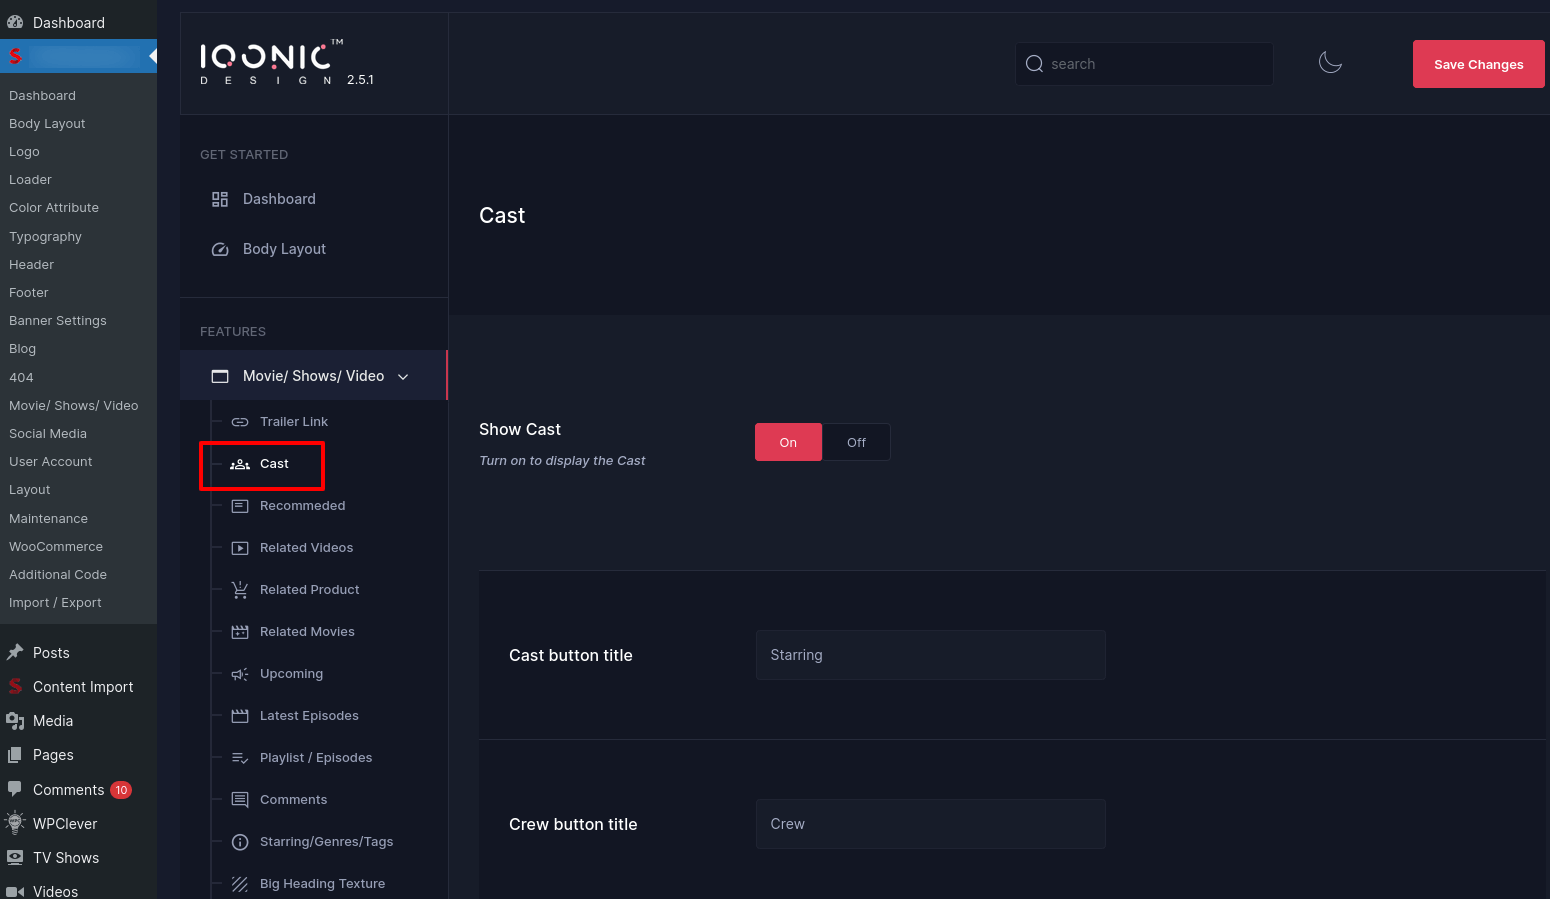
Cast
Show the cast in Single Item Page

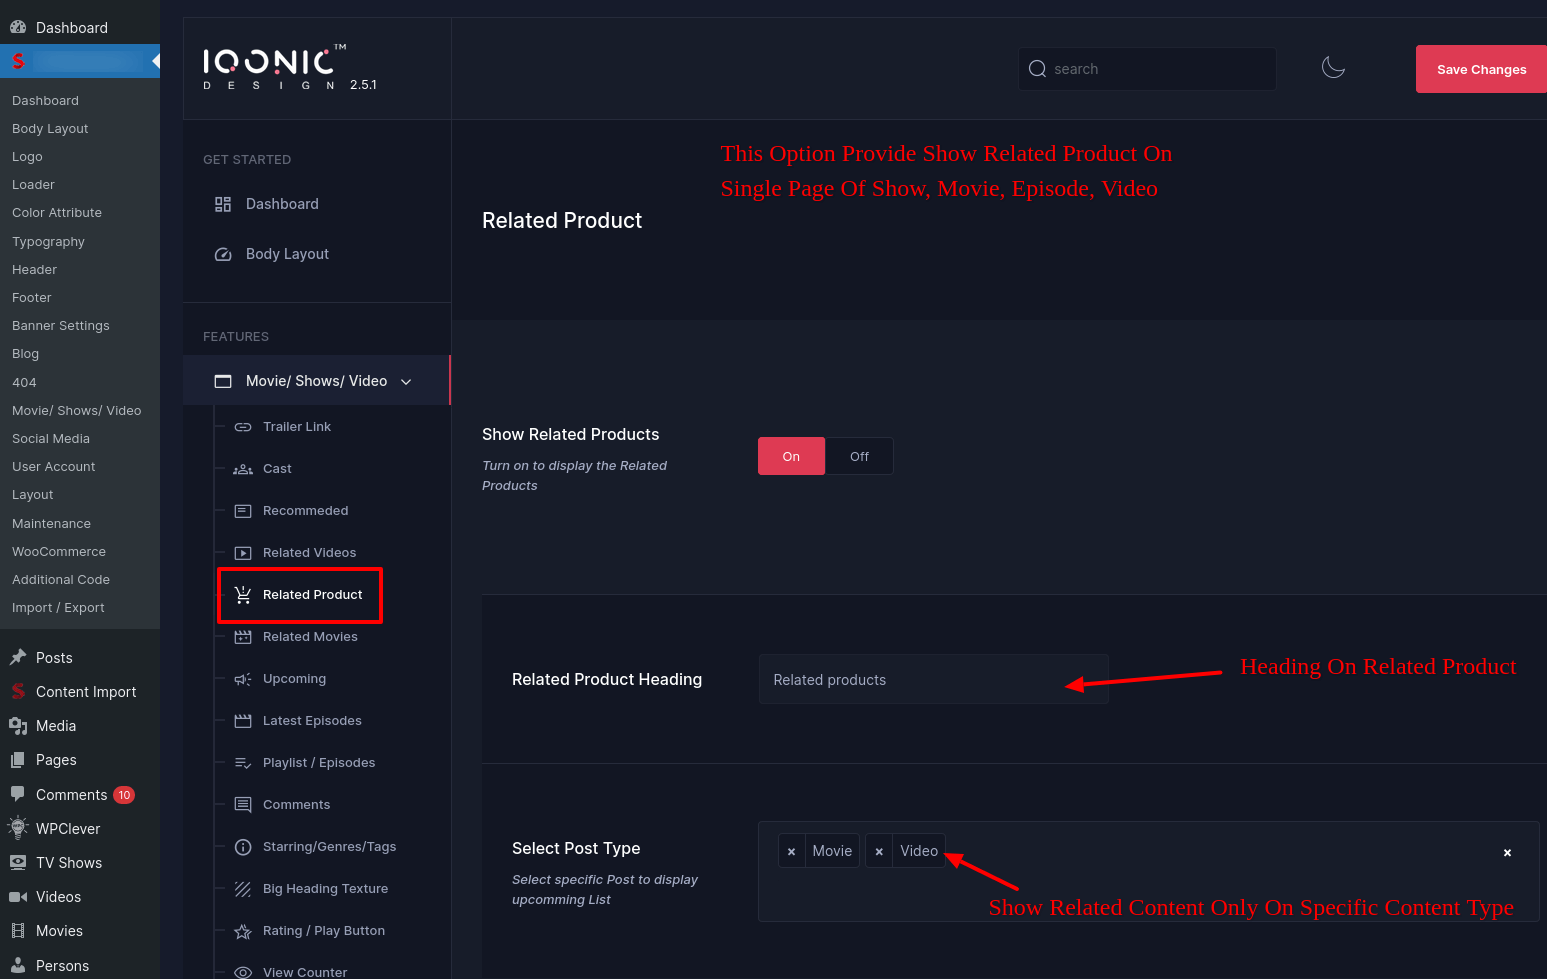
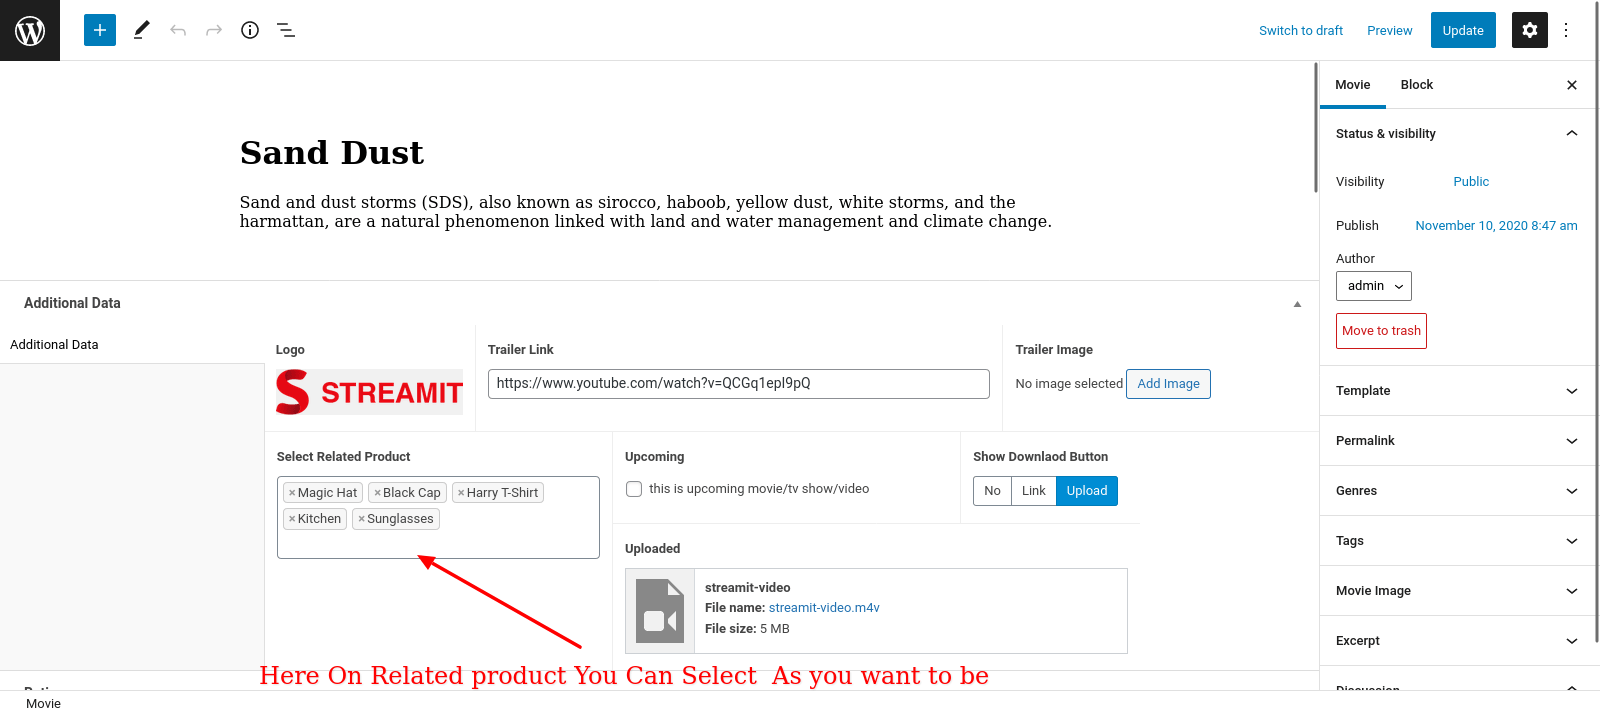
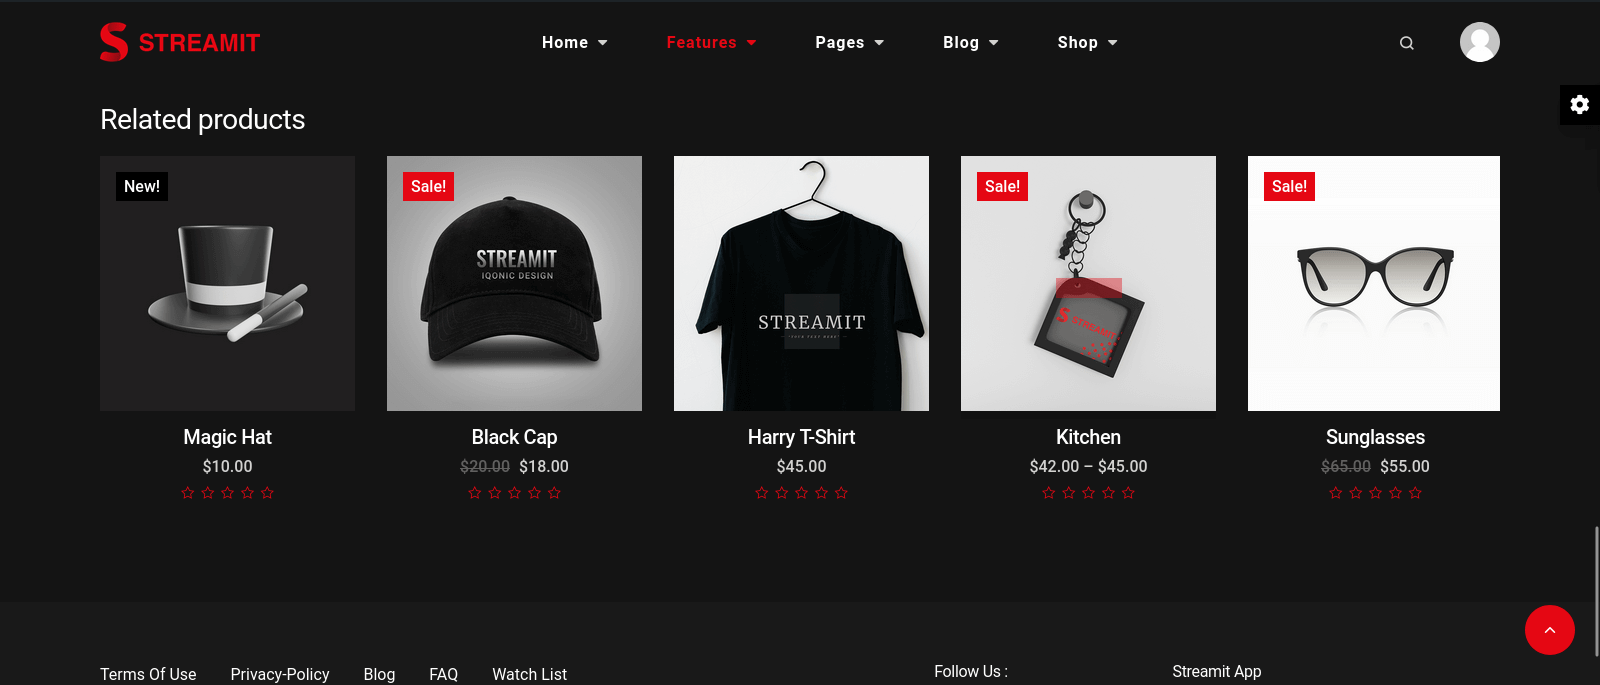
Related Product
Show the Related Product in Single Item Page
Recommended , Related Video And Movies,Upcomming
Show the Recommended , Related Video And Movies,Upcomming in Single Item Page


Genres / Tags / Category
Customization Single Genres , Tags , Category Page


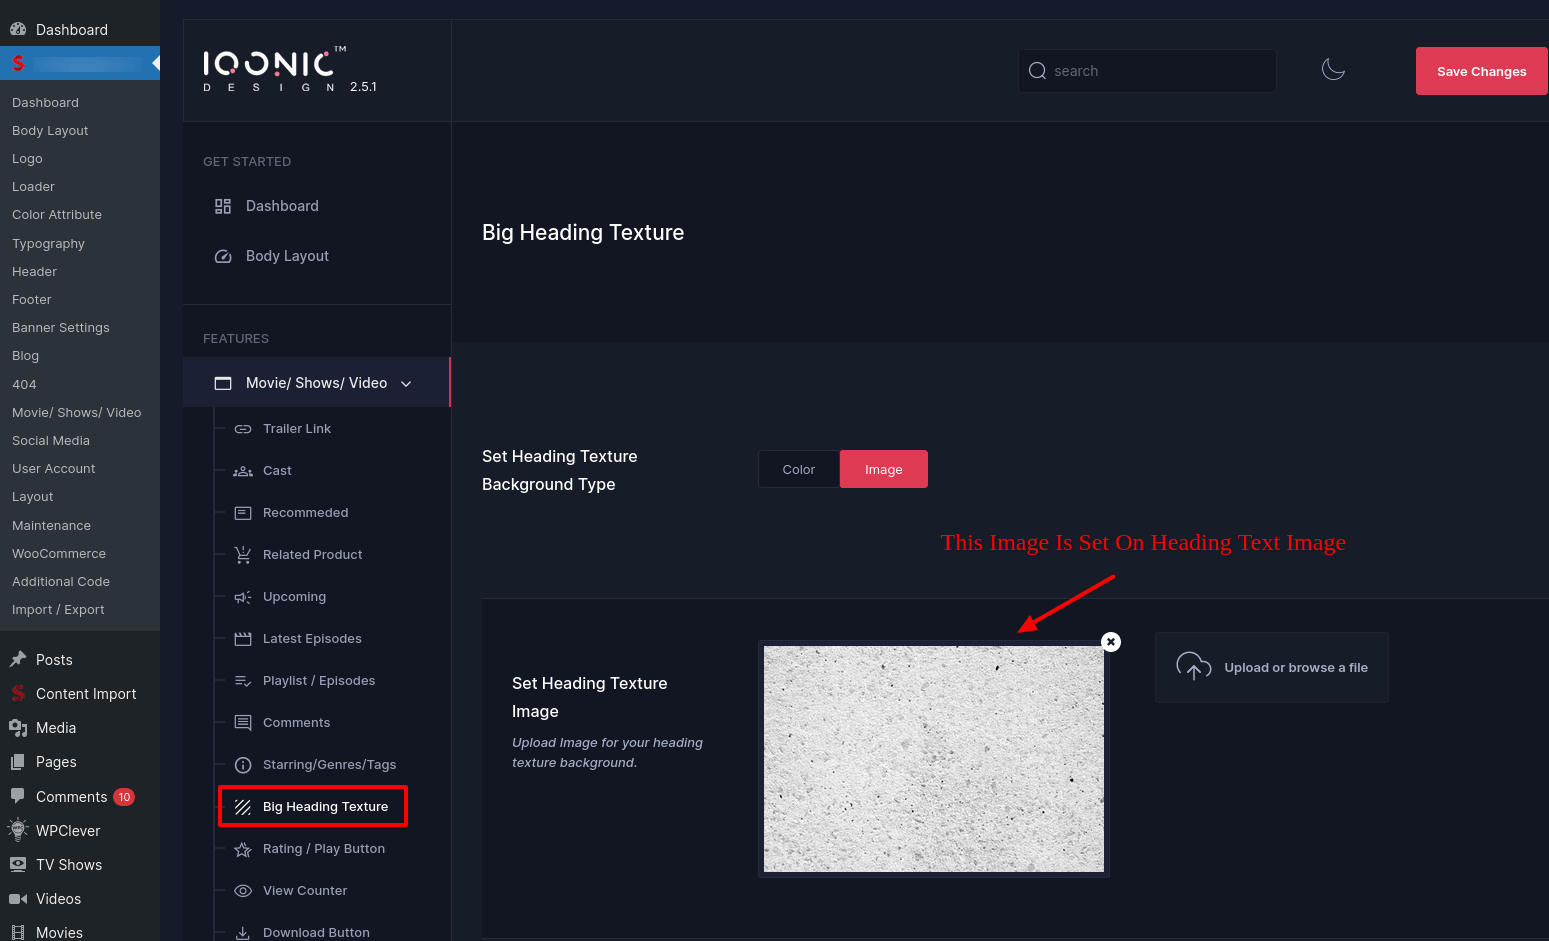
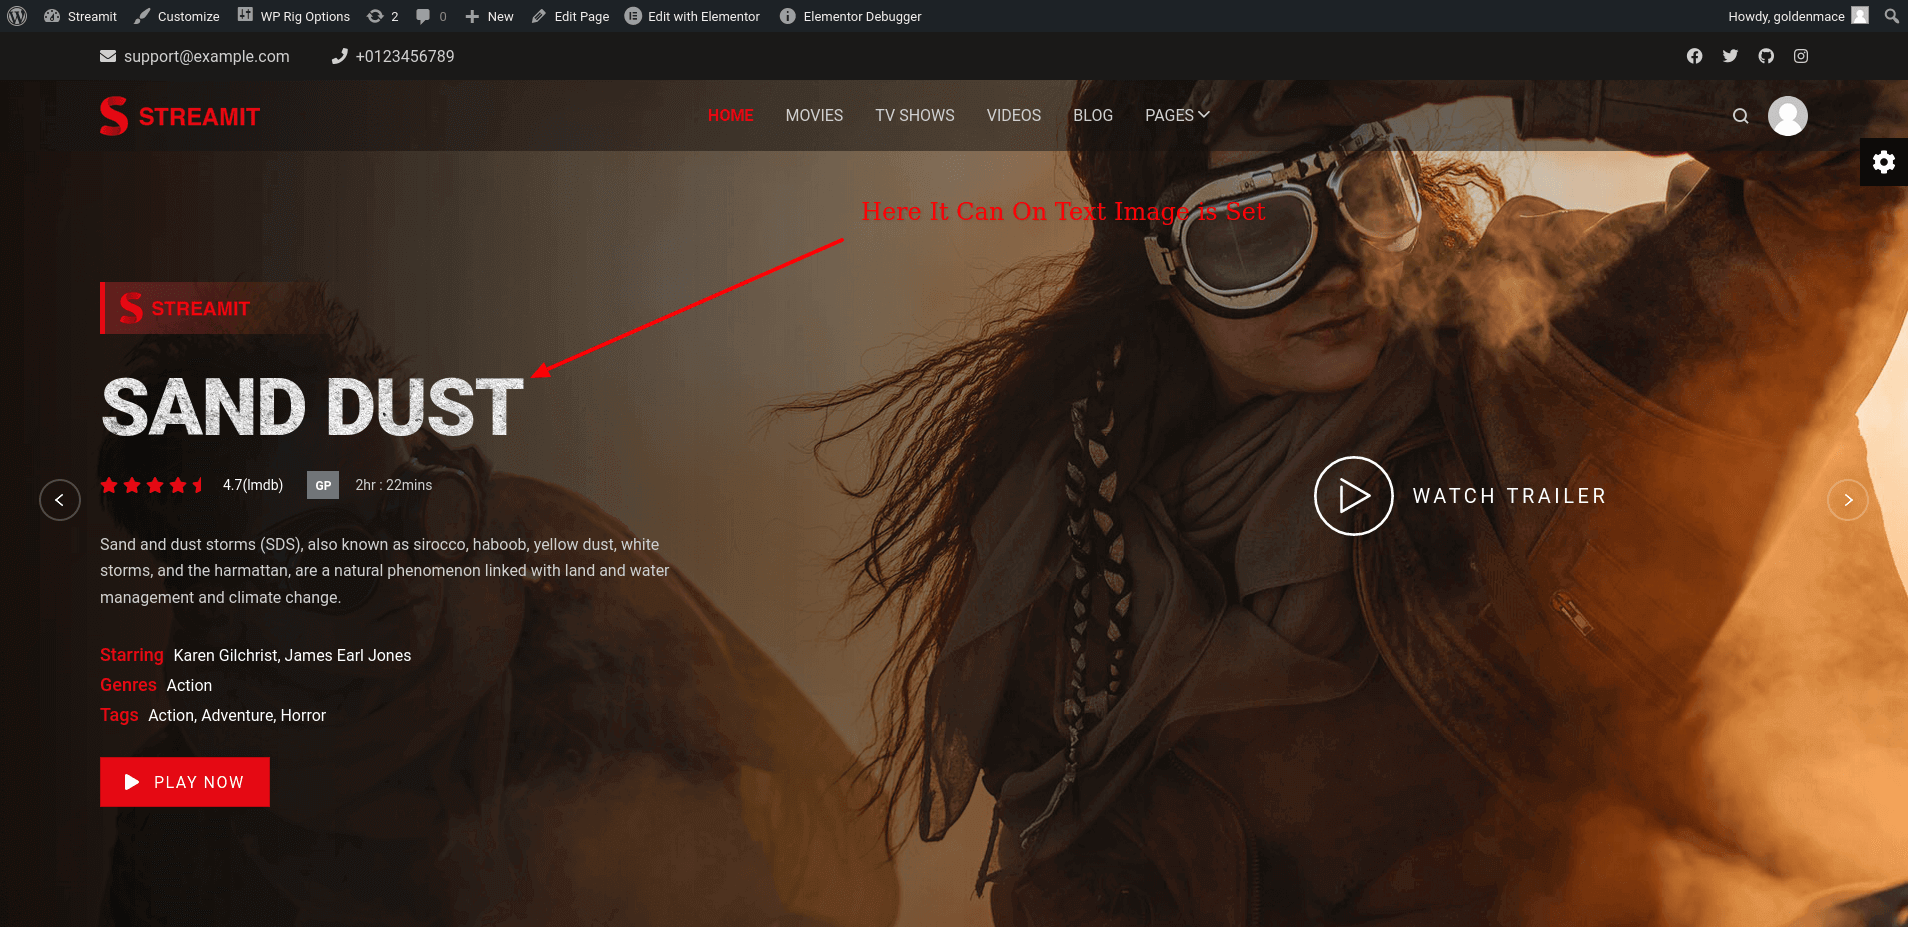
Big Heading Texture
Customization Big Heading Texture
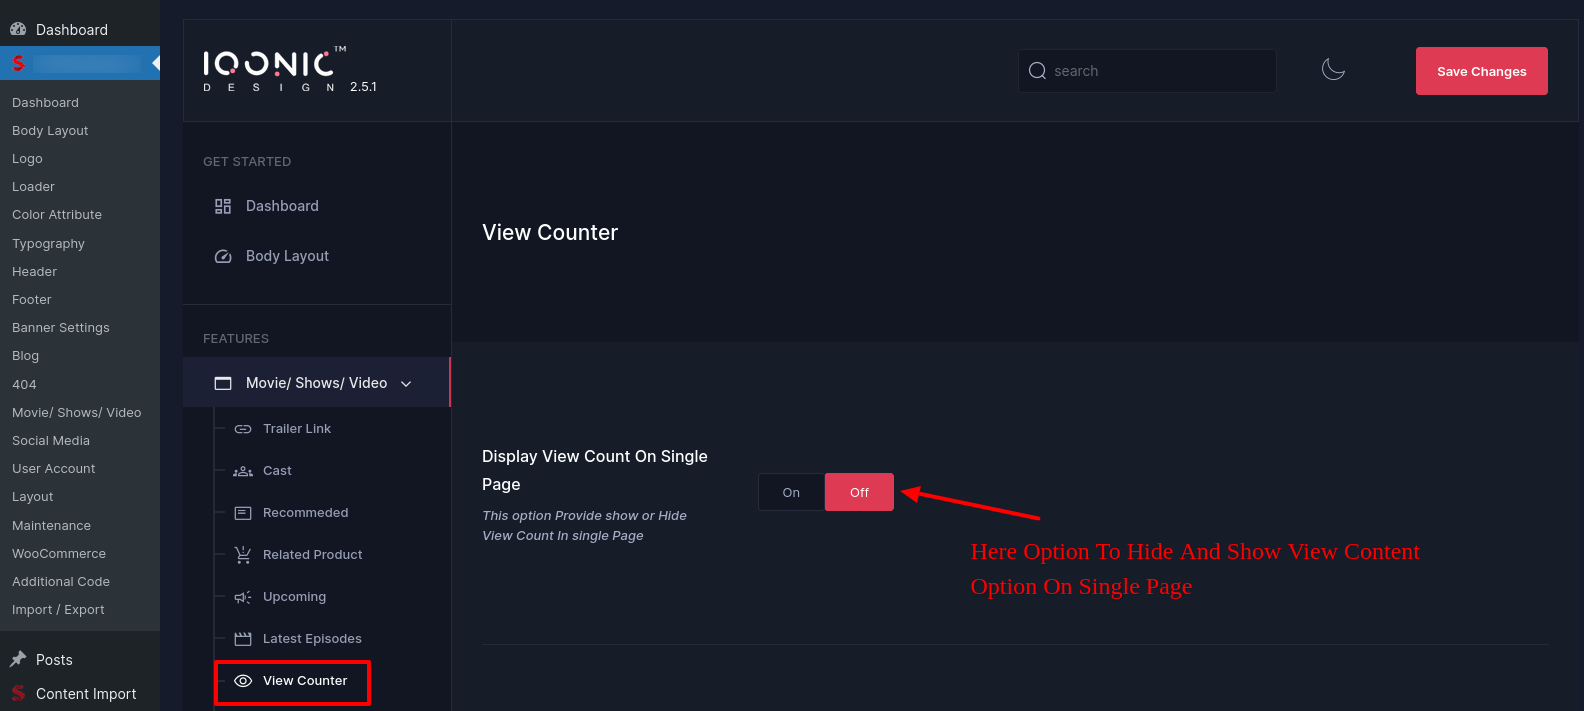
View Counter
Display View Count On Single Page
Download Button
Display Download Button

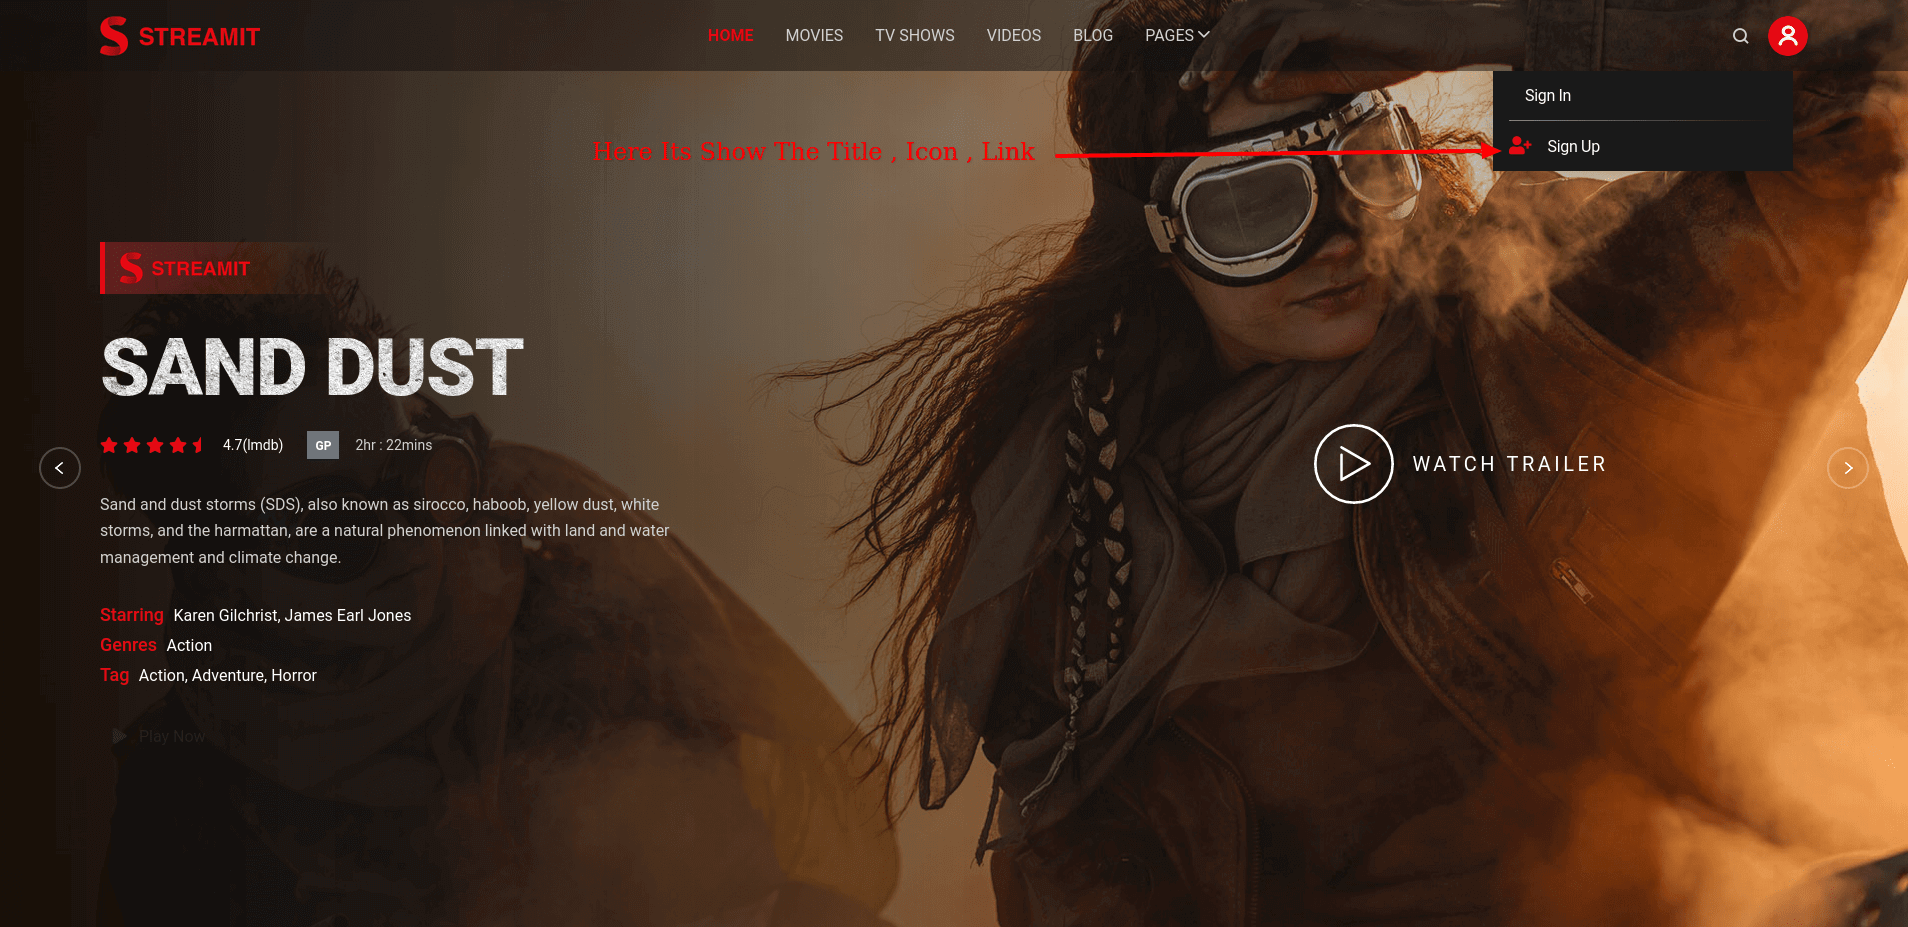
User Account
You can change settings for User Account .
User Account Settings
Here Admin can Change user account settings related button style and link

SideIcons Settings
Here Admin can Change sideIcons settings related button style and link


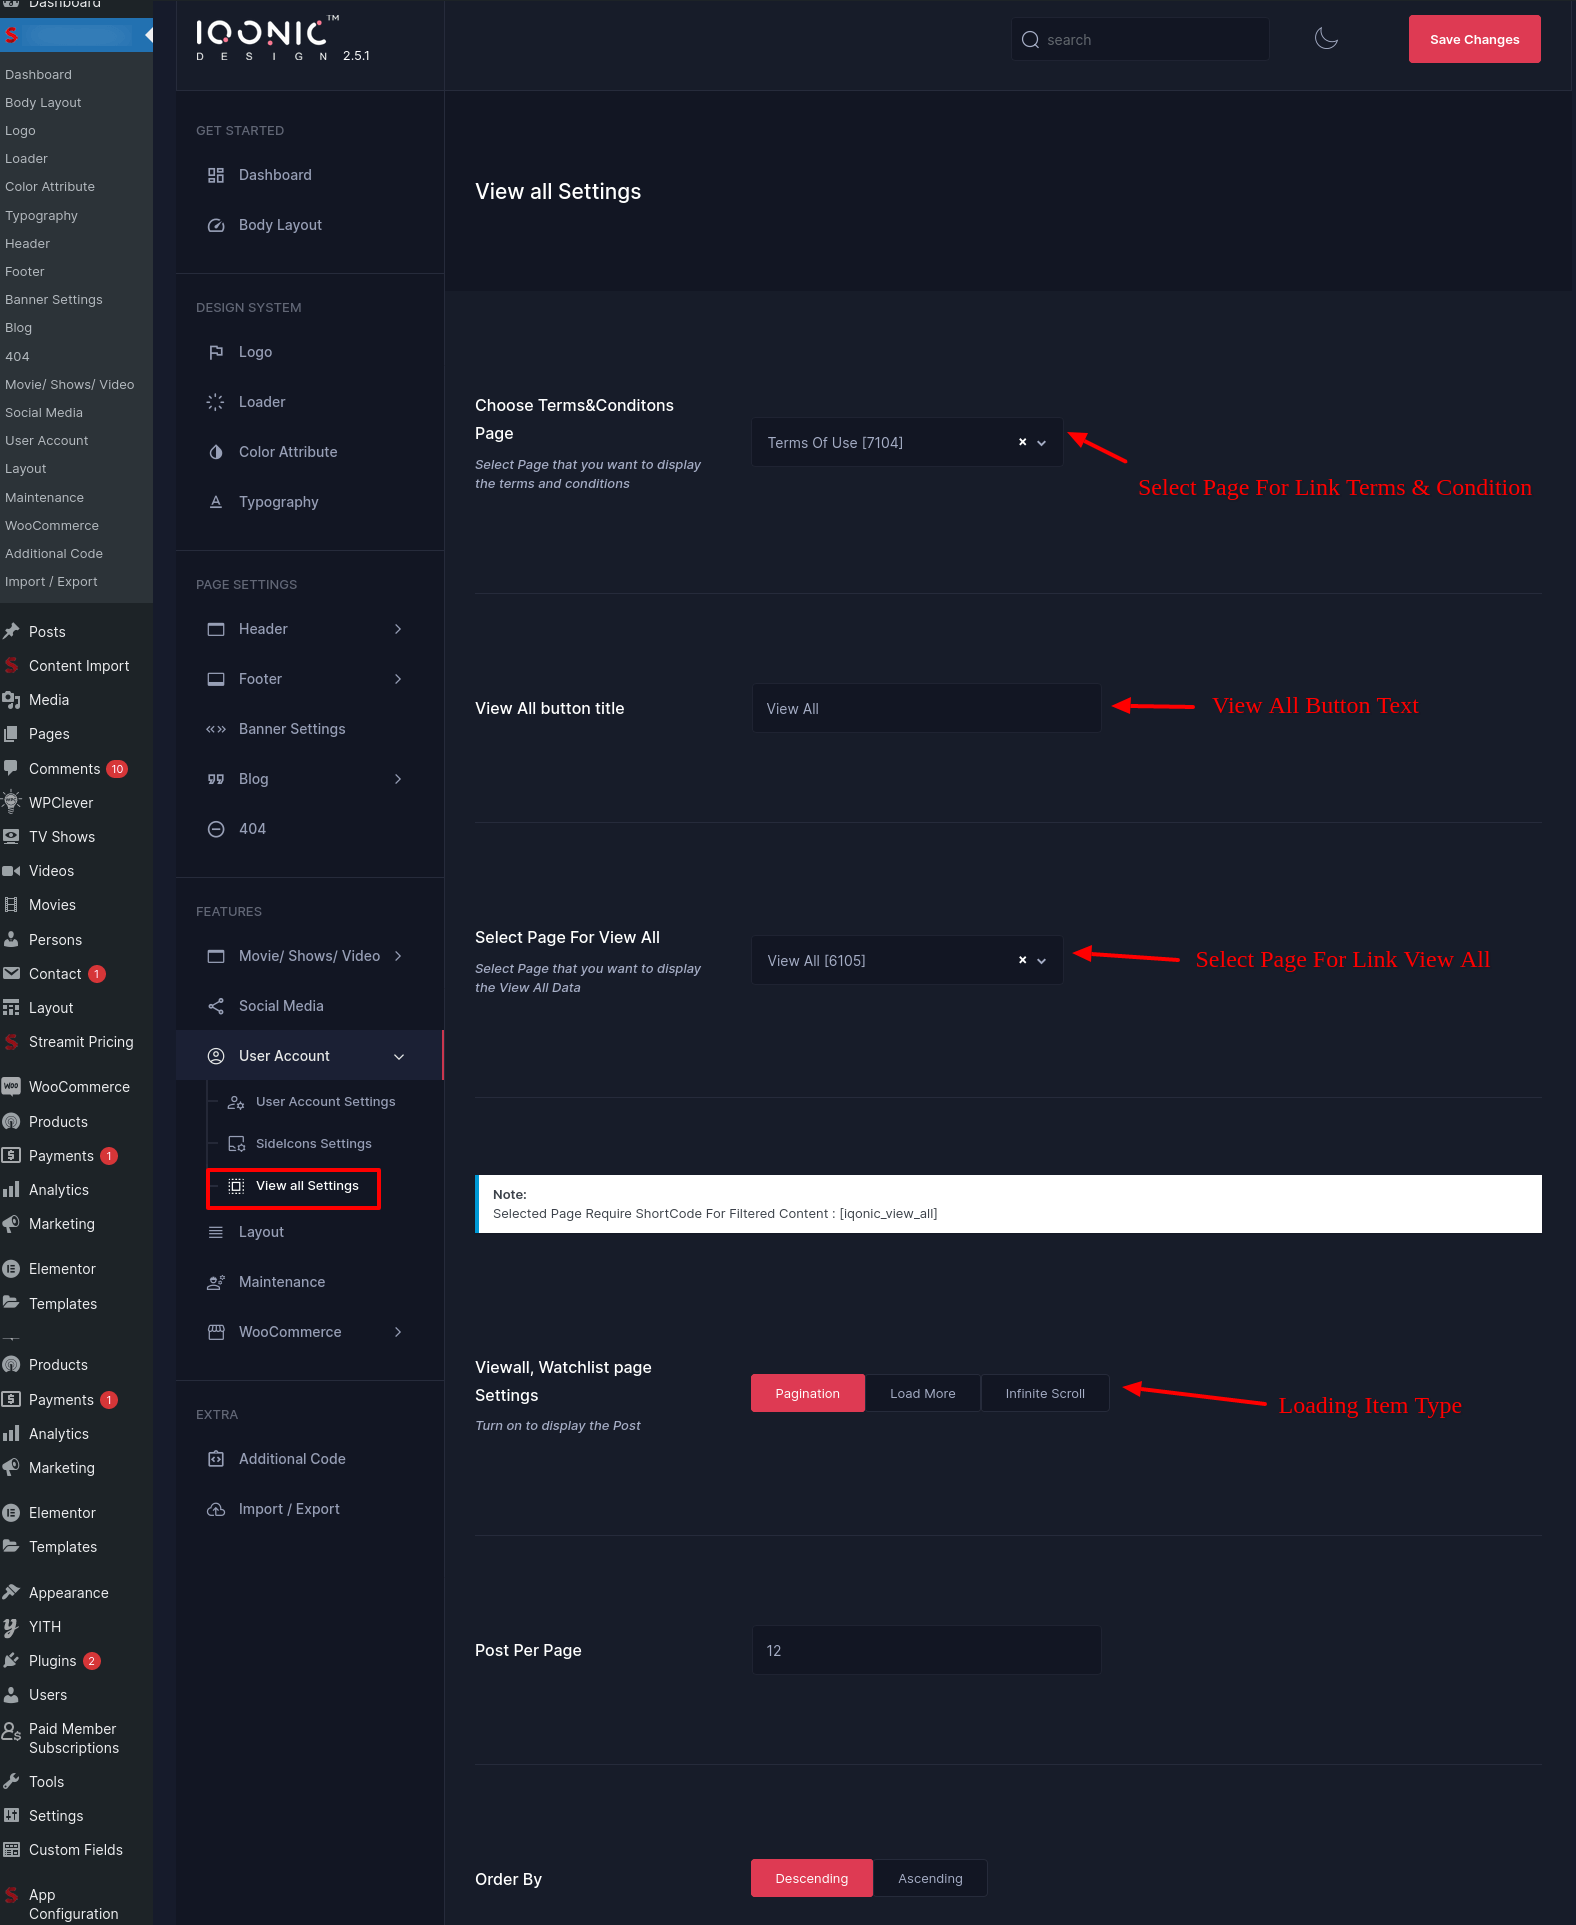
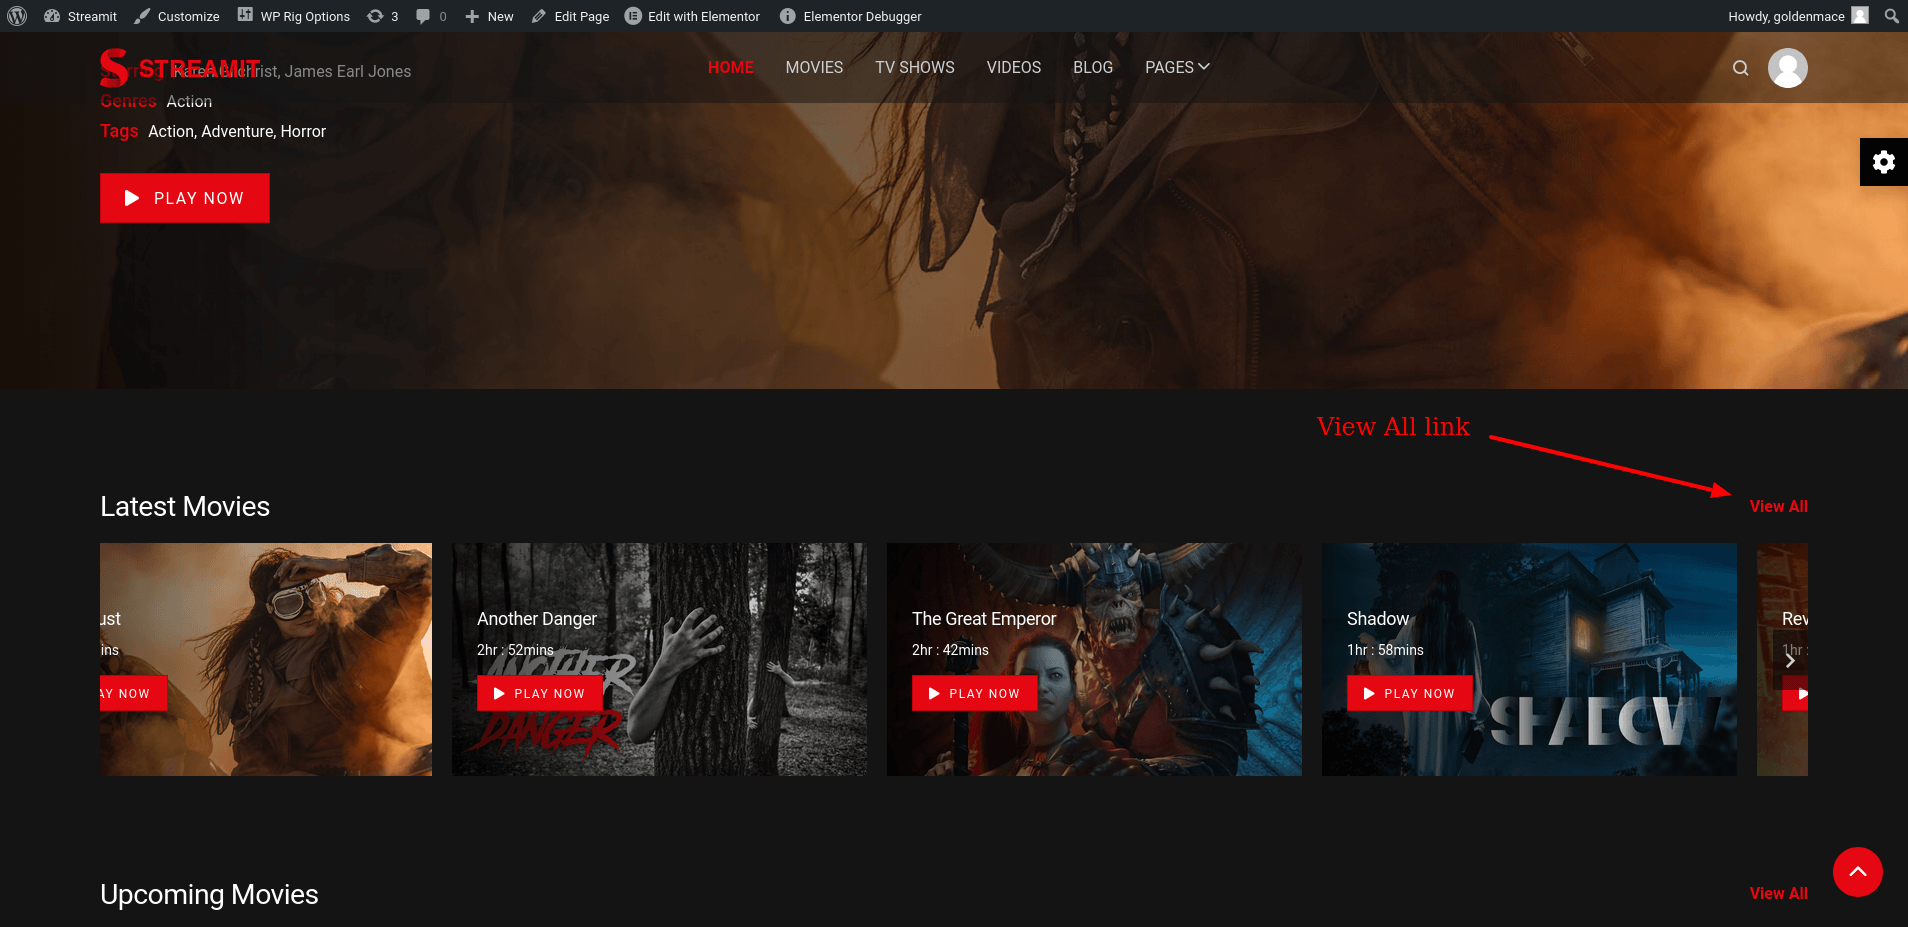
View all Settings
Here Admin can Change view all settings related button style and link
Blog Settings
You can change settings for Blog from here.

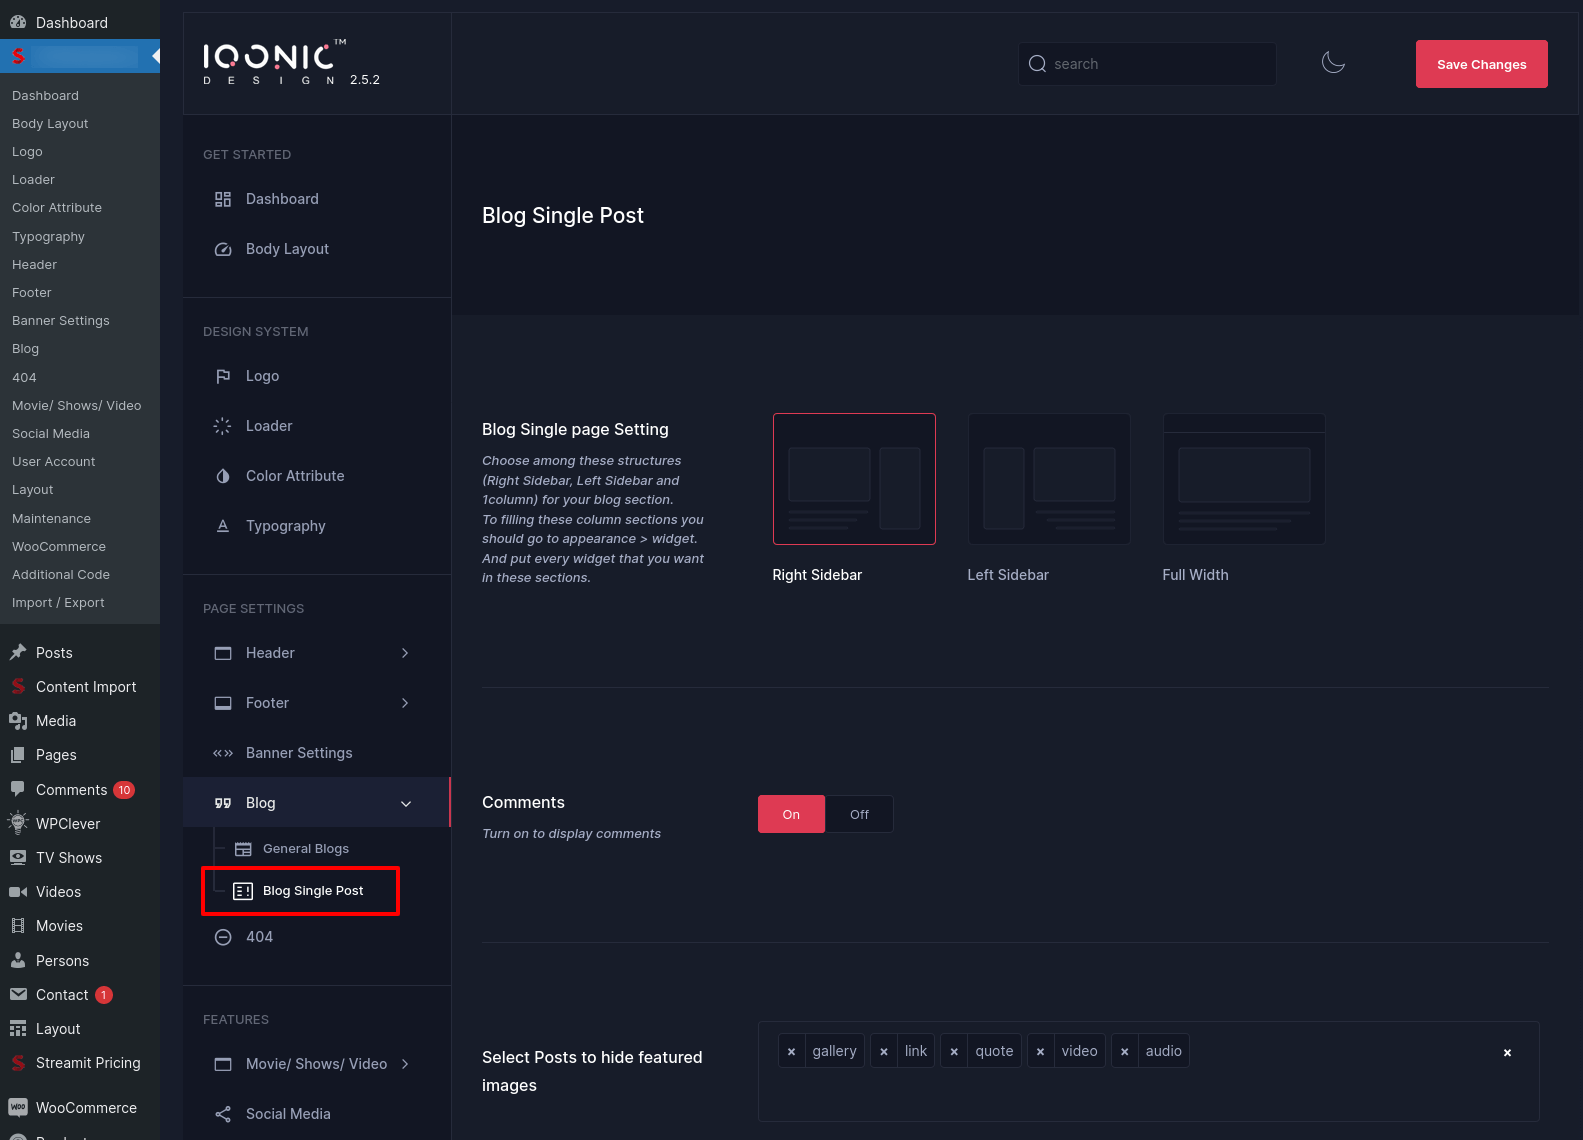
Blog Single Page
You can change settings for Blog Single page from here.
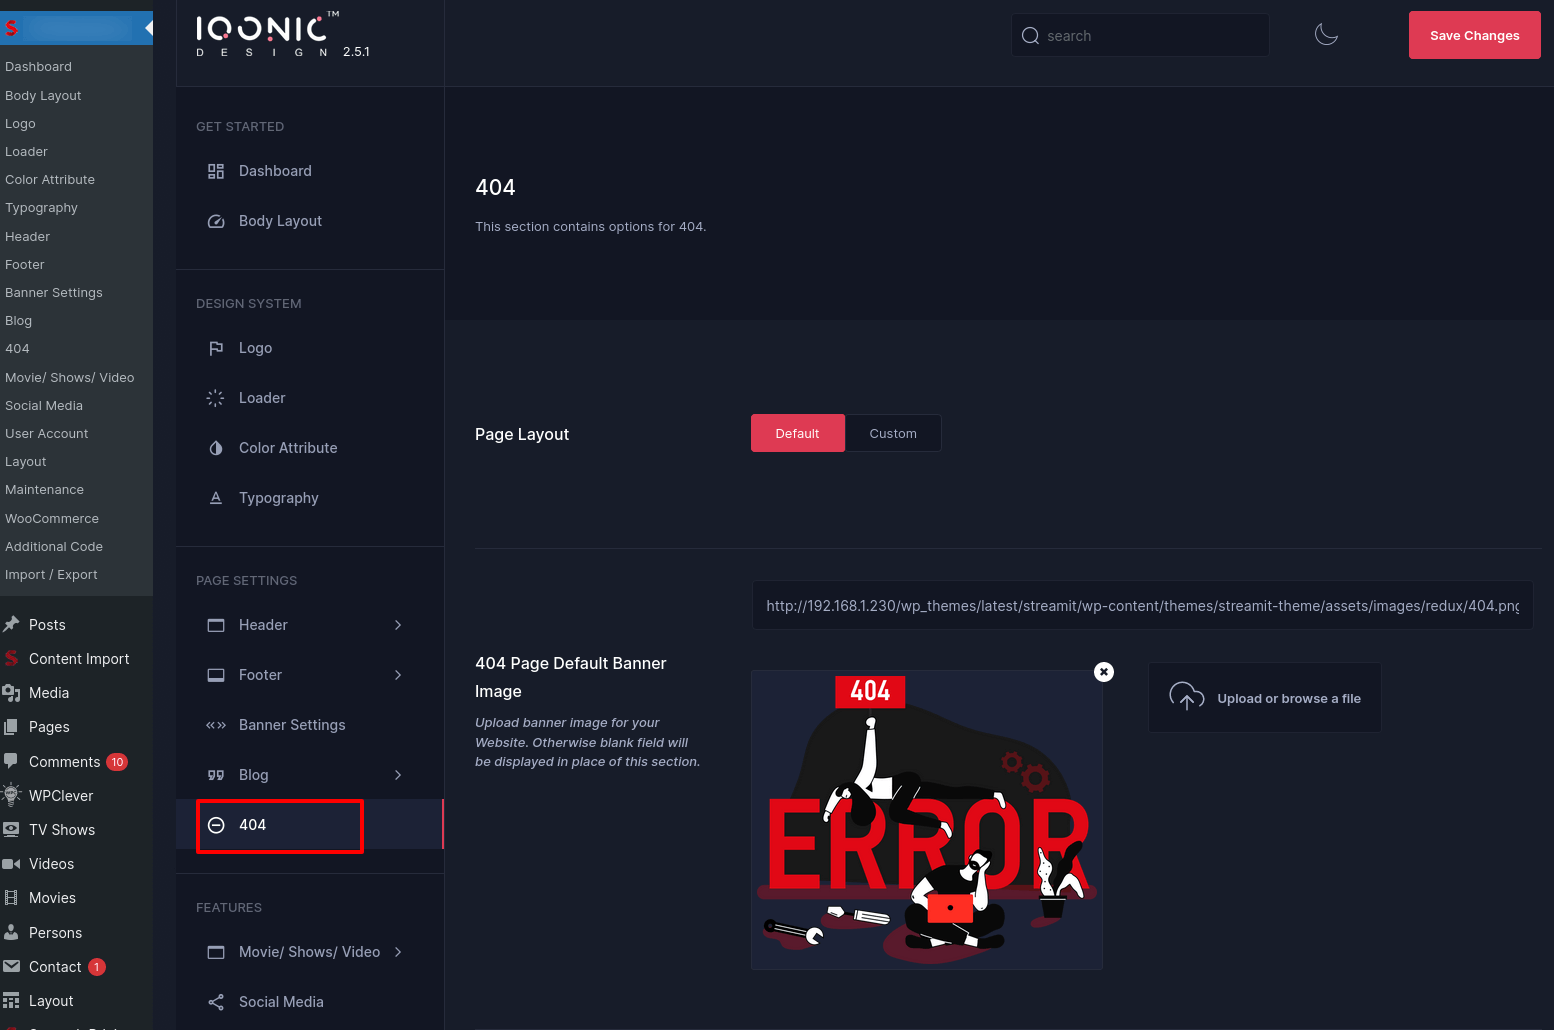
404 Settings
You can change settings for 404 Page not found from here.
Contact Settings
You can change settings for Contact Information from here.
Footer Settings
By-default, Footer functions from Theme Options -> Footer Settings for all pages. You can change settings for Footer from here.

In above example, 'Footer Layout 4' was selected. This means Footer 4 Column would appear on ALL PAGES of your site.
Now, sometimes we receive requests from buyers where they want to show different Footer style (for menu or appearance) for different pages. So we have come up with this option where you can display a different Footer style for a particular page.
For example, if you want to display a different Footer style for about page then go to Pages -> Select a page ->Edit . In below example about page was chosen.
On next screen, scroll down a bit and you'll see a section to choose Page settings styles. Refer to the screenshot below. You can now select any footer settings and save the page. Now, you have a new footer settings apply for your about page. You can do same for other pages also.
Link For the Custom Footer Layouts is HERE
Social Media Settings
You can change settings for Social Media from here.

Typography Settings
You can change settings for Typography from here.

WooCommerce Settings
Here User change Change The WooCommerce Settings.
Shop Page Setting
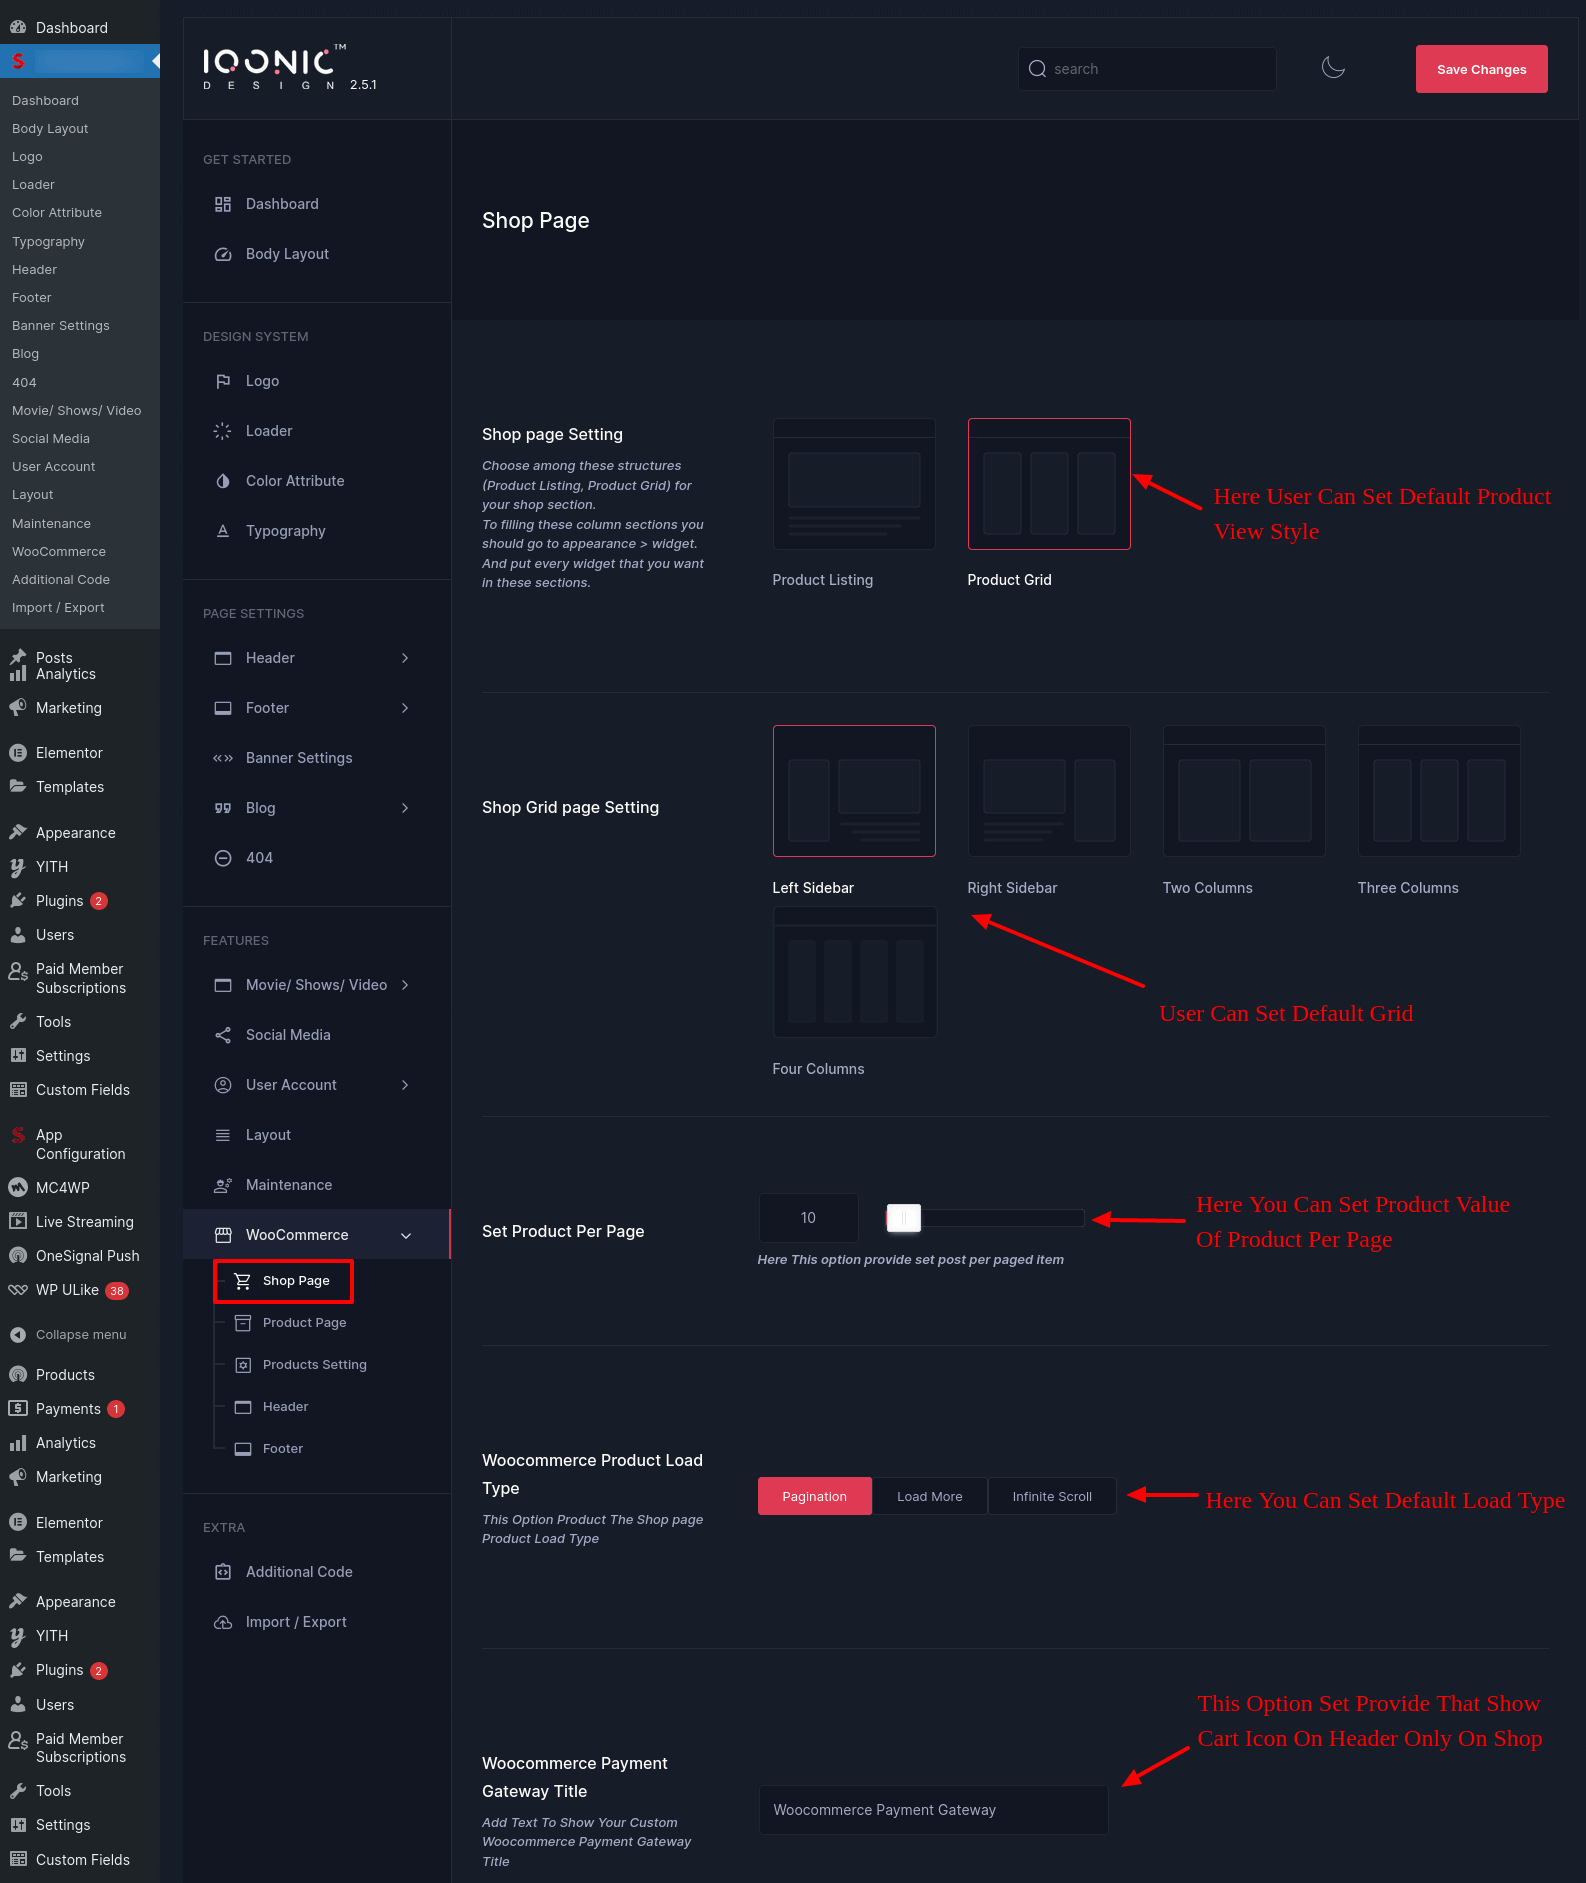
Here User can set default product view style

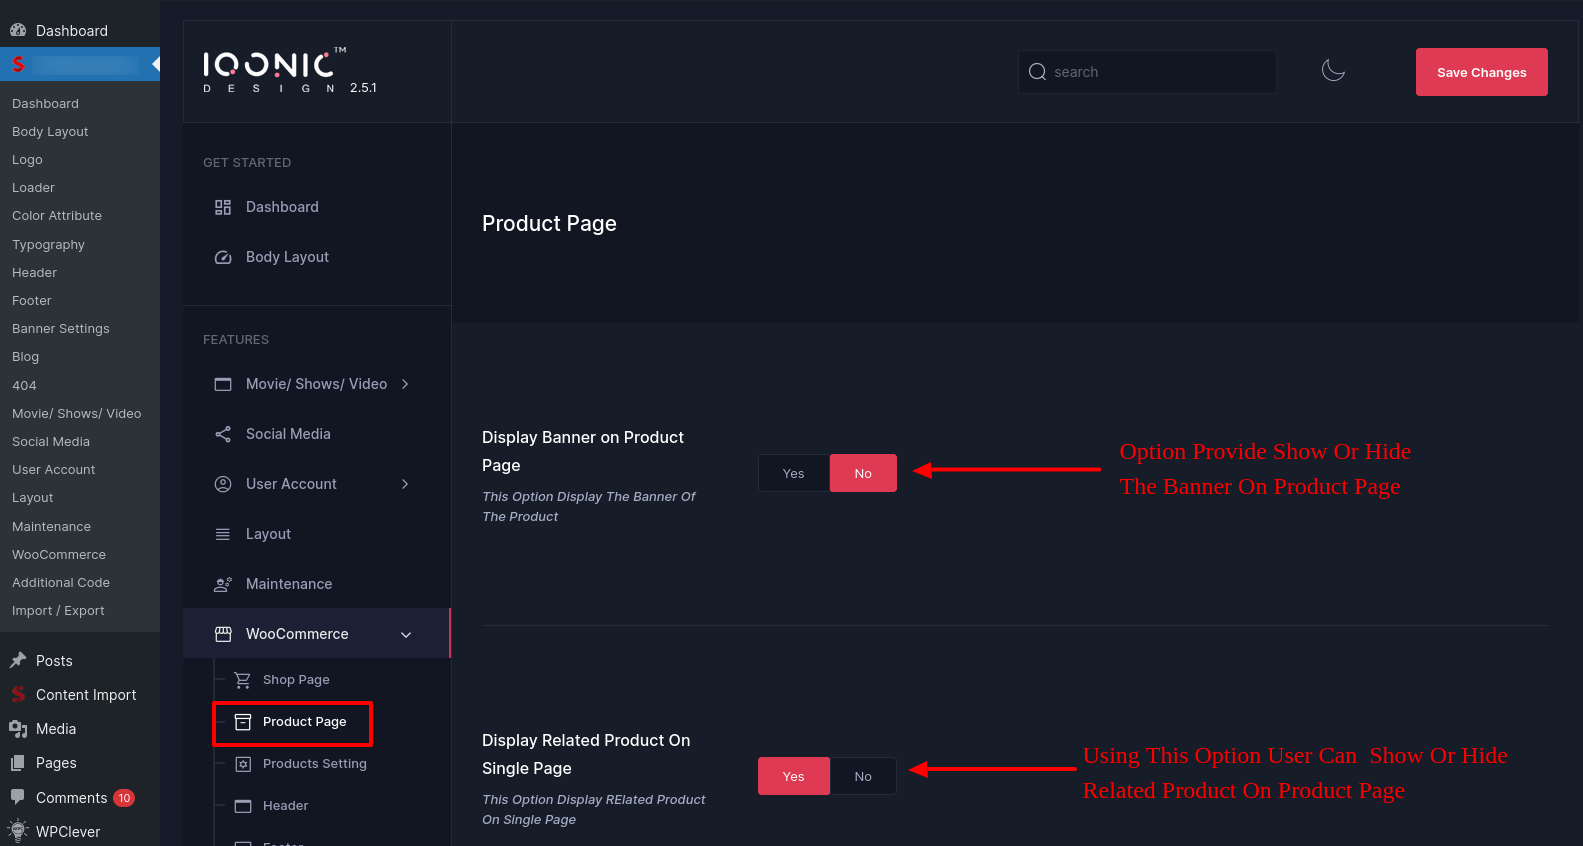
Product Page
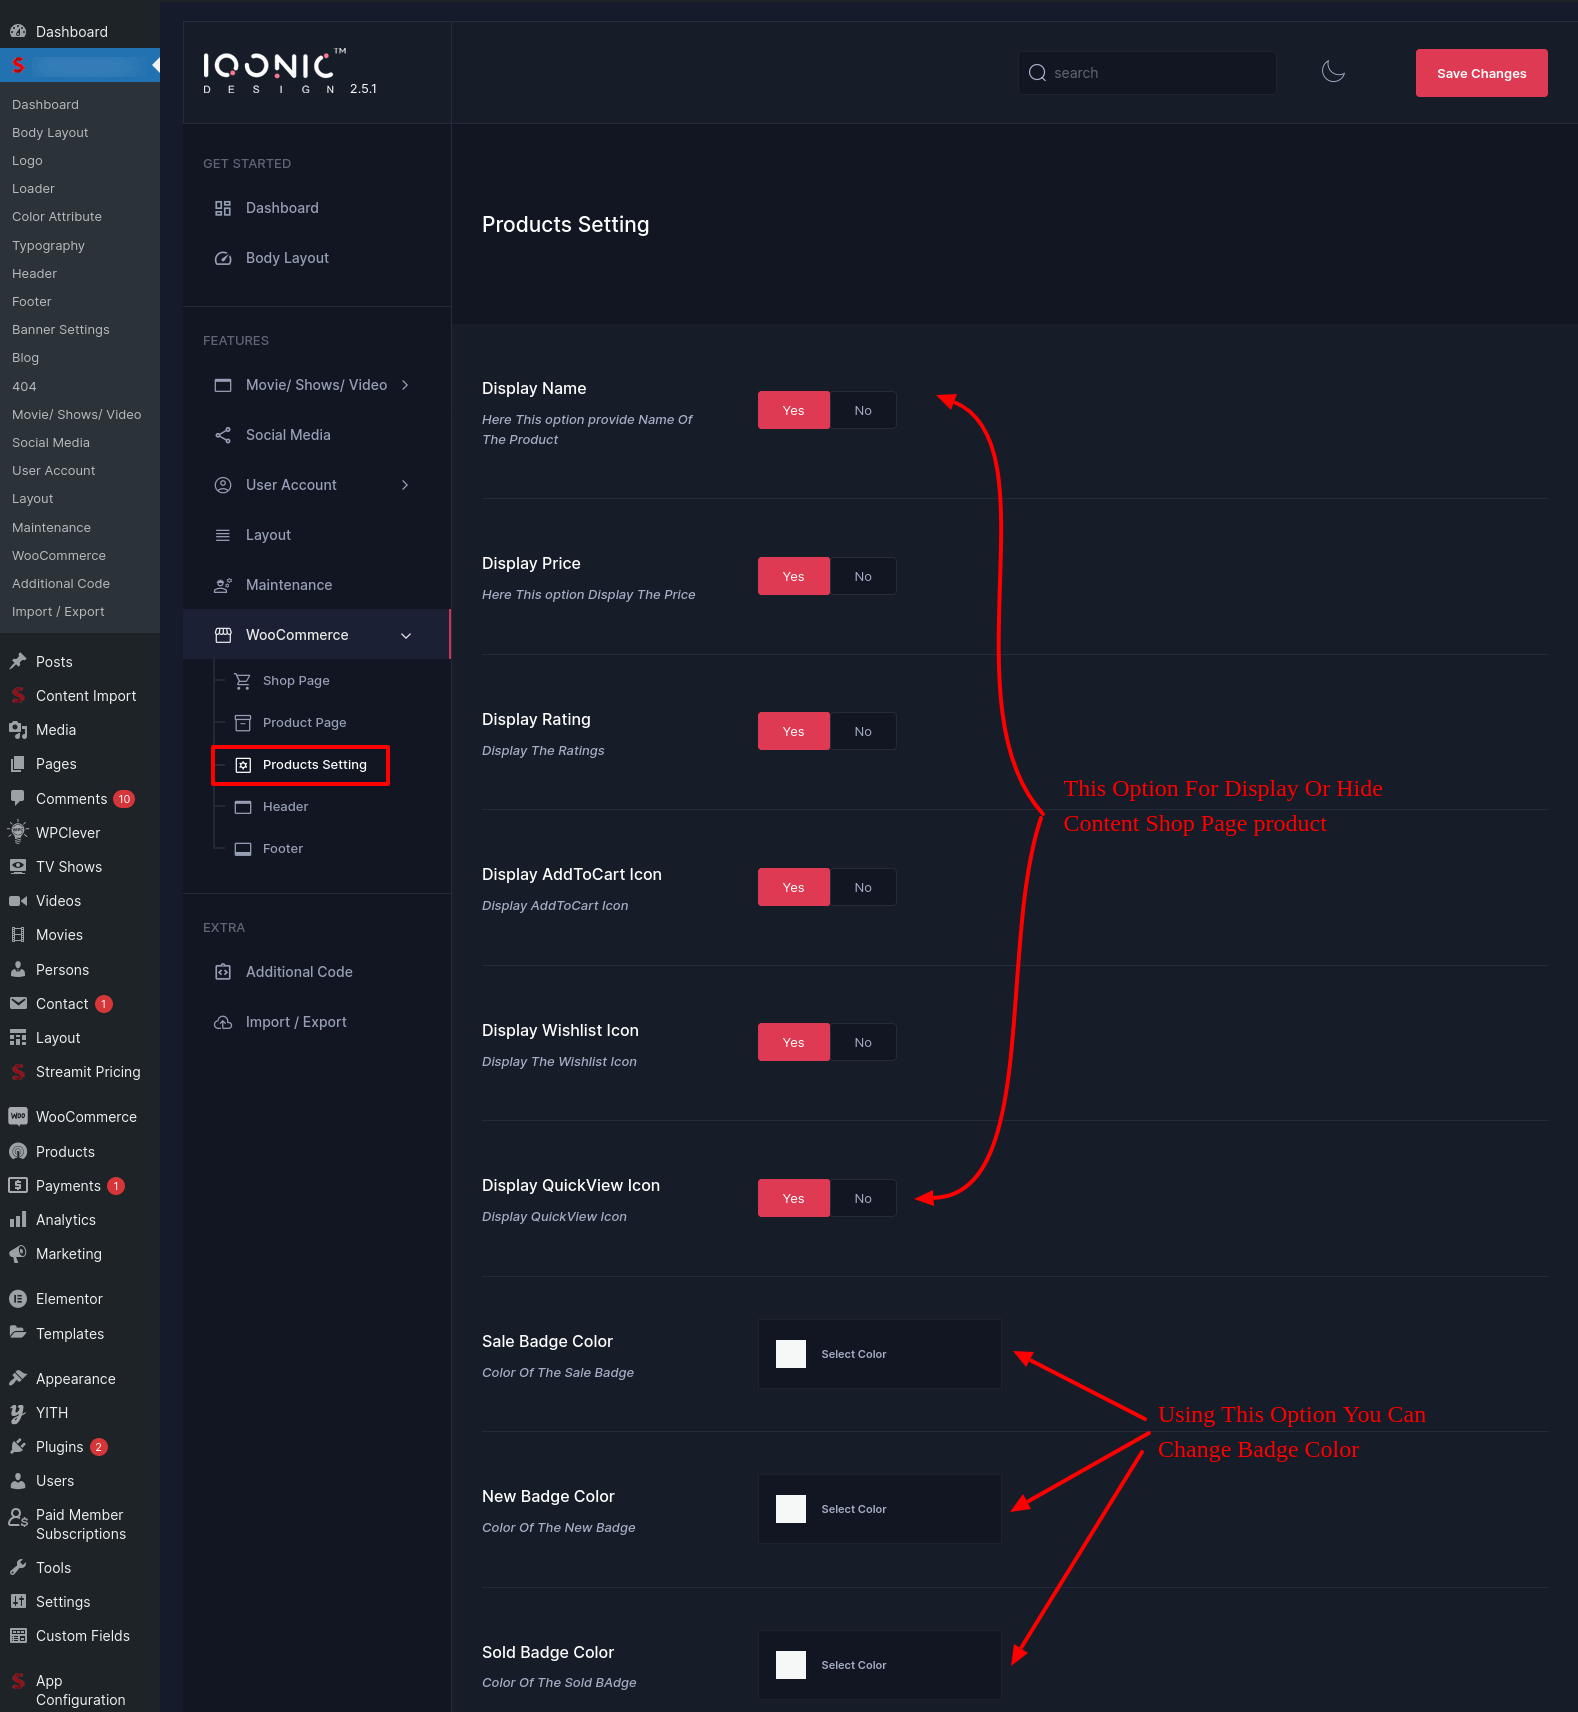
Product Setting
WooCommerce Header & Footer

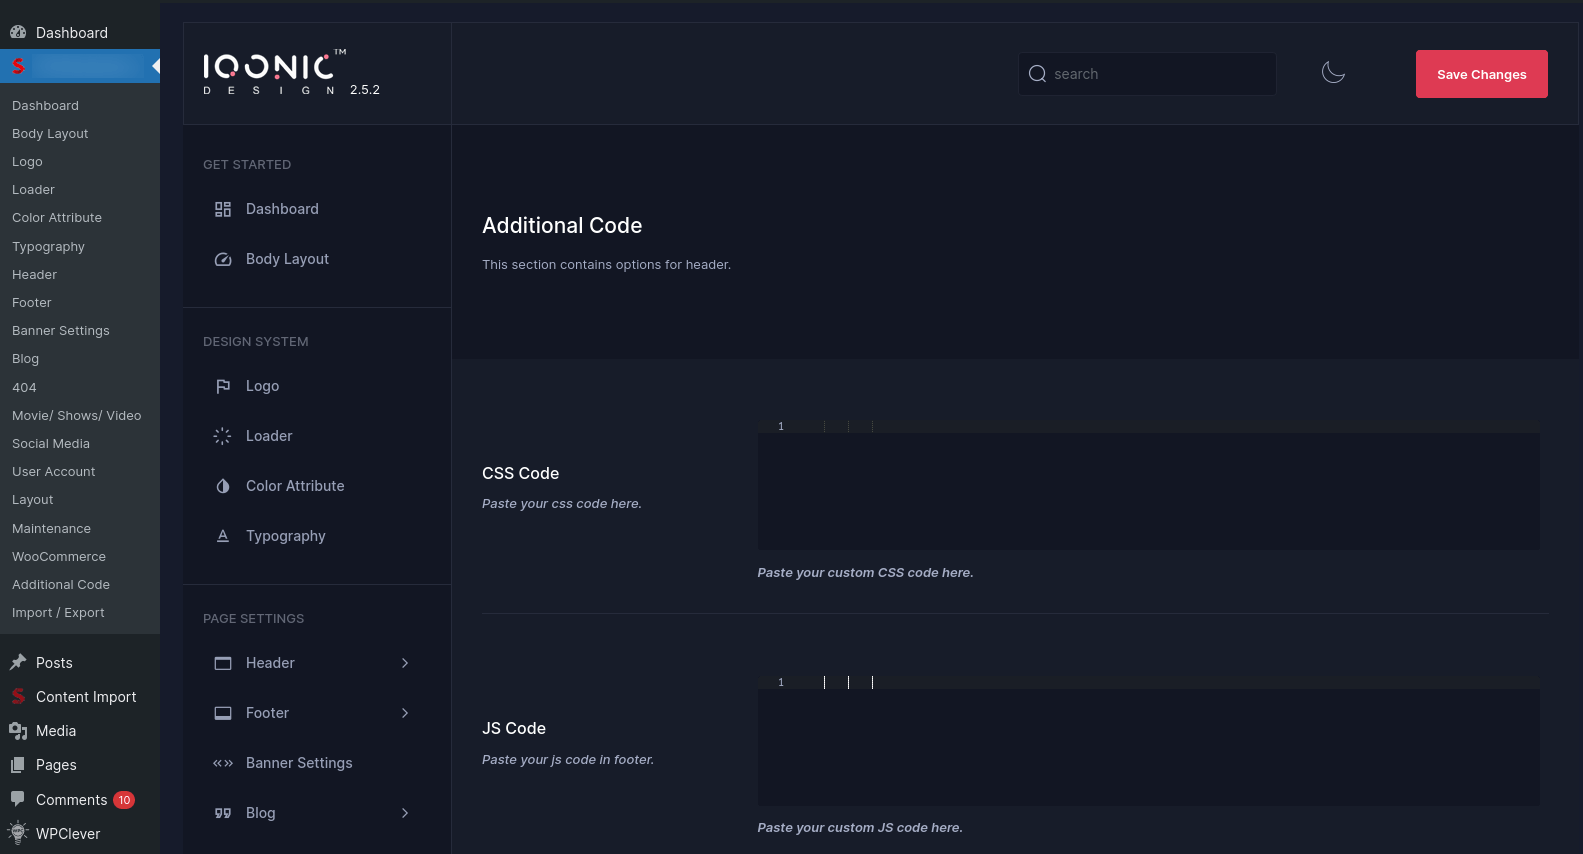
Additional Code Settings
You can change global css, js from here.
Import / Export
You can import or export theme settings from here. This will be usefull when you are developing your site on other server and want to move only theme settings. Just click "Download" button to export the settings and click "Import from file" button to import it.

Streamit Extension
Elementor Widgets
The following list contains all the widgets related to Elementor that are provided by the Streamit Extension plugin.
-
1) Accordion
Can be used for a variety of purposes such as displaying frequently asked questions, creating a table of contents, or listing features of a product
-
2) Ajax Search
A feature that allows users to find content on a website without the need to refresh the page
-
3) Banner Inner Slider
A type of slider that is typically used to display images or videos
-
4) Banner Slider
A type of slider that is typically used to display images or videos
-
5) Blog
Displays the blog posts in different styles
-
6) Button
Sets the link to any page in the site or to another site also
-
7) Cart
Displays product that are added to the cart
-
8) Box
Used to organize and display content of a specific category
-
9) Category Slider
Used to organize and display content of a specific category in slider mode
-
10) Continue Watching
Displays list of previously watched unfinished videos -
11) Genres
Displays different genres for movies -
12) Image Box
Highlight's a specific image, such as a product, service, or feature
-
13) Marquee Text
Text animation that involves moving text horizontally across a web page.
-
14) Movie Slider
Displays lists of movies in slider format
-
15) Movie Tab
Displays lists of movies in tabs format
-
16) Persons
Displays the movies cast and crew information
-
17) Pricing Plan
A set of features or services that are offered at different price points
-
18) Product Banner Slider
Displays the product in a banner slide format which attracts attention of the users
-
19) Products
Displays woocommerce products
-
20) Products Slider
Displays woocommerce products in a slider
-
21) Search
A feature that allows users to find content on a website
-
22) Section Title
Used to create a hierarchy of information and to make it easy for users to understand the structure of the page.
-
23) Social Icons
Small graphical elements that link to social media profiles or pages.
-
24) Tags
Displays the specific movies tags
-
25) Toogle Menu
A type of navigation menu that allows users to hide or reveal a list of options by interacting with a button or other control
-
26) Tv show slider
A type of user interface element that allows users to browse through a list of television shows
-
27) Tv show tab
A type of user interface element that allows users to browse through a list of television shows with cast and episode details
-
28) User
Displays the woocommerce pages link for logged in/logged out users
-
29) Verticle Slider
Allows users to scroll through a list of options that are arranged in a vertical layout
-
30) Video Slider
A type of user interface element that allows users to scroll through a list of videos
-
31) Video Tab
A video tab is a type of user interface element that allows users to access and view a collection of videos.
-
32) Video Popup
Allows a video to be displayed in a separate, overlay window on top of the current webpage.
-
33) Watchlist
Allows users to keep track of and easily access a list of videos, movies, TV shows, or other content that they want to watch or are interested in.
-
34) Woocommerce login
Display the woocommerce login/logout, account summary or order tracking form
-
35) Banner Thumb Slider
The Banner with Thumbnail Slider with interactive banners that capture user attention
-
36) Top Ten
This widget gives you access to the top 10 movies and TV shows updated daily, so that you can stay up to date with the most popular content.
-
37) Movie Cards
Our new interactive movie card widget will enhance your movie viewing experience. With its stunning design, it is incredibly easy to add on web page
-
38) Favourite Personality
Introducing the show you favorite actor and actress info widget
-
39) TVShow Season
Introducing the revolutionary tv show season wise episodes widget! This widget offers viewers an efficient and comprehensive way to stay up-to-date with their favorite shows.
Streamit Shortcodes
Shortcodes
The following list contains all the shortcodes related to Streamit Theme.
-
1) iqonic_view_all
Displays the list of the post type video,tv_shows,movie or products based on the url.
example: [iqonic_view_all]
-
2) iqonic_forgot_pass
Shows the woocommerce forgot password form for logged out users
example: [iqonic_forgot_pass]
-
3) iqonic_login
Shows the login form to the users for logging into the website
example: [iqonic_login]
-
4) iqonic_user_playlist
Allows users to create,view,edit and delete palylists in moveis,videos and tv shows sections
example: [iqonic_user_playlist]
-
5) iqonic_playlist
Allows users to save the movie, video or tv show to their desired playlist they have created
example: [iqonic_playlist]
-
6) iqonic_edit_user
Allows user to change the first name, last name, email id, DOB, gender, bio, profile image
example: [iqonic_edit_user]
-
7) iqonic_edit_user_avatar
Allows user to change the profile image only
example: [iqonic_edit_user_avatar]
-
8) streamit_user_account
Displays the current user subscription plan details, profile edit, payment details
example: [streamit_user_account]
-
9) iqonic_user_profile
example: [iqonic_user_profile]
-
10) iqonic_register_form
Presents a form for the user to input personal information, such as their first and last name, email address, date of birth, gender, a brief description of themselves, and a profile picture.
example: [iqonic_register_form]
-
11) iqonic_user_watchlist
The main function of the user watchlist is to keep track of items that user is interested in and want to come back to it later. The watchlist is typically specific to each individual user and can be accessed through their account or profile
example: [iqonic_user_watchlist]
-
12) iqonic-signup-form
A signup form in WooCommerce is a feature that allows users to create an account on an e-commerce website that is built using the WooCommerce platform. This form typically includes fields for the user to enter their personal information, such as their name, email address, and a password. Once the form is submitted, a new account will be created for the user and they will be able to log in and access the website's features and functionality, such as viewing their order history, managing their shipping and billing information, and more
example: [iqonic-signup-form]
-
13) iqonic-login-form
A login form in WooCommerce is a feature that allows users to access their existing account on an e-commerce website that is built using the WooCommerce platform. The form typically includes fields for the user to enter their email address and password. Once the form is submitted, the user will be logged in to their account and will be able to access the website's features and functionality, such as viewing their order history, managing their shipping and billing information, and more.
example: [iqonic-login-form]
-
14) streamit_continue_watching_slider
"Continue Watching" is a feature that allows users to pick up where they left off in a video or series they were previously watching. It allows users to quickly resume watching a video or episode they have started but haven't finished, rather than having to search and find the content again. This feature is helpful for users who want to avoid interruption in the middle of a video and continue watching it later.
example: [streamit_continue_watching_slider]
How-To`s / Guides
-
Question-1 How to Install Theme & Plugins?
-
Question-2 How to Add Movies?
-
Question-3 How to Use PMS Plugin?
-
Question-4 How to Use Streamit Option?
-
Question-6 How to Add TV Shows?
-
Question-7 How to Add Cast & Crew?
-
Question-8 How to Use Contact Form?
-
Question-9 How to Use Download Options?
Before Go To Set Download Button Check This Site OptionThis is new option iqonic added into it

-
Question-10 How Import Demo Data?
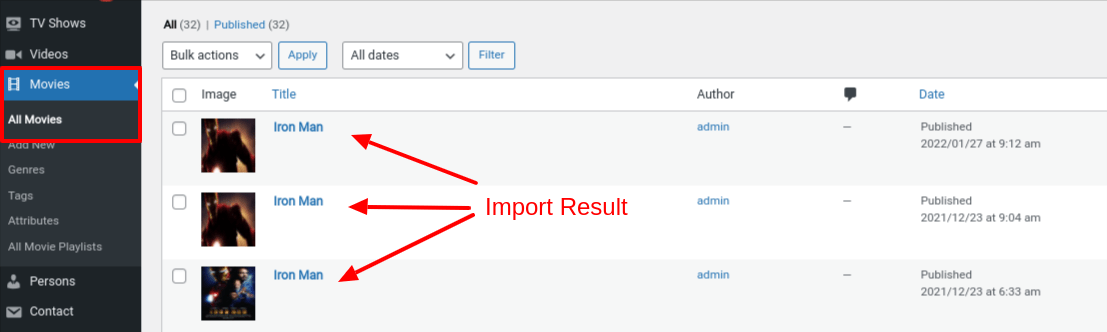
Multiplatform Content Import
Multiplatform import feature provides a data import option from various platforms like youtube, OMDB, TMDB, Vimeo in MasVideo plugin's post type movie, video.
Configure your suitable platform

Search content
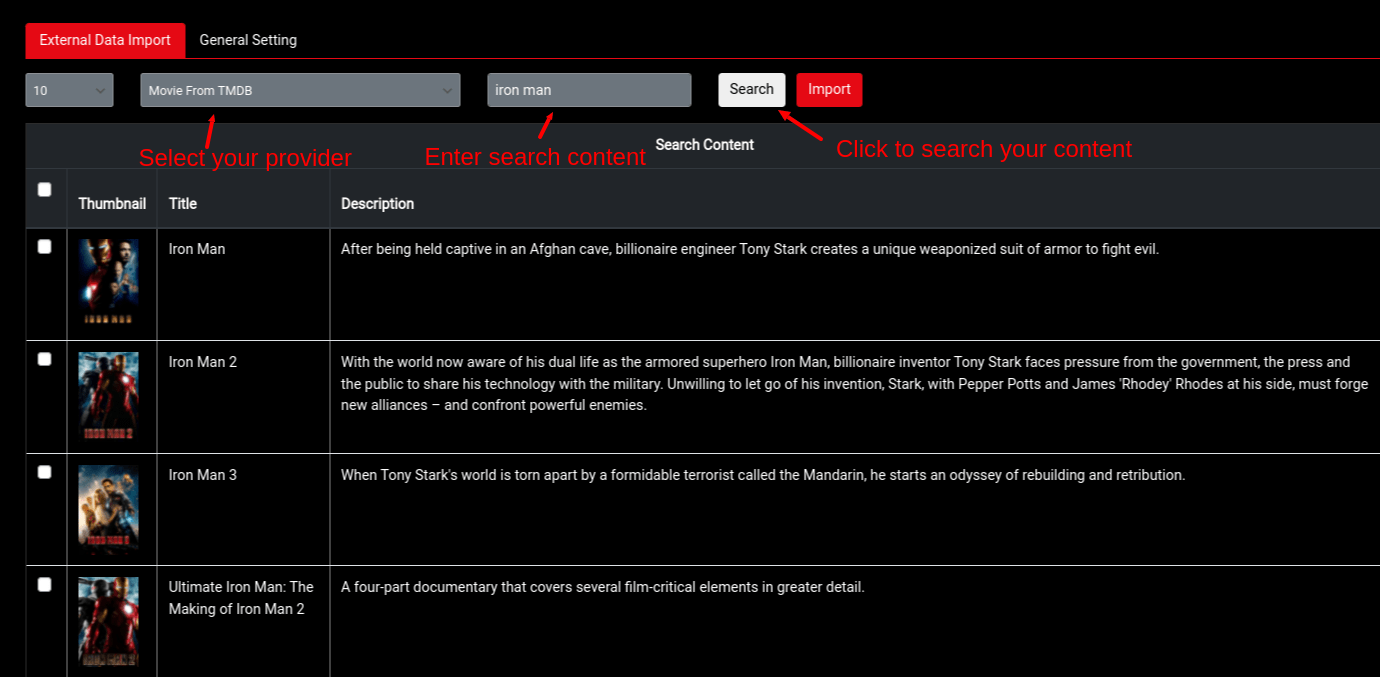
Selected content import

Import result
Sidebars and Widgets
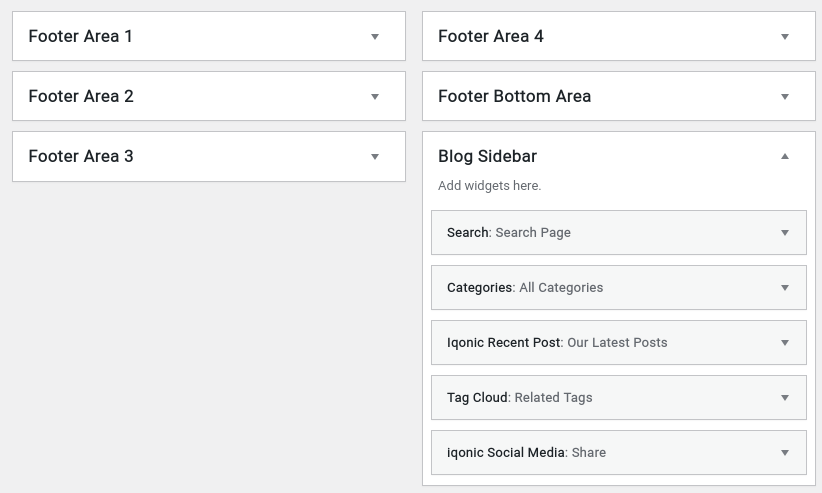
This section shows a list of pre-defined widgets on a page, so that you will find it easier when pulling out widgets to set up your site.
- Blog Sidebar : You can add widgets here to appear in your sidebar on blog posts and archive pages.
- Footer Area 1 : This Widget Position will be shown in first footer area as first widget position.
- Footer Area 2 : This Widget Position will be shown in second footer area as second widget position.
- Footer Area 3 : This Widget Position will be shown in third footer area as third widget position.
- Footer Area 4 : This Widget Position will be shown in fourth footer area as fourth widget position.
- Footer Bottom Area : This Widget Position will be shown in footer center area as bottom widget position.
Contact Form
To build contact form you can go step by step using screens given below.


Elementor Builder
If you doesn't know Elementor , can read it's official documentation here
You can add Elementor Settings from here.

Iqonic Layout Plugin:
Introduction of Iqonic Layout Plugin
With the help of the Iqonic Layouts plugin, you can make your own custom header, footer, mega menu, 404 page, and custom layout using Elementor Page Builder.
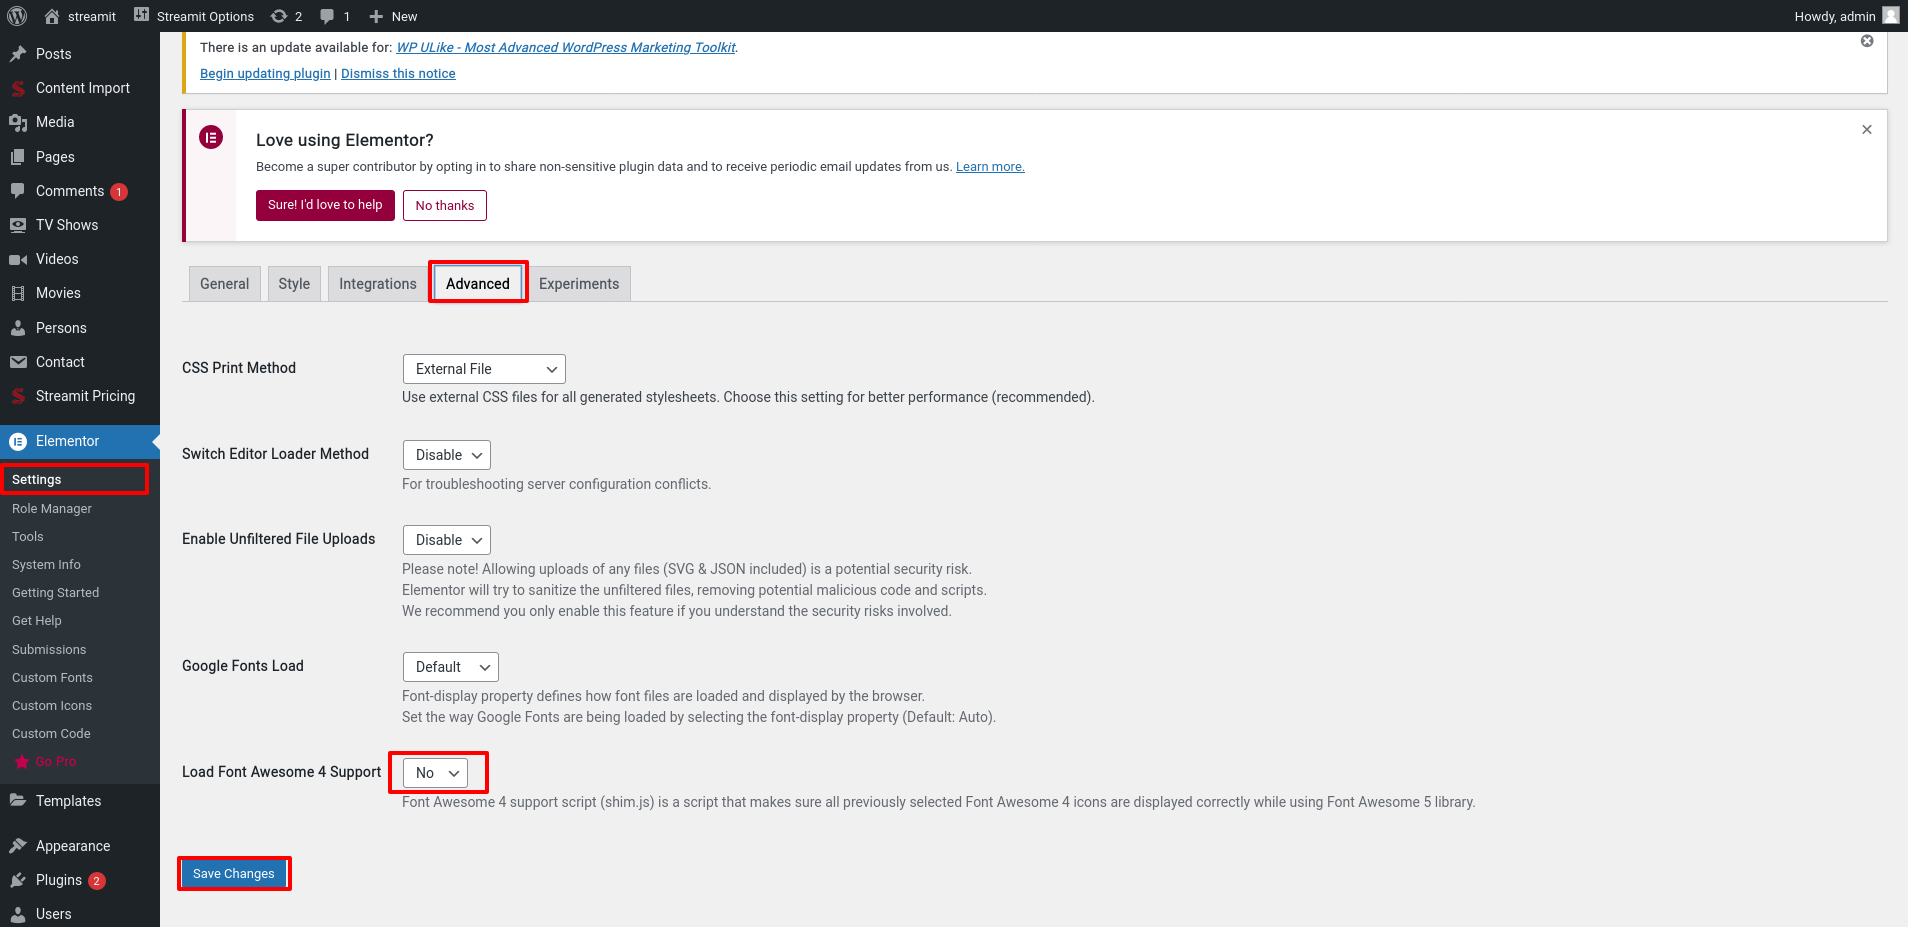
Enable Layout
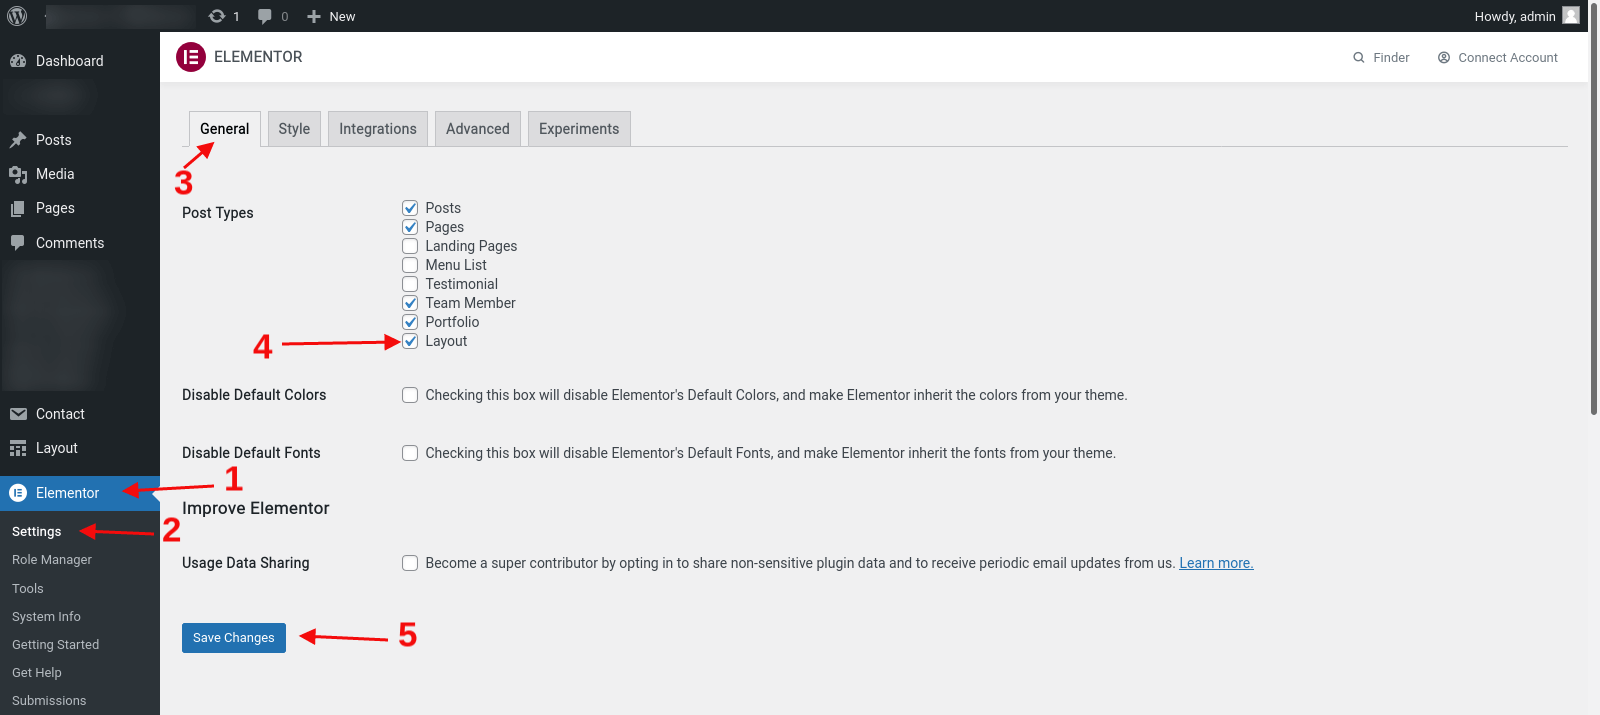
Before you start using the Layout option, You need enable layout option in Elementor option. To do so refer to the below image.
Admin Dashboard > Elementor > Settings > General > Select Layout > Save Changes
Now making a Header / Mega Menu / Footer / Custom / 404 is as easy as you make other things using Elementor.
Note: If you doesn't know Elementor , can read it's official documentation here
Create Layout
Step 1 - Got to the Layout > Add New which you can find at the left sidebar of admin panel.
Step 2 - Give a Title to your layout.
Step 3 - Select Type of your layout.(Types : Header / Mega Menu / Footer / Custom / 404)
Step 3 - Publish layout.
Step 4 - Edit layout with Elementor.

Header layout
For Create Header Layout you need to follow below video tutorial
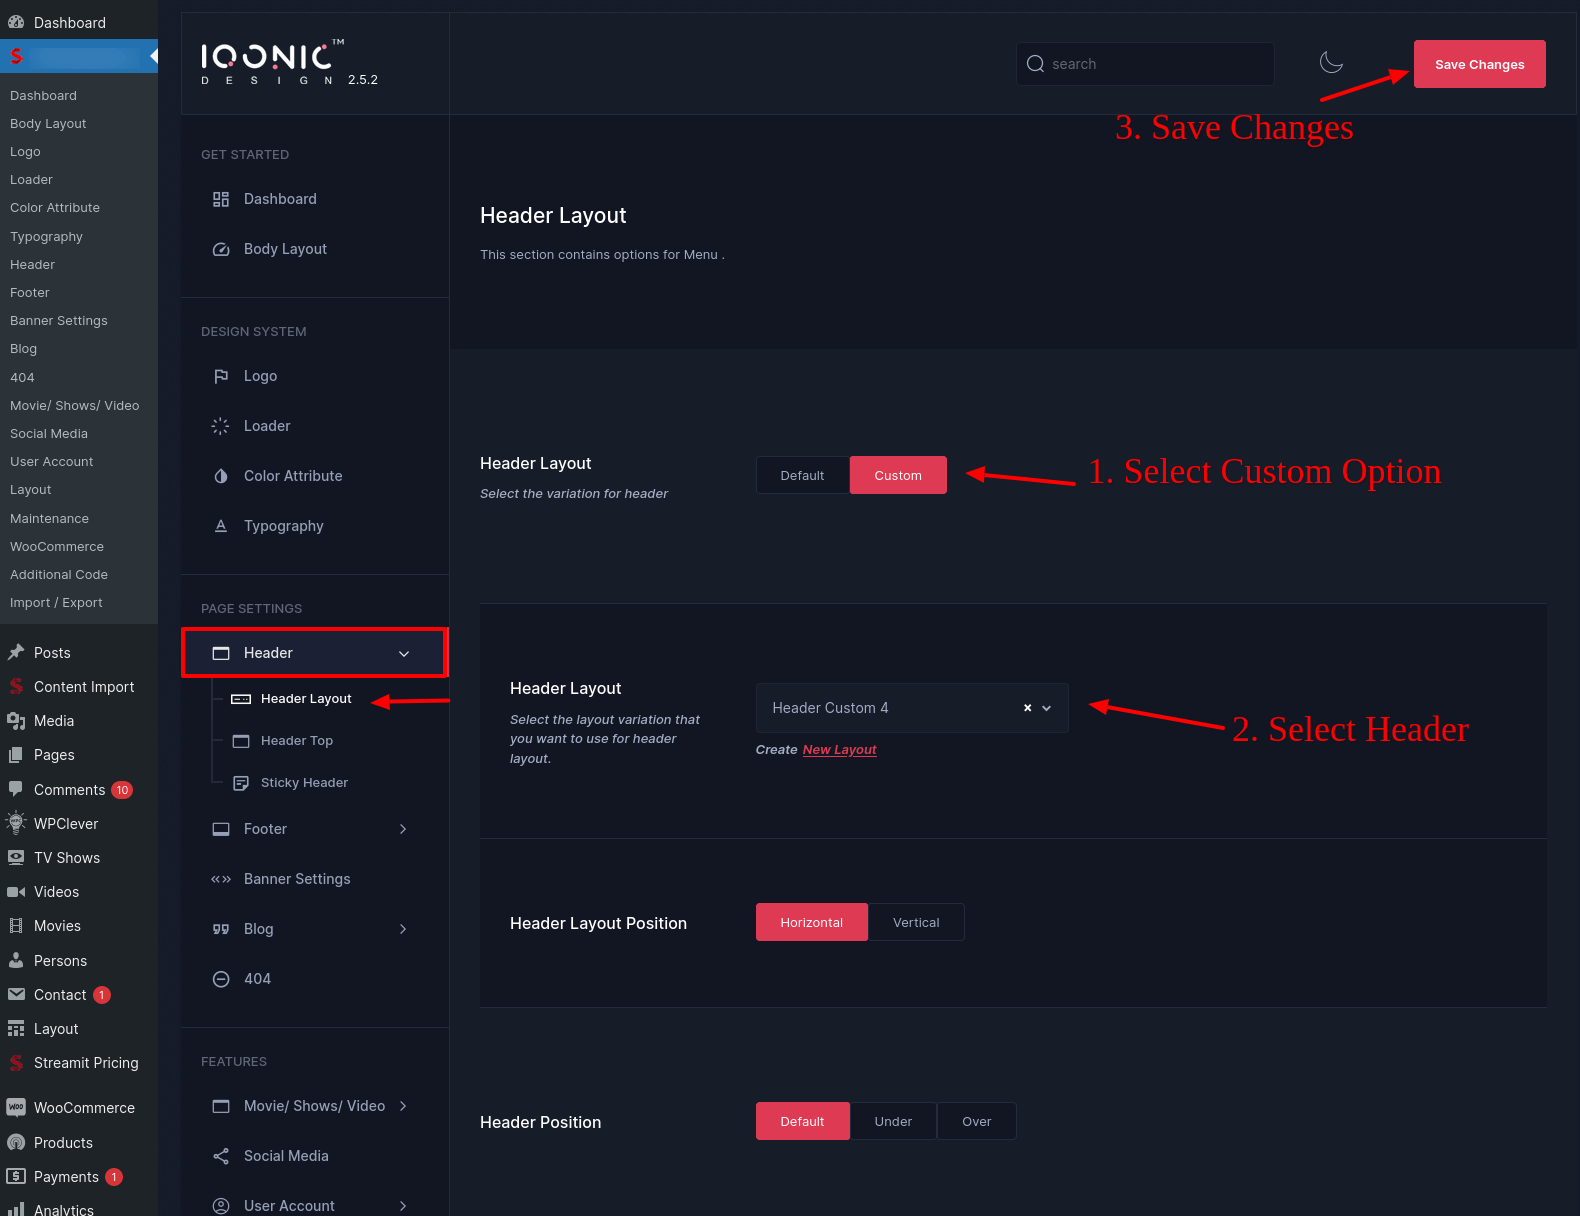
Follow the steps to select Header layout for site/pages.
1 - Streamit Options
Set header to all pages.
You can find Streamit Header Options in Admin Dashboard > Streamit Option > Header > Header Layout
Then after By Selecting custom option of the header you can get all the headers which you created with Elementor.
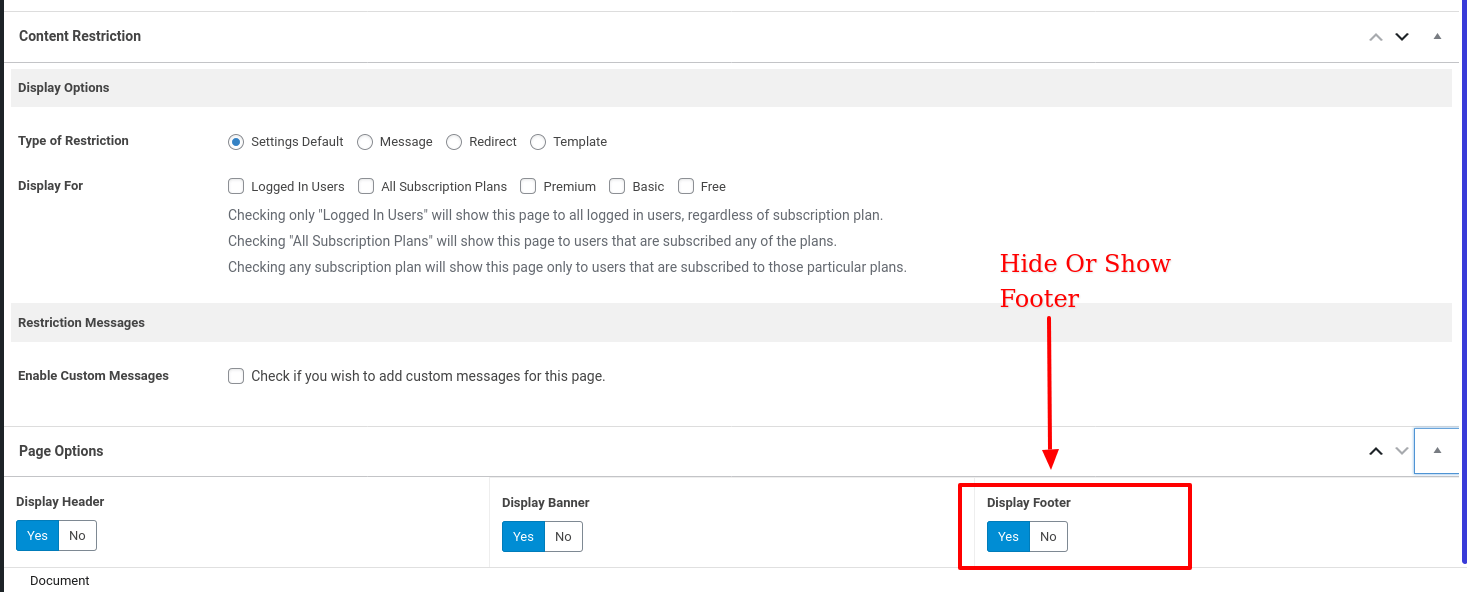
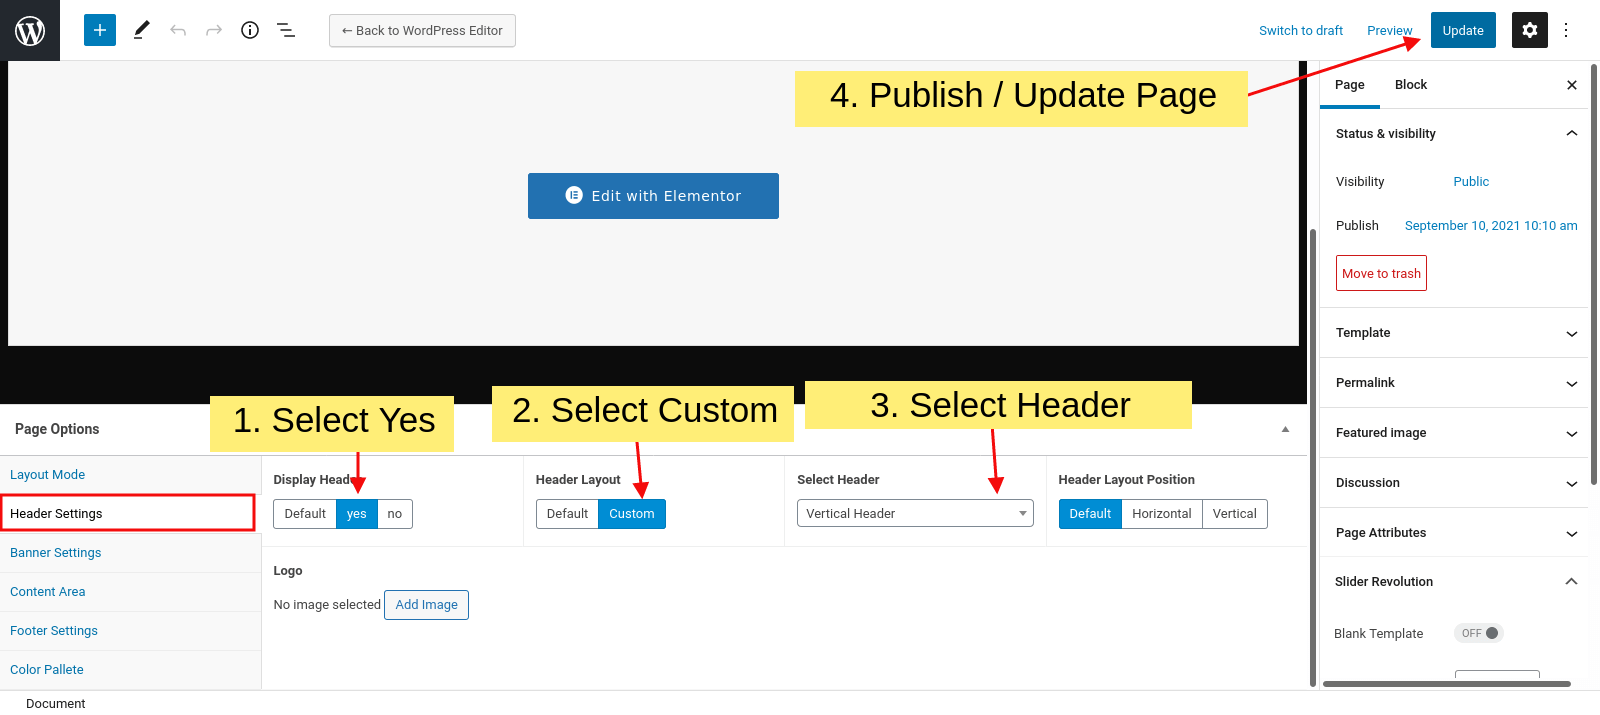
2 - Page Options
Set header to specific pages.
You can find Page Header Options in Admin Dashboard > Pages > Add / Edit Page > Page Settings > Header Settings
Then after By Selecting custom option of the header you can get all the headers which you created with Elementor.
For Sticky Header
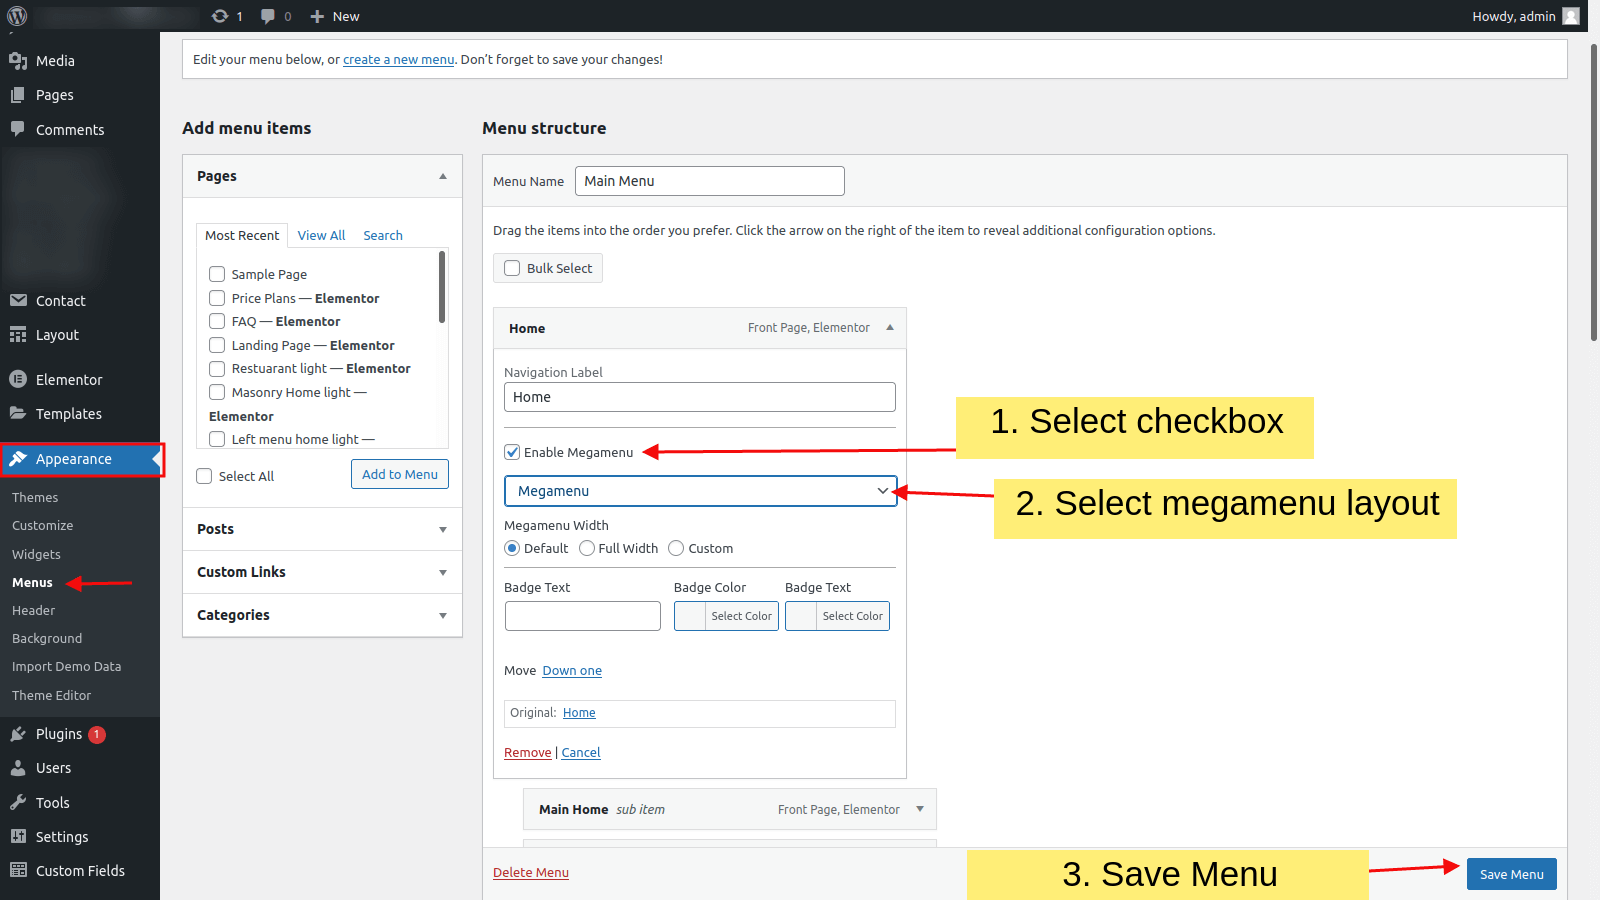
MegaMenu Layout
For Create Mega Menu you need to follow below video tutorial
Follow the steps to select MegaMenu layout for the menu.
Step 1 - Got to the Appearance > Menus which you can find at the left sidebar of admin panel.
Step 2 - Add Custom Link.
Step 3 - Enable Megamenu.
Step 3 - Select Megamenu layout.
Step 4 - Save Menu.
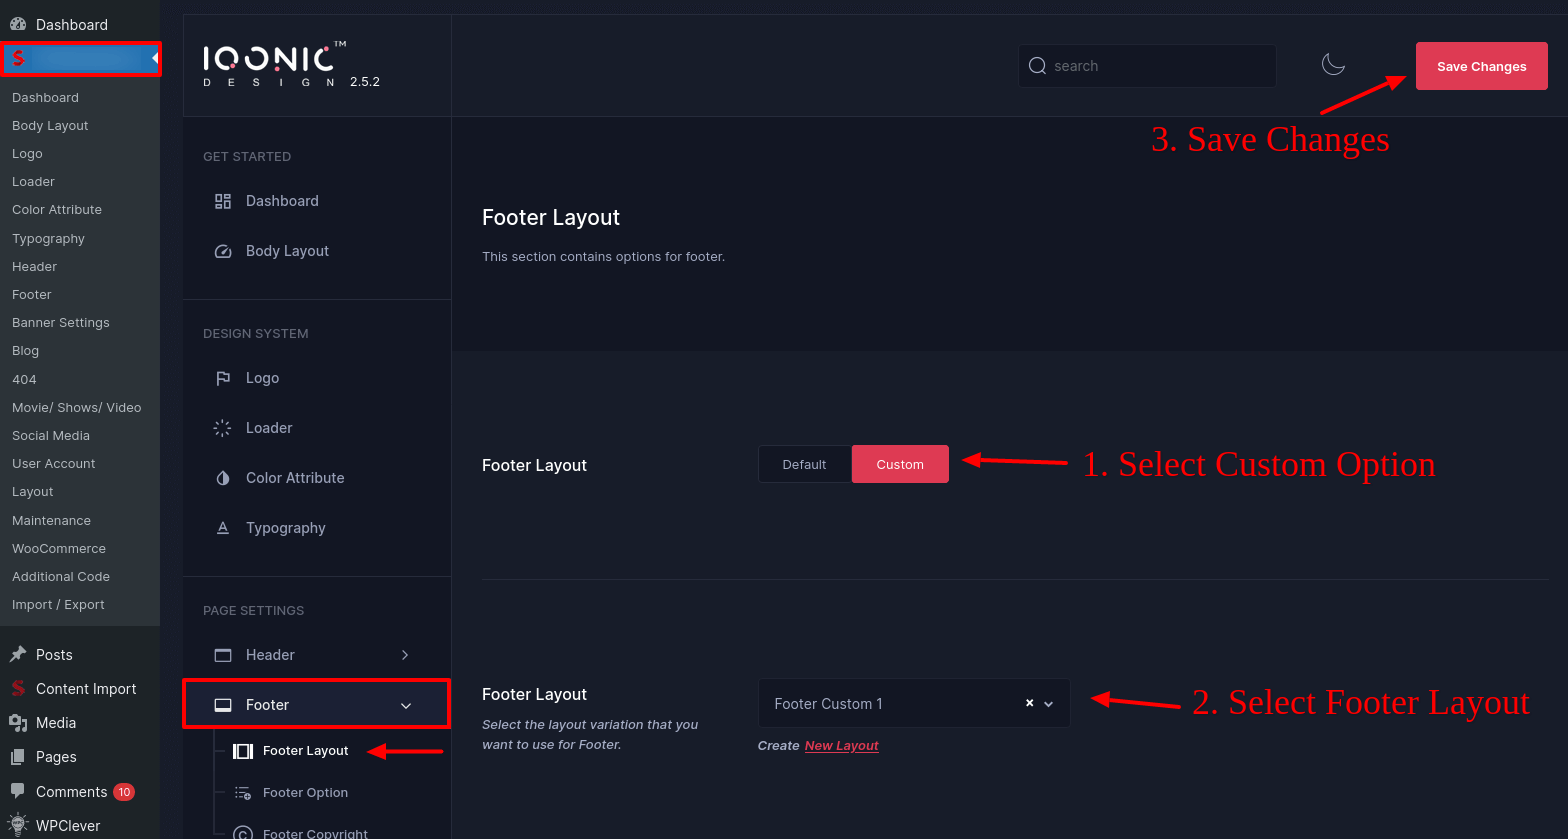
Footer Layout
For Create Footer Layout you need to follow below video tutorial
Follow the steps to select Footer layout for the site/pages.
1 - Streamit Options
Set footer to all pages.
You can find Streamit Footer Options in Admin Dashboard > Streamit Option > Footer > Footer Layout
Then after By Selecting custom option of the footer you can get all the footers which you created with Elementor.
2 - Page Options
Set footer to specific pages.
You can find Streamit Footer Settings in Admin Dashboard > Pages > Add / Edit Page > Page Settings > Footer Settings
Then after By Selecting custom option of the footer you can get all the footers which you created with Elementor.

404 Layout
Follow the steps to select 404 layout.
Streamit Options
You can find Streamit 404 Options in Admin Dashboard > Streamit Option > 404
Then after By Selecting custom option of the 404 page layout you can get all the 404 layouts which you created with Elementor.

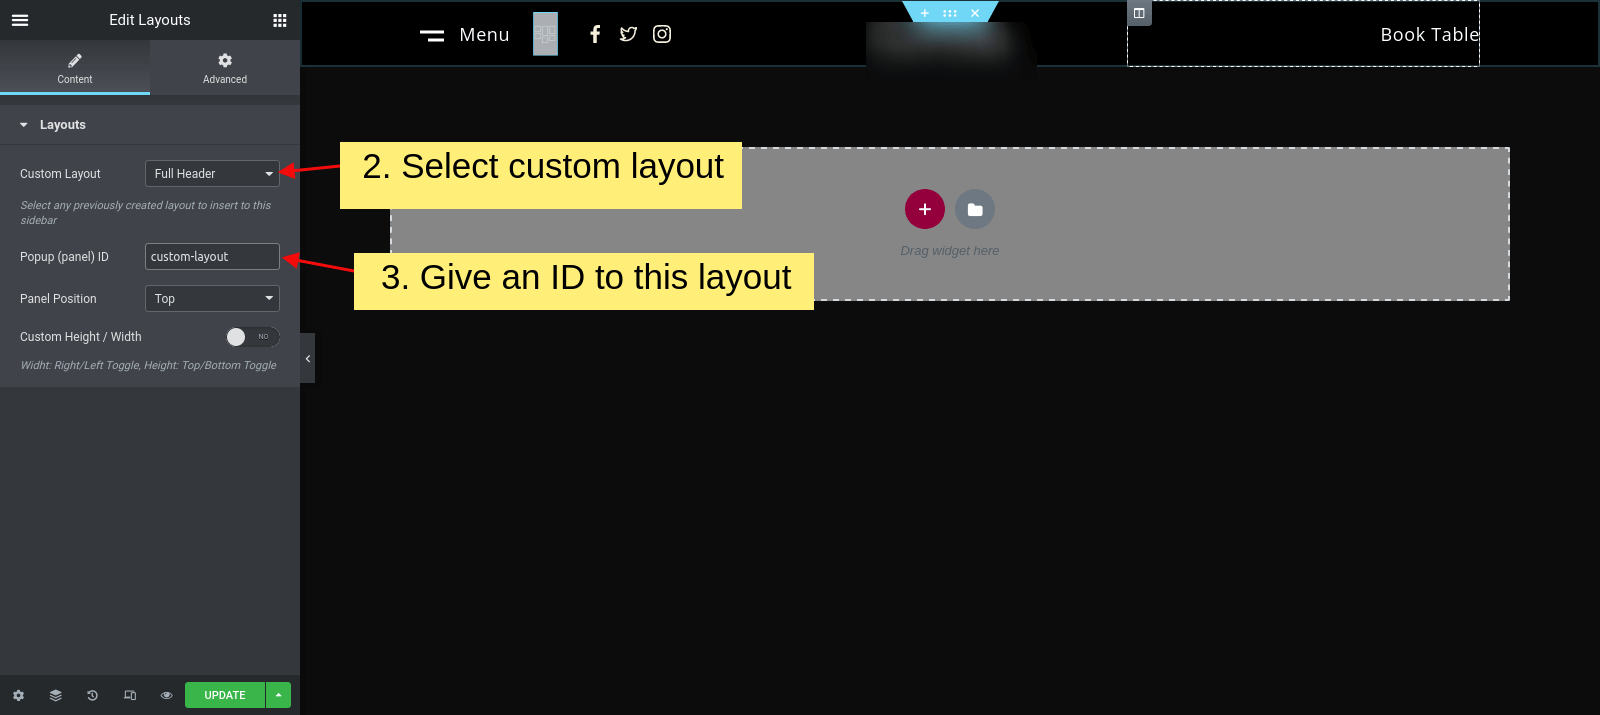
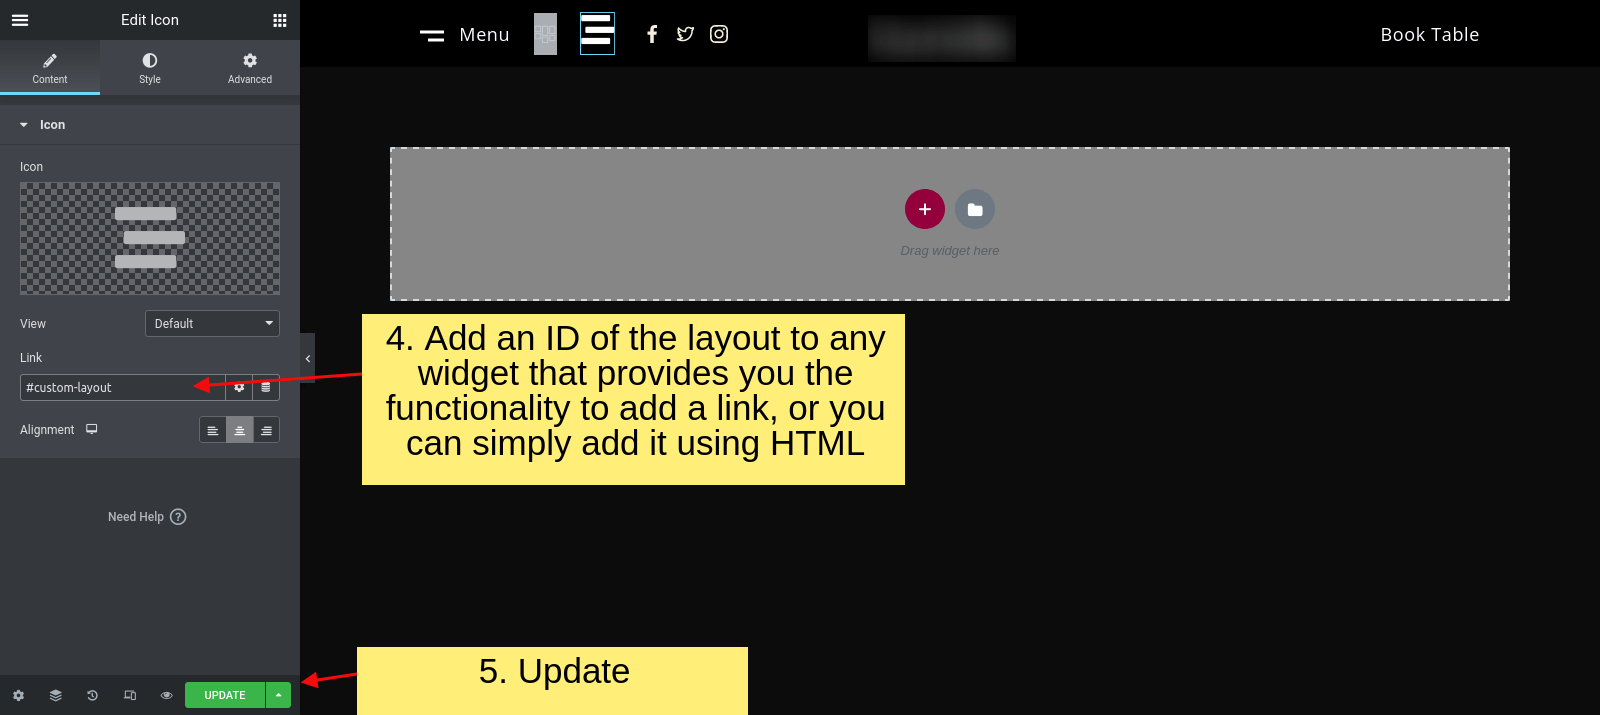
Custom Layout
For Create and Use Custom Layout you need to follow below video tutorial
You can add custom layout anywhere in page using Elementor.
Follow the steps to add and open a custom layouts.
Step 1 : Go to the Elementor Editor in any page/post.
Step 2 : Drag and drop Layout Widget from elementor side bar.
Step 3 : Select Custom Layout you created.
Step 4 : Give a ID to the layout.(i.e. id='custom-layout')
Step 5 : Add that ID into the any link.(i.e. href='#custom-layout')
Step 5 : Update

Layout Elementor Widgets
We provided some Elementor widgets with layout builder that helps you to make your header / footer / custom layouts.
Along with these you can use any other widgets also in layout builder.
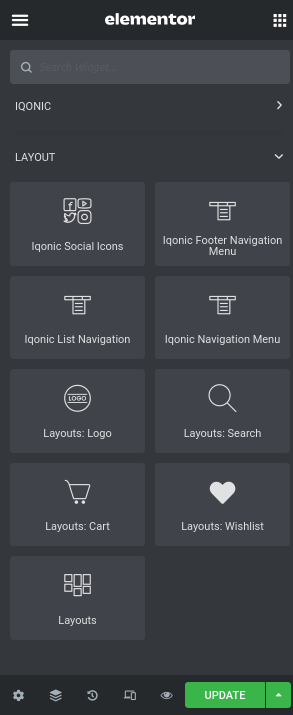
Layouts

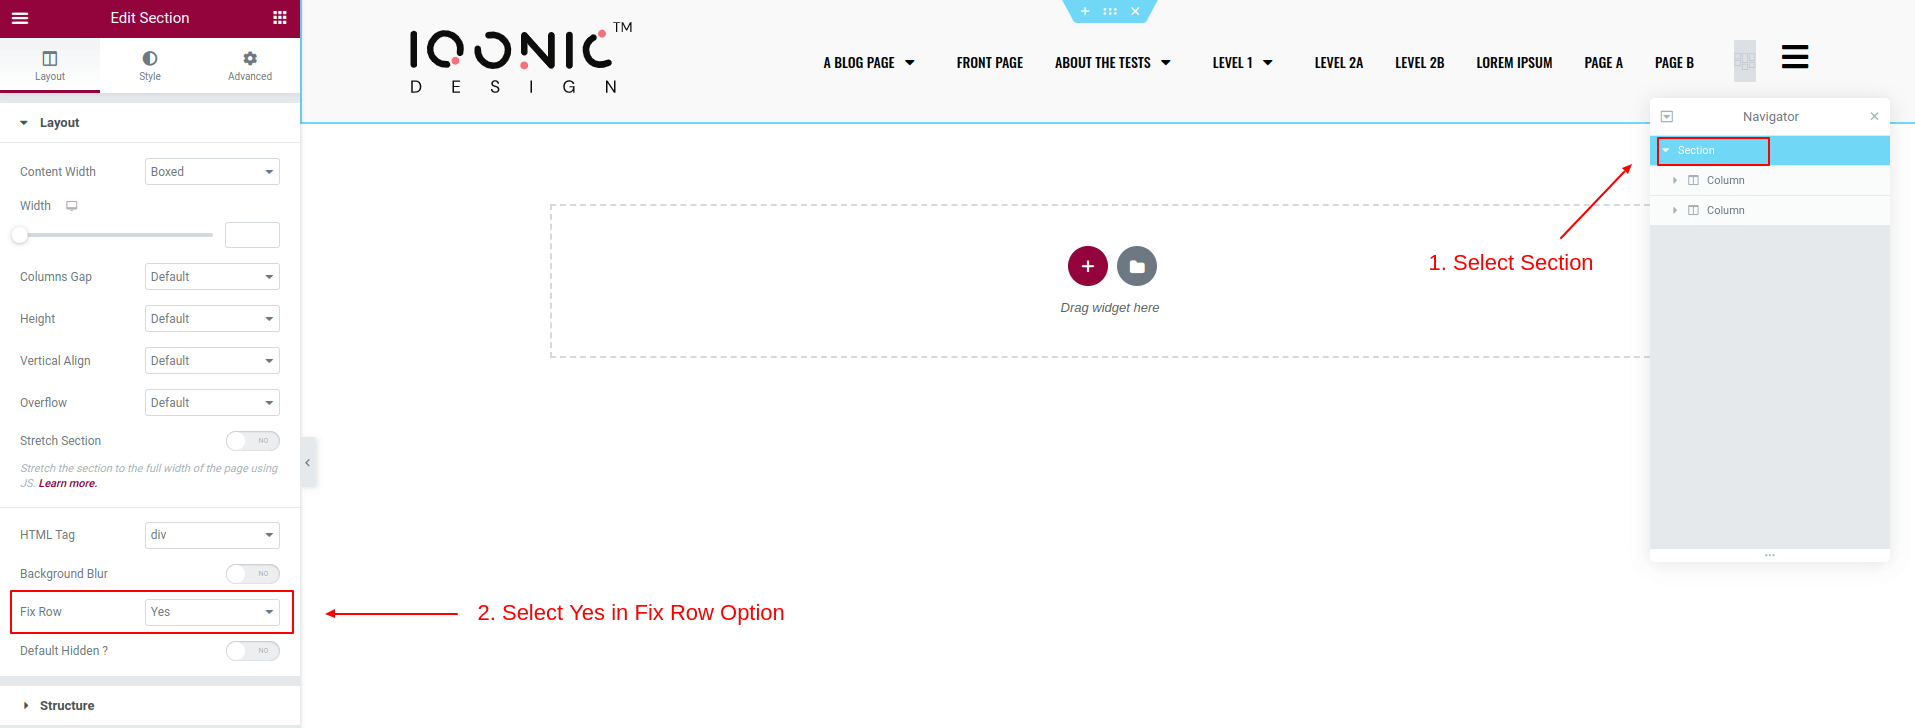
The Layouts Widget is used to display your custom layouts (such as sidebars, toggle menus, and other items you created in the Custom Layout option) on site pages.
- Custom Layout:select the layout you want to display.
- Popup IDGive a specific ID to the layout.
- Hide close button:For Hide Default Close button
- Panel Position:Choose which direction you wish to open the layout.
Note: This Widget only works for custom layout. To create a custom layout, you need to Follow this direction. Dashboard > Layout > Add New > Choose custom in the Select layout option.
Layouts Logo
You can upload your logo with using layouts logo widget
-
Logo Options
- Theme Logo: You do not need to upload a logo if you choose this option. the logo directly appears from theme option. if you uploaded it there
- Custom: If you select these options, you will be able to upload a logo from media
- Page Logo: If you select this options, then the logo appears from page option.
Note: If you don't know about page option then you need to Follow this direction for upload logo in page option. Dashboard > Pages > All Pages > choose the edit option for that page > Page option > Header Settings > Display Header > Select Yes > logo
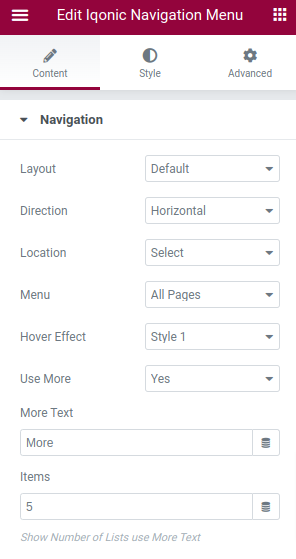
Iqonic Navigation Menu
-
Layout:You can choose your menu style using it.
- Default: for the default menu style.
- Burger: for the mobile menu.
-
Direction:You can choose your menu direction using it.
- Horizontal: for the horizontal menu style.
- Vertical: for the vertical menu style.
- Menu:You can display any menus you've built. simply select the menu name you wish to display.
- Hover Effect:In the hover effect option, you can apply any of these hover styles to the menu.
Note: If it doesn't show anything, then you need to create the menu first. You must go to this area to build a menu. Dashboard > Appearance > Menus
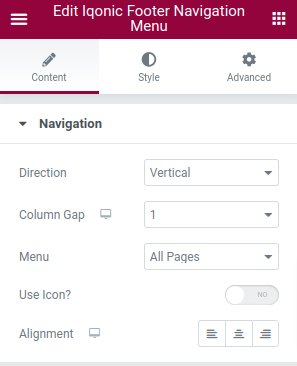
Iqonic Footer Navigation Menu
-
Direction:You can choose your menu direction using it.
- Horizontal: for the horizontal menu style.
- Vertical: for the vertical menu style.
- Menu:You can display any menus you've built. simply select the menu name you wish to display.
Note: If it doesn't show anything, then you need to create the menu first. You must go to this area to build a menu. Dashboard > Appearance > Menus
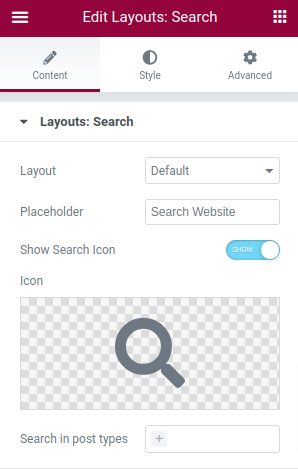
Layout Search
-
Layout:You can choose your search using it.
- Default: for the default search style.
- Modern: for display modern search style. it's show a search button, and clicking it expands the search form
- Placeholder:it's show placeholder text in input field
- Icon:for changing the search icon.
WooCommerce
WooCommerce Settings from here. By Clicking Login to your WordPress Admin Panel > Go to WooCommerce > Settings > Products.

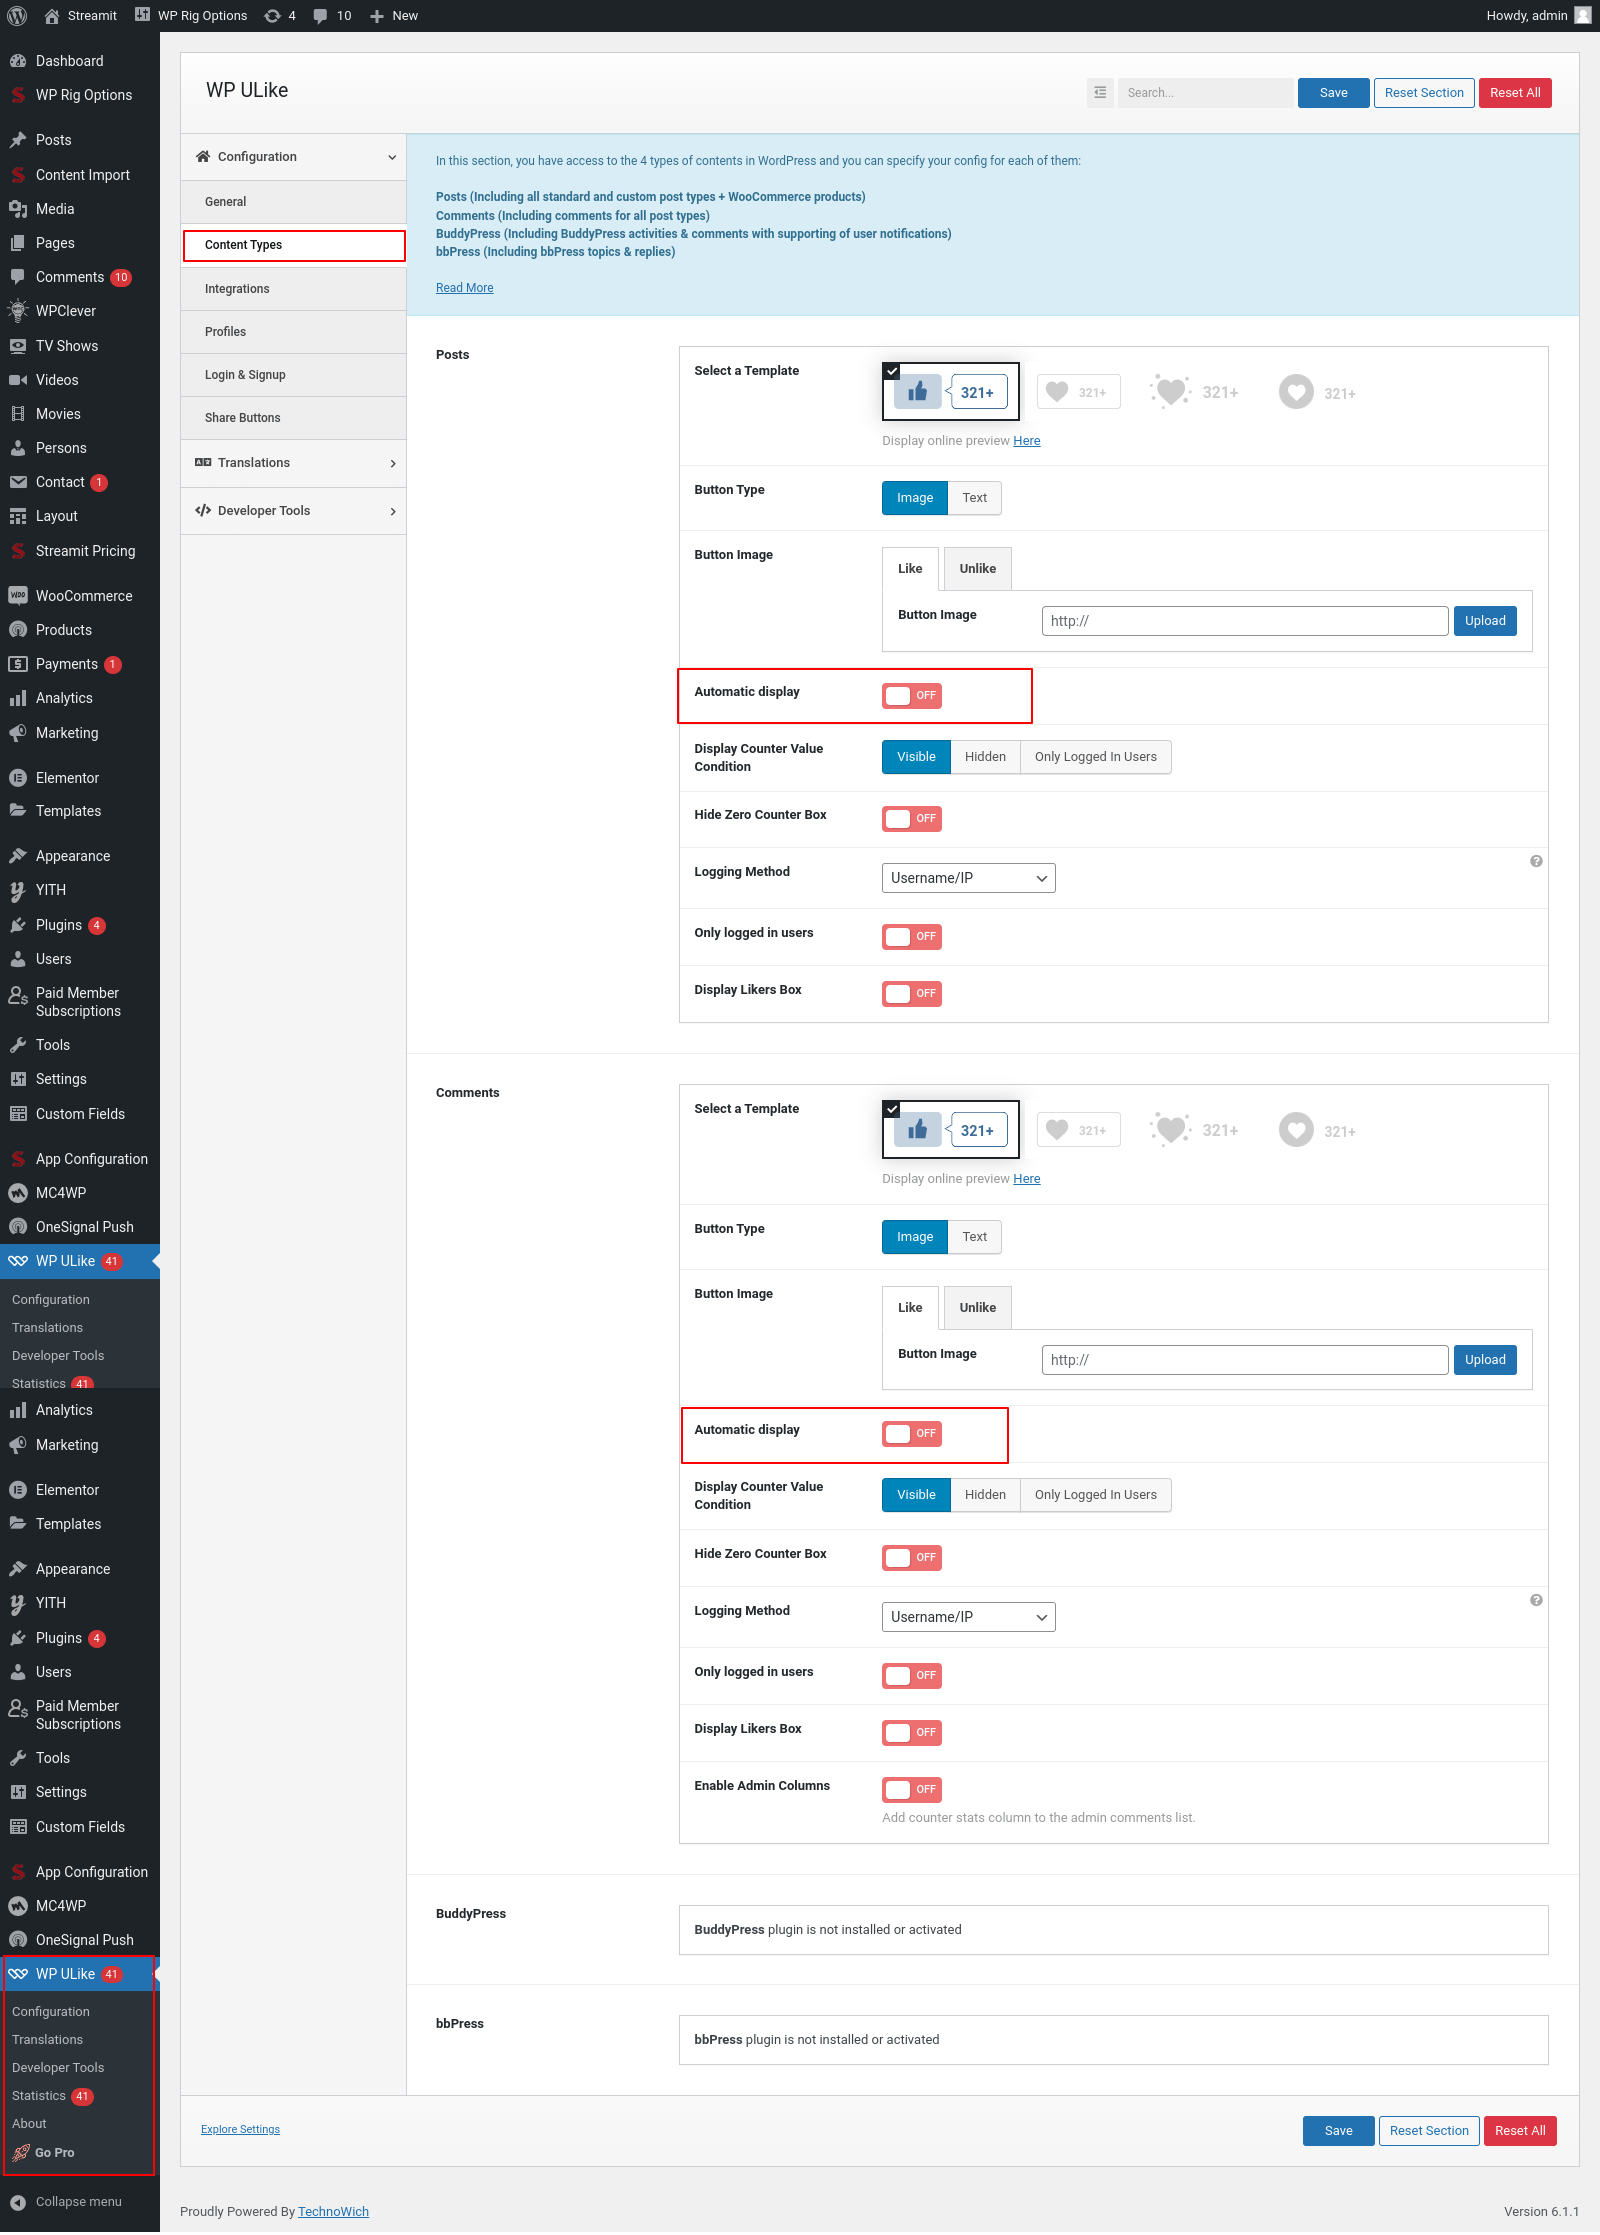
WP ULike - Disable Like Icon
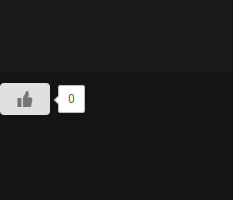
To remove the like icon located at the bottom of any page, you can follow these steps:
1) Log in to your WordPress admin dashboard.
2) Look for the "WP ULike" section and click on it.
3) Click on "Content Types" within the WP ULike section.
4) Locate the "Automatic Display" option. This option may appear in two different locations. By default, both of these options will be turned on.
5) Turn off the "Automatic Display" option and click on "Save".
6) This should disable the like icon from appearing at the bottom of any page
Refer to the image for more information.
How To Update Page/Card Style
If you want to update your existing home page with this new page style, than watch this video, and perform the step by step instructions, as shown in the video.
Your old page will quickly resemble this incredible new home page.
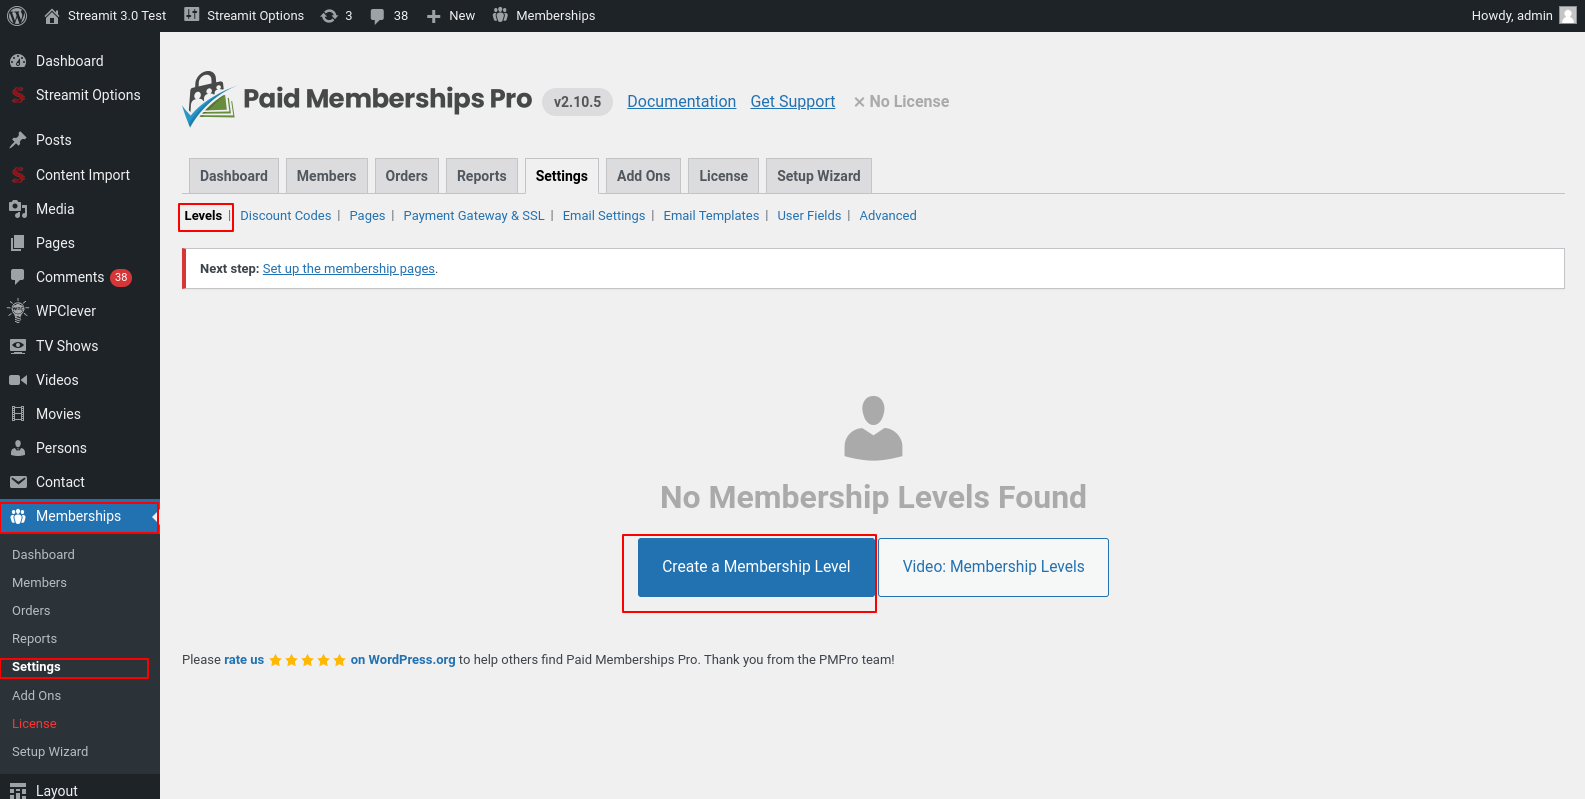
How To Switch From Paid Membership Subscriptions(PMS) to Paid Memberships Pro(PMP)
Switching from one membership system to another can be a complex process. However, we have streamlined the switching process to ensure a seamless transition for you. By following our guidelines, you can switch from your current membership system to the new one without encountering any major difficulties or complications.
To ensure a smooth transition from Paid Membership Subscriptions (PMS) to Paid Memberships Pro (PMP), it is essential to activate both plugins.
Skipping any step or not activating both plugins may lead to complications during the transition. It is important to adhere to these instructions to ensure a successful switch from PMS to PMP.
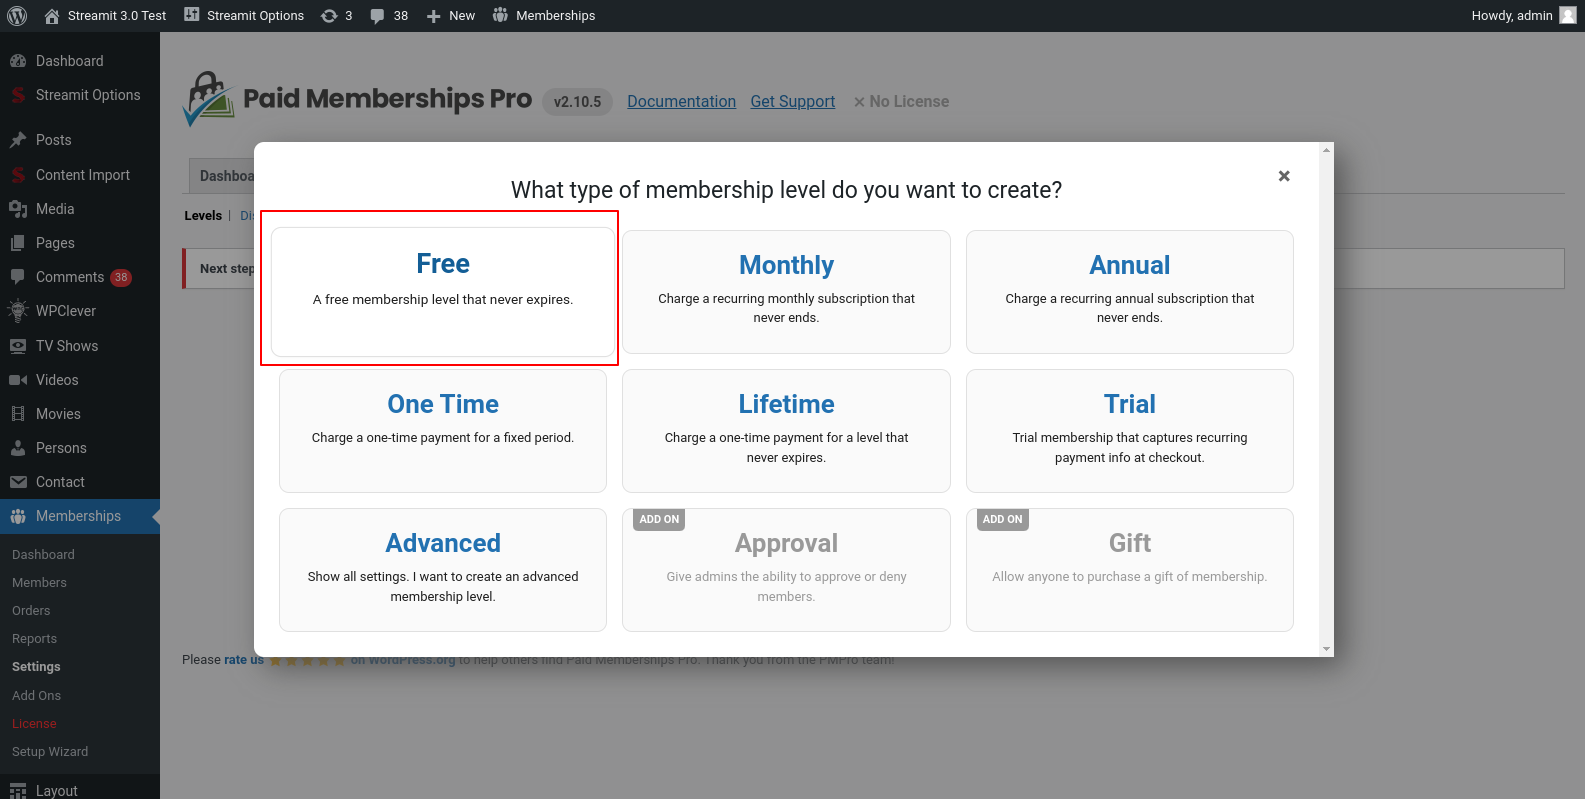
Step 1) Importing PMS Plans
In order to import the PMS plans, it is necessary to create a free dummy plan first. This will enable the visibility of the "import PMS plans" button. Without creating the dummy plan, the button will not be accessible to you.
Importing PMS Plans button will include two things.
1) PMS Plans Import - You can directly import all the PMS plans into the PMP plans. This includes both active and inactive plans, as well as plans that are in the trash or drafts. If there are any plans that you do not require, you can easily delete them afterwards.
2) PMS Restricted Plans For Posts - This will also import the restricted plans that you have selected for the posts. The restricted content will only work for post types movies, tv_show, episode, video, person, post and pages.
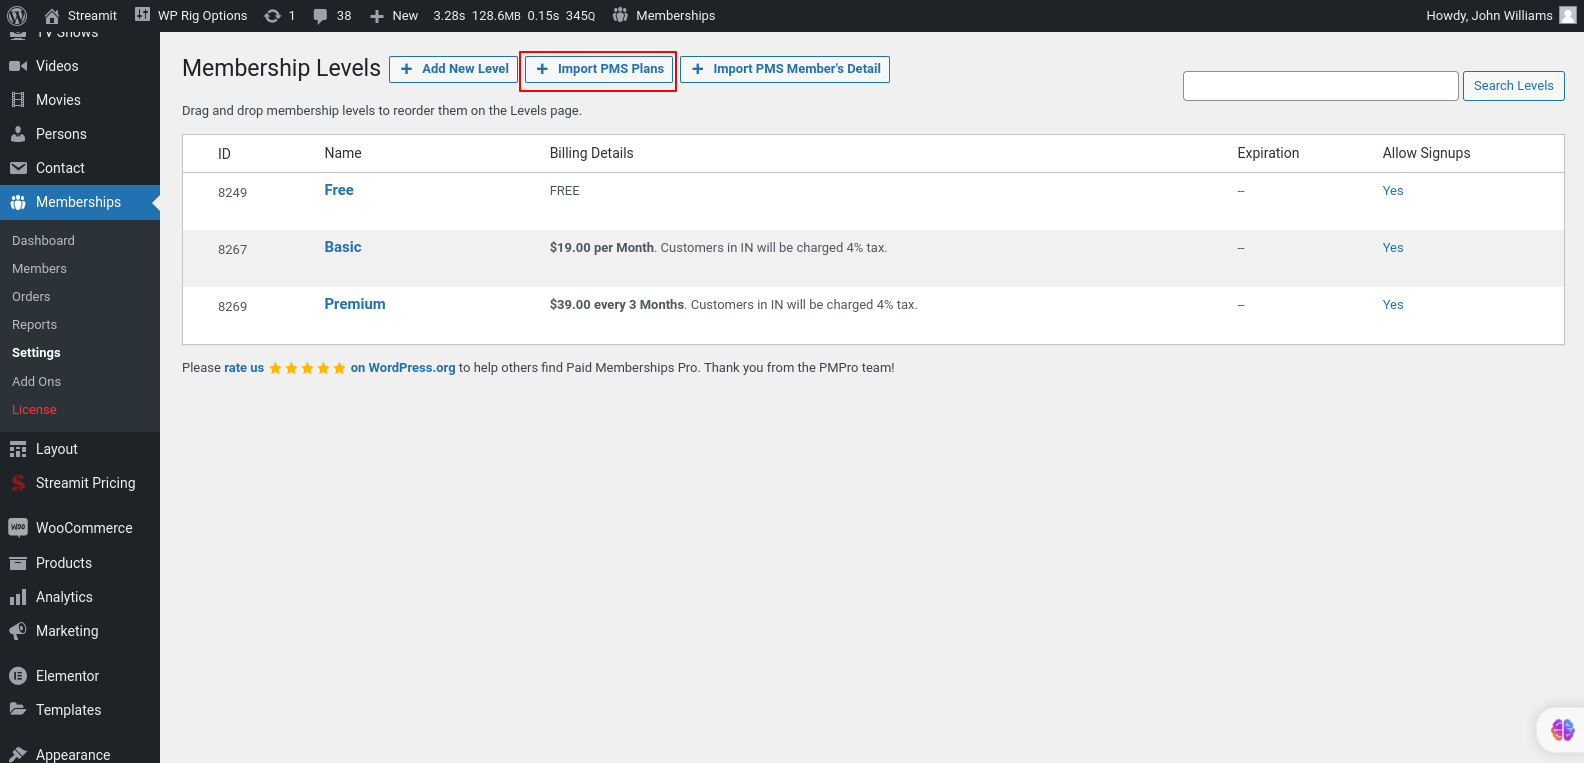
Once the plans have been successfully imported, you can proceed to delete the dummy plan that you created earlier. This step is necessary to ensure that your plans are organized and only the desired ones are visible.
Step 2) Importing PMS Member's Detail

Importing PMS Member's Detail button will include two things.
1) PMS Members Data - Members detail like first name, last name, email, active plan, plan start data, expiration date will be imported
2) PMS Payment Data - Payment Details includes past purchased plan, current active plan, payment status
Difficulties you may face when switching from PMS to PMP
While both plugins, Paid Membership Subscriptions (PMS) and Paid Memberships Pro (PMP), have their own unique features and functionality, it's important to note that not all features may be directly available in PMP when making the switch. However, PMP offers a range of addons that can provide the same or similar functionality as those in PMS. By utilizing these addons, you can extend the capabilities of PMP and achieve the desired features that you were previously using in PMS.
The first challenge is the feature that is provided by default in Paid Membership Subscriptions (PMS) is the Woocommerce integration, which allows seamless integration between your membership site and the Woocommerce platform. However, in Paid Memberships Pro (PMP), you will need to utilize an addon specifically designed for Woocommerce integration to achieve the same functionality. This addon will enable you to effectively integrate PMP with Woocommerce, allowing you to sell products, manage subscriptions, and offer exclusive content to your members through the Woocommerce platform.
For more detailed information on the WooCommerce Integration addon, please visit the following link: WooCommerce Integration Addon Documentation. This documentation will provide you with comprehensive instructions on how to set up and utilize the addon effectively to integrate Paid Memberships Pro (PMP) with the WooCommerce platform.
The second challenge you may encounter is limiting the number of logged-in users. Unlike in Paid Membership Subscriptions (PMS), this feature is not available by default in Paid Memberships Pro (PMP). However, you can utilize an addon to achieve this functionality. You can utilize the WP Bouncer addon to restrict and limit user logins. This addon provides the functionality you need to manage and control the number of logged-in users effectively.
The third challenge you may encounter pertains to the login and registration pages. If you have utilized the PMS shortcodes such as pms-register, pms-login, and pms-account, you will need to modify the names of these shortcodes.
The pms-login shortcode will be replaced with pmpro_login, while pms-register will become pmpro_levels in PMP. This change is necessary because in PMP, users first need to select a pricing plan before they can register. Additionally, pms-account will be replaced with pmpro_account. There are also a few other useful shortcodes provided by PMP that you can take advantage of.
Regarding this, you will also need to update the page settings in the Streamit options for the login and register pages. Additionally, if you have used custom headers, you will need to make the necessary changes there as well to ensure consistency with the updated shortcodes.
PMP Addons
There are numerous other addons available with Paid Memberships Pro (PMP) that offer additional functionality and features. We recommend exploring these addons to find ones that align with your specific requirements and preferences. These addons can enhance your membership site by providing various capabilities and customization options. Feel free to browse through the available addons and choose the ones that best suit your needs. Here is the link to access the complete list of available addons: Addons List. This page provides detailed information about each addon and its respective functionalities.
Translation
There are no ready language files, but you need to take only a few steps to translate your website to the needed language. You can translate the theme to any language, as well as RTL Language.
The first step you should take is create your own language file. To implement this you should install Poedit:
www.poedit.netCopy streamit.pot file to your computer.
Note: You will find the language pot file in wp-content/themes/streamit/languages.
Translate your website
Do you want to translate your WordPress site? You just need to follow few steps to get started. You can translate the theme to any language, as well as RTL Language.
Start by installing Poedit.
- Set your WordPress for the language so the admin section will be in your language
- Create language PO file for translation
- Modify the PO file using POEdit software and translate all strings in it. This will also generate MO file which is used by WordPress
Change Log
-
Version 3.4.8 - 15th Nov 2024
- [Updated] - Compatibility updates for: Wordpress (v6.7) , WooCommerce (v9.4.1)
-
Version 3.4.7 - 13th Nov 2024
- [Fixed] - Miscellaneous Known Bugs..
-
Version 3.4.6 - 22nd October 2024
- [Updated] - Updated outdated WooCommerce templates.
- [Fixed] - Minor bugs resolved.
-
Version 3.4.5 - 12th August 2024
- [Updated] - Updated PMPro outdated templates.
- [Fixed] - Minor bugs resolved.
-
Version 3.4.4 - 11th August 2024
- [Added] - Compatibility regained with Paid Memberships Pro plugin.
- [Updated] - Updated outdated WooCommerce templates.
- [Fixed] - Issue with TV show data import.
- [Fixed] - Issue with video data import.
- [Fixed] - Minor bugs.
- [Fixed] - Checkout page redirect issue.
-
Version 3.4.3 - 23rd July 2024
- [Added] - Compatibility with WordPress 6.5.x.
- [Added] - Continue - Watching list can now be emptied.
- [Updated] - Templates of WooCommerce.
- [Updated] - Templates of Paid Membership Pro.
- [Fixed] - Miscellaneous Known Bugs.
-
Version 3.4.2 - 19th March 2024
- [Added] - New Twitter-X Logo.
- [Fixed] - User Layout Dropdown: Icon Color.
- [Fixed] - Navigation Button: Hidden When Menu Absent.
- [Fixed] - Continue Watching: Hover Design.
- [Fixed] - Episode Detail Page: Displayed Published Year.
- [Fixed] - TV Show Detail Page: Pagination.
- [Fixed] - Miscellaneous Known Bugs.
-
Version 3.4.1 - 12th February 2024
- [Updated] - Compatibility with Latest WordPress (6.4.3).
- [Fixed] - Minor Bugs fixed.
-
Version 3.4.0 - 24th January 2024
- [New] - Streamit Content Import: Language support for TMDB.
- [Updated] - Compatibility with WooCommerce 8.5.1.
- [Updated] - Single Person Page Official Site URL in Anchor Tag.
- [Fixed] - Blog, Movies/TvShows/Video, Genre, Tag Archive Pages Show List Loadmore, Infinite Scroll.
- [Fixed] - Blog Pagination.
- [Fixed] - Lazy Load Images in Search.
- [Fixed] - Elementor View More Image Style in Movie Cards, Video Cards, and TvShow Cards.
- [Fixed] - Person Detail Page Description Issue.
- [Fixed] - Logo Upload.
- [Fixed] - Shop Page CSS.
- [Fixed] - Known Bugs.
-
Version 3.3.2 - 17th November 2023
- [Fixed] - Home Page: Banner widget - Responsive issue.
- [Fixed] - Elementor widget: Search - button issue.
- [Fixed] - Default Header: Search button issue.
- [Fixed] - Other known bugs.
-
Version 3.3.1 - 10th November 2023
- [Fixed] - Color Code Changes
- [Fixed] - Mega Menu Image Changes
-
Version 3.3.0 - 09th November 2023
- [New] - Elementor Popular Movie, Tv show widget
- [New] - View Password Functionality for Login/Register Page
- [Added] - Notifications for Guest Users
- [Updated] - Person Detail Page UI
- [Updated] - Compatibility with WordPress 6.4.1
- [Updated] - Compatibility with WooCommerce 8.2.2
- [Fixed] - Known bugs
-
Version 3.2.1 - 21st September 2023
- [Fixed] - View All Notifications Page Link
-
Version 3.2.0 - 20th September 2023
- [Added] - Compatibility With Paid Memberships Pro Add-On WooCommerce Integration
- [Added] - Notifications Module For Newly Published Movies/Tv Shows/ Videos
- [Added] - Shortcode for notification [iqonic_notification]
- [Added] - Shortcode for Viewing All notification [iqonic_notification_all]
- [Added] - Movie and Video Gallery Display
- [Added] - Premium Badges Option for Movie Cards, Tv Show Cards, Video Cards
- [Updated] - Compatible With Woocomerce 8.1.1
- [Updated] - Compatible With Paid Memberships Pro Plugin 2.12.2
- [Improved] - Code Optimization
- [Improved] - Optimized SQL Queries
- [Fixed] - Known bugs
- [Fixed] - Issues With Demo Import
-
Version 3.1.0 - 4th August 2023
- [Added] Search History (Displays the last 10 search history results)
- [Added] Multiple Download Sources Link
- [Added] Minified Scripts For Streamit Extension Plugin
- [Added] Admin Bar Option to Regenerate Current or All Page Scripts
- [Updated] Compatible With Woocomerce 7.9.0
- [Updated] Compatible With Paid Memberships Pro Plugin 2.11.2
- [Updated] Watchlist Widget For Changing Style Between Cards And Tiles
- [Updated] Lazy Load Feature In Elementor Widgets Listed Below:
- 1) Banner Slider
- 2) Banner Inner Slider
- 3) Banner Thumb Slider
- 4) Verticle Banner Slider
- 5) Movie Tab
- 6) Tv Show Tab
- 7) Video Tab
- [Updated] Ajax Feature In Elementor Widgets Listed Below:
- 1) Movie Slider/Grid
- 3) Tv Show Slider/Grid
- 3) Video Slider/Grid
- 4) Movie Cards
- 5) Tv Show Cards
- 6) Video Cards
- 7) Top Ten
- [Updated] Changing Cards Style Option From Theme Options
- 1) Recommended Movies
- 2) Related Movies
- 3) Related Videos
- 4) Upcomming Movies
- 5) Movie/Tv Show/Video Archive Pages
- [Updated] iqonic_user_watchlist shortcode to switch between cards and tiles option
- => [iqonic_user_watchlist style=tiles|cards img-orientation=landscape|portrait]
- [Improve] Code Optimization
- [Fixed] Known bugs resolve
-
Version 3.0.0 - 23rd May 2023
- [Added] - Paid Memberships Pro(PMP) Integration
- [Added] - PMP Pricing Plan Page
- [Added] - Elementor Widget PMP Pricing Plan
- [Upgraded] - IMDB Logo Option
- [Fixed] - Known bugs
-
Version 2.7.0 - 31st Mar 2023
- [Added] - Social Login
- [Added] - 404 Error Page (2)
- [Added] - Coming Soon
- [Added] - New single blog template
- [Added] - New user profile menu design
- [Added] - New Search design
- [Added] - New Contact us page
- [Upgrade] - Search Result layout
- [Upgrade] - Recent post widget design
- [Upgrade] - Category widget design
- [Upgrade] - Tags widget design
- [Fix] - Known bugs
-
Version 2.6.0 - 17th March 2023
- [Added] New Home Page.
- [Added] New Elementor Widgets
- Banner Thumb Slider Shortcode
- Top Ten Shortcode
- Movie Cards Shortcode
- Favourite Personality Shortcode
- TVShow Season Shortcode
- Continue Watching New Style
- Vertical Slider New Style
- [Update] UI Of Theme Options
- [Update] Verticle Slider Widget [Style 2]
- [Update] Watchlist Shortcode [Style 2]
- [Update] View All Shortcode [Style 2]
- [Update] Continue Watching Widget [Style 2]
- [Fixed] Known Bugs
-
Version 2.5.2 - 28th Feb 2023
- [Fixed] Child Theme Issue
-
Version 2.5.1 - 06th Feb 2023
- [New] Custom Header can be edited from any page
- [Fixed] Continue Watching Model Translation
- [Fixed] Blog Redux option issue fix
- [Fixed] Blog Structure Bootstrap RTL fix
- [Optimize] Optimize CSS style
- [Improve] Performace in ACF
-
Version 2.5.0 - 17th Jan 2023
- [Add] Continue Watching In Default Media Player
- [Add] New Pricing Plan Style - 3
- [Add] Pre-Apply Discount Coupon Feature In ALL Pricing Plans
- [Add] Elementor Persons Widgets (Cast & Crew Widget)
- [Update] Ionic Icon Library To V4.5.10. support
- [Update] Live RTL Switcher
- [Update] Woo-commerce latest Template Support
- [Update] User login Avatar in comment
- [Improve] Performance Improve
- [Fixed] Admin View Translation
- [Fixed] Archive Global Query
-
Version 2.4.0 - 20th Oct 2022
- [Add] - Playlist Shortcode
- [Add] - Episode Load more, Pagination
- [Add] - Thumbnail Image to default Media Player
- [Fixed] - Shareable Link now with feature image
- [Fixed] - Theme Setup Wizard Bug Fix
- [Fixed] Minor Bug Fixes
-
Version 2.3.1 - 07th Sep 2022
- [Add] - Crew Tab
- [Add] - In Multiplatform Content Import Casts are now importing into movies and tv-show
- [Update] - Woocommerce Template Update With Latest Version
- [Fixed] - Menu Fade Animation On Default Header
- [Fixed] - Get Category by a slug in the Elementor Product category widget
- [Fixed] - Minor Bug Fixes
- [Optimise] - Code
-
Version 2.3.0 - 04th Jun 2022
- [Add] - WooCommerce Payment Gateway Integration
-
Version 2.2.2 - 30th May 2022
- [Add] - WordPress Version 6.0 Supported
-
Version 2.2.1 - 20th May 2022
- [Fixed] - Minor Bug Fixes
-
Version 2.2.0 - 12th May 2022
- [New] WooCommerce Supported Added
- [New] Merchandise Store Home Page Added
- [New] In Movie, TV-Show , Video, Episode Add List in Related Merchandise
- [New] WooCommerce Product List And Grid Switcher Options Added
- [New] WooCommerce Product Pagination - (LoadMore , Infinte Scroll , Pagination) Added
- [New] Product Slider, Product grid, Category Slider, Category Box , Video Popup Add Shortcode in Elementor
- [New] WooCommerce mini cart added
- [New] WooCommerce Dynamic Options Add In Redux and Elementor Side
- [Fixed] Minor Bug Fixed
-
Version 2.1.2 - 26th April 2022
- [Added] Download Button Option add in Detail page Movies, videos , Episode
- [Added] Initial views options , Views hide/show option in Elementor and Redux Side
- [Fixed] Genres redirect title on view all page
- [Fixed] Login Form In Maintenance / Coming Soon Mode Issue Resolved
- [Fixed] Minor Bug Fixed
-
Version 2.1.1 - 25th Mar 2022
- [Fixed] Elementor Version 3.6.0 Supported
-
Version 2.1.0 - 22nd Mar 2022
- [Add] Iqonic Header Footer Layout Plugin
- [Add] New 2 Header and Footer using Iqonic Header Footer Layout
- [Add] New Blog Pages Add
- [Add] Theme Setup Wizard Added
- [Add] User Widgets Added
- [Add] Person Archive Page Added
- [Add] Some dynamic options add in Redux Theme options Added
- [Add] In Login, Register, Forget Password Add Logo in Design (PMS Plugin)
- [Fixed] Watchlist Item JS Fixed On Load more
- [Fixed] Banner Slider Widget Trailer Button When It Doesn't Have Url
- [Fixed] Widget Set Limit Post per Page on Movies,Tv show, Video
- [Fixed] Tv Show, Video, Movie tab Shortcode bug fixed
- [Fixed] Minor Bug Fixes
-
Version 2.0.0 - 18th Jan 2022
- Improve - Major Performance Improvement
- Added - New Elementor Tags Shortcode Added
- Added - New Tags design with new lising Page Added
- Added - New Related Movies Add in Movie Pages
- Added - New Tags List Add in Movie / TvShow / Video Inner Pages
- Added - New Movies/TvShows/Video ,Genere,Tag Archive Pages Show List With Loadmore , Lazy load scroll
- Added - PlayNow text change Option
- Added - New Top Bar in Header(optional)
- Added - More dynamic options add in Redux Theme options Added
- Added - Display limit for starring,genre,Tags on banner slider
- Fixed - Banner slider in Responsive mode design
- Fixed - Minor Bug Fixes
-
Version 1.5.5 - 13th Dec 2021
- Fix - Known Bug Fixes
-
Version 1.5.4 - 08th Dec 2021
- Fix - Known Bug Fixes
-
Version 1.5.3 - 07th Dec 2021
- Add - TMDB - Cast, Persons, Rating, Movie Genres added.
- Add - Sources list add-in movie, episode detail page added
- Add - Review & rating add in Movie, TvShow, Video, Episode detail page added
- Add - Related Video add in Movie details page added
- Add - Upcoming, Latest, Most-Viewed, Most-liked on view all / view all link for all shortcode
- Add - Trailer Link detail page added
- Add - Pricing plan custom URL link ACF, elementor shortcode option
- Add - WordPress Version 5.8.* Supported
- Add - Some dynamic options add in Redux Theme options Added
- Add - Image alt text dynamic
- Fix - Known Bug Fixes
-
Version 1.5.2 - 18th Sep 2021
- Fix: Movie / TvShow / video Verticle Slider Responsive Design Update
- Fix: Minor Bug Fixed
-
Version 1.5.1 - 27th Aug 2021
- Fix: Minor Bug Fixed
-
Version 1.5.0 - 30th July 2021
- Added: TMDB Data import support added
- Fix: Minor Bug Fixed
-
Version 1.4.0 - 20th July 2021
- Added : Genres Page Added
- Added : Person Cast Page Added
- Added : In Movie, TV-Show Added Person Cast List
- Fix : Some Dynamic Options Add In Redux and Elementor Side
- Fix: Minor Bug Fixed
-
Version 1.3.7 - 07th July 2021
- Fix: Minor Bug Fixed
-
Version 1.3.6 - 27th May 2021
- Added : Tv Screen Mode Supported
- Added : After Register Form Redirect link option
- Added: Dynamic slider option for Movie, Tv_show, video slider shortcode
- Fix: Minor Bug Fixed
-
Version 1.3.5 - 15th May 2021
- Fix : Minor Bug Fixed
-
Version 1.3.4 - 01st May 2021
- Added : Live Search Ajax
- Fix : Some dynamic options add in Redux side
- Fix : Bug Fixed
-
Version 1.3.3 - 28th Apr 2021
- Add : Some dynamic options added in Redux Theme options.
- Fix : Bug fixed
-
Version 1.3.2 - 16th Apr 2021
- Add : TV-Show vertical slider shortcode
- Add: Video Vertical slider shortcode
- Add movie, tv-show, video, episode trailer link on the detail page,
- Add: Dynamic text option for Movie, Tv_show, video tab shortcode
- Add: More dynamic options add in Theme options
- Add: Full-width custom template
- Fix: Minor Translation errors
- Fix: Minor bug fixes
-
Version 1.3.1 - 3rd Apr 2021
- Bug Fixes
- Added Comment Section
- Some Translation set proper
- Trailer Link and Play Now option make dynamic
- Some dynamic options added in Redux Theme options
- Trailer Link add in ACF ( Movie, Tv-Show, Video )
-
Version 1.3.0 - 20th Mar 2021
- Added: Video Support and video pages
- Added: Grid, load more, infinite scroll, pagination option
- Added: OMDB, Youtube and Vimeo Import feature
- Minor Fixes
-
Version 1.2.1 - 15th Feb 2021
- Added Child Theme
- Minor Fixes
-
Version 1.2.0 - 07th Feb 2021
- Added RTL Support
- Minor Fixes
-
Version 1.1.3 - 22nd Jan 2021
- Added New Widget & More Customizations
- Minor Fixes
-
Version 1.1.2 - 05th Jan 2021
- Minor Fixes
-
Version 1.1.1 - 02nd Jan 2021
- Header enable/disable for specific page
- Minor Fixes
-
Version 1.1.0 - 29th Dec 2020
- [Added] Subscription Plugin Support
- Hide admin bar for users
- Minor Fixes
-
Version 1.0.0 - 24th Dec 2020
- Initial release.
Help and Support
The expert team at Iqonic Design is always happy to help you with any questions or concerns you encounter. If you need any support with the item, please contact us through our dedicated support portal at Desky or email
- Support System: https://iqonic.desky.support/
- Support Email: [email protected]
Support Policy:
We request you to kindly read our documentation carefully. It will help you resolve most of your concerns with incorrect configuration. To get technical support and assistance, you need to have a valid purchase code. You will find this when you sign in your Themeforest “Download” page. Click on the theme’s download link.
PLEASE NOTE! Please be informed that theme-related features are only covered in technical support. Additional customization is not covered in support. Support does not include 3rd party plugins integration or any other compatibility issues that might arise. But, support is applied to plugin(s) we have developed and integrated ourselves.
If you have any questions that are beyond the scope of documentation, feel free to post them on our support portal at https://iqonic.desky.support/. Expect answer within 24-48 hours, usually as soon as possible in the order they were received.
PLEASE NOTE! Support requests are being processed on business days (Monday to Saturday) from 9:00 to 18:00 (GMT +05.30).We are in GMT+5:30 time zone. We address all the support queries 6 days weekly on the first-come, first-solve basis (Sundays off).
If any support ticket has no response from the item owner for 7 days, the ticket will be considered closed. If you need further assistance you can create another ticket.
Please be aware that before submitting a new ticket, please try searching the topic from our Articles and Knowledgebase for an answers.
Have pre-sales questions or concerns, please write to us via our website contact page or email us at [email protected] If you like our product and support then please drop a rate and write a review at https://themeforest.net/downloads
Thank you for purchasing our theme
Welcome and congratulations on being our premium item owner.
Congratulations, your websites is set to launch. If you have any questions or have a query, or simply wish to give us a suggestion or two, please reach us at our support portal and raise a ticket at https://iqonic.desky.support/
You get free 6 month support with this theme. You can write to us at [email protected] for any basic customization requests. Our support agents will guide you further on it. We wish you all success in your project.
Build, scale, monetize, and own AI-first OTT platforms with Streamit. Explore the official ecosystem and streaming solutions streamit.tech
Copyright 2026 Made with by Iqonic Design. All rights reserved.