General Information
- Item Name : SocialV - Social Network and Community BuddyPress Theme
- Author : Iqonic Design
- Support Ticket: https://iqonic.desky.support/
Thank you for choosing our theme. We hope you enjoy building your project with us. It is a powerhouse of great features and powerful functionalities that would take months to develop. The theme is fully responsive and be rest assured your project looks absolutely stunning on any type of screens.
Regular License
ThemeForest regular license allows an item owner to create one single End Product (the final website customized with client's own content). This end product could be for item owner himself or for one of his client.
What is acceptable in single regular license:
- You are allowed to create 1 website (on a single domain) for yourself or for your client. You can then transfer that website to your client for any fee. Please note that your license also has to be transferred to your client.
- You can install the theme on your test server for testing or for the development purposes (this installation should not be shared to the public). SocialV
- You can modify and customize the theme, you can combine it with other works to create the End Product.
What is not acceptable:
- With a single regular license you are not allowed to create multiple websites. For multiple websites you will need multiple regular licenses.
- If you would like to resell the same website (Single End Product) to another clients. Mandatorily, you will need to purchase an extended license for this case.
Bundled Plugins
All the premium plugins that comes with the theme are fully functional without any registration license key. If however, you wish to use the additional features or receive automatic updates and support from the plug-in party, you shall purchase the plug-in separately.
Theme Installation
WordPress Information
For WordPress Installation you can check the Famous 5-Minutes Install here:
- Support System: https://wordpress.org/support/article/how-to-install-wordpress/
Theme Requirements
To use SocialV, you must be running WordPress 4.9.1 or higher, PHP 7.1 or higher, and MySQL 5.6 or higher. We have tested it with Mac, Windows and Linux. Below is a list of items you should ensure your host can comply with.
Recommended PHP Configuration Limits
White screen, demo content fails when importing, empty page content and other similar issues are all related to low PHP configuration limits. The solution is to increase the PHP limits. You can do this on your own, or contact your web host and ask them to increase those limits to a minimum as follows:
- max_input_vars = 3000
- memory_limit = 512M
- max_execution_time = 300
- max_input_time = 300
- upload_max_filesize = 64M
- post_max_size = 64M
Theme Installation
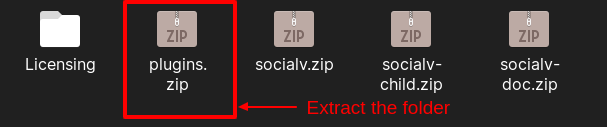
Unpacking the theme
Before installing the theme, please make sure you unpacked the archive and extracted the theme files. Some of the folders names may slightly vary. Treat the screenshot below as an example only.
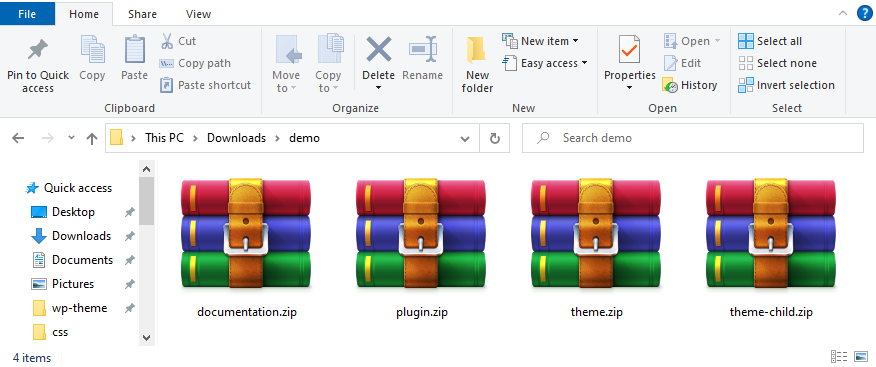
The main package contains archives with the main theme, child theme, documentation and bundled plug-ins.
If you try to install the wrong files, you will get the missing style.css error. This is the most common error that means you are trying to install an incorrect package.
In order to install the theme, you need to have a working version of WordPress installed on your server first. Check out this guide for detailed information on how to install WordPress. We also highly recommend updating your WordPress to the latest stable version.
Below you can find a video tutorial on how to install the theme.
There are 3 ways to install the theme:
Theme Installation via WordPress:
Step 1 - Login to your WordPress Admin Panel.
Step 2 - Go to Appearance > Themes. Click the Add New button.
Step 3 - Click on the Upload Theme button. Locate "socialv.zip" and click Install Now.
Step 4 - After the successful installation,click on Activate.
Theme Installation via FTP :
Step 1 - Log into your Hosting server using an FTP client.(Ex: FileZilla)
Step 2 - Locate "socialv.zip" that you found in your ThemeForest Package and unzip it. Once it is done you'll get a folder named SocialV with all theme files in it.
Step 3 - Locate your WordPress directory and upload SocialV folder (unzipped in the previous step) into ../wp-content/themes/
Step 4 - Click on the Activate button to activate SocialV. Congratulations, you have now activated SocialV! You can now proceed with SocialV's Plugin Installation.
Theme Installation via Envato Market:
- If you already have the "Envato Market Plugin" installed on your site then just go to Admin > Envato Market and install theme from there. If not, than download the plugin by clicking on this link and install the plugin on your site. After installation, you just need to configure it (linking with your ThemeForest account). Click here for step-by-step tutorial.
- Then just go to Admin > Envato Market plugin menu and install the theme. The theme would be available to install so you can easily install it.
- NOTE: Please note that the "BuddyPress for SocialV Theme" is required plugin. So make sure you install that plugin after you install/activate the theme.
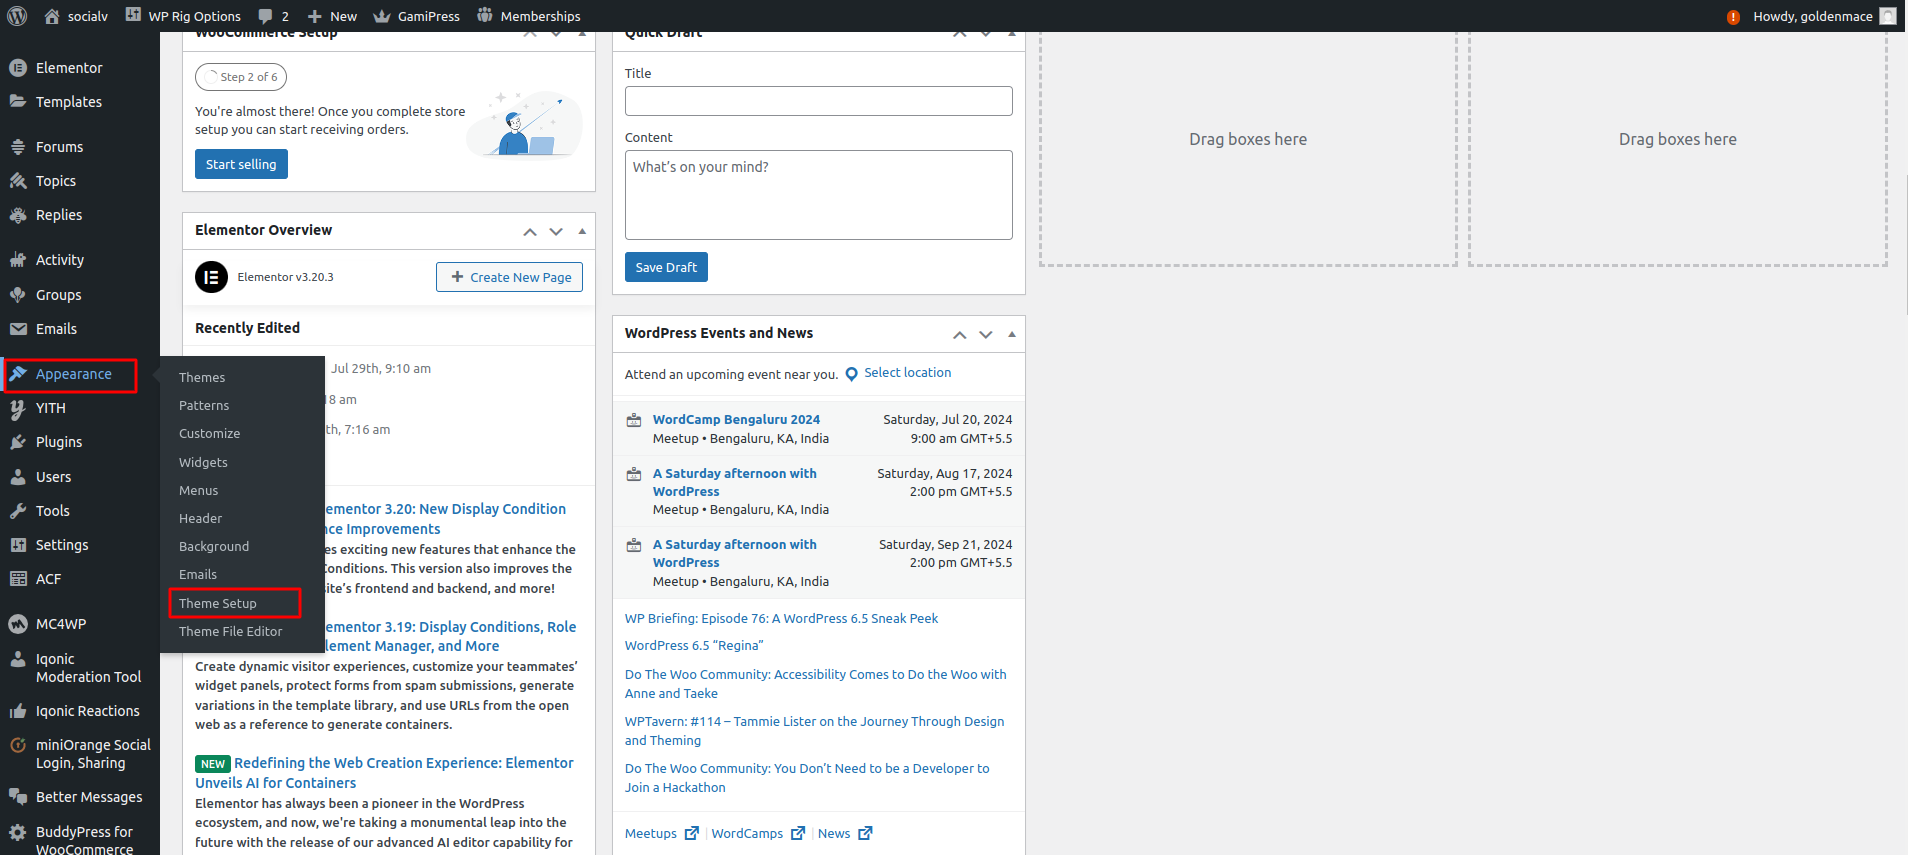
Theme Setup Wizard
Here Iqonic Introduces Theme Setup Wizard to Setup Theme For Easy And Best User Experience. Setup Theme Step By Step Way
Go to Appearance > Theme Setup Then, Click on It.
-
-
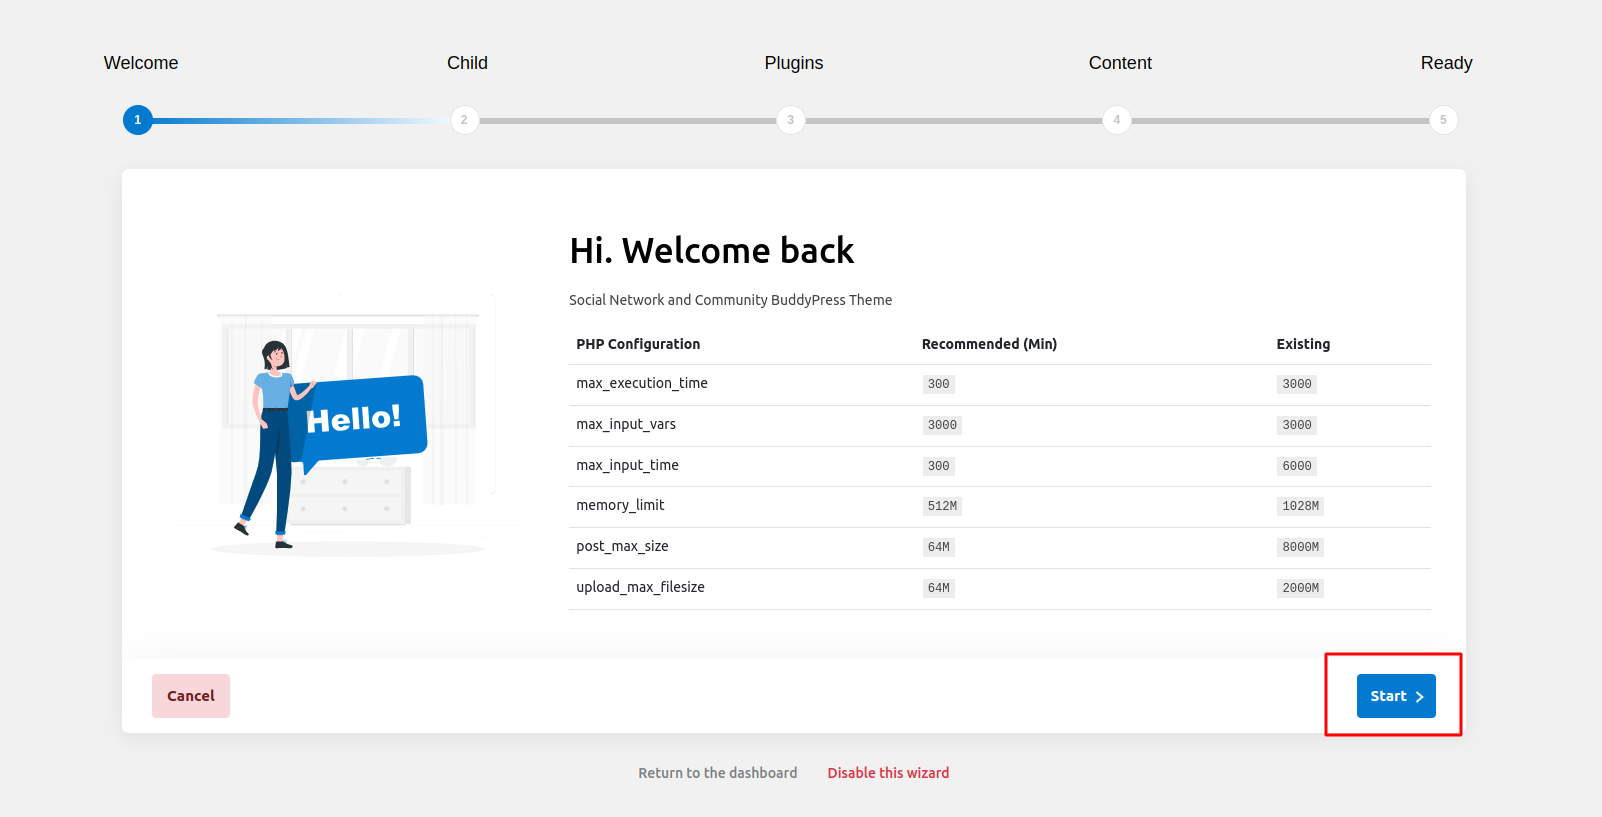
Step 1: Welcome
In this step, check Theme Setup Minimum Configuration, then click the Start button.
-
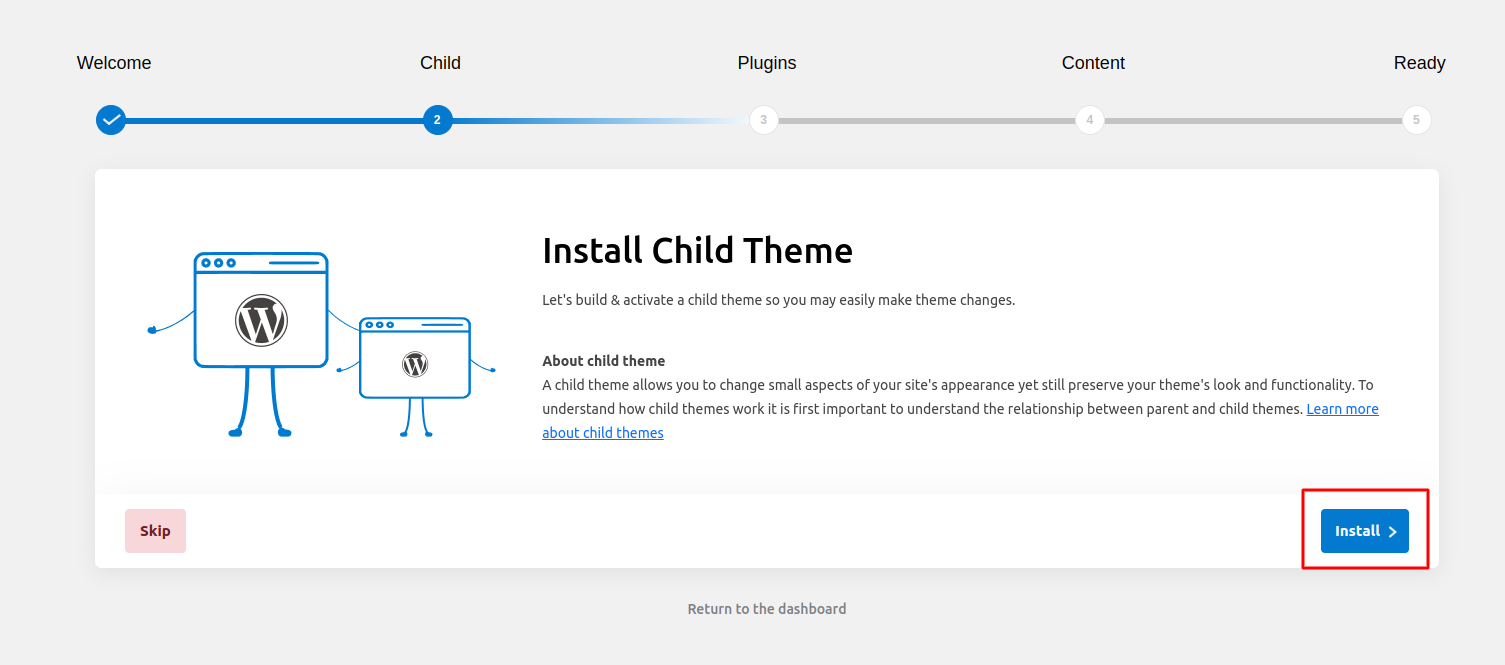
Step 2: Child Theme
In this step, you can install a child theme by clicking on the Install button. It's an optional step.
-
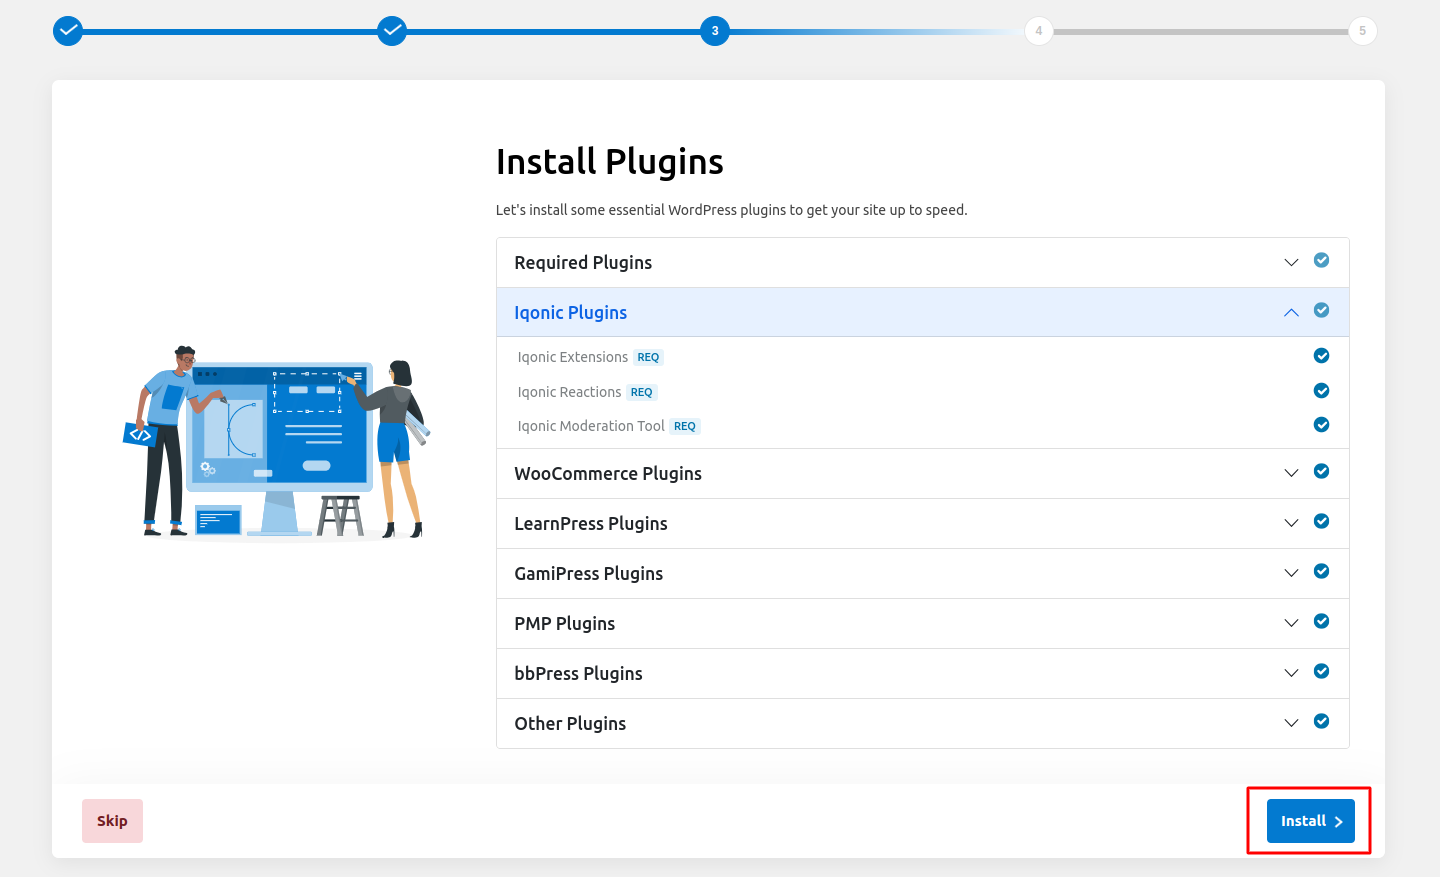
Step 3: Plugins
In this step, install all required plugins, and also remove any plugins from the list that you do not want to install according to your requirements.
-
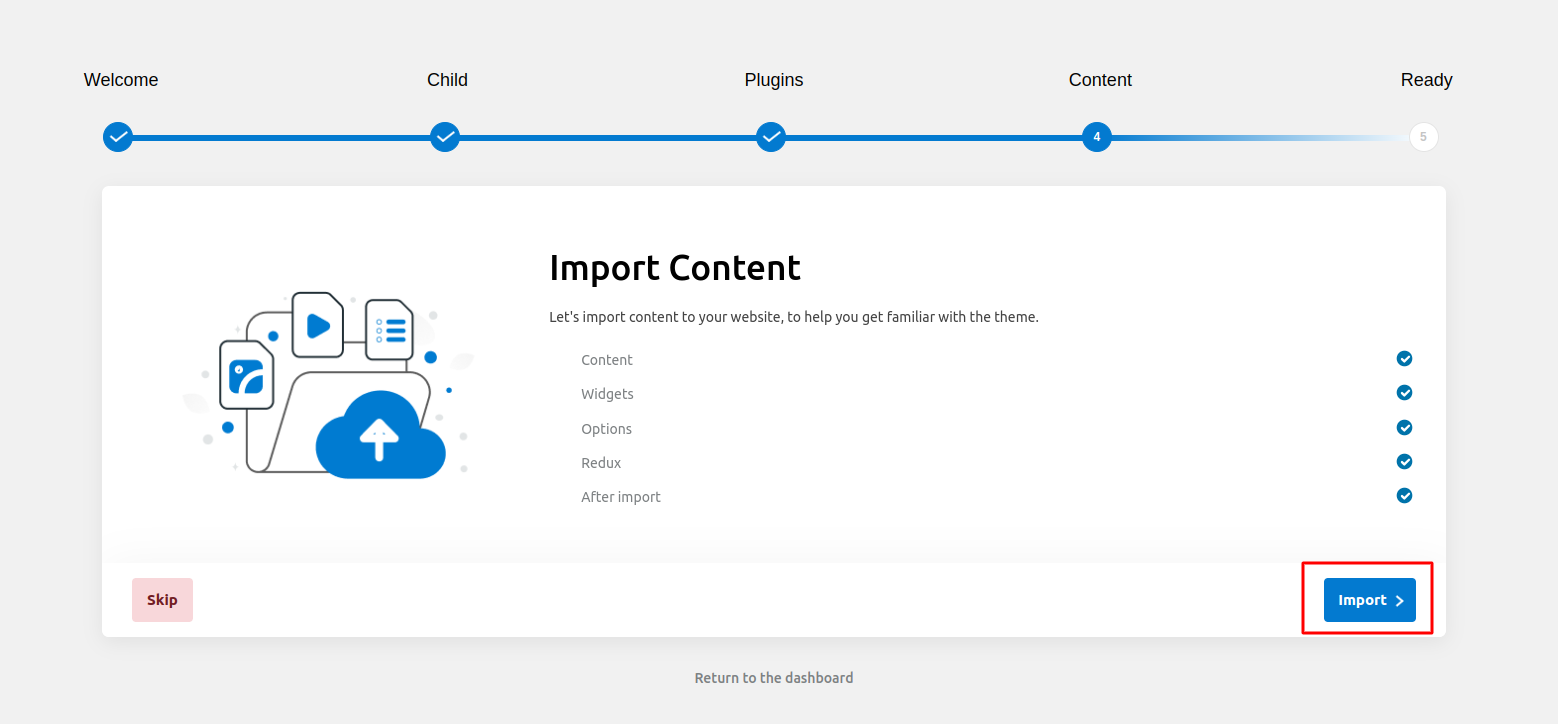
Step 4: Content
In this step, import content into your site by clicking on the import button.
Note: This step will take some time, so please be patient.
-
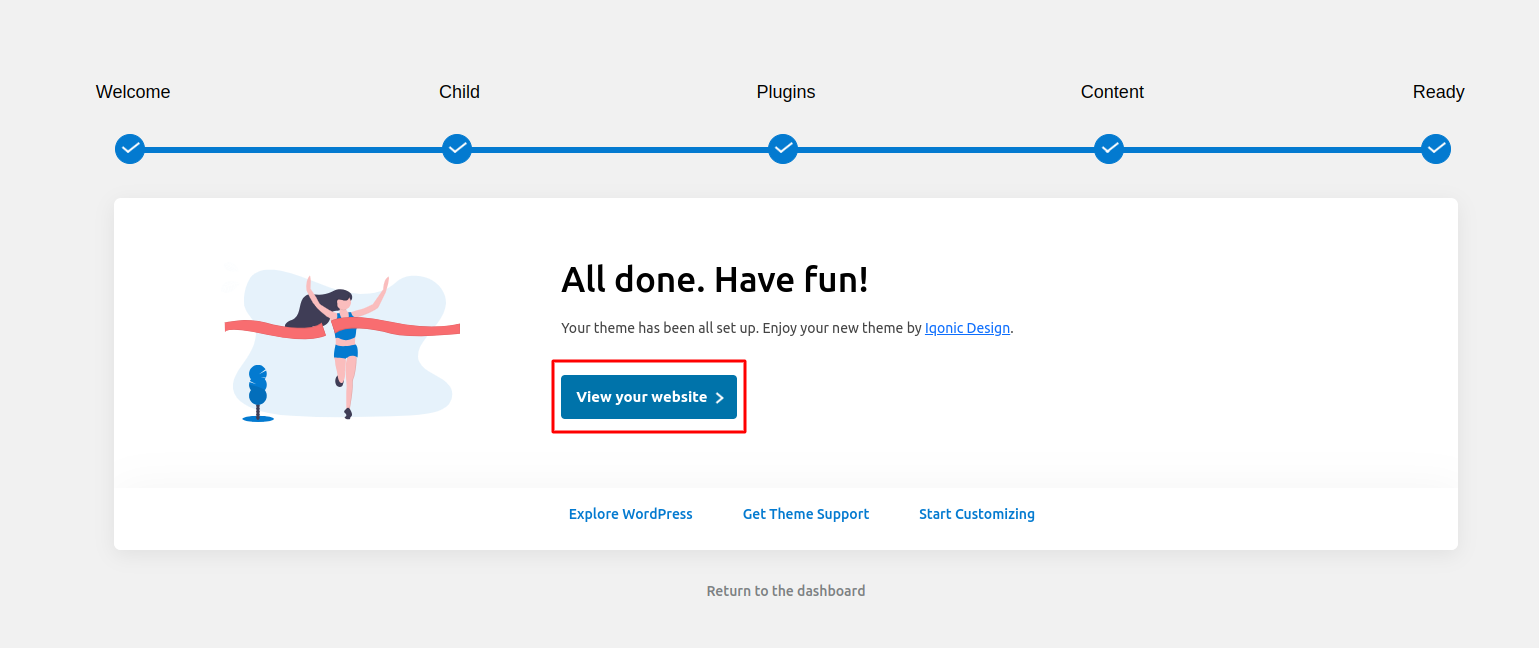
Step 5: ready
Congratulations! your theme has been setup
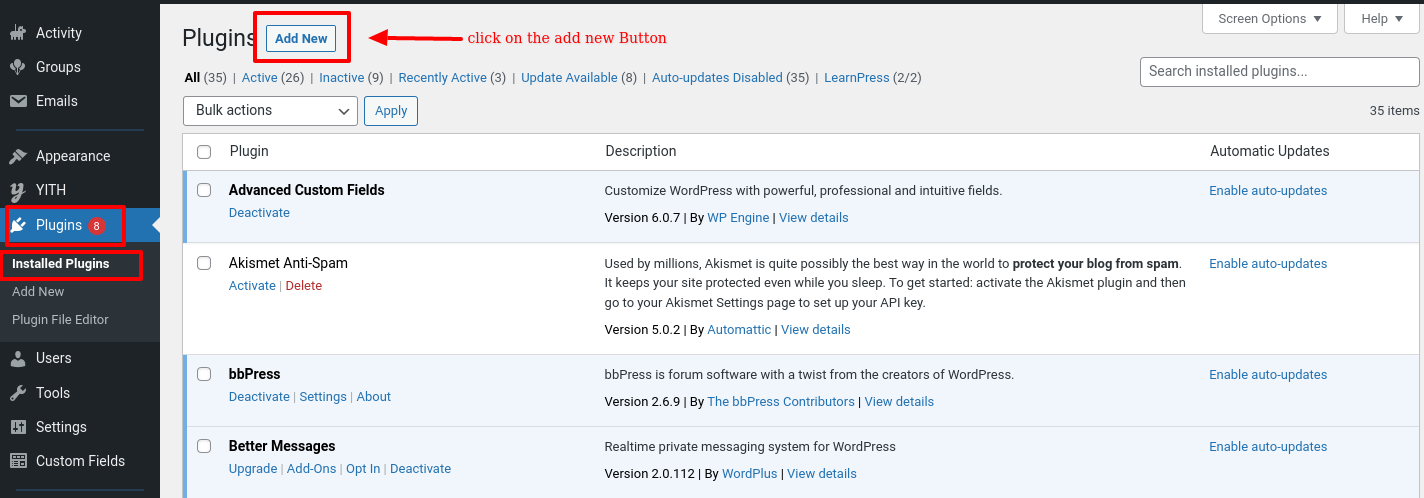
Plug-ins Installation
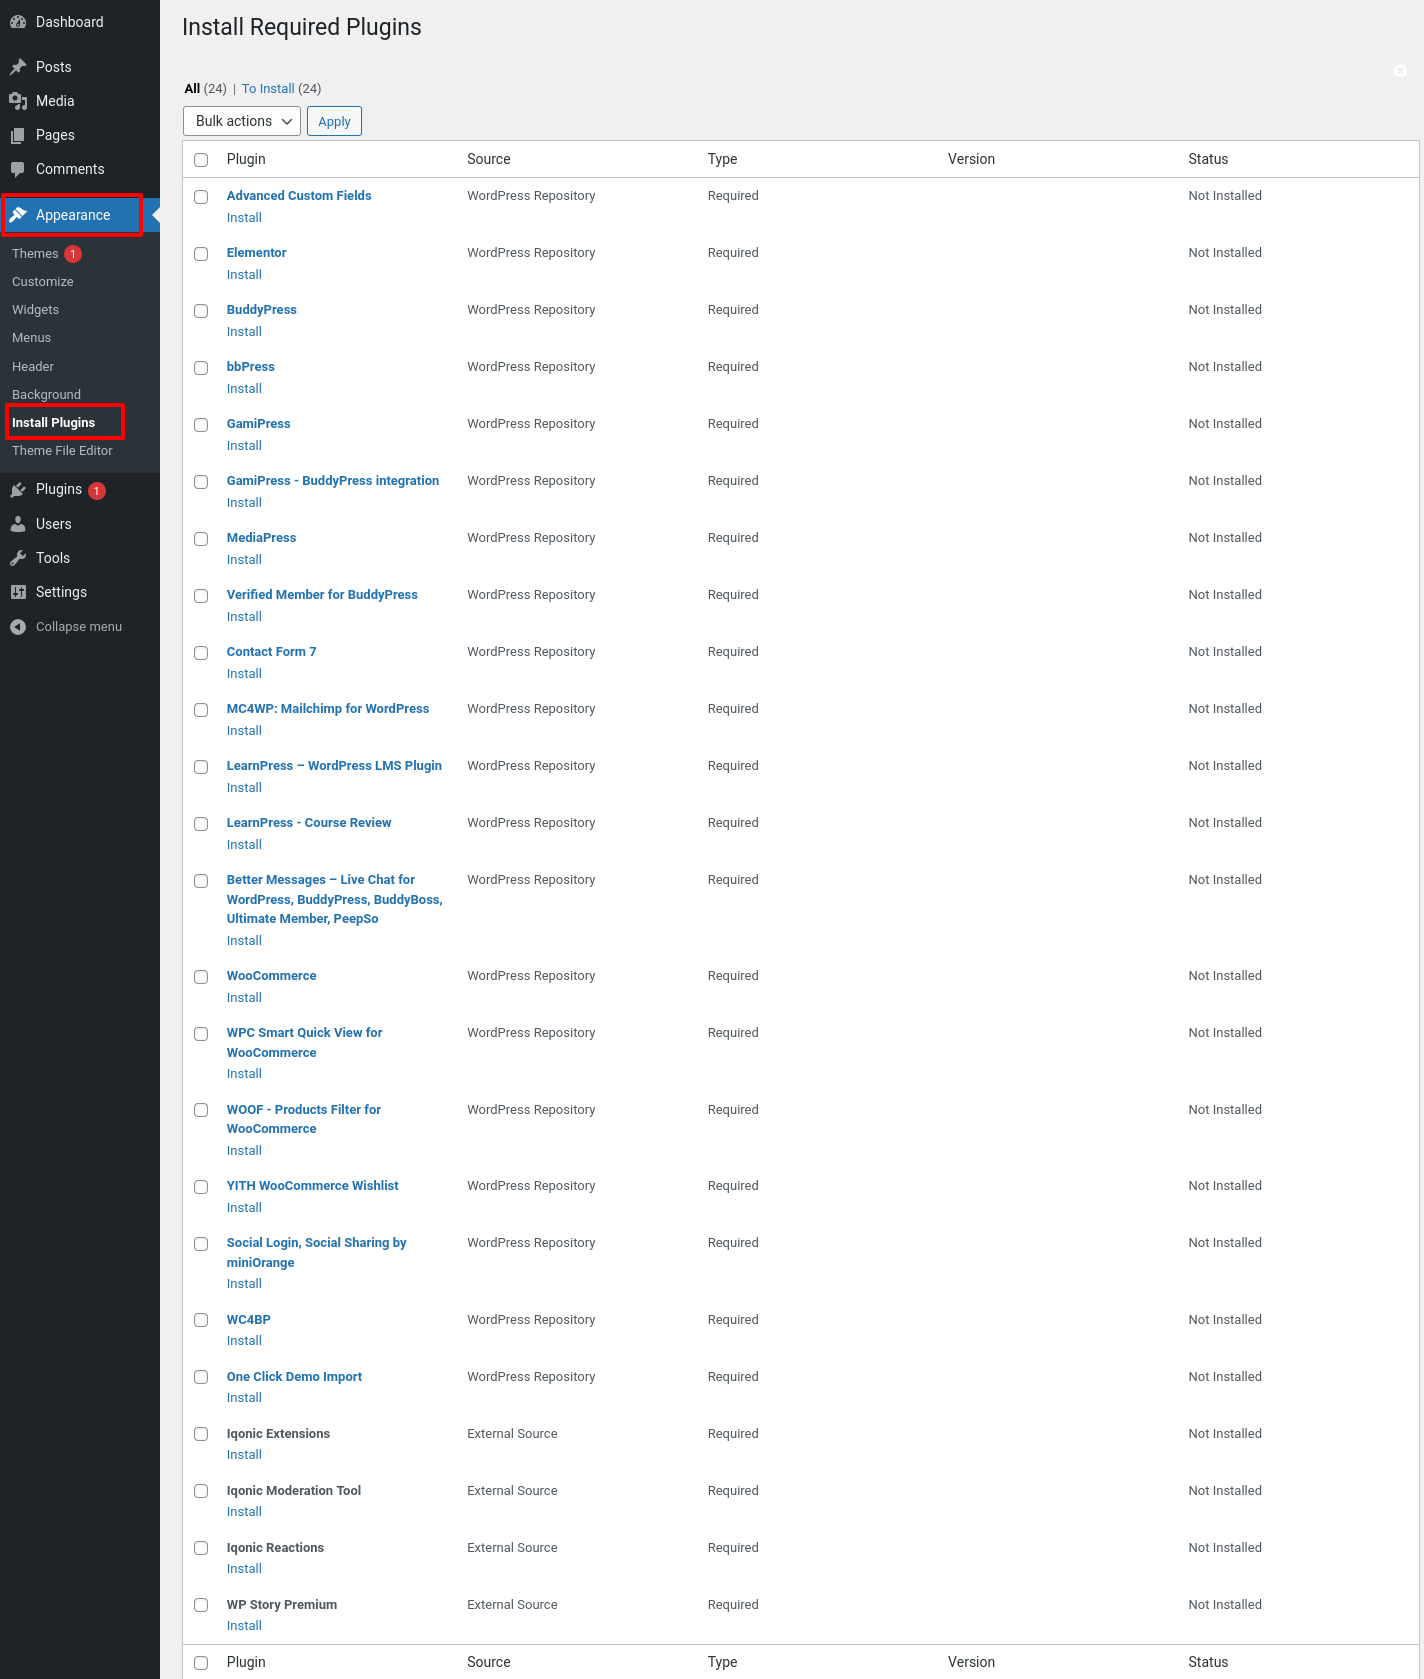
All required plugins are already added in your downloaded package.
Step 1 - After theme installation you should be redirected to Install Required Plugins page, which shows list of plugins:
Step 2 - Now, Select all "plugins"
Note - The installation process may take few minutes. Proceed further after successful installation.
Step 3 - When "All installations have been completed" appears, click on "Return to Required Plugins Installer".
Step 4 - Now, Select all plugins and choose Activate from drop down box this time.
Update Theme
There are 3 ways to Update the theme:
First of all, do a backup on your local computer. There is a lot of tool and plugins available to help you to do this. Just find one with a good rating and get it set up now, not later: https://wordpress.org/plugins/search.php?q=backup+wp
ALWAYS make a backup of your entire site before you update. Usually. the update installs within seconds and cause zero problems, but it's better to be safe than sorry.
How to upgrade?
The first thing to know is that if you have modified PHP, CSS, JS files into the core theme, the update will overwrite what you did.
The update will NOT affect your content such as your blog post, photos, videos, option theme settings, WordPress settings. Basically, the update replaces the PHP, JavaScript and CSS files of the theme, not your database, and not the WordPress core files.
OPTION 1 - AUTOMATIC UPDATE:
- Download and Install the official Envato Market WordPress plugin here
- Follow the instruction on the Envato Market WordPress plugin official page.
- When the theme update is done, please go to WP-Admin > Appearance > Install Plugin and click "update" for every plugin that requires an update.
- If for some reason you see some code on your front-end website after the theme update, make sure that all the required plugin are activated by going to WP-Admin > Plugins.
OPTION 2 - MANUAL UPDATE:
1. Redownload the theme files on ThemeForest (ThemeForest always have the latest version of the theme). So login to your Envato account, then go to Downloads, and download "Installable WordPress file Only" package.
2. Go to Wp-Admin > Appearance > Themes and activate another theme such Twenty Fifteen.
3. Delete the Theme you want to update. (Yeah, you must delete the theme before re-uploading the same theme).
4. Go to WP-Admin > Appearance > Themes > Add New and Upload the theme .ZIP file you've just downloaded from ThemeForest.
5. Activate your theme by clicking the "Activate button".
6. Make sure to reactivate the plugins by going to WP-Admin > Plugins.
7. When the theme update is done, please go to WP-Admin > Appearance > Install Plugin and click "update" for every plugin that requires an update.
8. If for some reason you see some code on your front-end website after the theme update, make sure that all the required plugin are activated by going to WP-Admin > Plugins.
9. If one of your plugins has not been updated (ex: WPBakery Page Builder), go to WP-Admin > Plugins and delete the plugin then go to WP-Admin > Appearance > Install Plugins and reinstall the plugins. Make sure to "activate" it again.
OPTION 3:
If deleting a theme makes your nervous, or you have an issue when uploading the theme via the WordPress dashboard, you can upload it manually by FTP.
1. Redownload the theme files on ThemeForest (ThemeForest always have the latest version of the theme). So login to your Envato account, then go to Downloads, and download "Installable WordPress file Only" package.
2. Unzip the zip file on your computer
3. Rename the root folder to something like "themename-new".
4. By using an FTP software (such as FileZilla), connect to your FTP.
5. Upload the folder to .../wp-content/themes/ (so you should have /wp-content/themes/themename-new/)
6. Once everything has been uploaded, go to WP-Admin > Appearance > Themes and activate your new theme.
7. Make sure to reactivate the plugins by going to WP-Admin > Plugins. If one of your plugins has not been updated (ex: Elementor, go to WP-Admin > Plugins and delete the old plugin.
8. Go to WP-Admin > Appearance > Install Plugins and reinstall the plugins. Make sure to "activate" them again.
Update plugin
Here Is Step To Update Plugin
First of all, do a backup on your local computer. There is a lot of tool and plugins available to help you to do this. Just find one with a good rating and get it set up now, not later: https://wordpress.org/plugins/search.php?q=backup+wp
ALWAYS make a backup of your entire site before you update. Usually. the update installs within seconds and cause zero problems, but it's better to be safe than sorry.
How to Upgrade Plugin ?
The update will NOT affect your content such as your blog post, photos, videos, option theme settings, WordPress settings. Basically, the update replaces the PHP, JavaScript and CSS files of the theme, not your database, and not the WordPress core files.
There Are Two Way to Update Plugins
Manually Update Plugin :
1. Backup Plugin Iqonic-Extensions in site->wp-content->plugins Folder
2. Extract the Plugin Zip file into the site->wp-content->plugin.
3. Replace The Old Iqonic-extensions Folder with new Extracted folder.
Auto Update Plugin :
1. Backup Plugin Iqonic-Extensions in site->wp-content->plugins Folder
2. Go to dashboard > plugins > Add New > Upload Plugin > Replace Current With Uploaded .
Step - 1
Step - 2
1. Download the Package : "socialv.zip" that you found in your ThemeForest Package and unzip it.
2. In there Extract the plugin folder.


Step - 3

Above Same Step follow as show in Iqonic Reaction, Iqonic Moderation Tools PLugin.
Features
Live Customizer
You can set Live Customizer Options for Setting from here.
Click Here for Live Customizer VideoModeration Tools
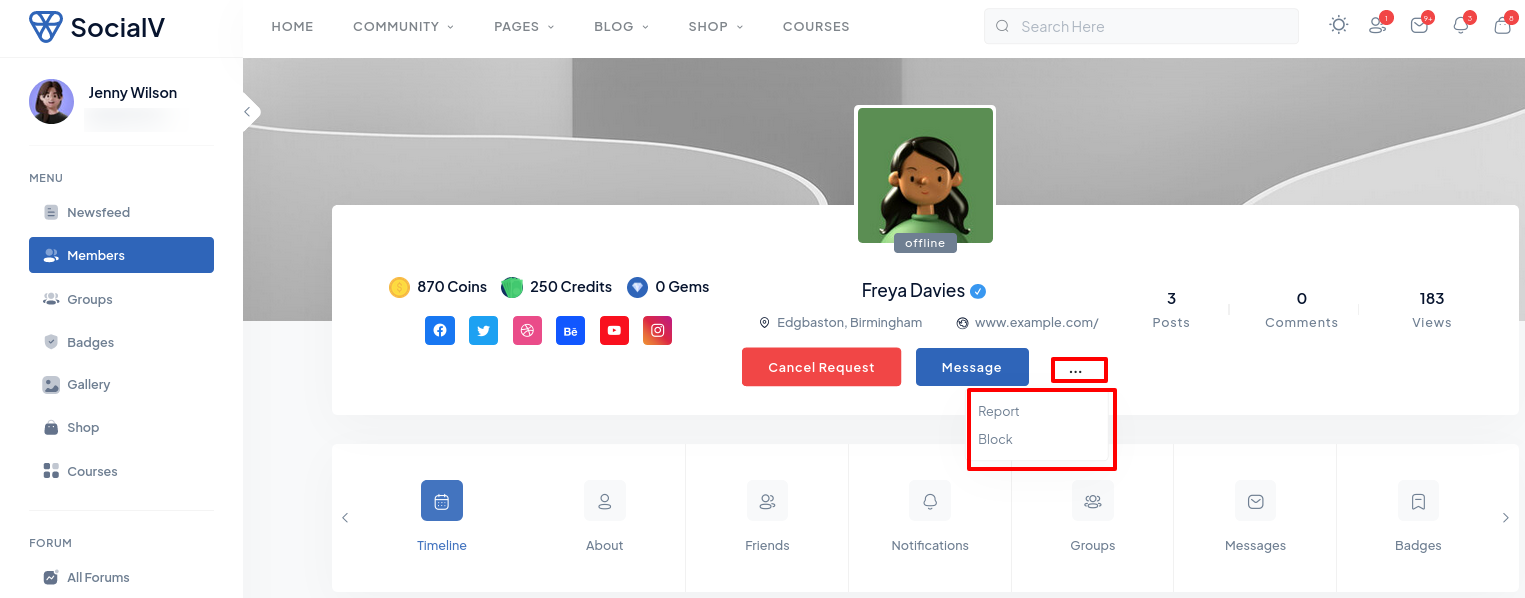
The BuddyPress Moderation Tools plugin adds a Report Abuse functionality to your BuddyPress based social network.
To install the plugin:

Add Report for here:
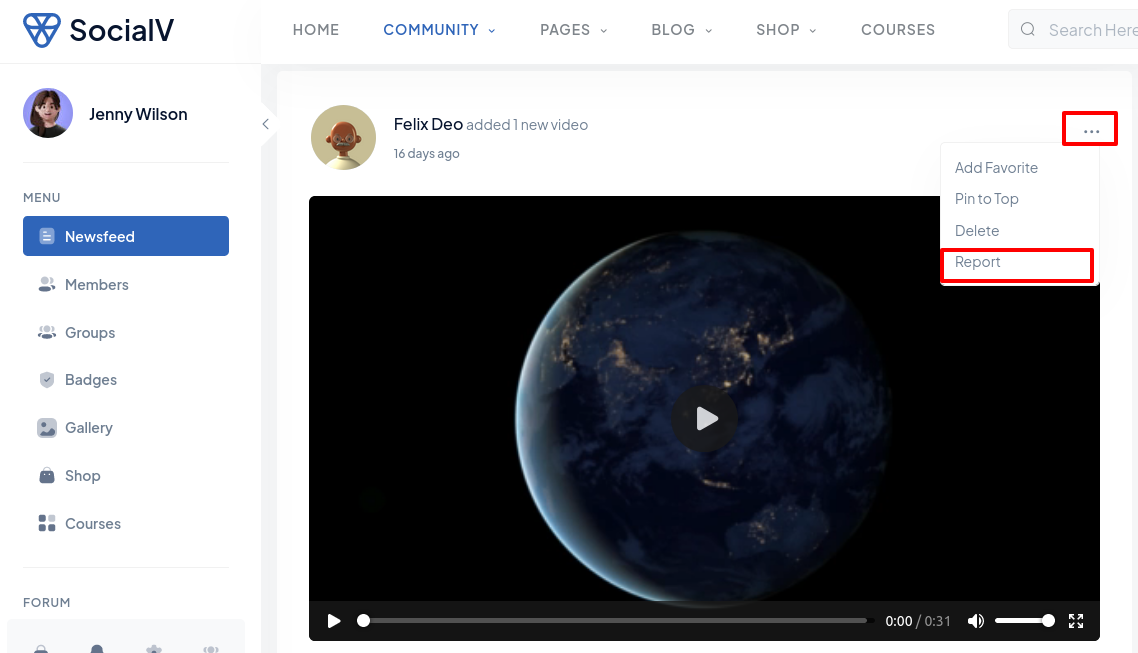
Add Block or Report for here:
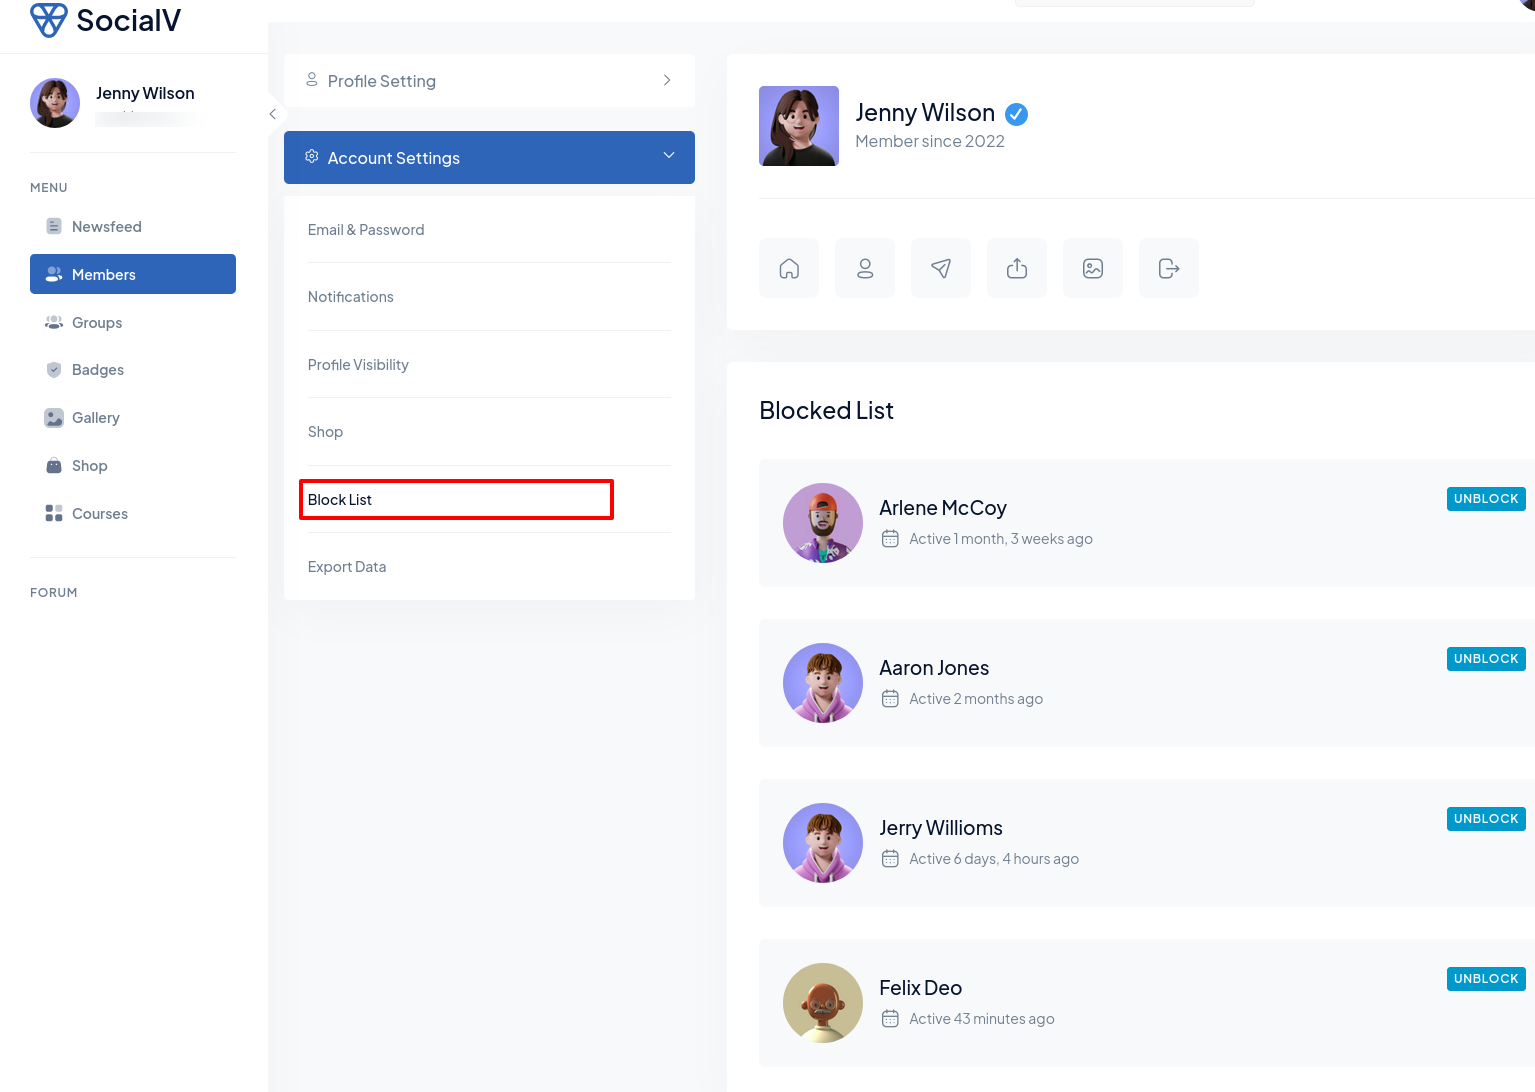
User Profile show blocked List here:
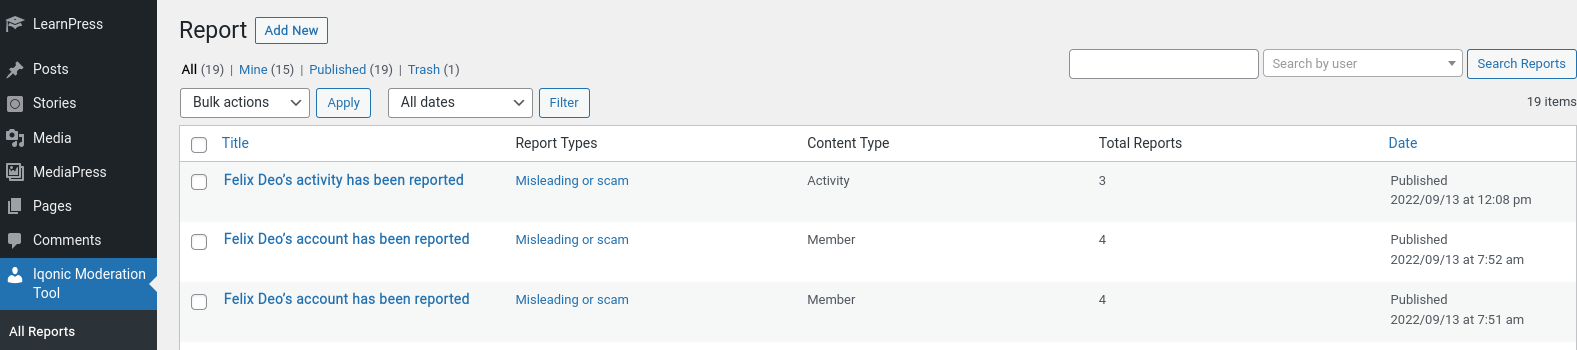
Admin can show reports here:
Admin can action report or add new report type here:

Iqonic Reactions
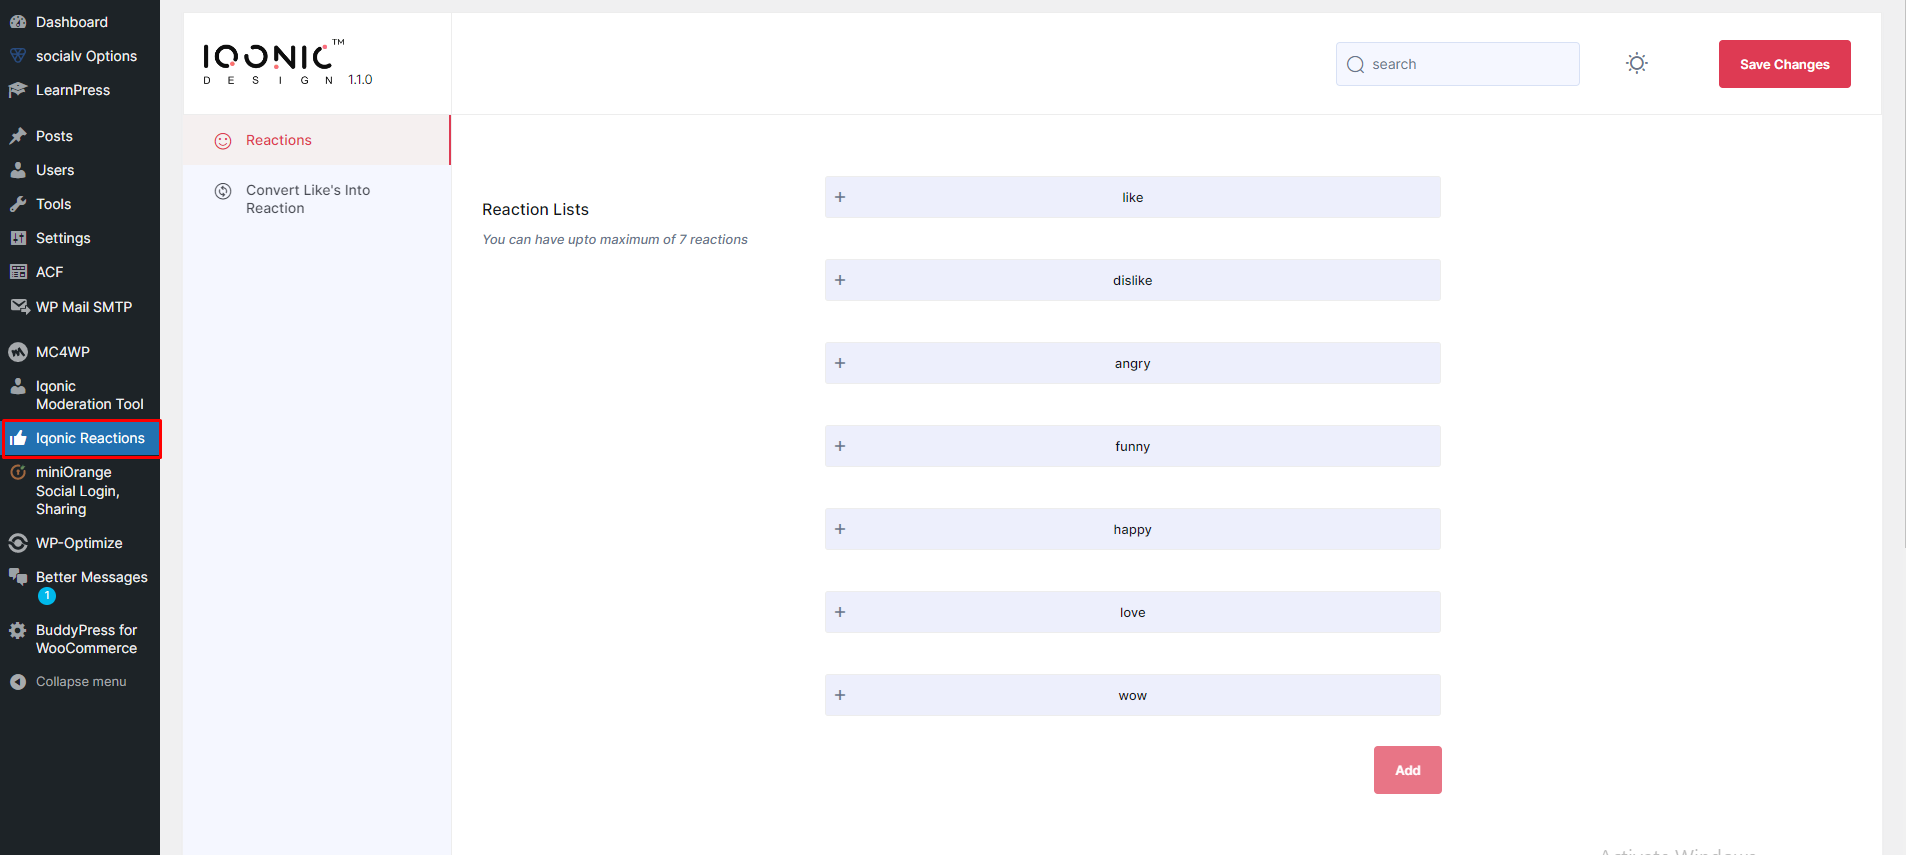
Iqonic Reactions is a simple and useful plugin where you can Add a custom reaction to your community so they can react to user posts.
You can also upload your own custom Emojis, such as.png, .gif, .svg or .etc

-
Default Reactions:
- You can change your default reaction using this option. If you select another reaction instead of "like" then your Selected Reaction becomes your default reaction.
-
Upload Reaction:
- To Display Different Like Icon.
LearnPress-BuddyPress Integration
Courses Module added in Buddypress User Profile from here

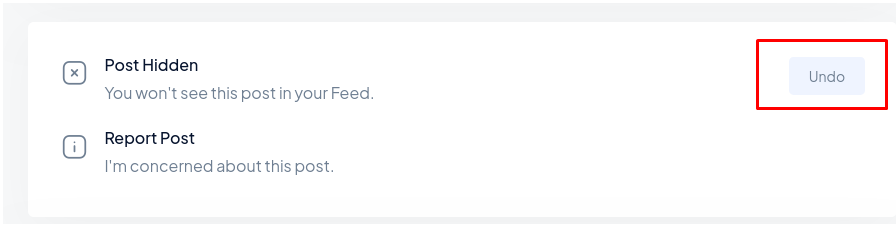
Post Hide/Undo
Hide Post click Here

Undo Post click Here
Theme Options
By clicking on the "SocialV Options" menu, you'll be able to change all template specific settings.
Customizer Settings
You can set dark-light mode Layout for Layout Option from here.

You can set Live Customizer Options for Setting from here.
Restricted Settings
You can change set restricted , non-restricted pages for Restricted Option from here.

Redirect on referrer page after login?
- Yes: After Login you can be redirect to in your previous page URL.
- No: Set your page manually where you want to redirect after login.
General Settings
You can change settings for General Option from here.

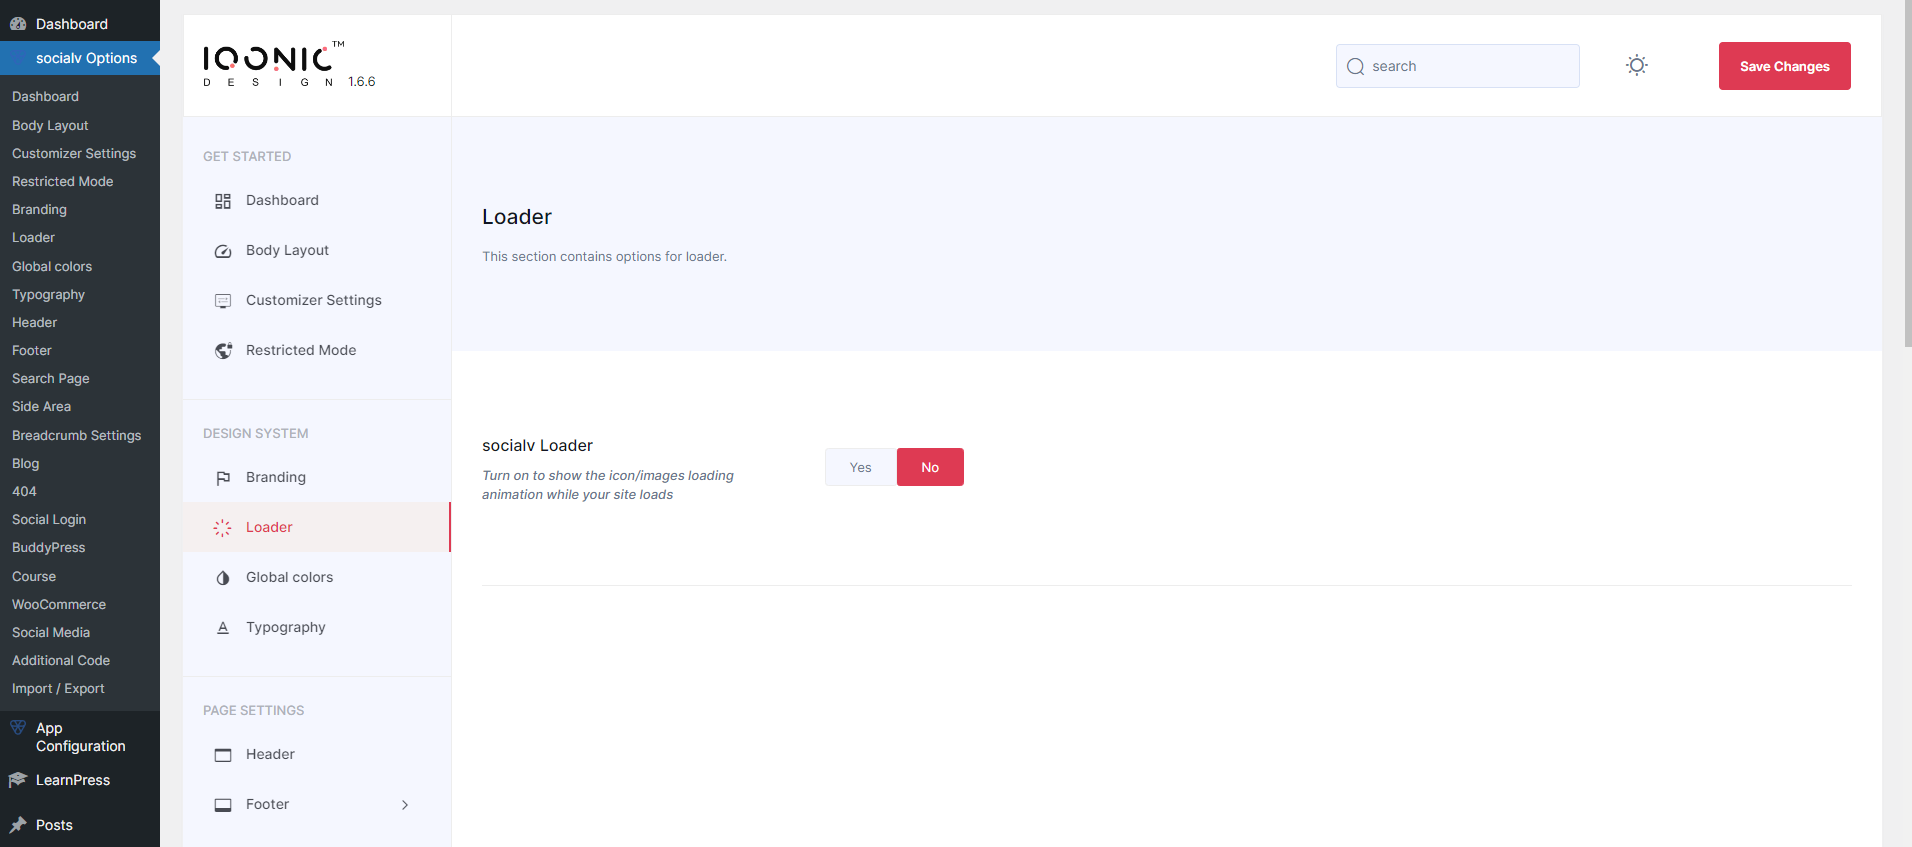
Loader Settings
You can change settings for Page section from here.
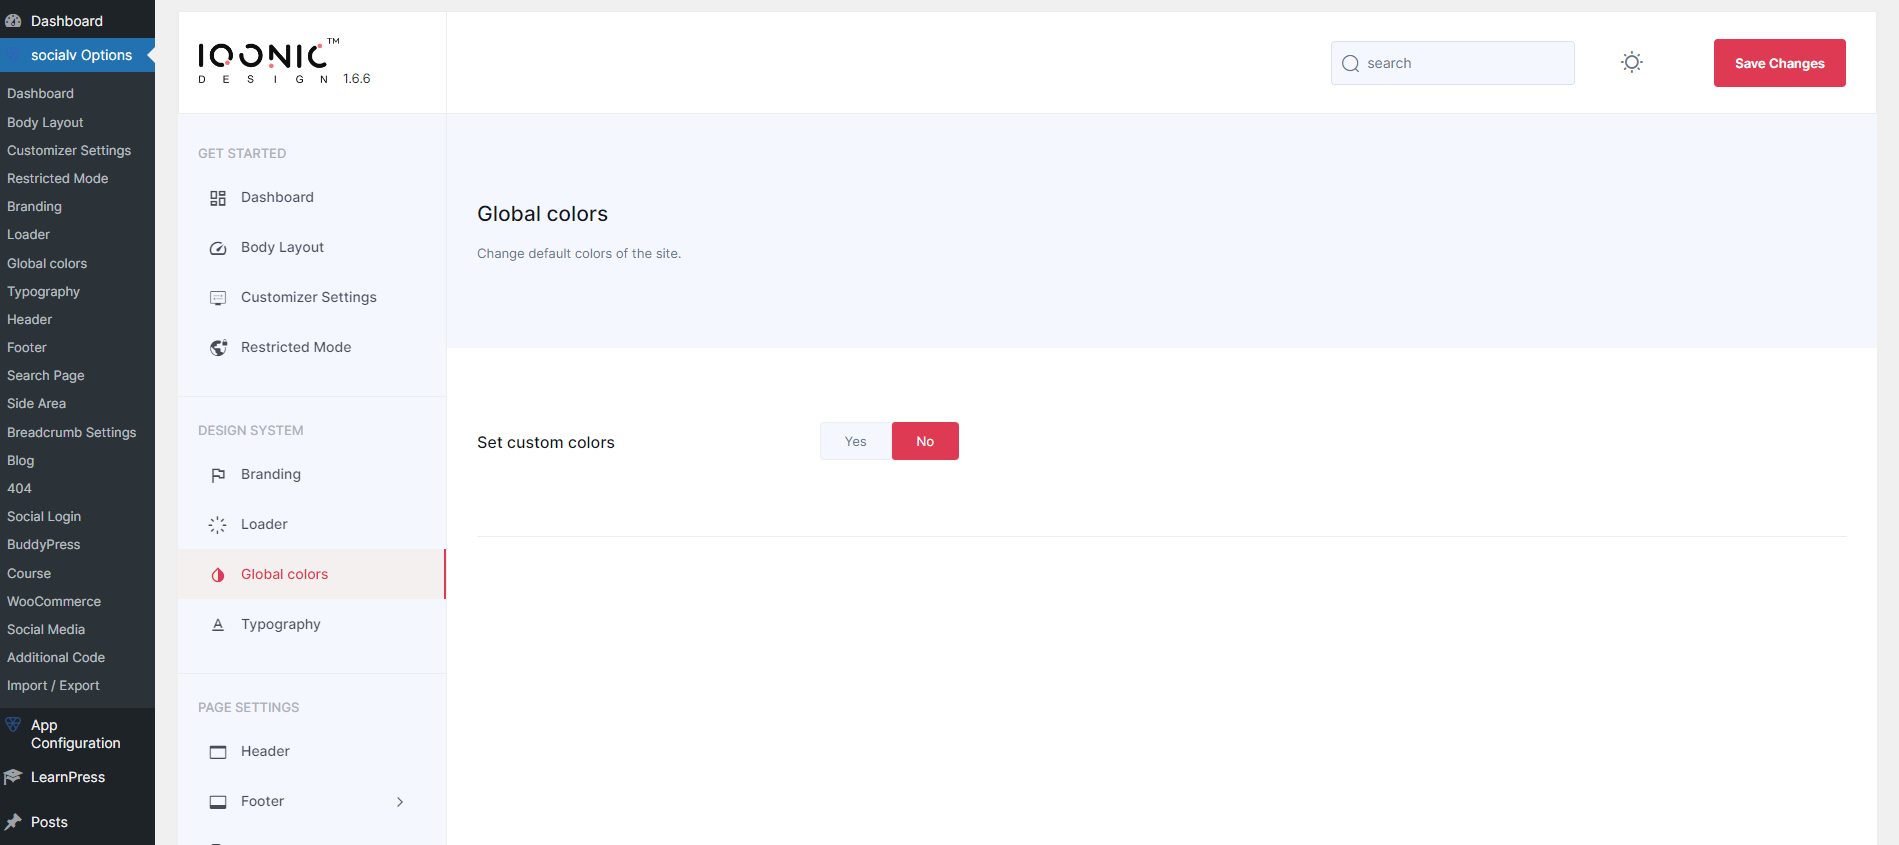
Color Settings
You can change settings for Page section from here.
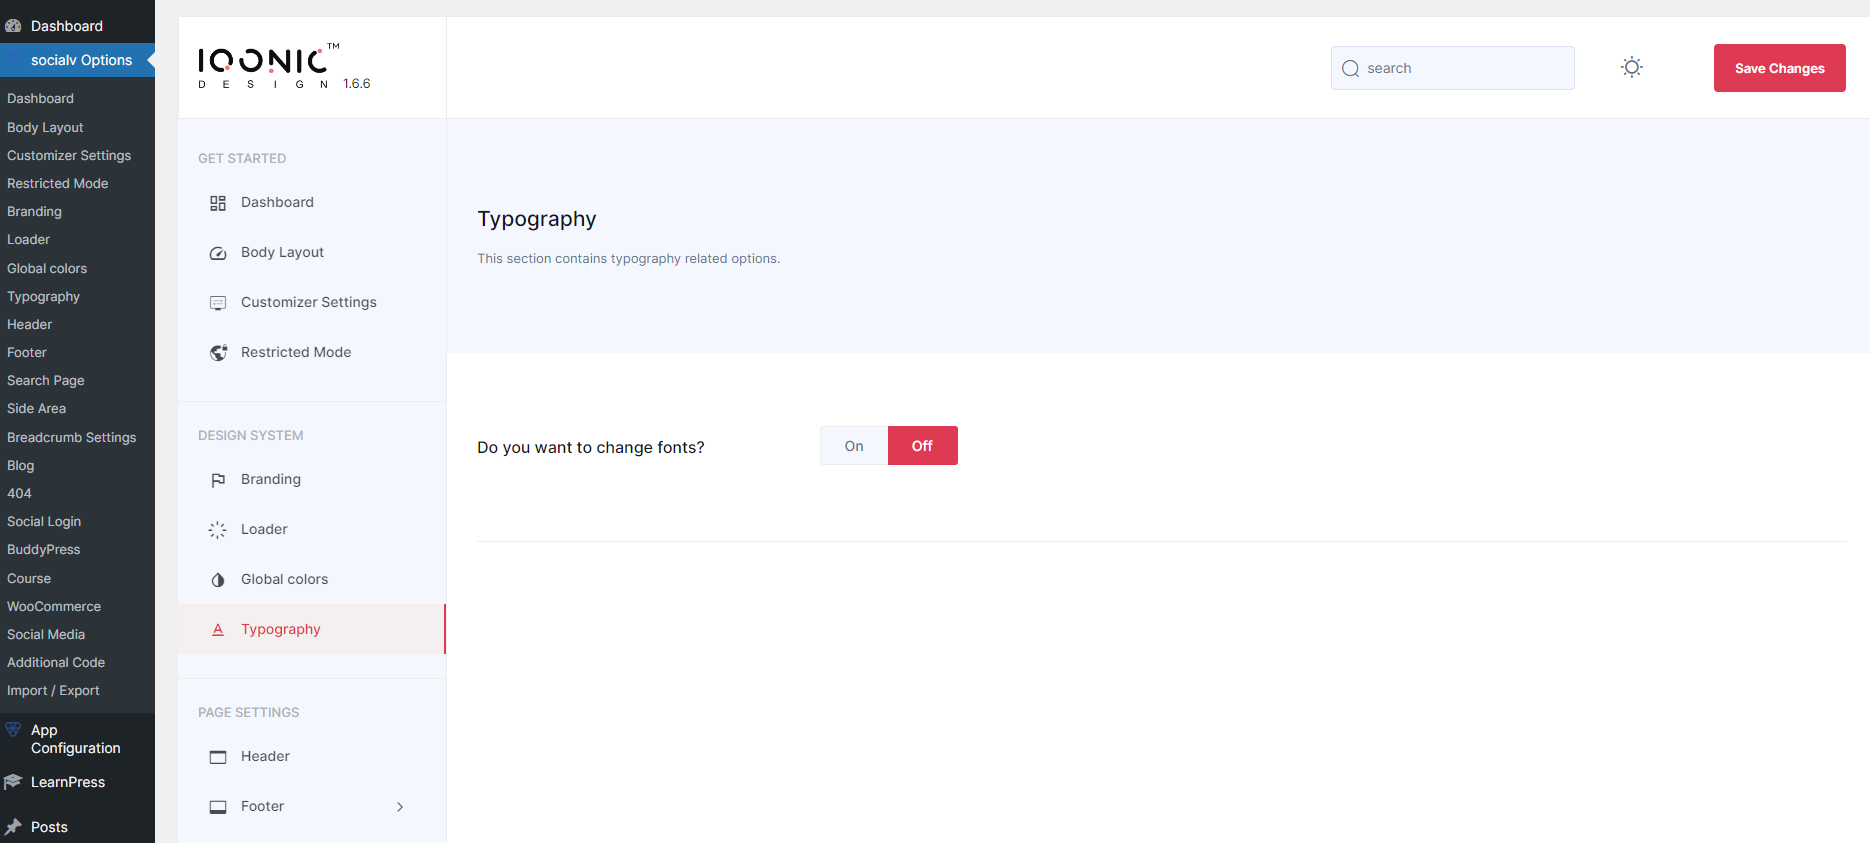
Typography
You can change settings for General Option from here.
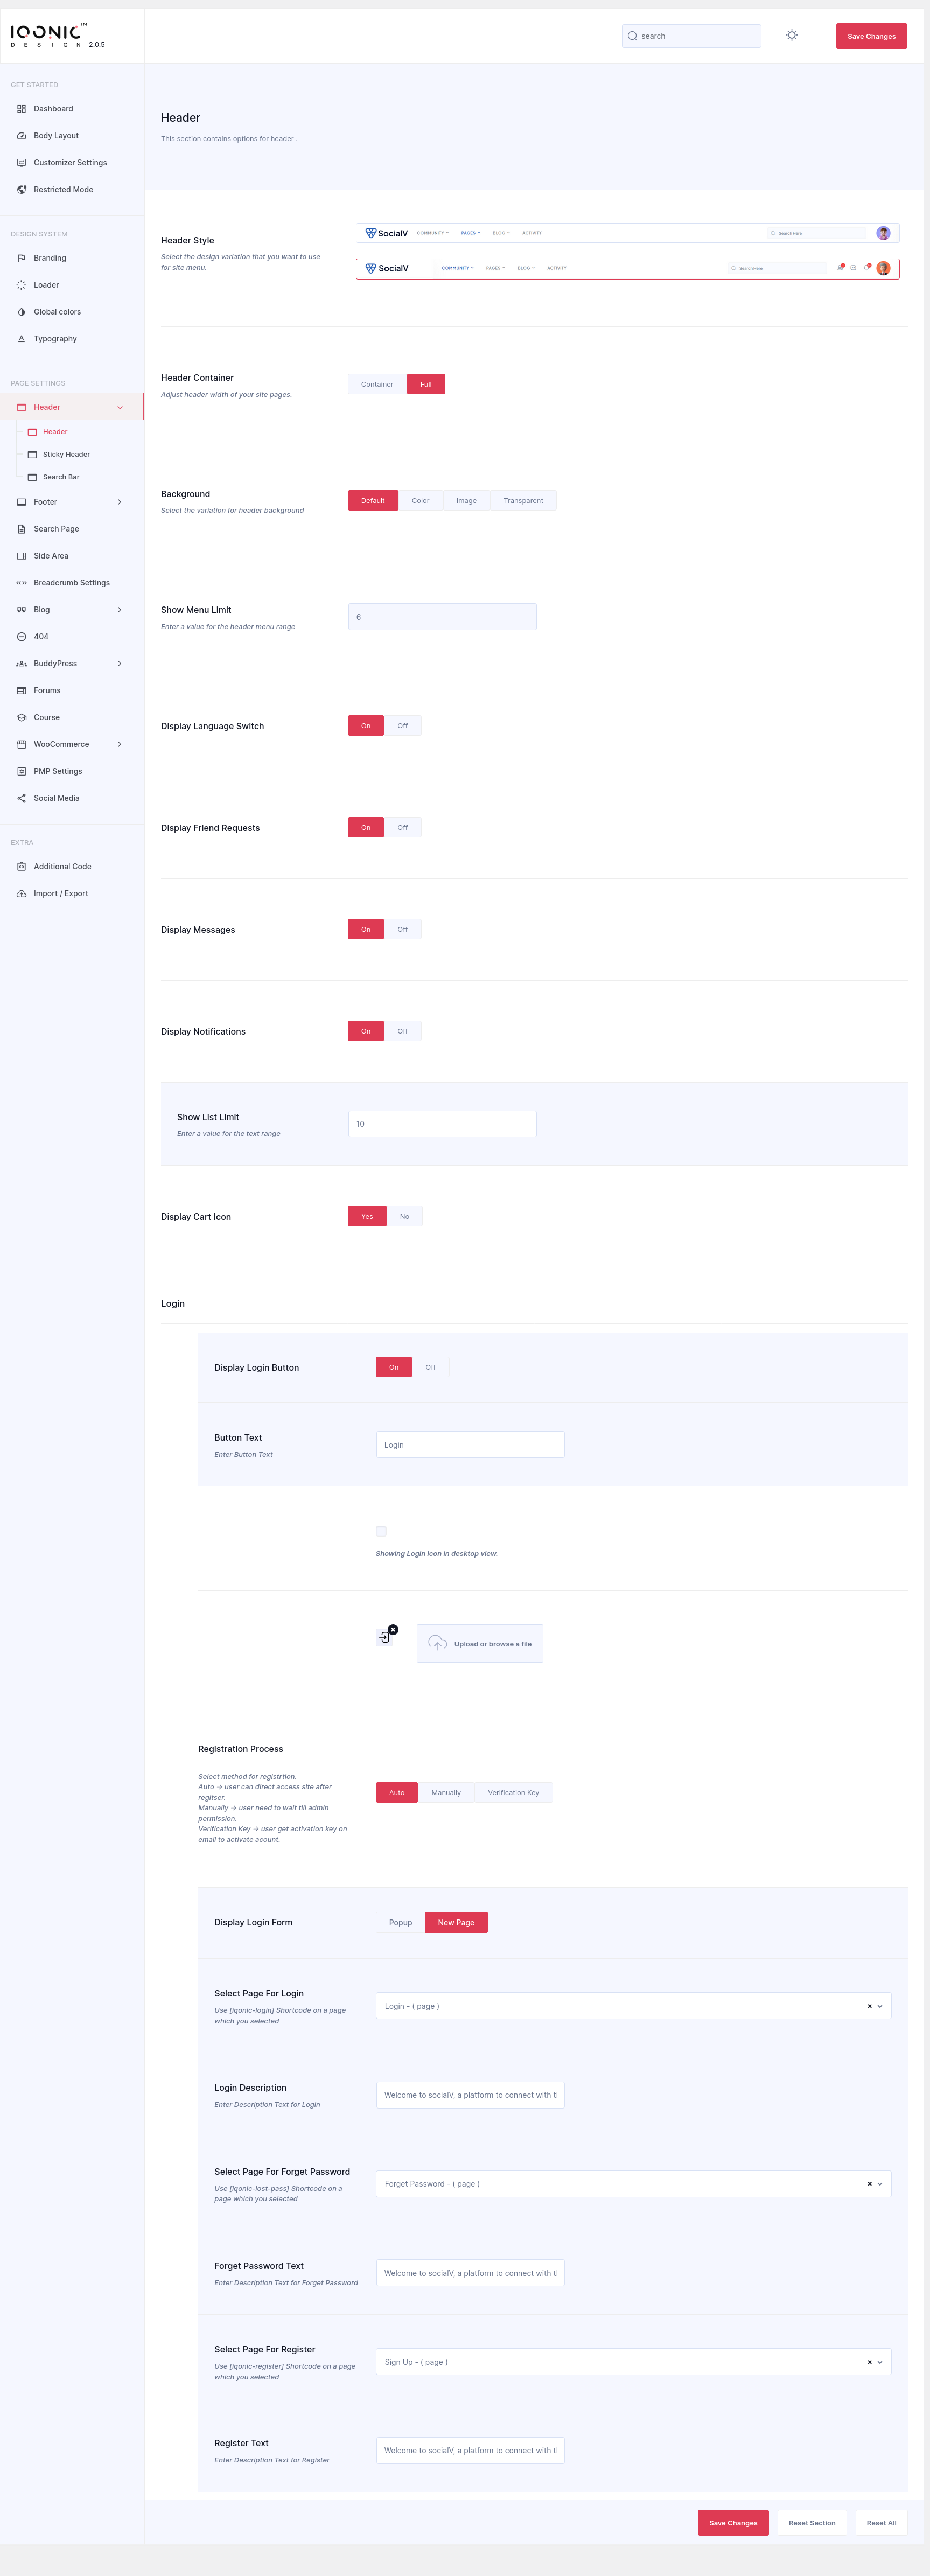
Header Settings
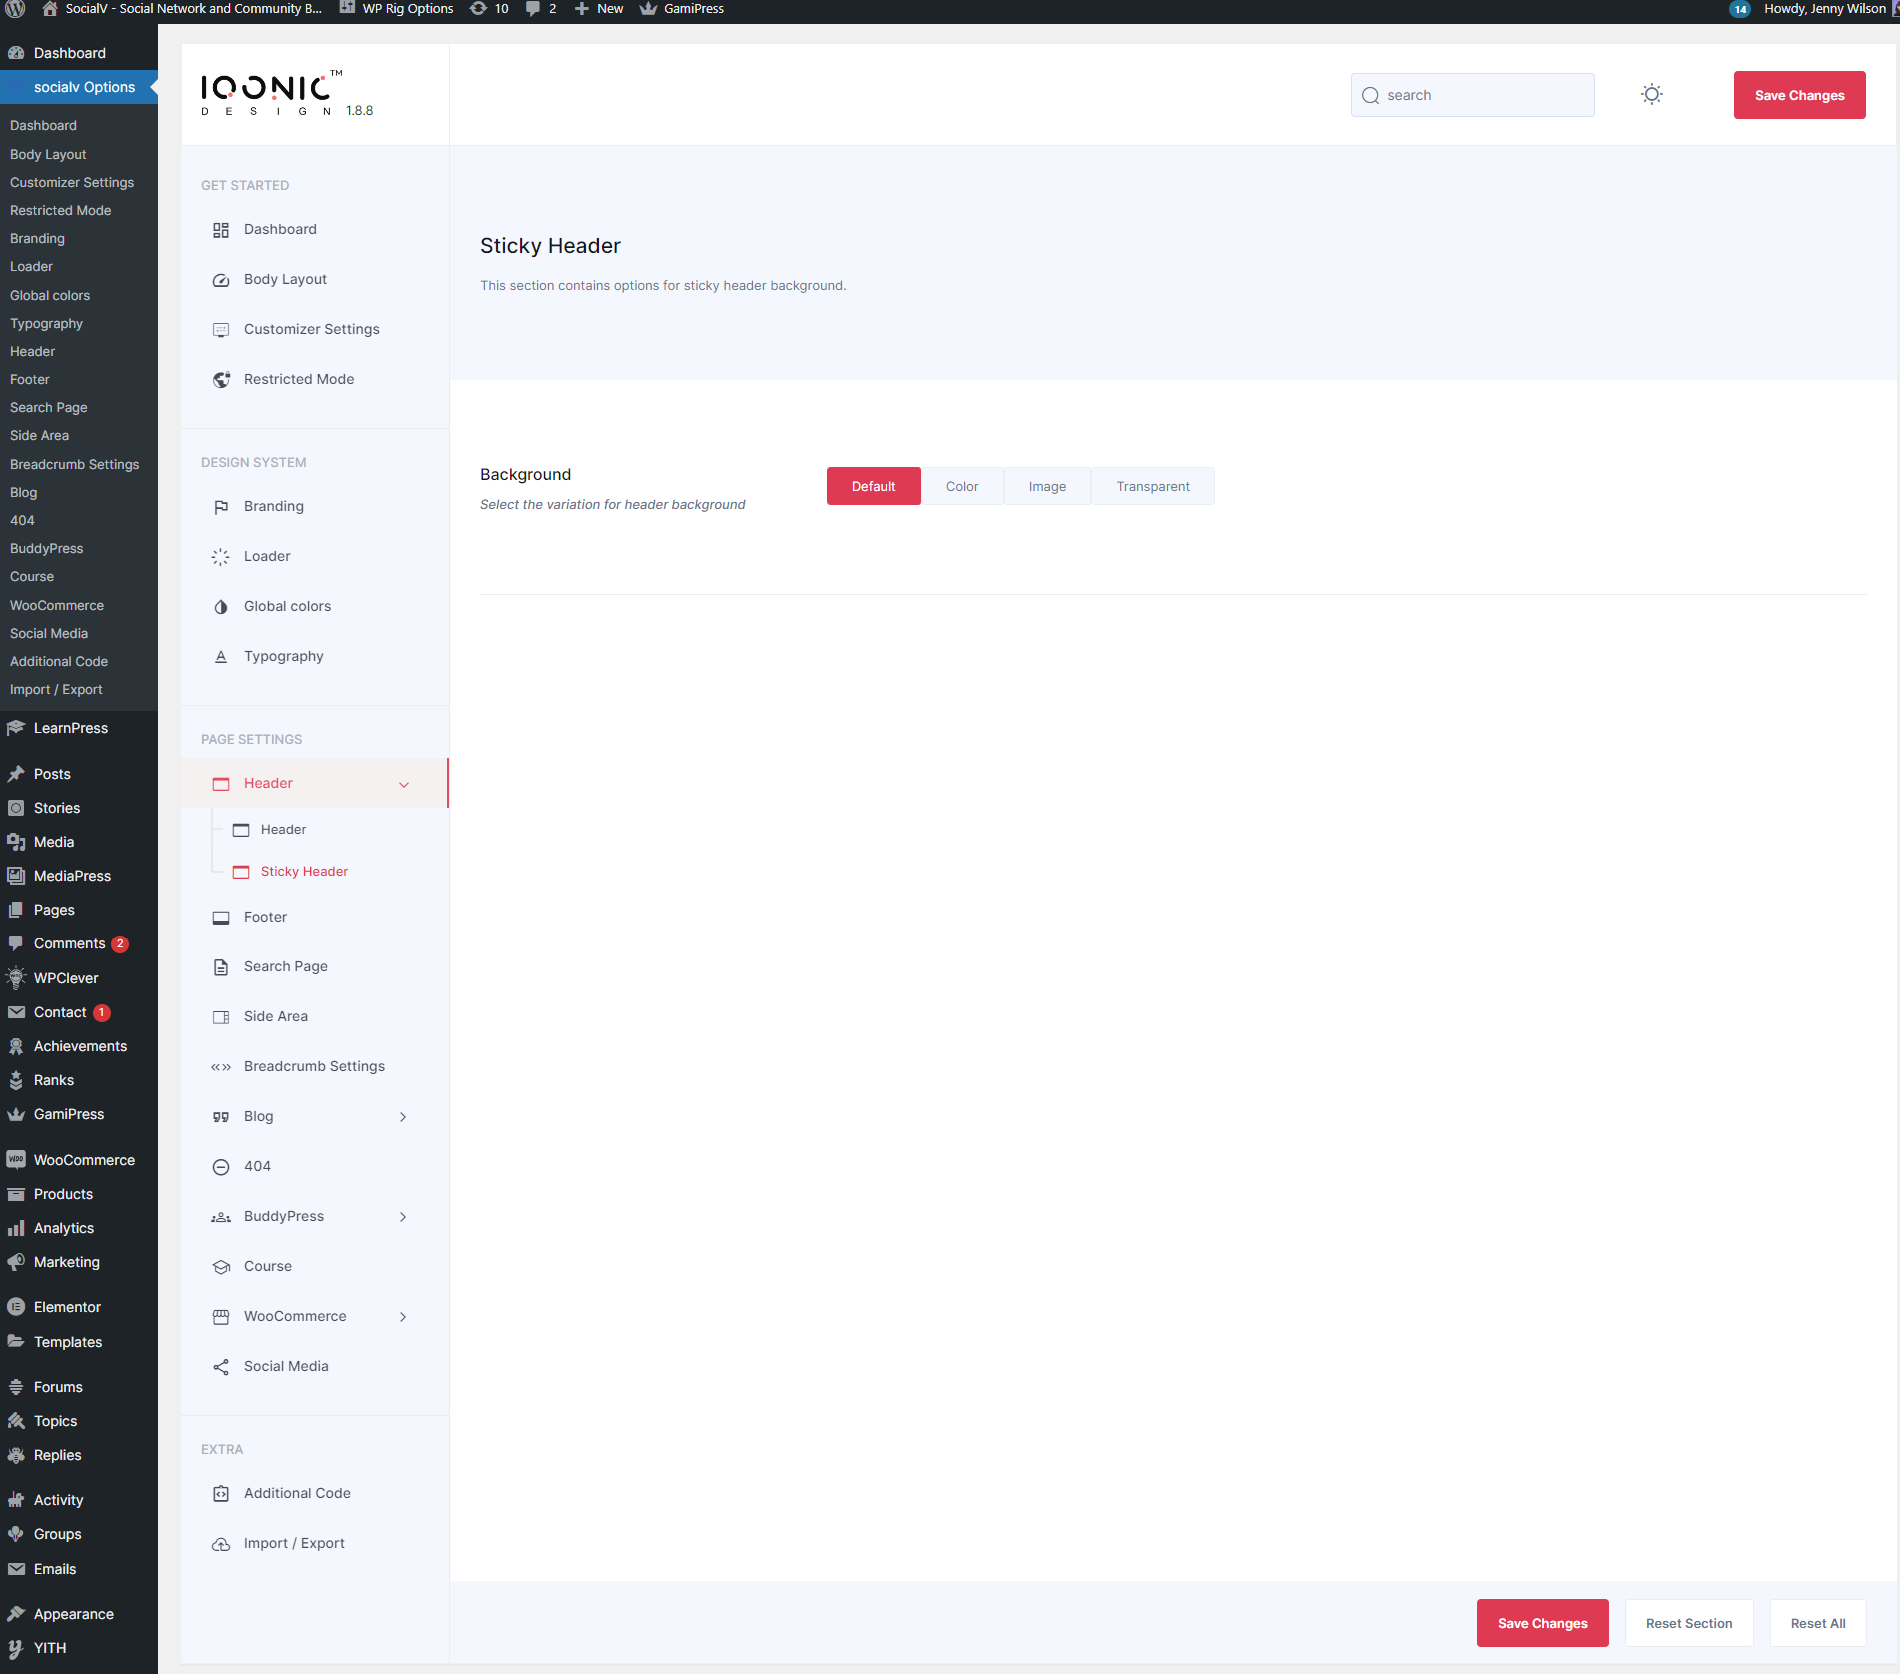
You can change settings for Header Option from here.
You can change settings for Header Sticky Option from here.
Branding Settings
You can change settings for Logo from here.
Breadcrumb Settings
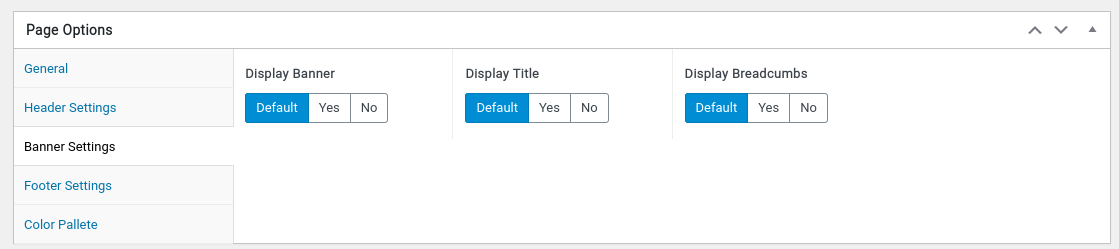
By-default, Page Banner functions from Theme Options -> Breadcrumb Settings for all pages. You can change settings for Page Banner from here.

In above example, 'Banner Style 1' was selected. This means Banner Style 1 would appear on ALL PAGES of your site.
Now, sometimes we receive requests from buyers where they want to show different Banner style (for menu or appearance) for different pages. So we have come up with this option where you can display a different Banner style for a particular page.
For example, if you want to display a different Banner style for about page then go to Pages -> Select a page ->Edit . In below example about page was chosen.

On next screen, scroll down a bit and you'll see a section to choose Page settings styles. Refer to the screenshot below. You can now select any banner settings and save the page. Now, you have a new banner settings for your about page. You can do same for other pages also.
Search Page Settings
You can change settings for Page section from here.

Blog Settings
You can change settings for Blog from here.

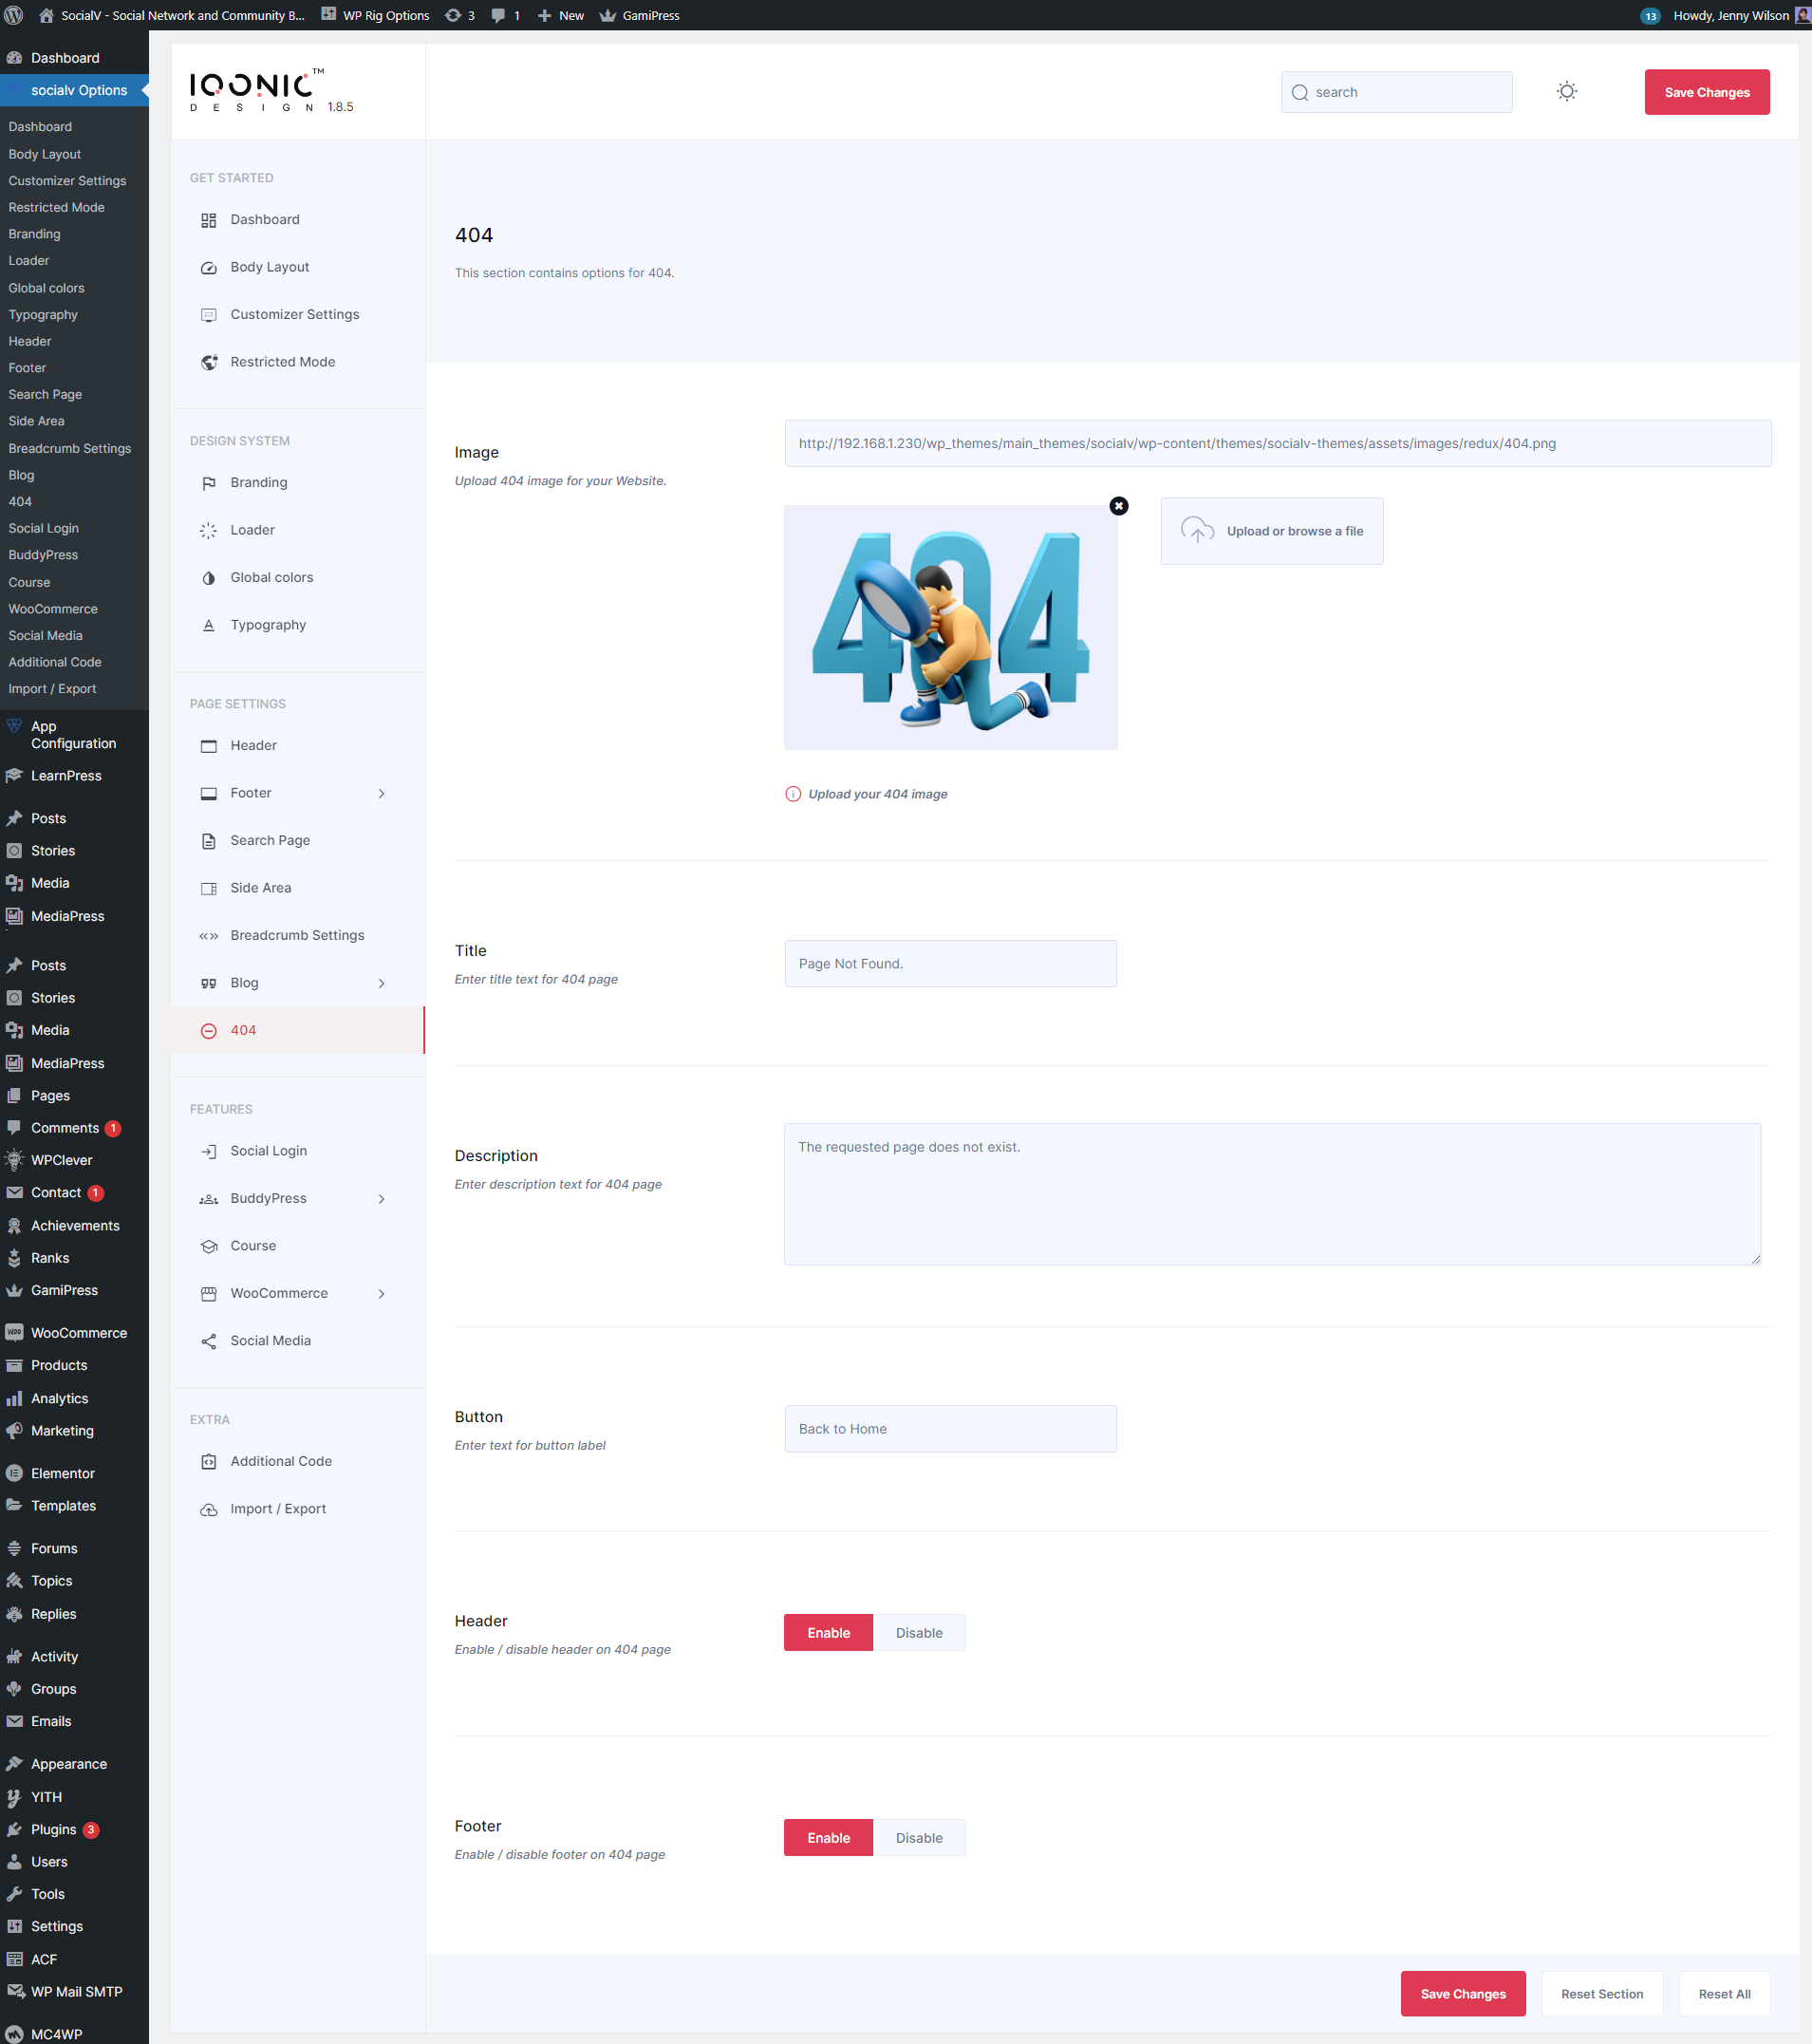
404 Settings
You can change settings for 404 Page not found from here.
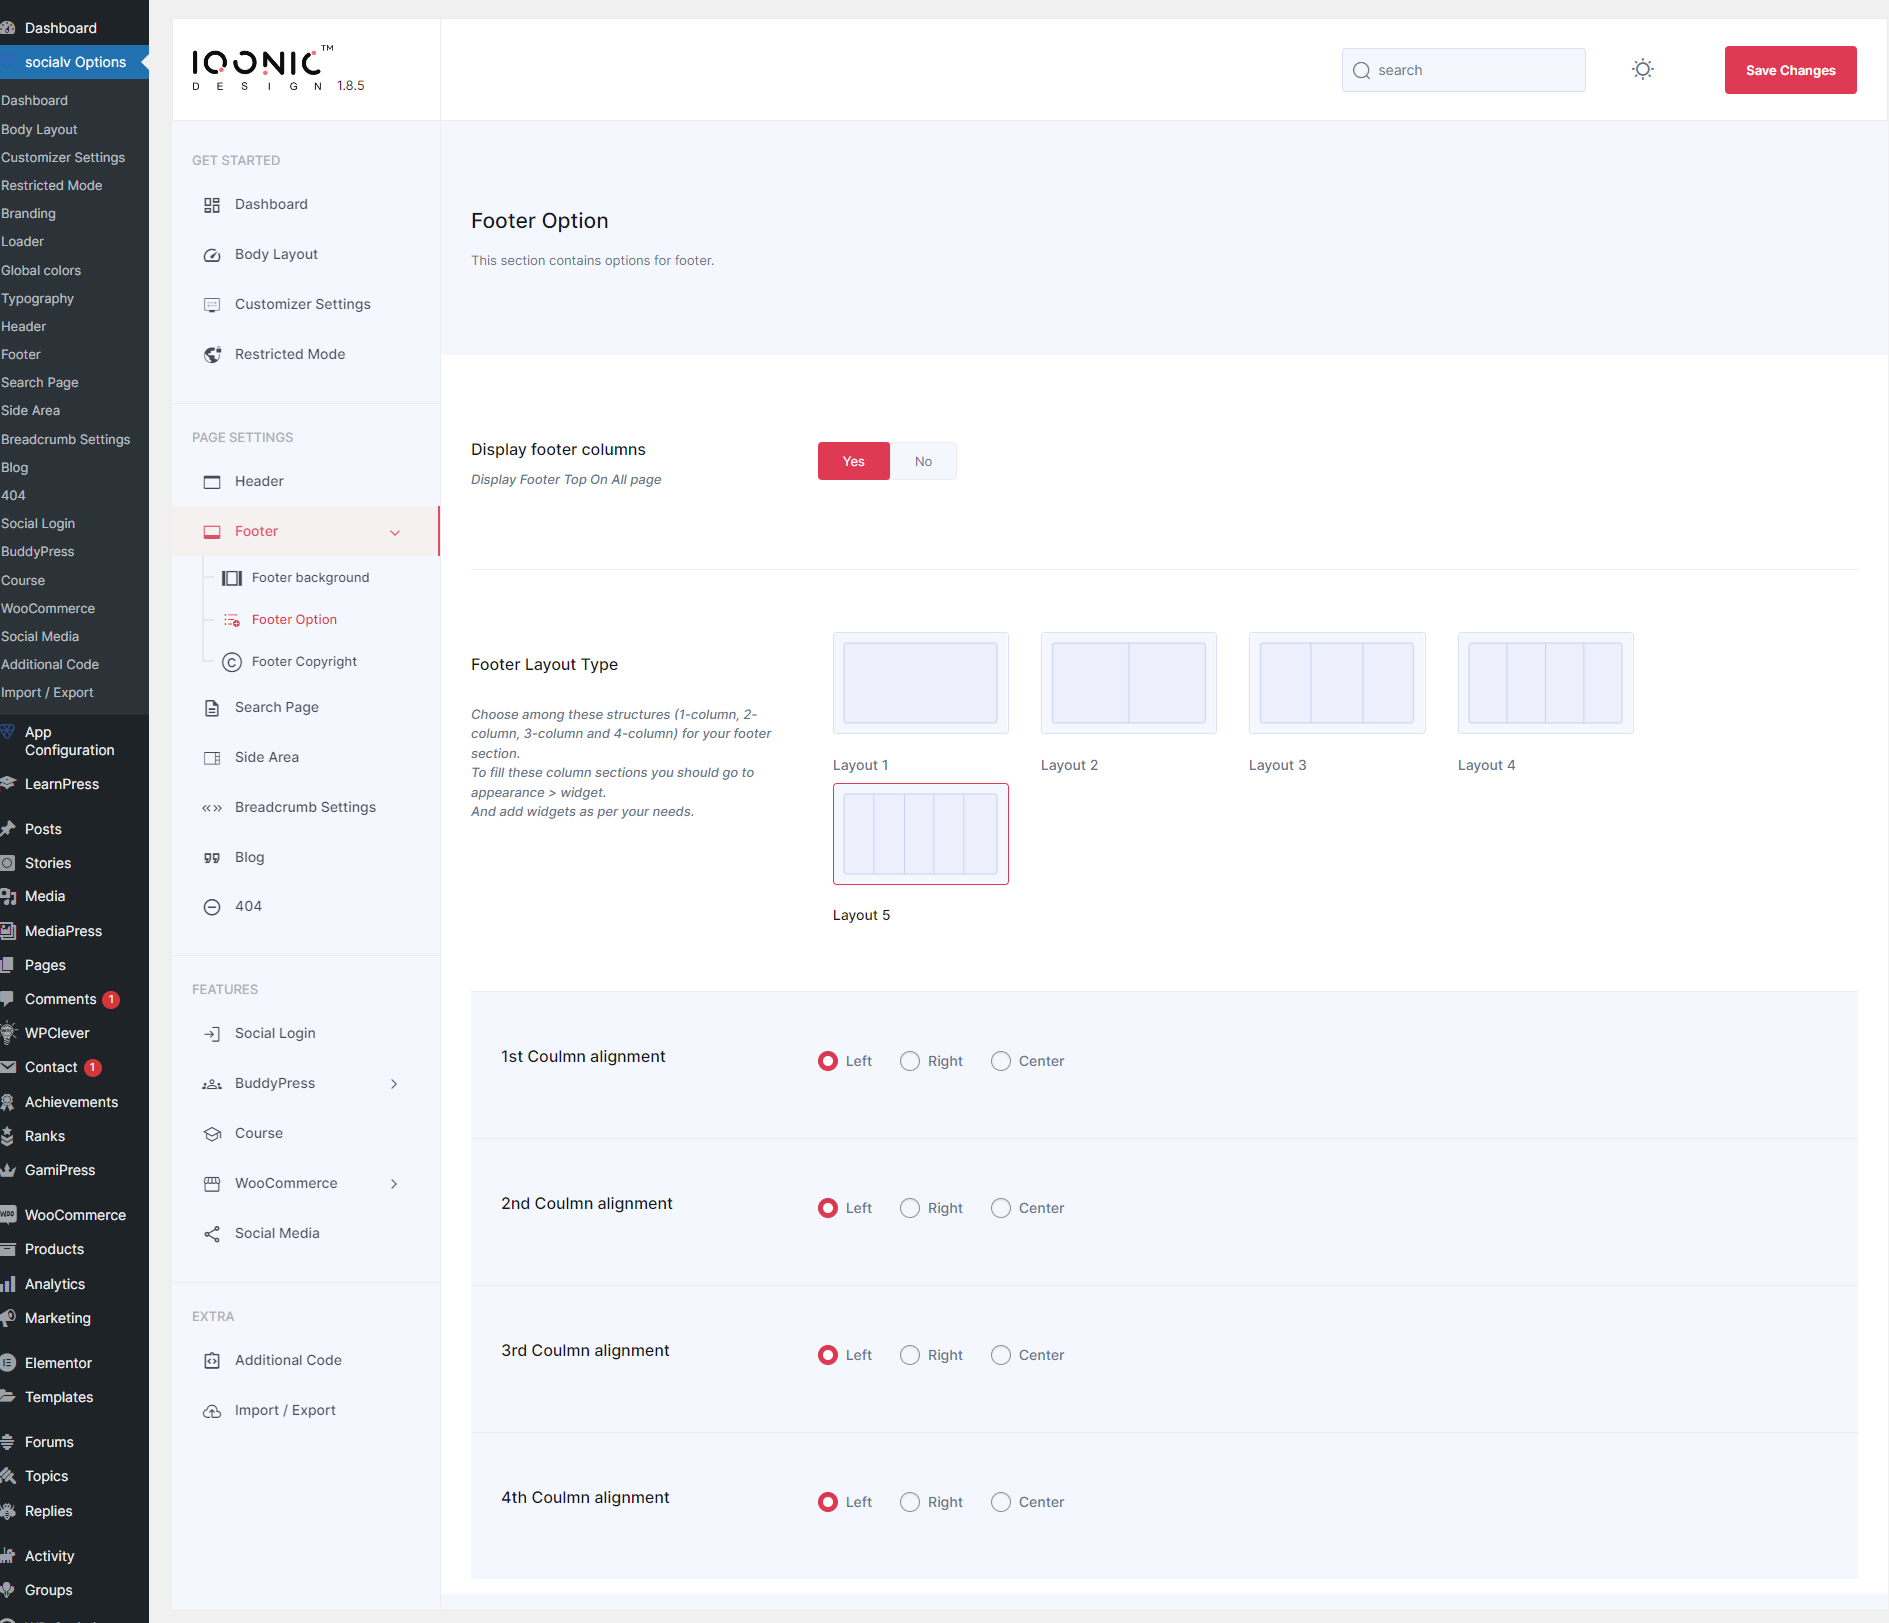
Footer Settings
By-default, Footer functions from Theme Options -> Footer Settings for all pages. You can change settings for Footer from here.

In Below example, 'Footer Layout 3' was selected. This means Footer 3 Column would appear on ALL PAGES of your site.
Now, sometimes we receive requests from buyers where they want to show different Footer style (for menu or appearance) for different pages. So we have come up with this option where you can display a different Footer style for a particular page.
For example, if you want to display a different Footer style for about page then go to Pages -> Select a page ->Edit . In below example about page was chosen.
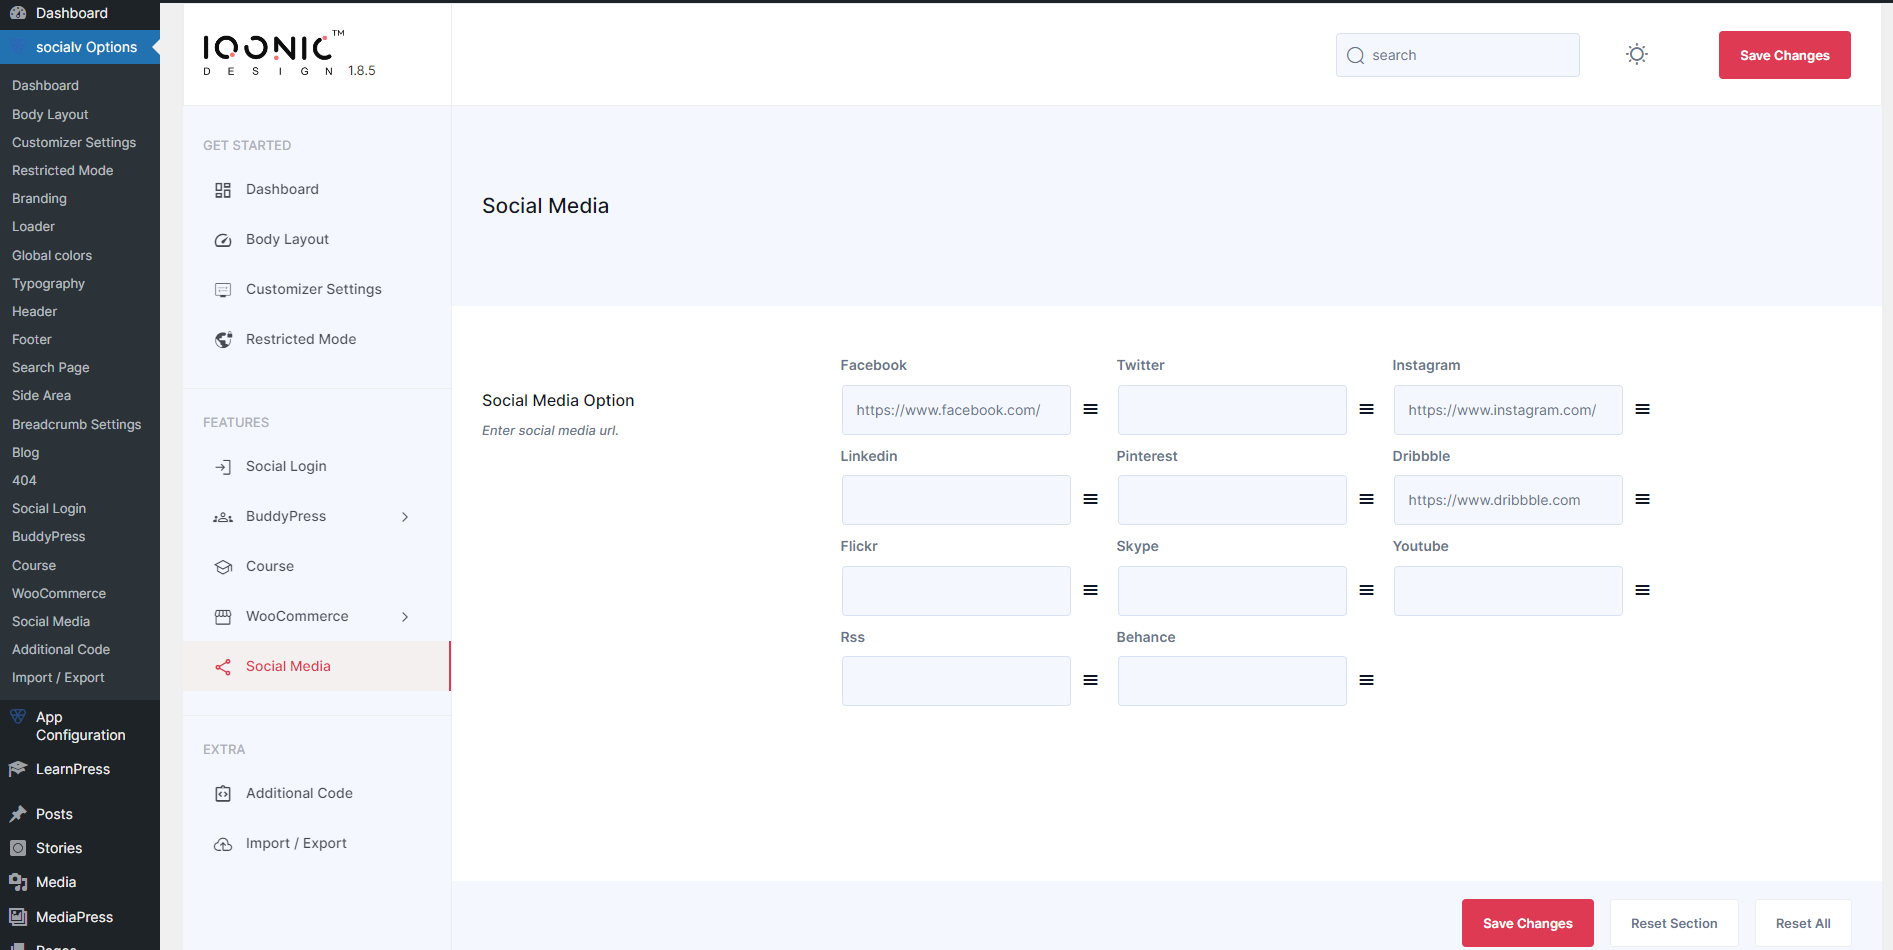
Social Media Settings
You can change settings for Social Media from here.
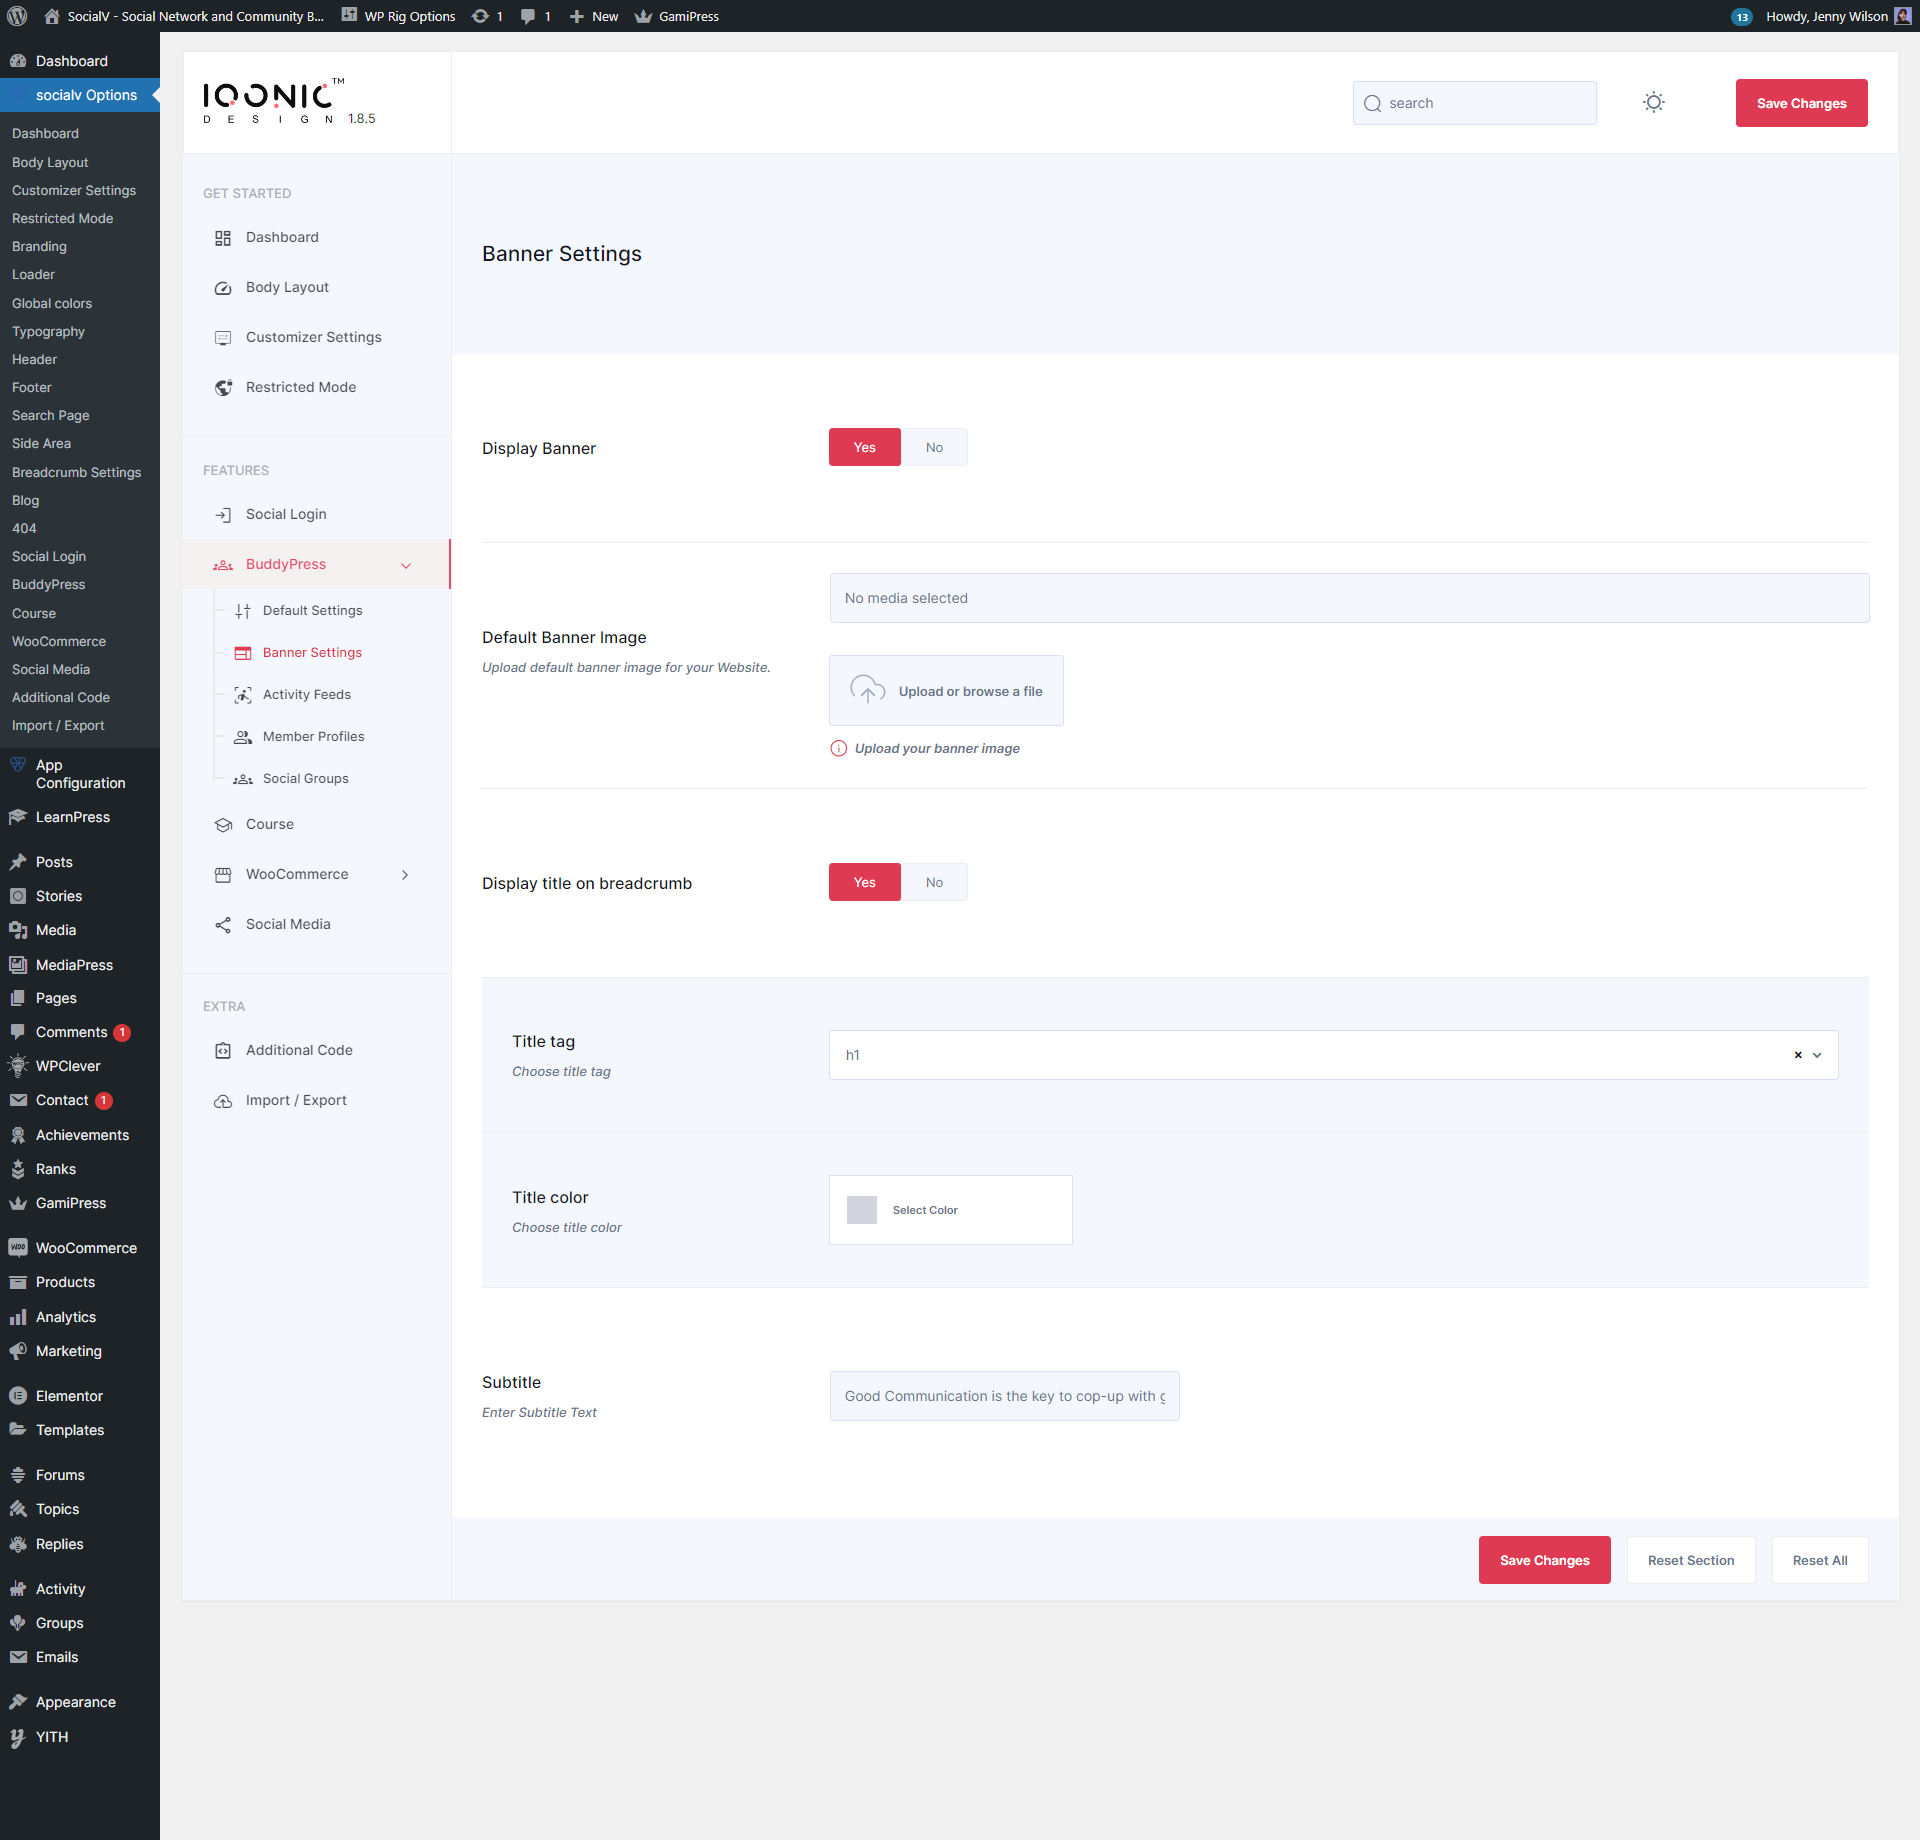
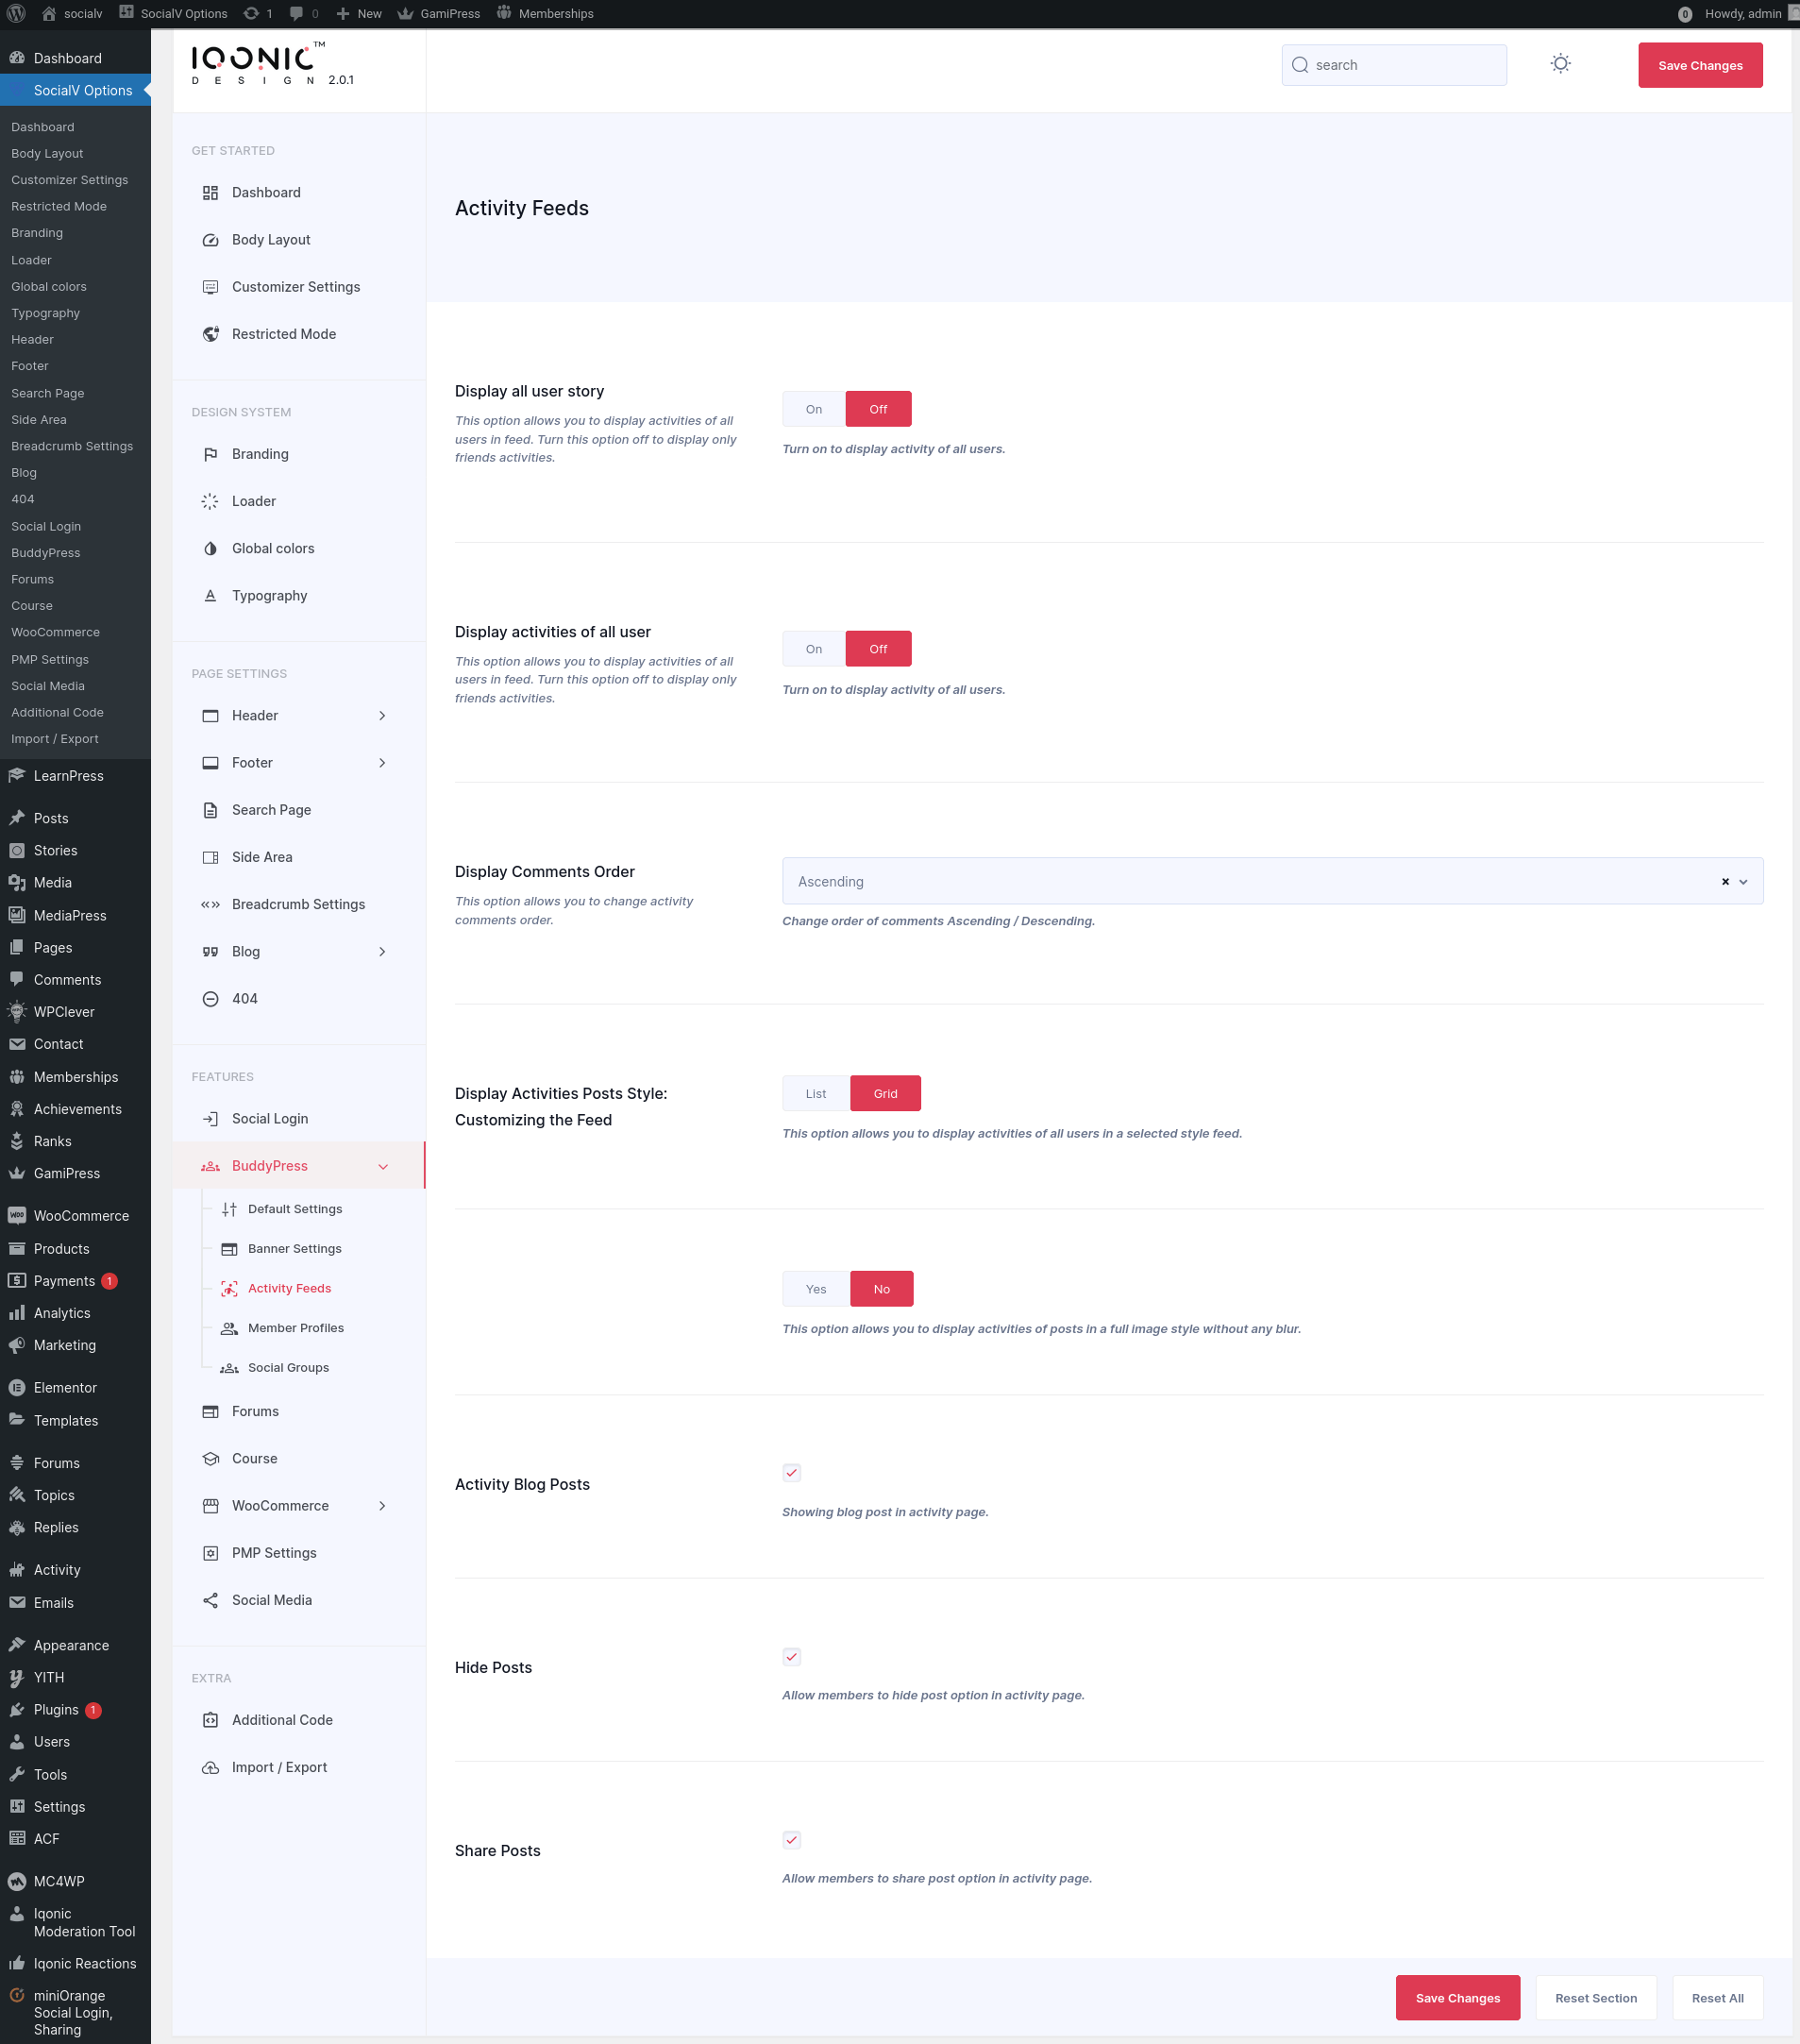
BuddyPress Setting
You can change settings for BuddyPress from here.
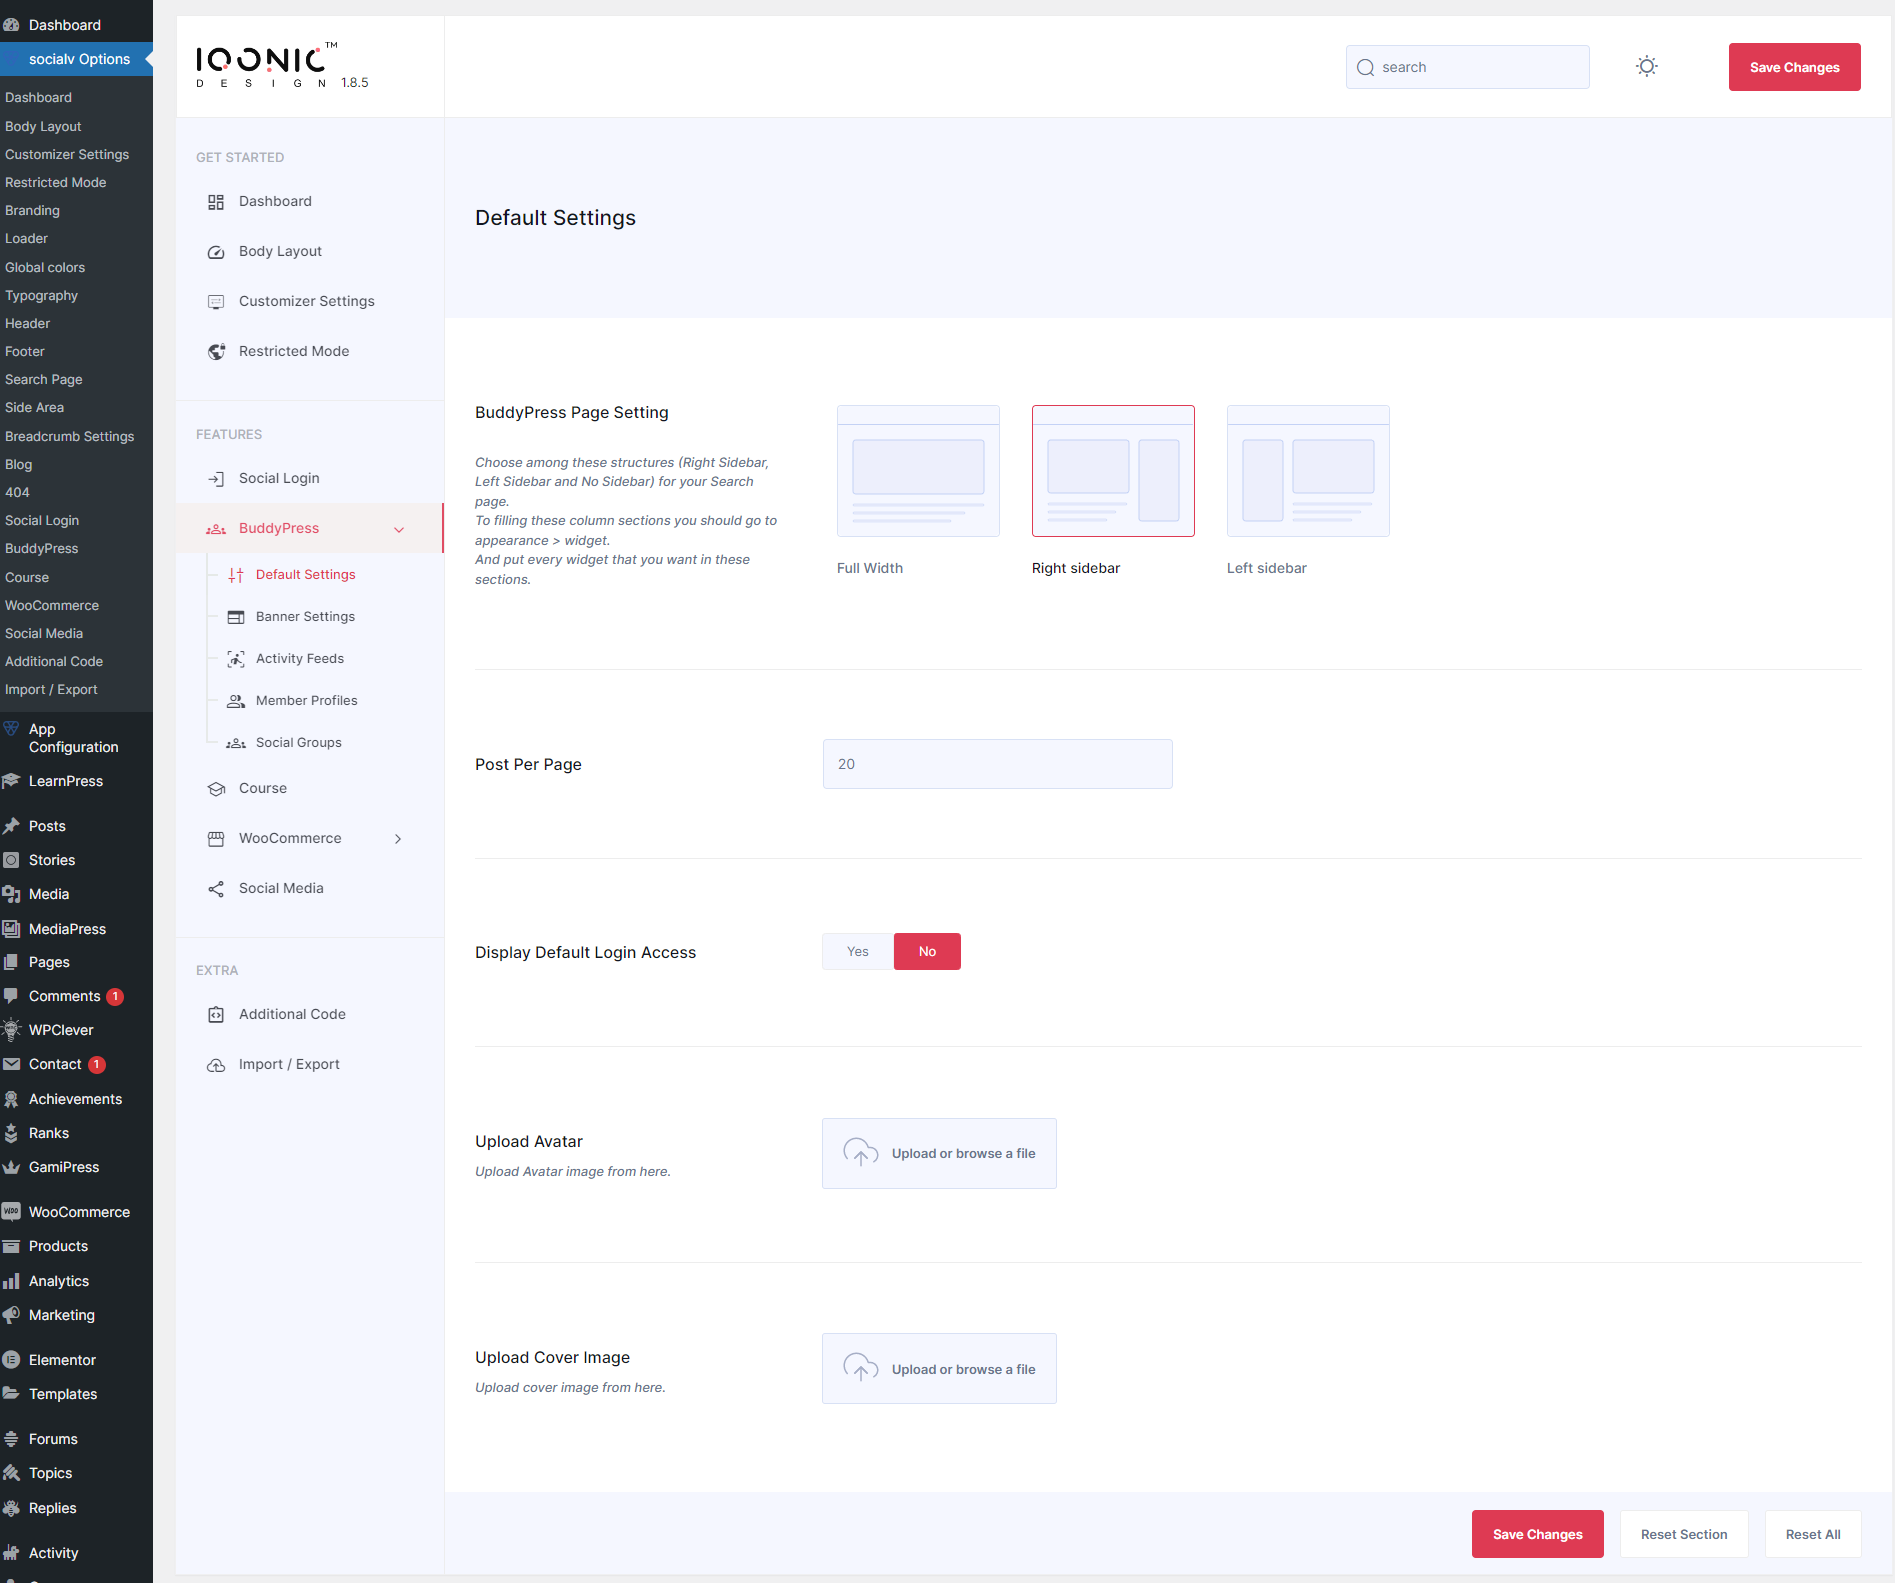
You can change settings for BuddyPress Page Banner from here
You can change Display activities and Activity Blog Posts from here
You can change Member Profile Setting from here

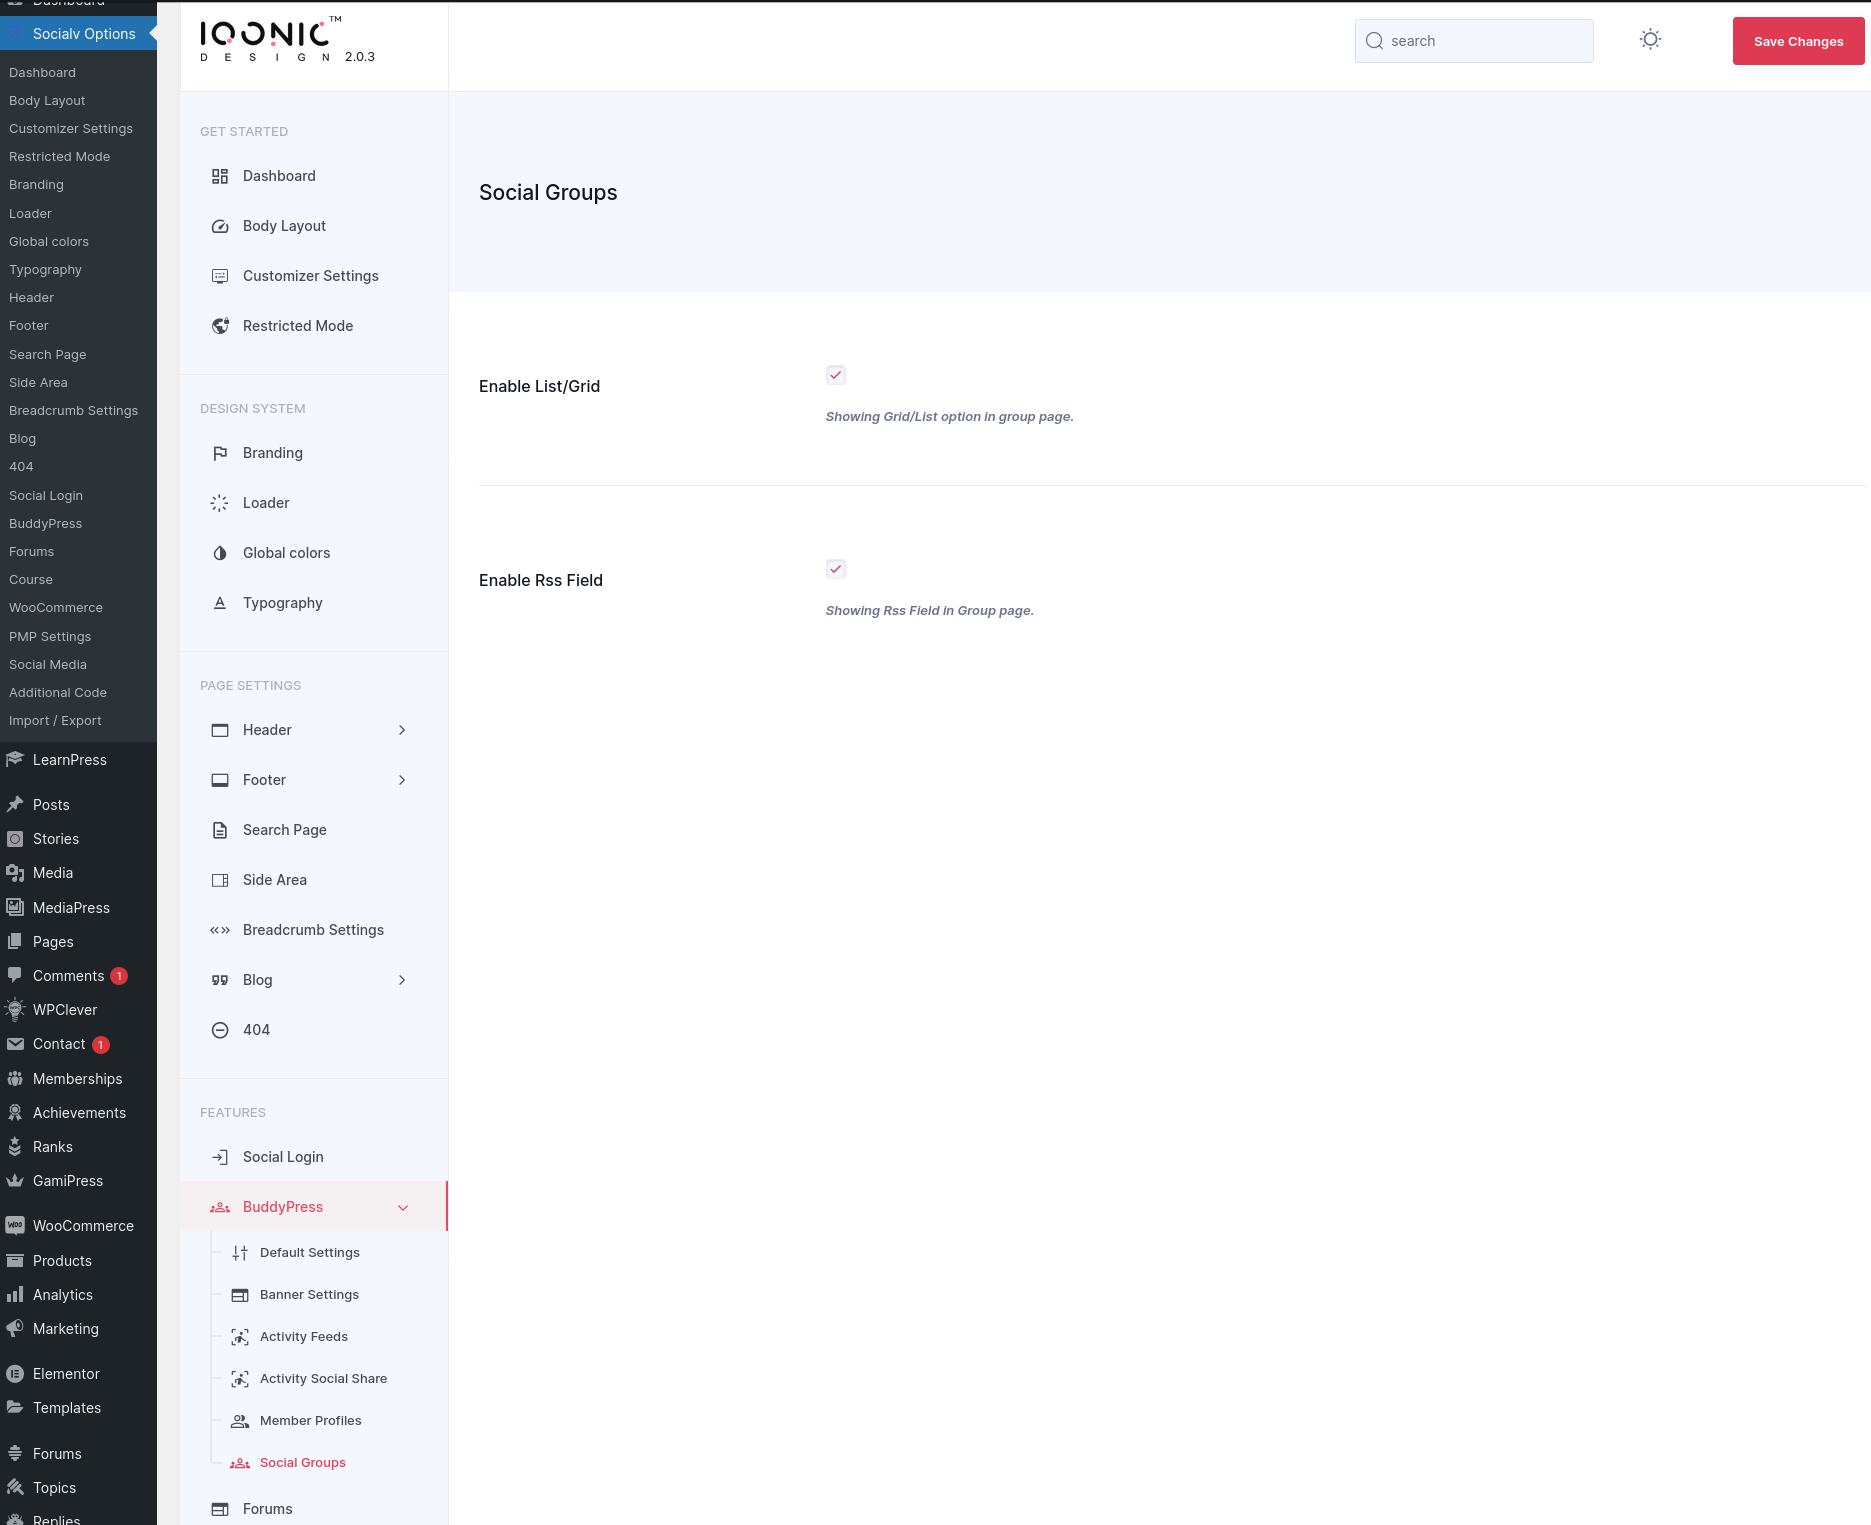
You can Enable RSS field from here
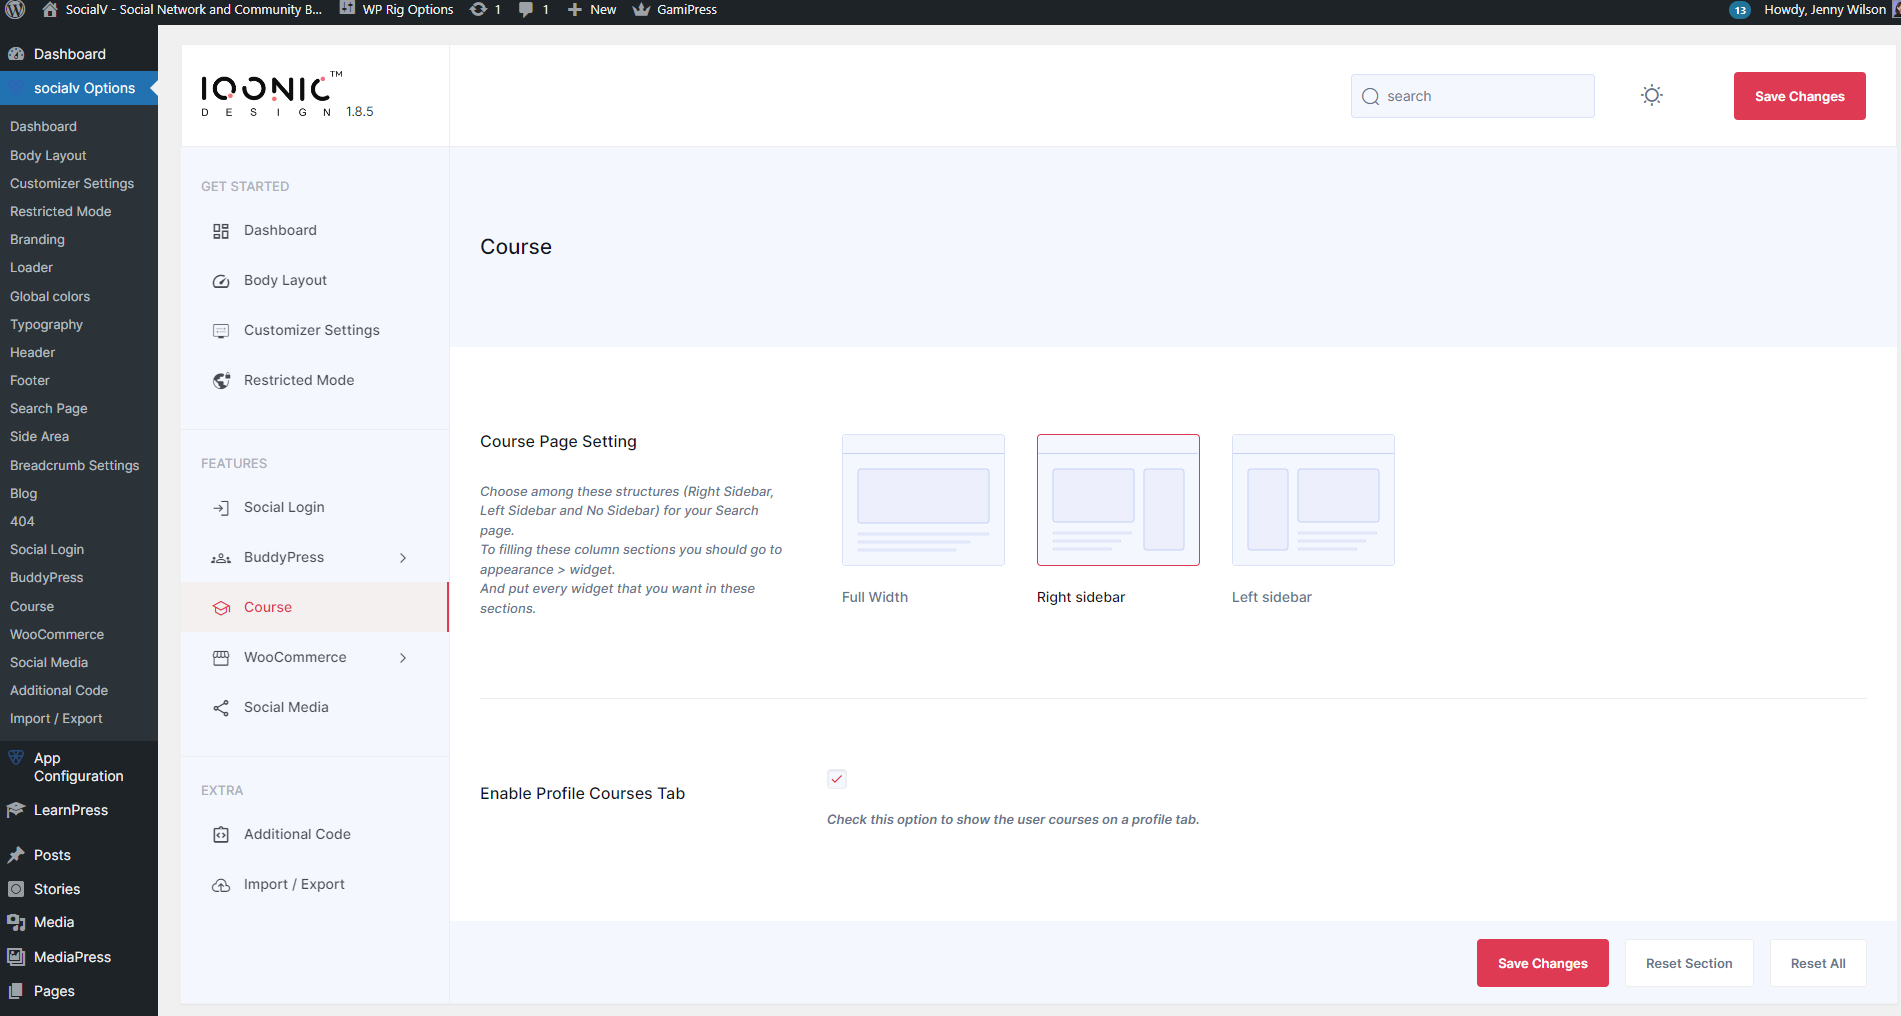
Course Setting
You can change settings for Course from here.
WooCommerce Setting
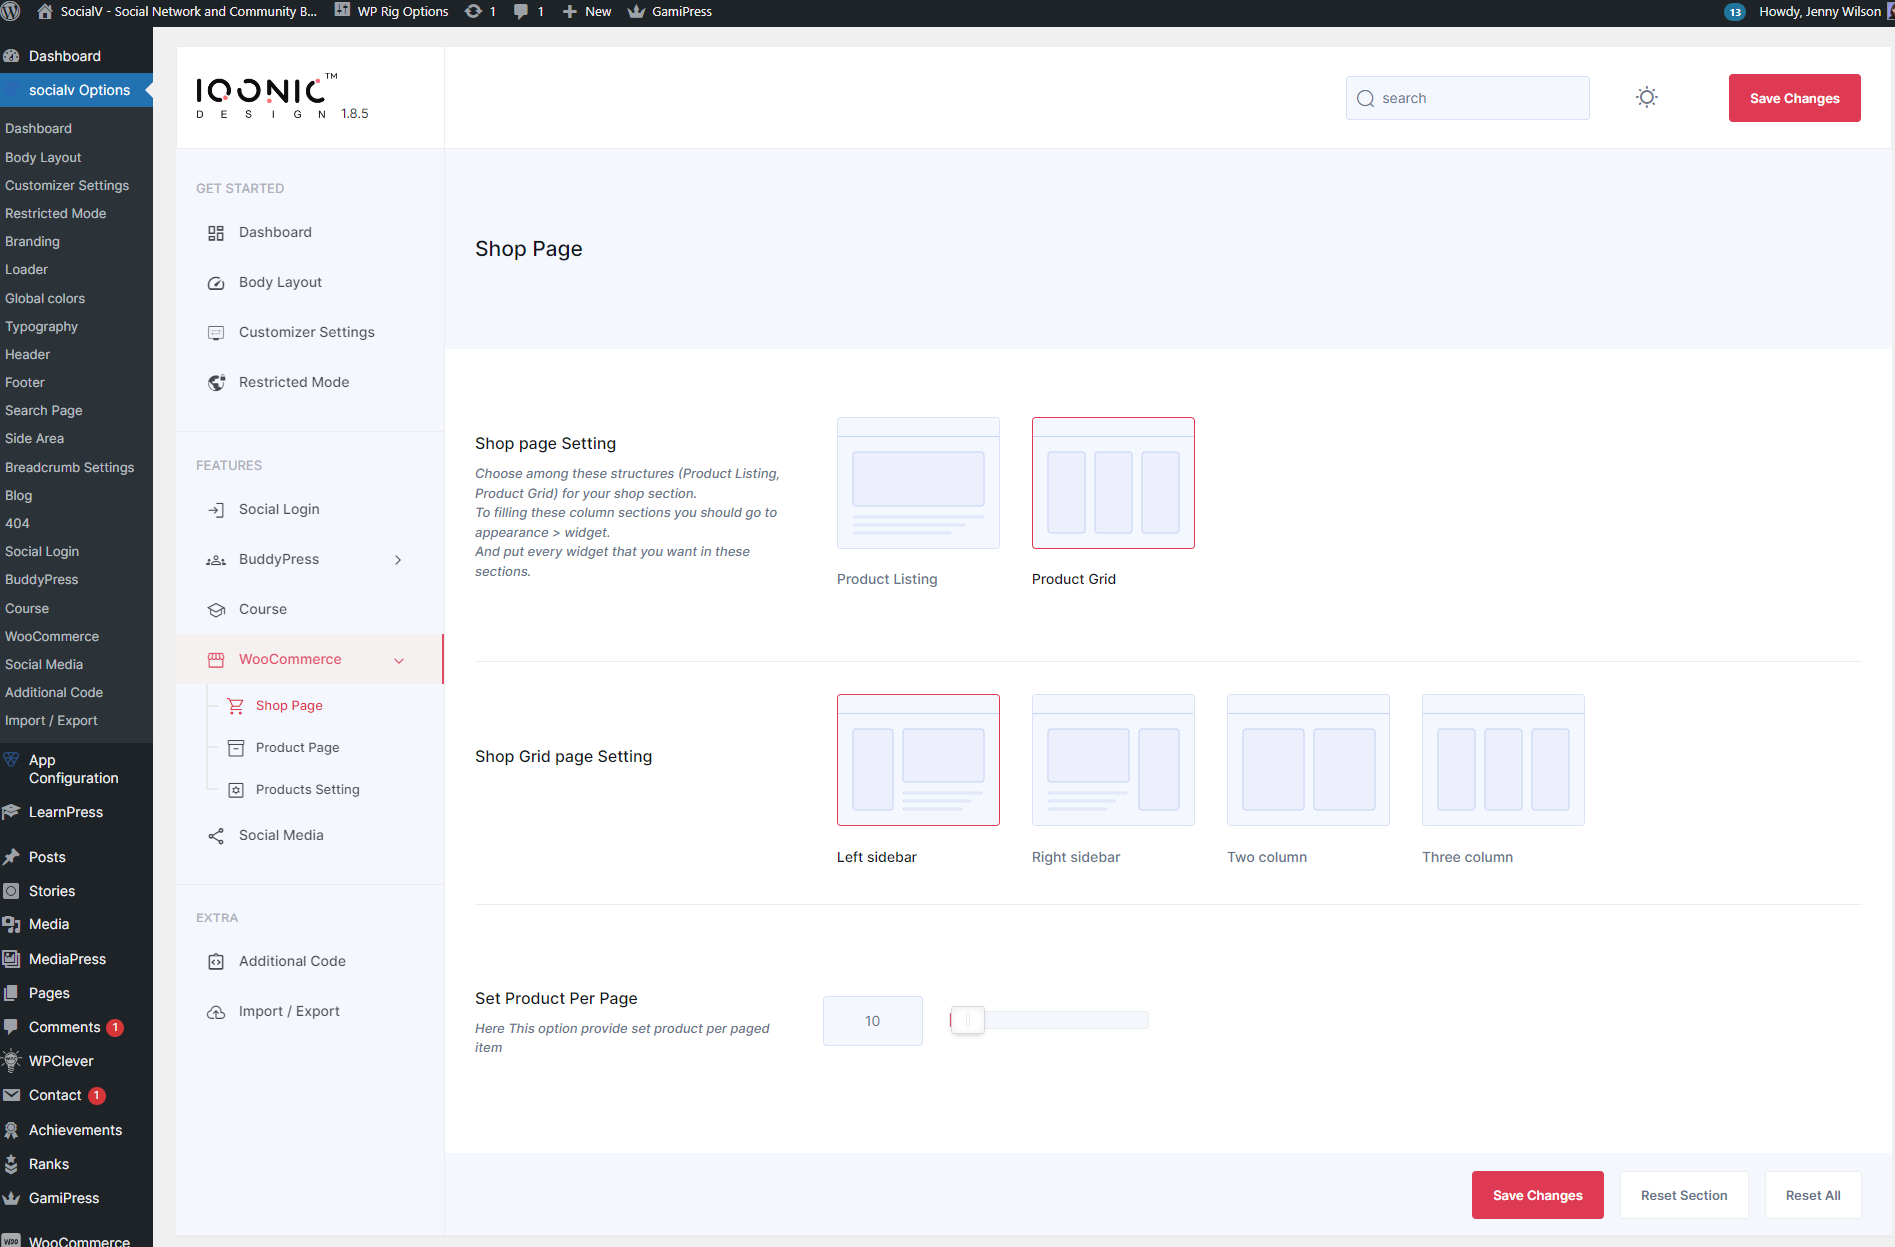
You can change settings for WooCommerce shop page from here.
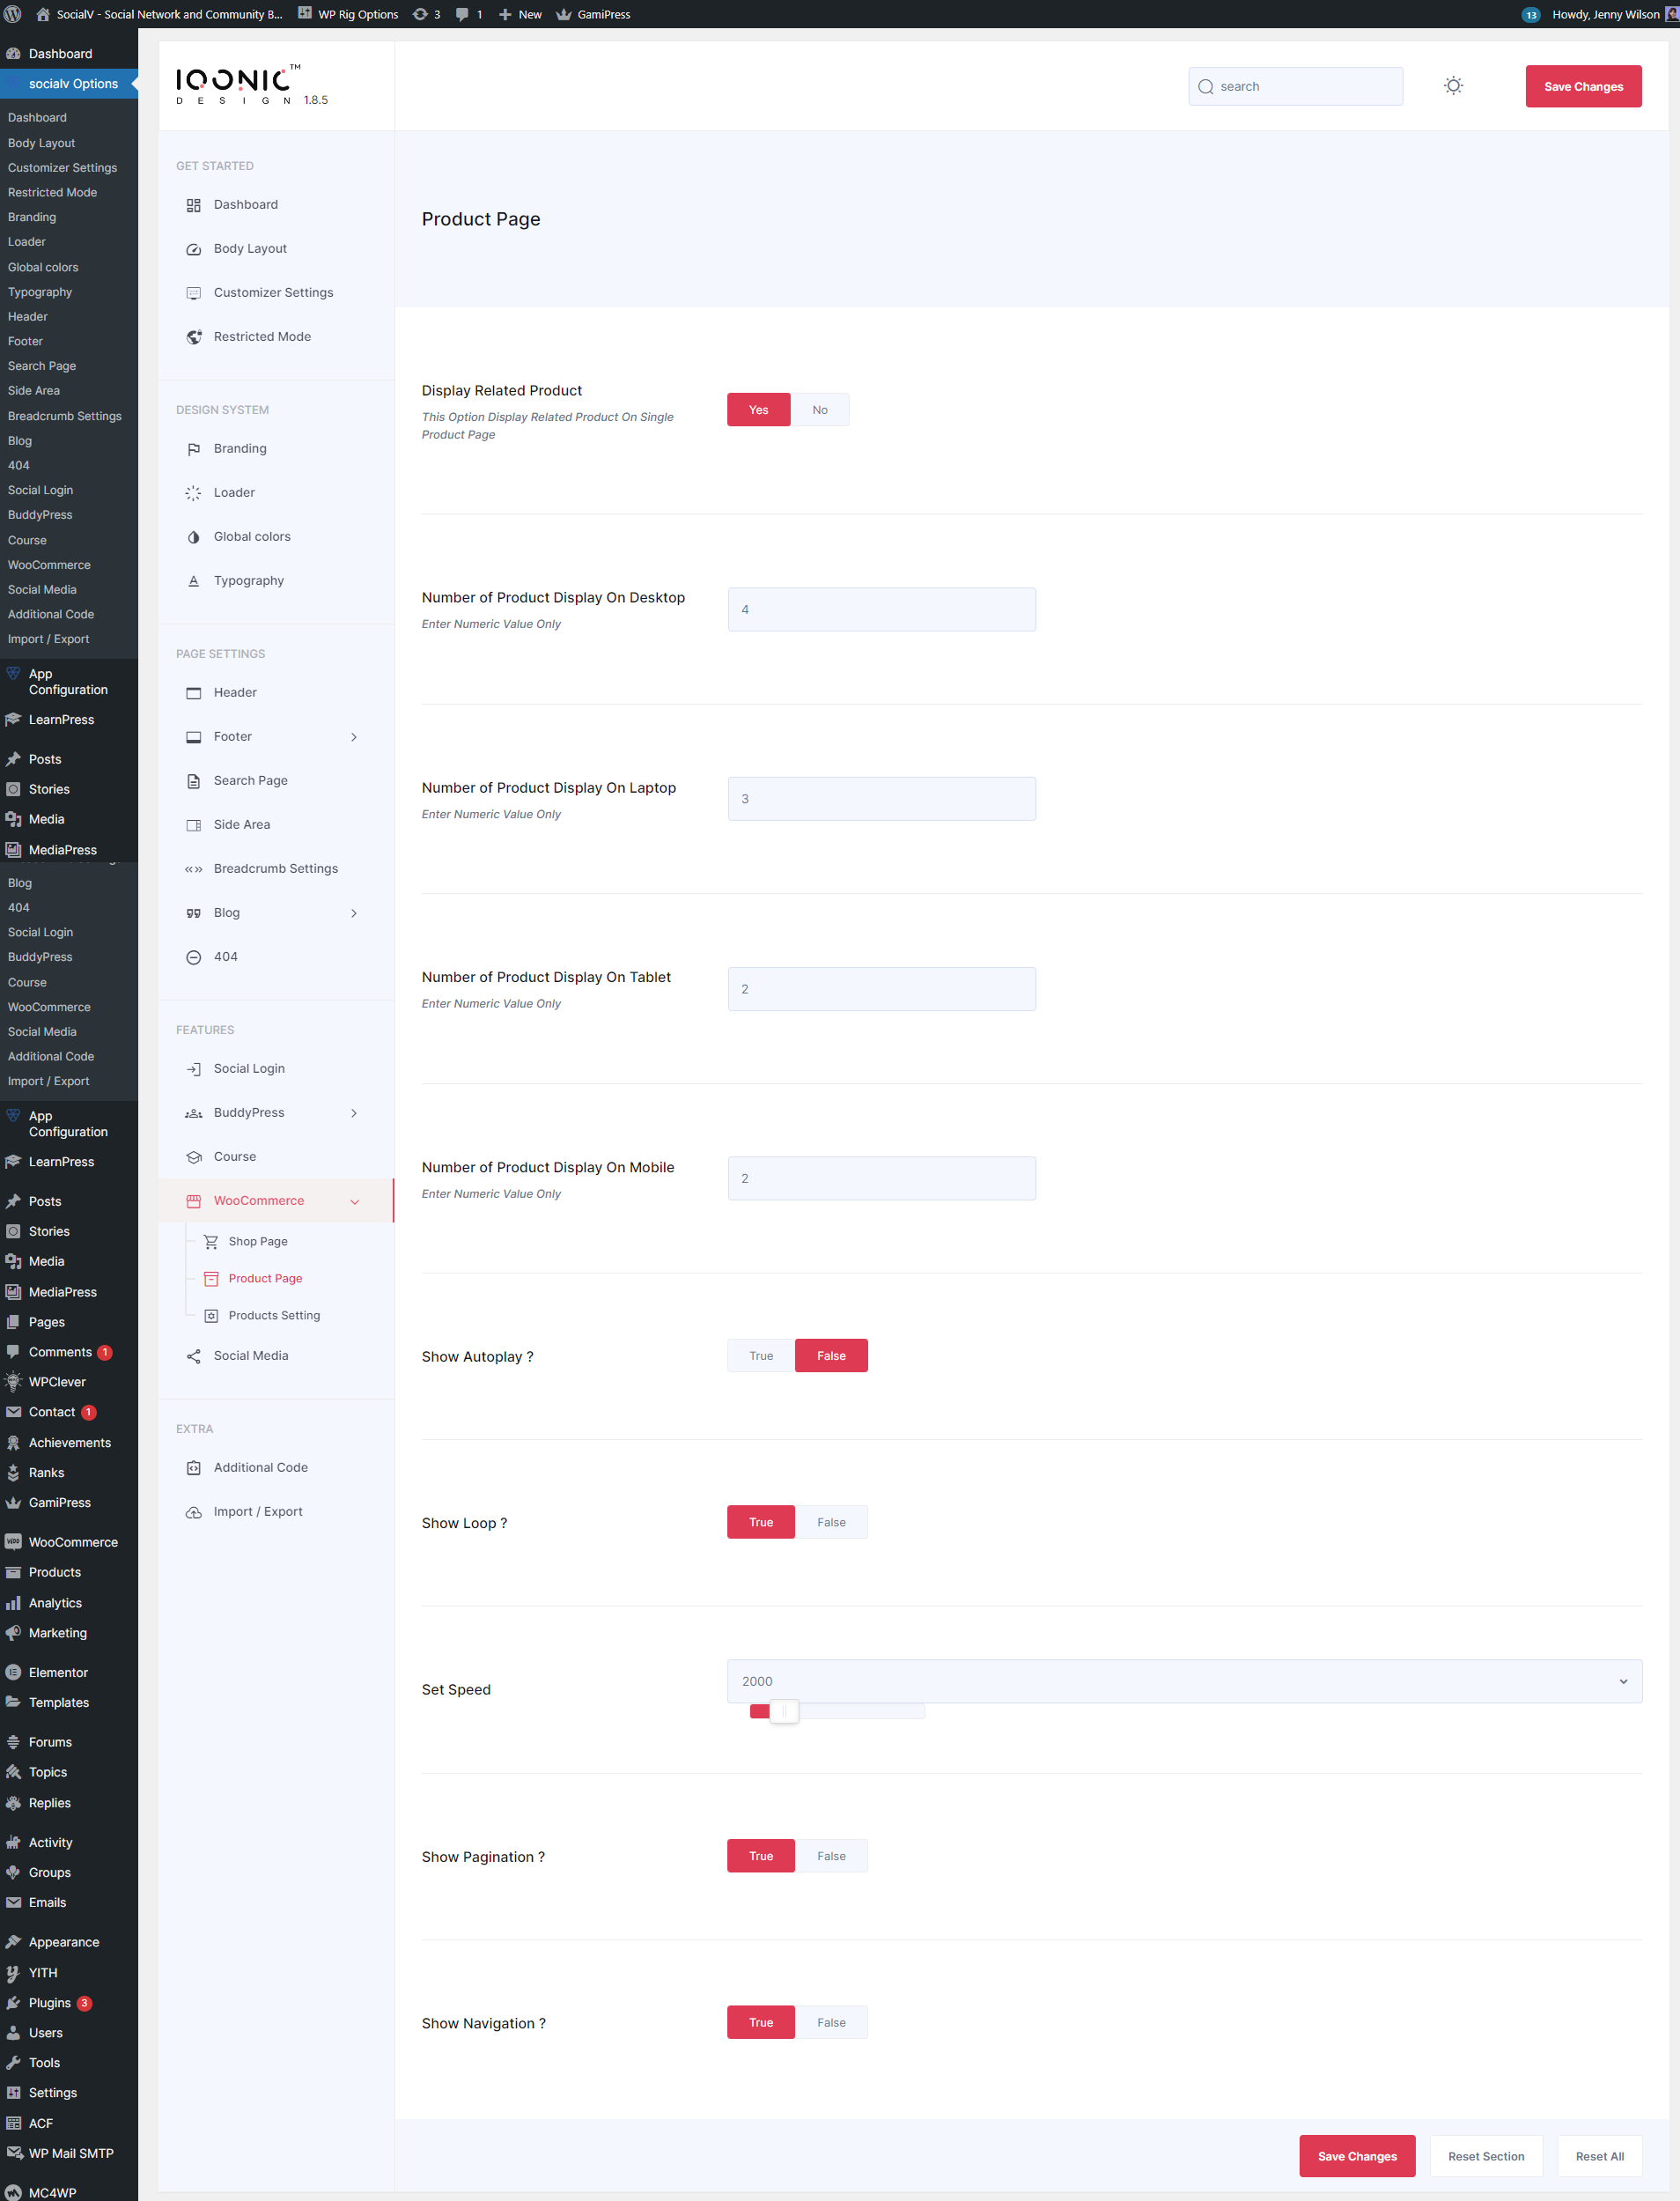
You can change settings for WooCommerce Product page from here.
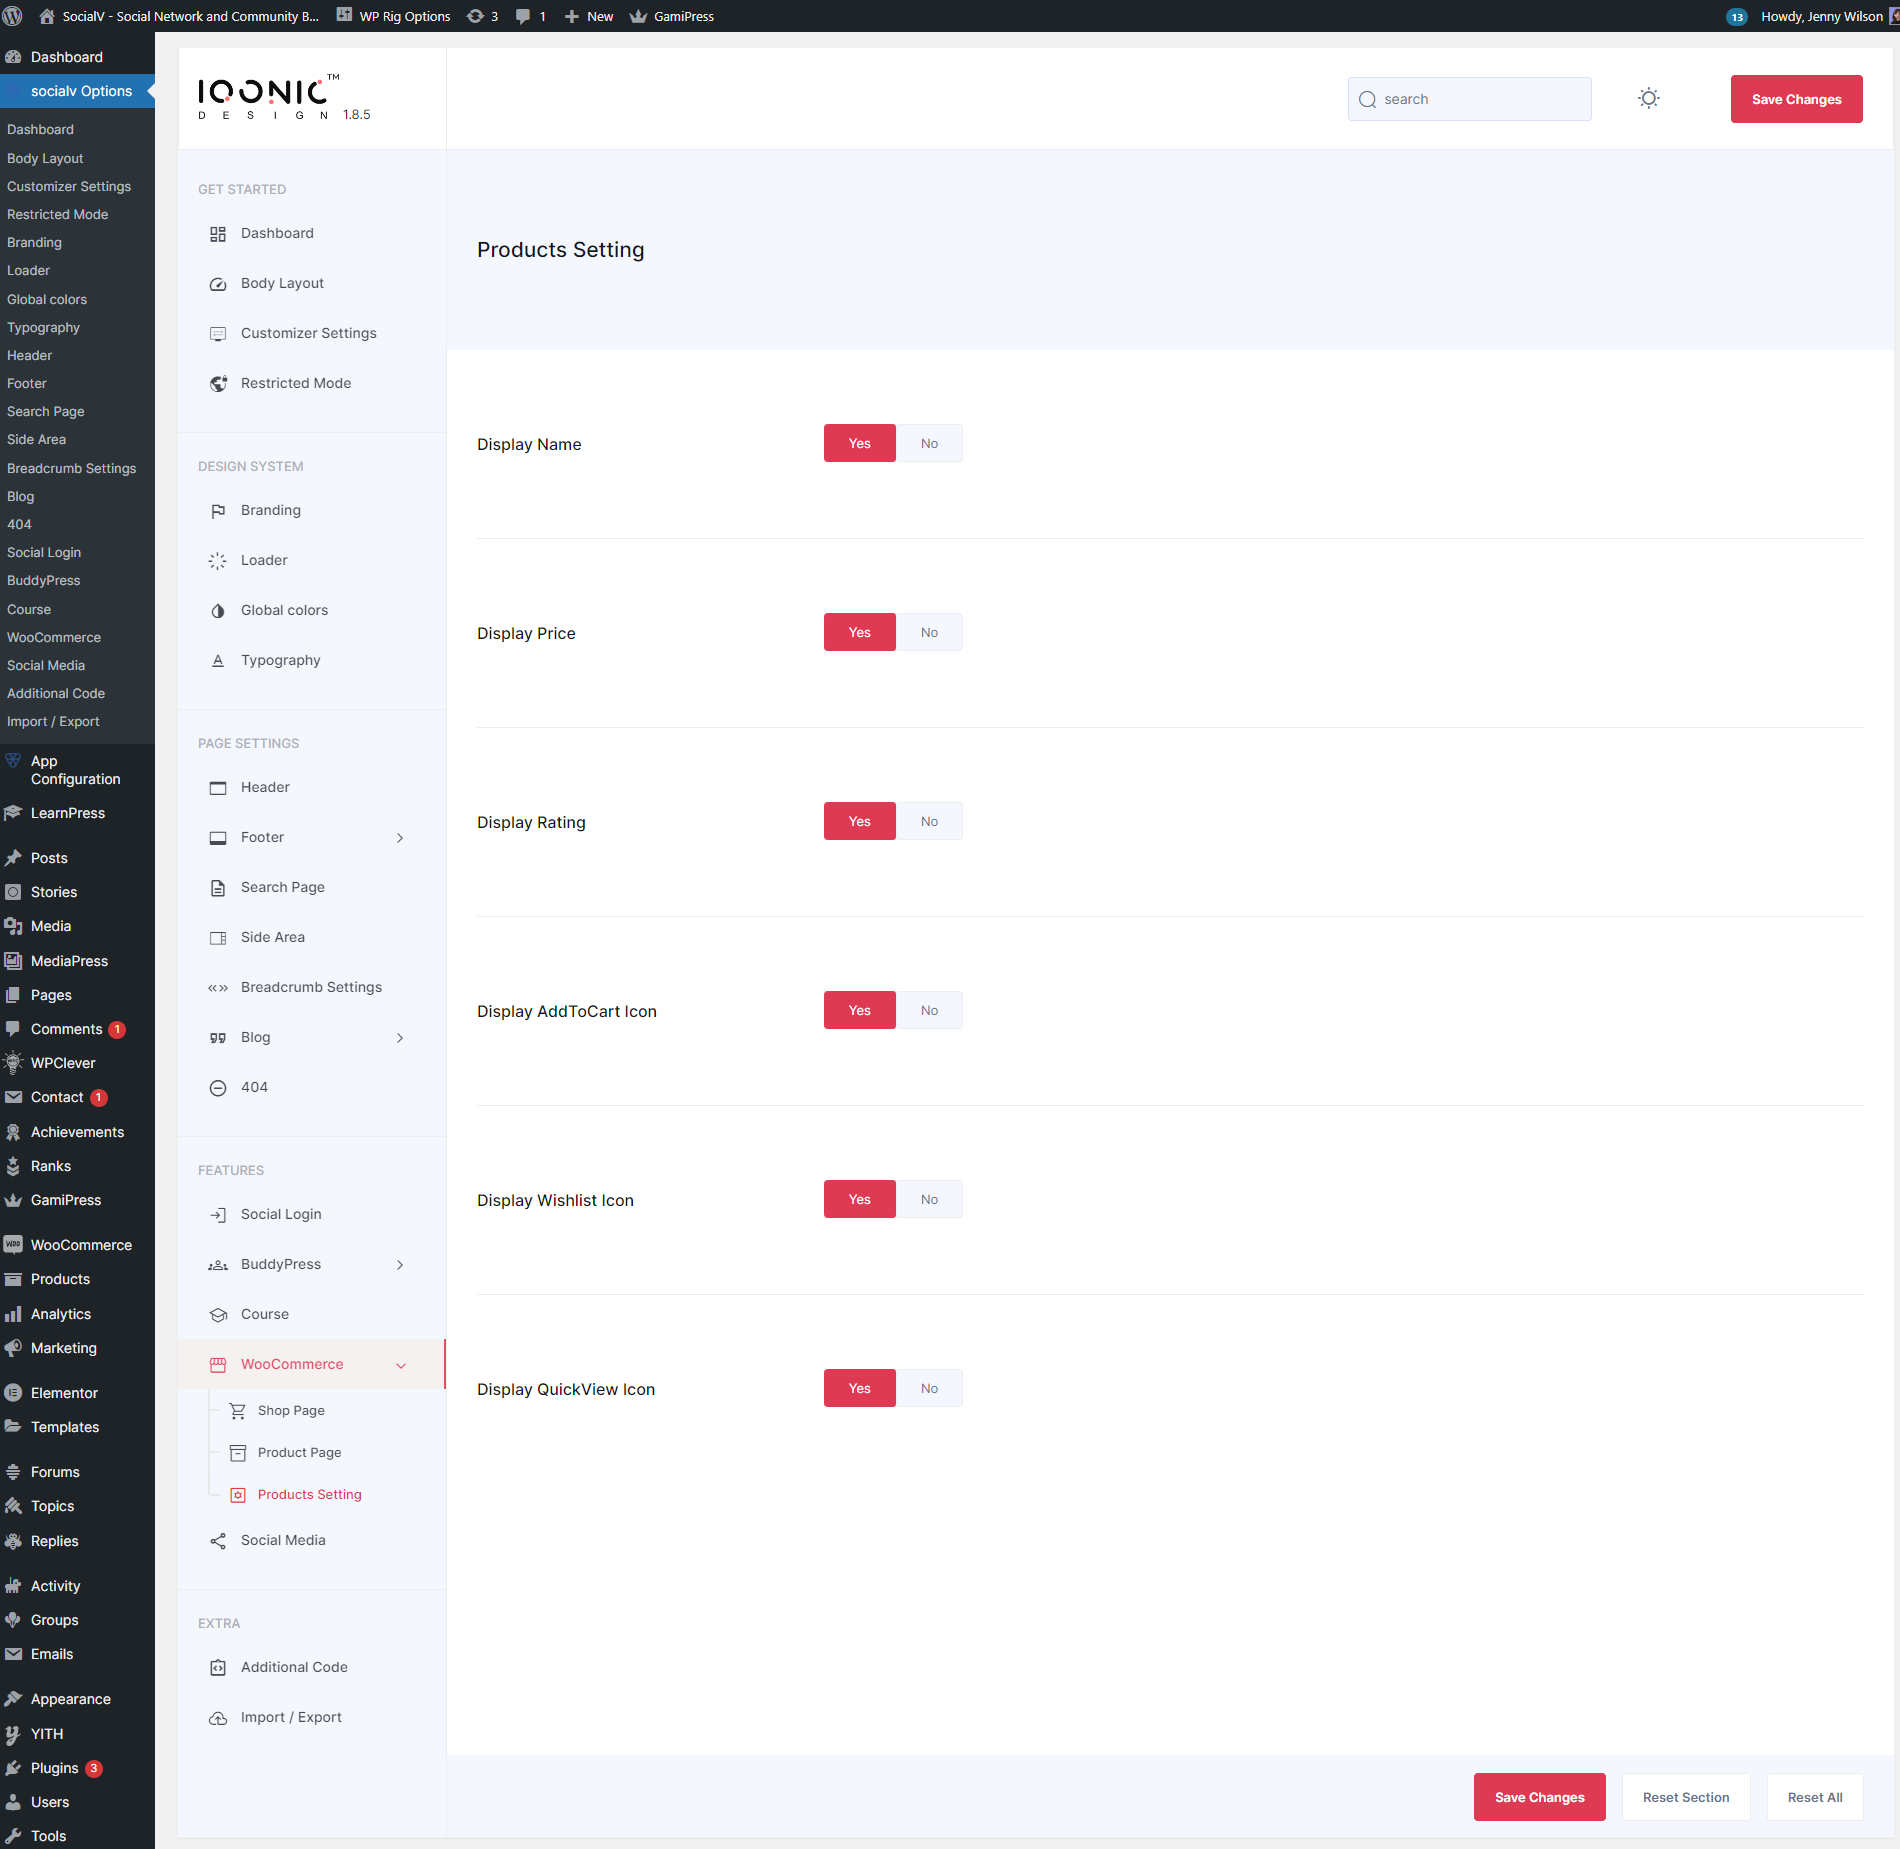
You can change WooCommerce Product Details Setting from here.
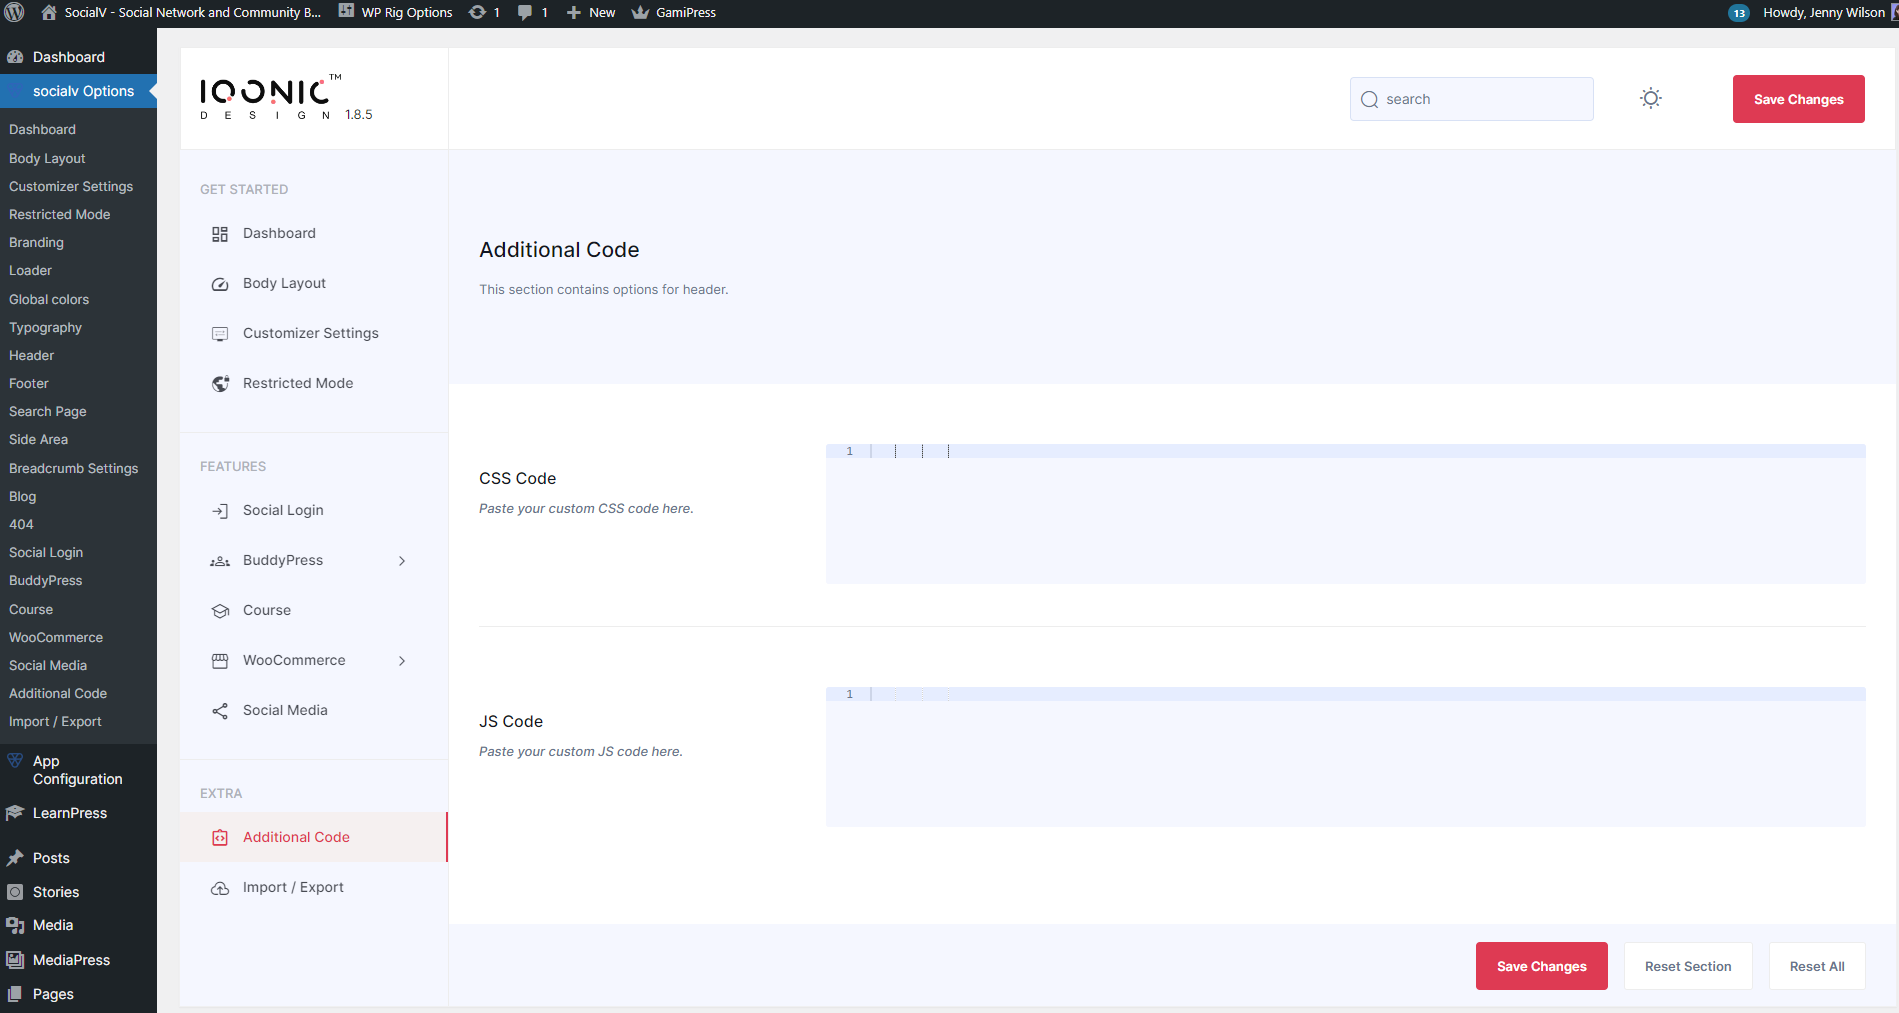
Additional Code Settings
You can change global css, js from here.
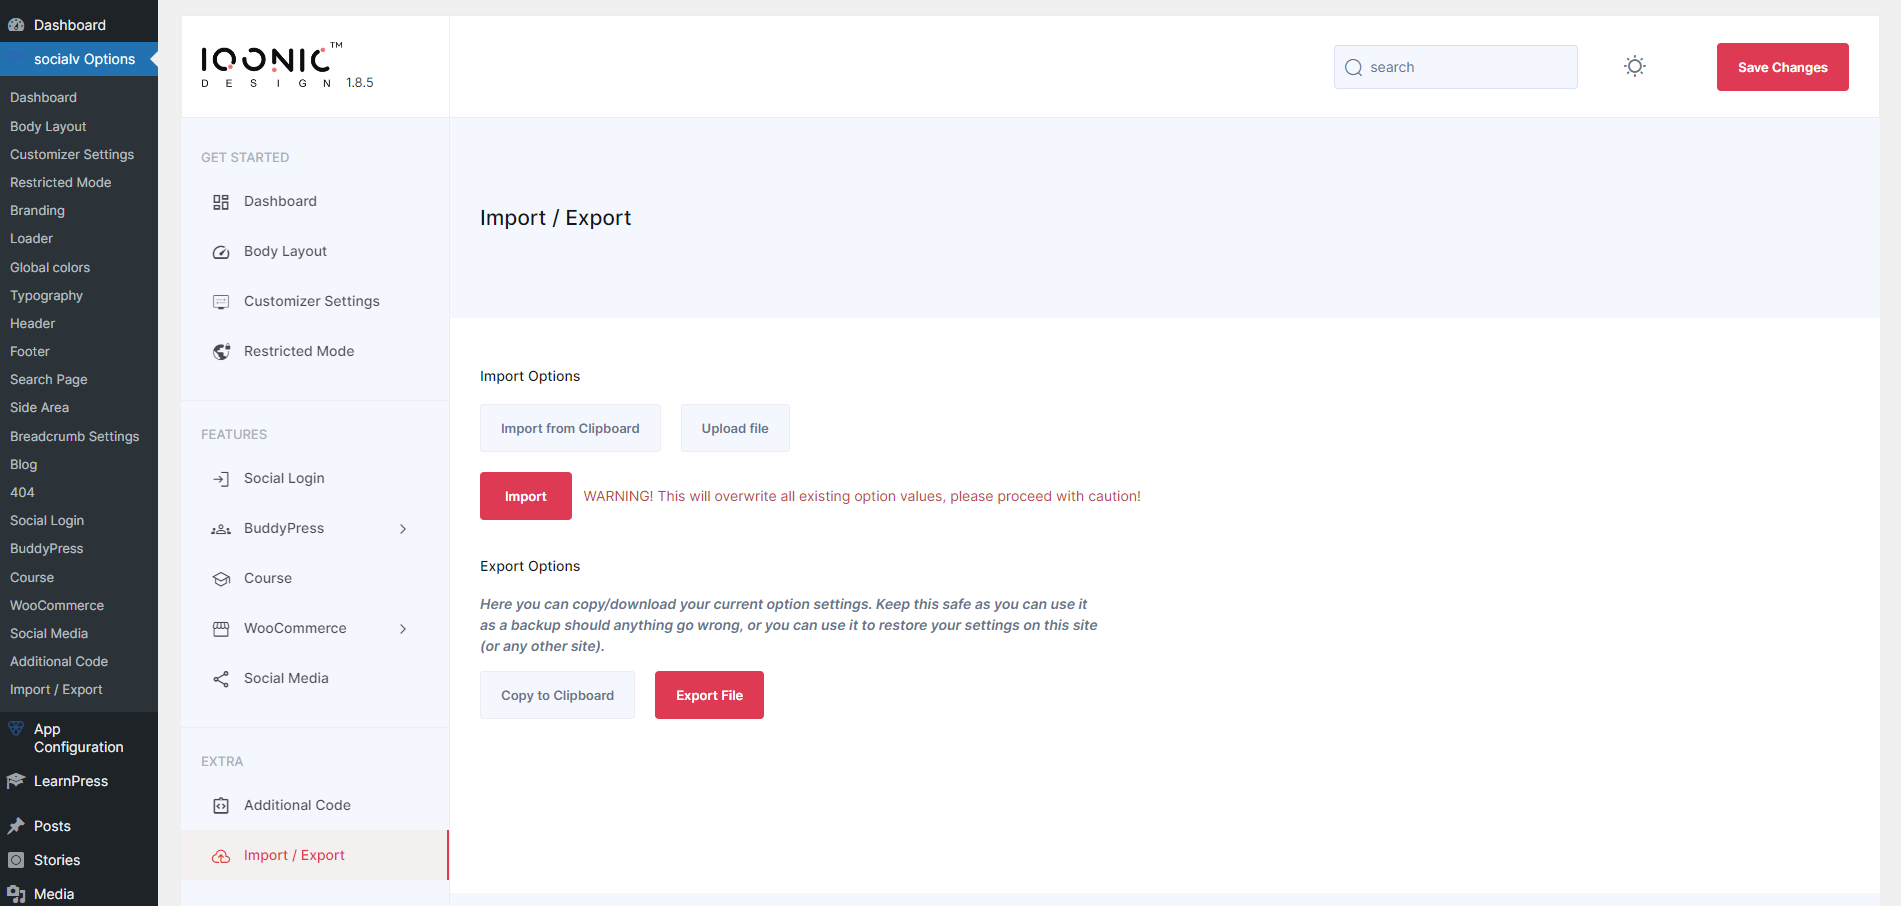
Import / Export
You can import or export theme settings from here. This will be useful when you are developing your site on other server and want to move only theme settings. Just click "Download" button to export the settings and click "Import from file" button to import it.
Iqonic Widgets
Widgets
Following is a list of all theme-related widgets provided by Iqonic Design.
-
Iqonic Social Icons
The Iqonic Social Icons widget allows you to easily display a stylish and customizable list of social media icons on your website. This flexible widget lets you add any social icon from the Font Awesome library or even upload your own custom SVG icons.
Key features include multiple layout options (icons only, text only, or both), horizontal/vertical positioning, and extensive styling controls. You can choose between official brand colors or set your own custom primary and secondary colors, adjust icon shapes (circle, square, rounded), and fine-tune size, spacing, and borders. To make your icons more engaging, you can also apply various hover animations and color effects.
.png)
-
Iqonic Button
The Iqonic Button widget enables the creation of stylish, interactive buttons with advanced link and popup functionality. It supports static URLs or dynamic page linking, enhancing navigation flexibility.
A built-in modal feature allows popups with custom titles, WYSIWYG content, and close icons—no extra plugins required. Design customization includes typography, colors, hover states, padding, borders, and shadows. Pre-defined styles and full visual control ensure seamless integration with your theme design.
.png)
-
Iqonic Section Title
The Iqonic Section Title widget is a versatile tool for creating stylish and structured headlines for any section of your page. It allows you to build a complete title block with a main title, a subtitle, and an optional description.
Key features include the ability to position the subtitle before or after the main title, select the appropriate HTML heading tag (H1-H6) for SEO, and make the entire title a clickable link. The widget offers extensive styling options, giving you granular control over the typography, colors, backgrounds, borders, and spacing for the container, title, subtitle, and description independently, including unique styles for hover states.
.png)
-
Iqonic Accordion
The Iqonic Accordion widget is a powerful and highly customizable tool for creating elegant collapsible content sections, perfect for FAQs, services, or any vertically stacked information.
It offers extensive control over styling, allowing you to set distinct colors and backgrounds for titles, content, and icons in both active (open) and inactive (closed) states. Enhance user experience by choosing unique icons for each state, adding modern box shadows, and selecting the appropriate HTML heading tag for titles to optimize SEO.
.png)
-
Iqonic Blog
The Iqonic Blog widget provides a powerful and stylish way to showcase your blog posts on any page. Display your articles in a clean, responsive grid with options for 1, 2, 3, or 4 columns. You have full control to filter posts by category, set the number of posts per page, and customize the sort order. Fine-tune the appearance with extensive styling options for titles, metadata, and colors to perfectly match your site's design.
.png)
-
Iqonic Blog Slider
The Iqonic Blog Slider widget provides a dynamic and stylish way to showcase your blog posts in a responsive, touch-friendly carousel. You can filter posts by specific categories to feature targeted content and customize the slider's behavior with options for autoplay, looping, and navigation. It deeply integrates with the SocialV theme by displaying post likes and comment counts, helping to boost user engagement directly from the slider.
.png)
-
Iqonic Testimonial
The Iqonic Testimonial widget allows you to showcase customer feedback and social proof in a dynamic and visually appealing slider. It features a sophisticated dual-carousel system where user profiles—including their image, name, and designation—act as interactive navigation for the main testimonial content. This widget is highly customizable, with full control over slider behavior (navigation, pagination, looping), typography, colors, and backgrounds, enabling you to perfectly match it to your site's design.
.png)
-
Iqonic IconBox
The Iqonic IconBox widget is a versatile tool for showcasing services, features, or key information. It comes with multiple pre-designed styles and gives you the flexibility to use either an icon from the library or a custom image.
You can add a title, description, and make the entire box a clickable link or include a separate call-to-action button. With deep customization for colors, typography, spacing, hover effects, and borders, you can create visually appealing and informative content blocks that perfectly match your brand.
.png)
-
Iqonic Timer
The Iqonic Timer widget for Elementor allows you to create a dynamic countdown timer to build anticipation and create a sense of urgency. It is perfect for upcoming events, product launches, or special offers.
You can set a specific future date and time, and choose which time units to display (Years, Months, Days, Hours, etc.). The widget offers extensive styling options, including full control over colors, typography, and alignment, as well as the ability to add custom backgrounds and borders to the timer blocks.
.png)
-
Iqonic Counter
The Iqonic Counter widget is designed to showcase important statistics and achievements with an engaging animated number effect. You can enhance your data by adding a custom icon or image, a title, and a description. The widget is highly customizable, offering full control over typography, colors, spacing, and borders, including distinct styles for hover states to create an interactive user experience.
.png)
-
Iqonic Lists
The Iqonic Lists widget is a versatile tool for creating stylish and highly customizable lists, going far beyond standard bullet points. It supports four distinct list types—ordered, unordered, custom icon, and image-based—and allows you to arrange content in a multi-column layout. You get full control over typography, colors, backgrounds, and borders for both the list container and the individual icons/images, enabling you to design lists that perfectly match your brand.
.png)
-
Iqonic Image Box
The Iqonic Image Box widget is a versatile and dynamic tool for creating a stylish, responsive image carousel, perfect for showcasing features, services, or a visual gallery.
The widget allows you to build a slider where each item consists of an image, a title, and a description. It comes with multiple pre-designed styles, including an advanced layout with a static background image behind the carousel for a modern effect. Each image box can be a clickable link, and you have full control over the slider's behavior, including autoplay, looping, and navigation. Extensive styling options for typography, colors, borders, and shadows ensure it integrates seamlessly with your site's design.
.png)
-
Iqonic Before/After Image
The Iqonic Before/After Image widget provides a visually compelling way to showcase transformations by comparing two images with an interactive slider. It allows you to highlight changes effectively by letting users drag a handle across the images, with support for both horizontal and vertical orientations. Full customization of the slider handle color ensures the tool integrates seamlessly with your brand's aesthetic. It's perfect for demonstrating product results, redesigns, or photo editing effects.
.png)
-
PMP Pricing Plan
The Iqonic PMP Pricing Plan widget provides a seamless way to display and customize individual pricing plans from the Paid Memberships Pro (PMP) plugin. It dynamically fetches all essential details from a selected PMP membership level—including the plan name, price, and billing cycle—and presents them in a stylish, fully customizable pricing box.
Key features include the ability to automatically apply a PMP discount code at checkout, display a custom sale price, and add a promotional banner. The widget intelligently adapts for existing members, changing the checkout button to an "My Account" link.
You can also create a custom "features" list with icons and have complete styling control over every element, including colors, typography, backgrounds, and spacing.
.png)
Iqonic ShortCodes
ShortCodes
Following is a list of all theme-related shortcode provided by Iqonic Design.
-
Iqonic Login
The Iqonic Login shortcode (use:
['iqonic-login']) is a powerful tool for adding a customizable login form to your website. This widget provides an easy-to-implement login solution that supports both traditional login (email/password) and social login options for a seamless user experience.Social Login Integration: The Iqonic Login widget integrates with the popular MiniOrange Social Login Plugin, enabling users to authenticate using their social media accounts, such as Facebook, Google, Twitter, and more. This integration allows website owners to configure social login options directly from the MiniOrange plugin, making it simple to activate and manage the login methods you want to offer to your users.
Key Features:
- Multiple Login Methods: Users can log in through traditional email/password or use their social media accounts for one-click login.
- MiniOrange Social Login Plugin Integration: Easily configure and manage social login options using the MiniOrange plugin, with a variety of social platforms available to connect.
- Secure Authentication: Includes encrypted login credentials, ensuring a safe and secure login experience for users.
- Fully Responsive: Optimized for all devices, providing an excellent user experience on both mobile and desktop platforms.
With the Iqonic Login shortcode, you can effortlessly enhance your website's login process, offering your users a secure, customizable, and easy-to-use login experience. The integration with MiniOrange also ensures that you can easily manage and configure various social login options through their user-friendly interface.

-
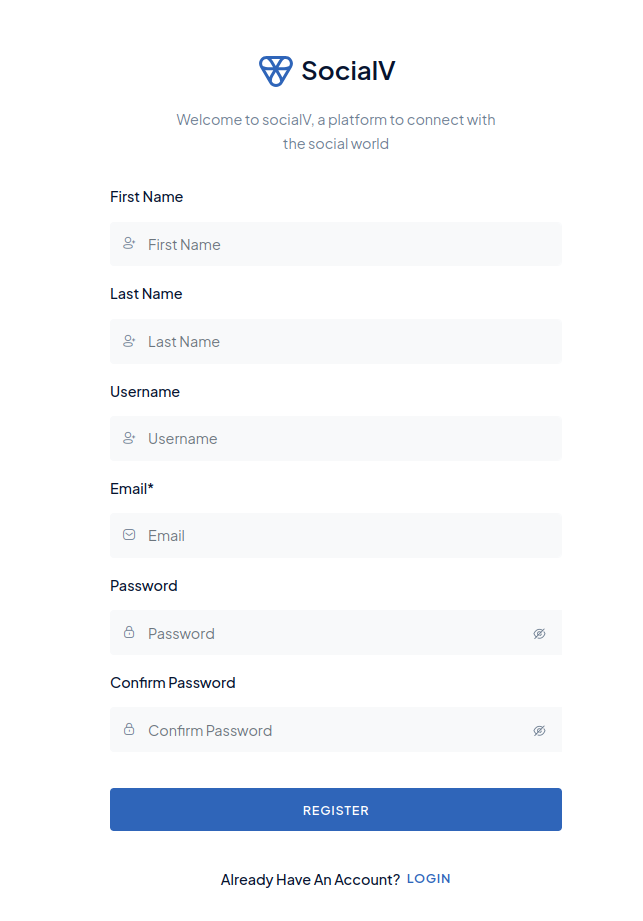
Iqonic Register
The Iqonic Register shortcode (use:
['iqonic-register']) provides an easy and secure registration system for your website. This widget supports three different registration methods to give admins flexibility in how users can register and gain access to the website:Available Registration Methods:
- Direct User Access: Admins can choose to automatically give users full access immediately after they complete the registration process. This method is suitable for websites where user approval is not required.
- Admin Approval Required: After the user registers, the admin needs to approve or deny the registration. This option gives admins more control over who can access the site.
- Email Validation Token: Upon registration, a validation token is sent to the user’s email. The user must validate their email address before they are granted access. This method adds an extra layer of security by confirming the user’s email identity.
All of these registration methods can be configured through the Social Login Options under the "Headers" section in the admin pannel. You can select the desired method that fits your website’s needs and enhance the user registration process accordingly.
Note: The Iqonic Register shortcode does not require custom field entries or additional coding. Everything is designed to work out of the box, making it easy for both website admins and users. This simplicity means that you don’t need to worry about manual coding to collect registration data or customize fields.
Key Features:
- Multiple Registration Methods: Flexibility to allow direct access, admin approval, or email validation to control how users register on your site.
- Easy to Implement: Simply use the shortcode
['iqonic-register']without the need for custom field entries or coding. - Admin-Controlled Access: Admins have full control over user registration, either approving manually or using automatic validation via email tokens.
- Seamless Integration: This shortcode integrates easily with your website, allowing you to manage user registrations efficiently and securely.
The Iqonic Register shortcode streamlines the registration process while giving admins full control over user access. Whether you choose automatic access, manual approval, or email validation, this widget ensures a smooth and secure registration process for your users.
-
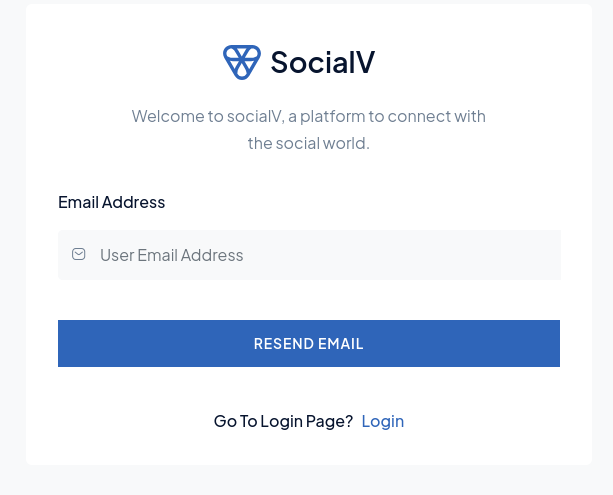
Iqonic Resend Verification Email
The Iqonic Resend Verification Email shortcode (use:
['iqonic-resend-verification-email']) provides a simple solution for users who have lost or did not receive their account verification email. This shortcode allows users to request a new verification email to activate their account and complete the registration process.How it Works: If a user has registered on your site but hasn't received their verification email, or if they have lost the original verification code, they can use the Resend Verification Email option. By entering their email address, they can trigger the system to send them a new verification email with a fresh activation link or code.
Key Features:
- Easy Email Resending: Users can quickly request a new verification email without needing to contact the admin or support team.
- Seamless User Experience: This feature improves the user experience by allowing users to resolve issues with verification emails independently and without delays.
- Works for Lost or Missing Emails: Perfect for users who may have missed the first email, or whose verification code expired, ensuring they can still complete their registration.
- Simple Implementation: Just add the shortcode
['iqonic-resend-verification-email']to your page, and it will automatically display a form for users to request a resend of their verification email.
The Iqonic Resend Verification Email shortcode is a great way to enhance your registration system, ensuring users can easily activate their accounts, even if they’ve missed or lost their verification email. It helps to improve both user satisfaction and account activation rates.
-
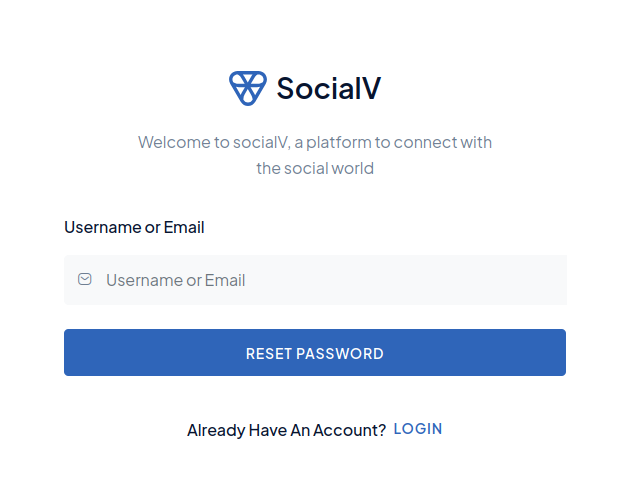
Iqonic Lost Password
The Iqonic Lost Password shortcode (use:
['iqonic-lost-pass']) is designed to assist users who have lost or forgotten their account password. By using this shortcode, users can easily request a new, auto-generated password to be sent to their registered email address, allowing them to regain access to their account.How it Works: If a user forgets their password, they simply enter their registered email address into the form provided by the Lost Password shortcode. The system will automatically generate a new password and send it to the user’s email. Once the user receives the new password, they can use it to log in and access their account again.
Key Features:
- Easy Password Recovery: Users can recover access to their account without needing to contact support. They will receive a new password instantly.
- Auto-Generated Password: The system generates a new, secure password automatically and sends it to the user’s email, ensuring the process is secure and seamless.
- Simple and Fast: Users can quickly regain access to their accounts without lengthy steps or complicated procedures.
- Simple Implementation: Adding the
['iqonic-lost-pass']shortcode to your page automatically displays the password recovery form, making it easy for users to use without additional configuration.
The Iqonic Lost Password shortcode is an essential feature for any website, offering a smooth and secure way for users to recover their accounts when they forget their password. It improves user experience and reduces the need for admin intervention in password recovery processes.
BuddyPress
All settings for socials community website. You can add user, group, forum with edits, customizations and other more settings.
1). Register Tab Settings (Admin Side)
The register settings allow for customization of user to register profile data.
2). User Profile Settings(Admin Side)
The xprofile settings allow for customization of user profile data. (Note: the data from our fields will not be accepted by your admin panel. You should create your own user xprofile fields to accomplish this.
To complete setting up these profile fields, select Xprofile settings. Fields can be added to field groups once they have been created. When you set up the fields groups as an admin, this is displayed on the User About tab in the User Profile Timeline.
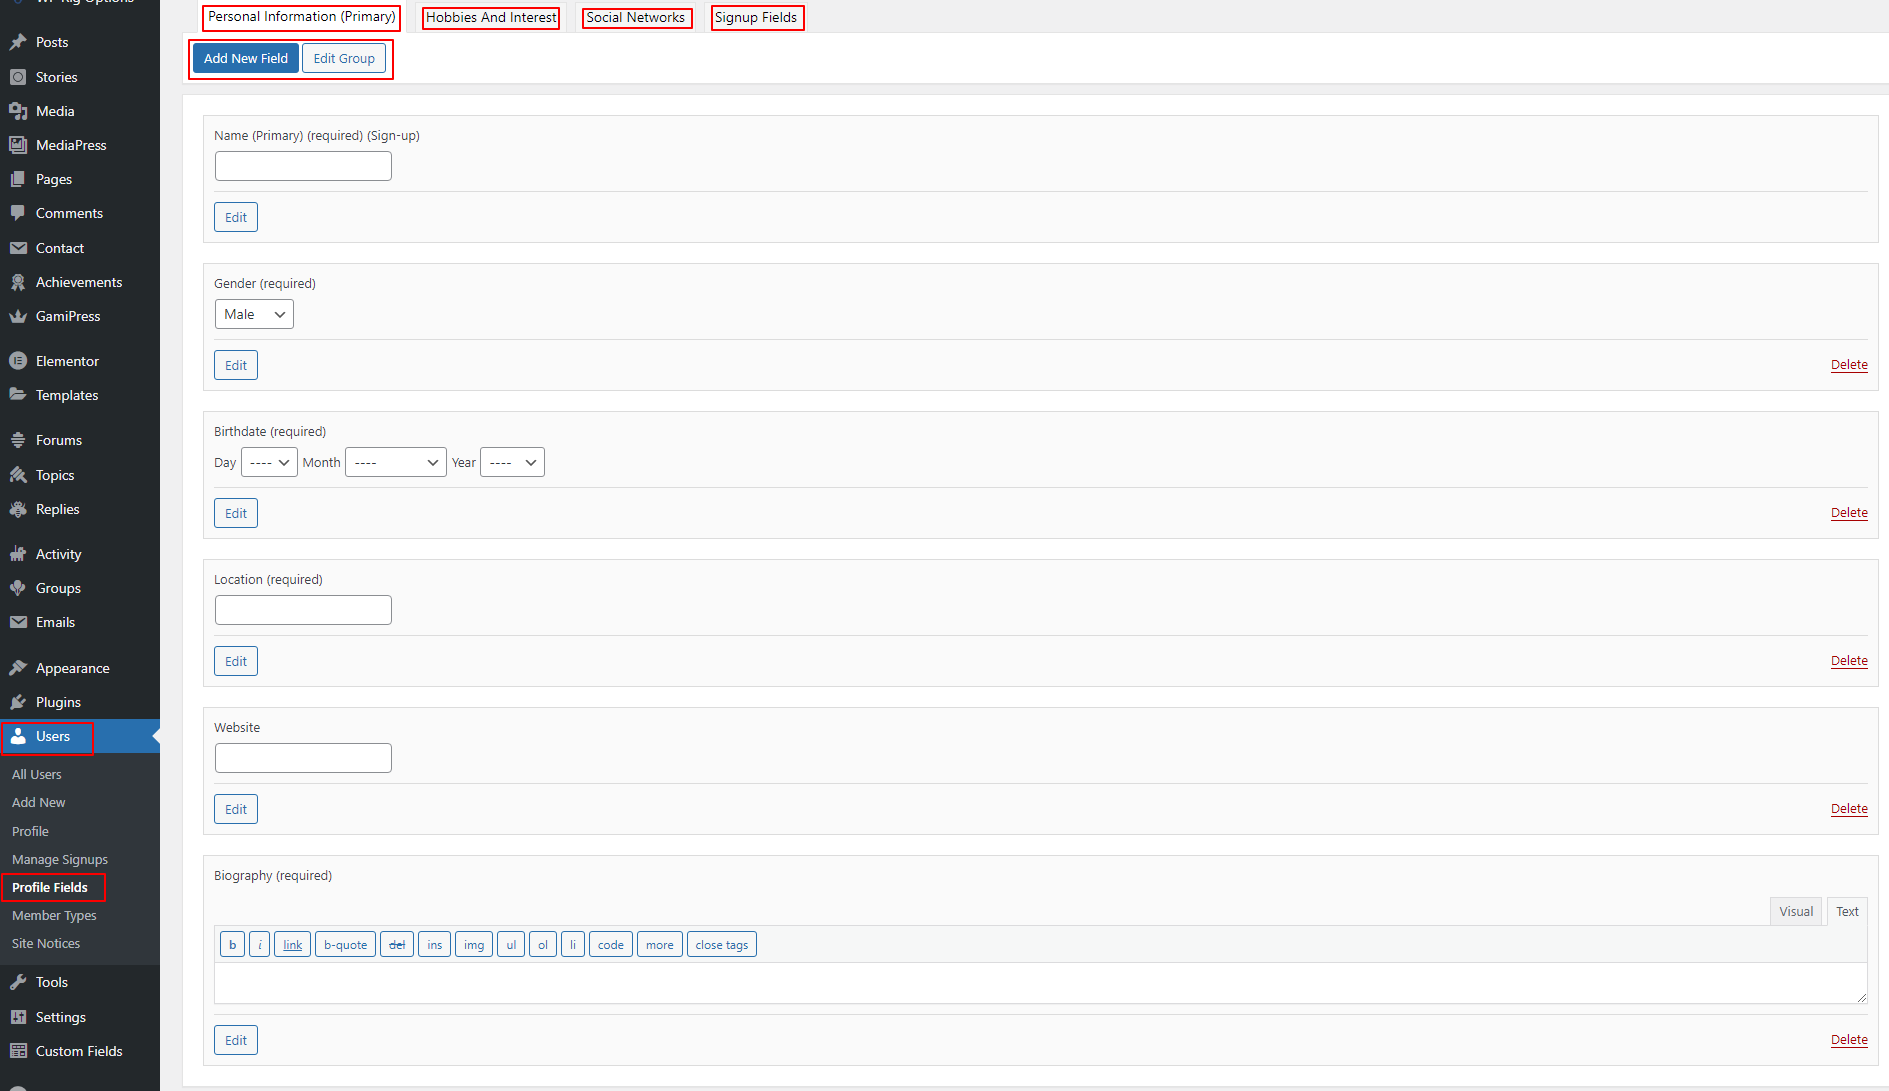
Check user profile fields working properly in user settings fields.

3). User Profile Settings(User Side)
Administrators can directly add users through the admin panel, but users will log in using the standard role editor on the login page.

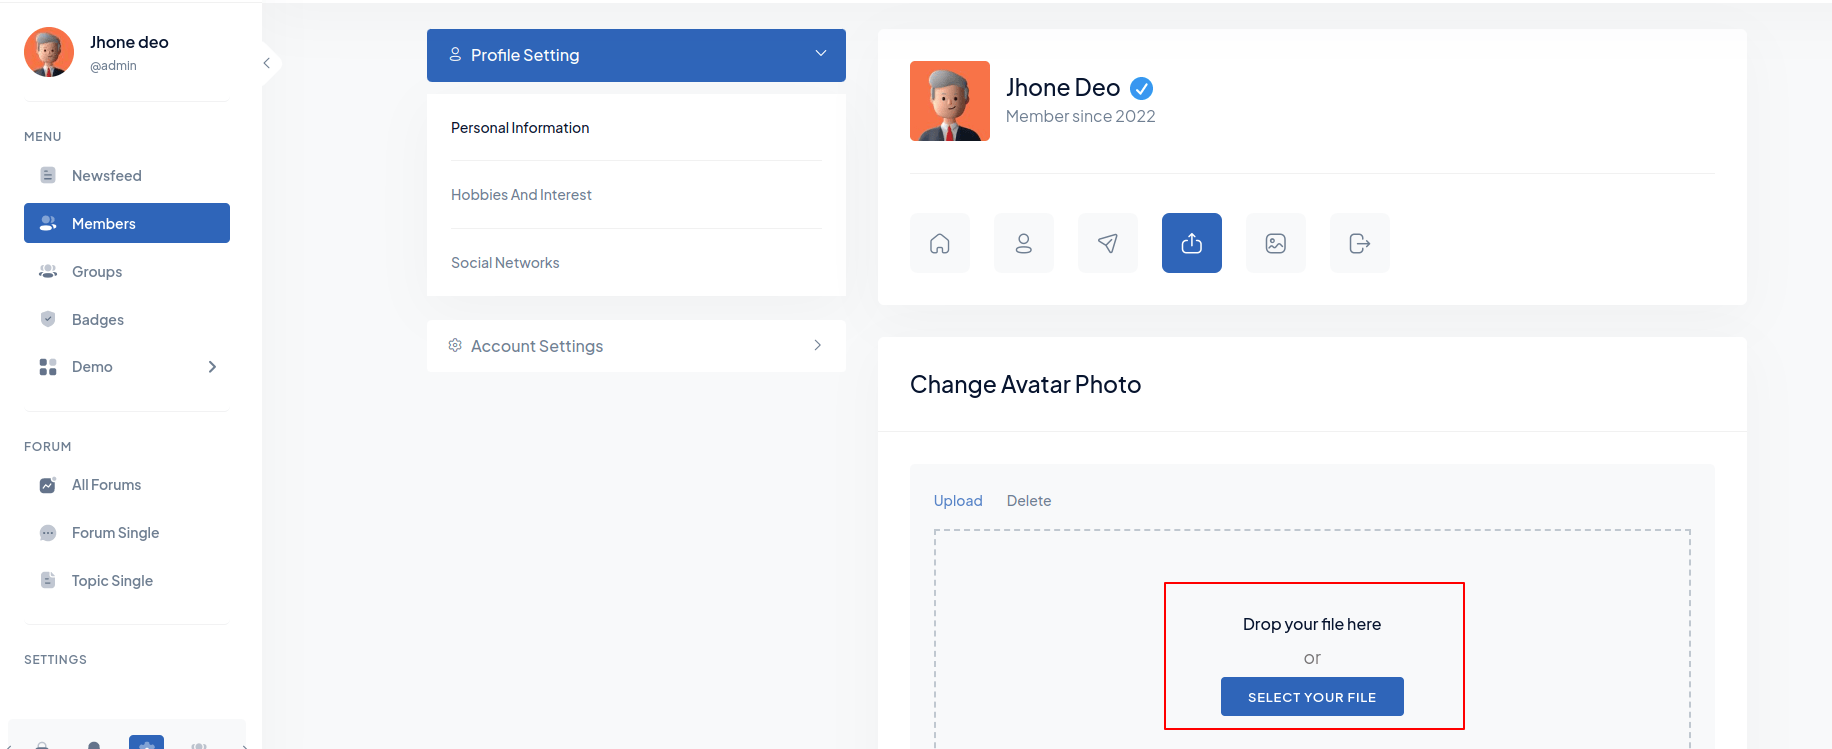
01. Profile Picture Settings
Step 1: Click on Change Profile icon.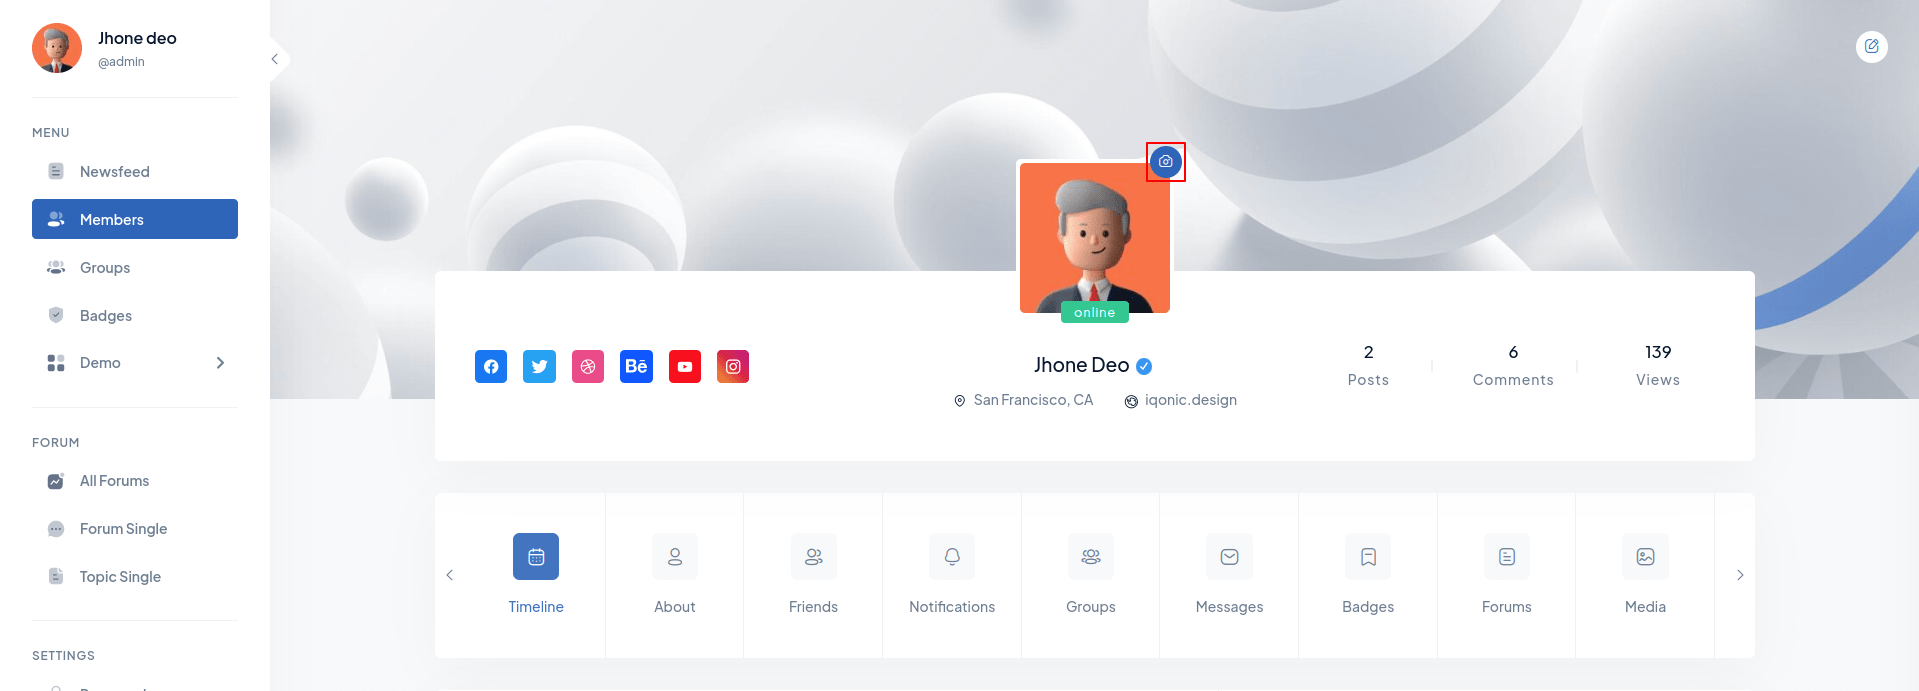 Step 2: Select/Upload Your
Profile Image.
Step 2: Select/Upload Your
Profile Image.
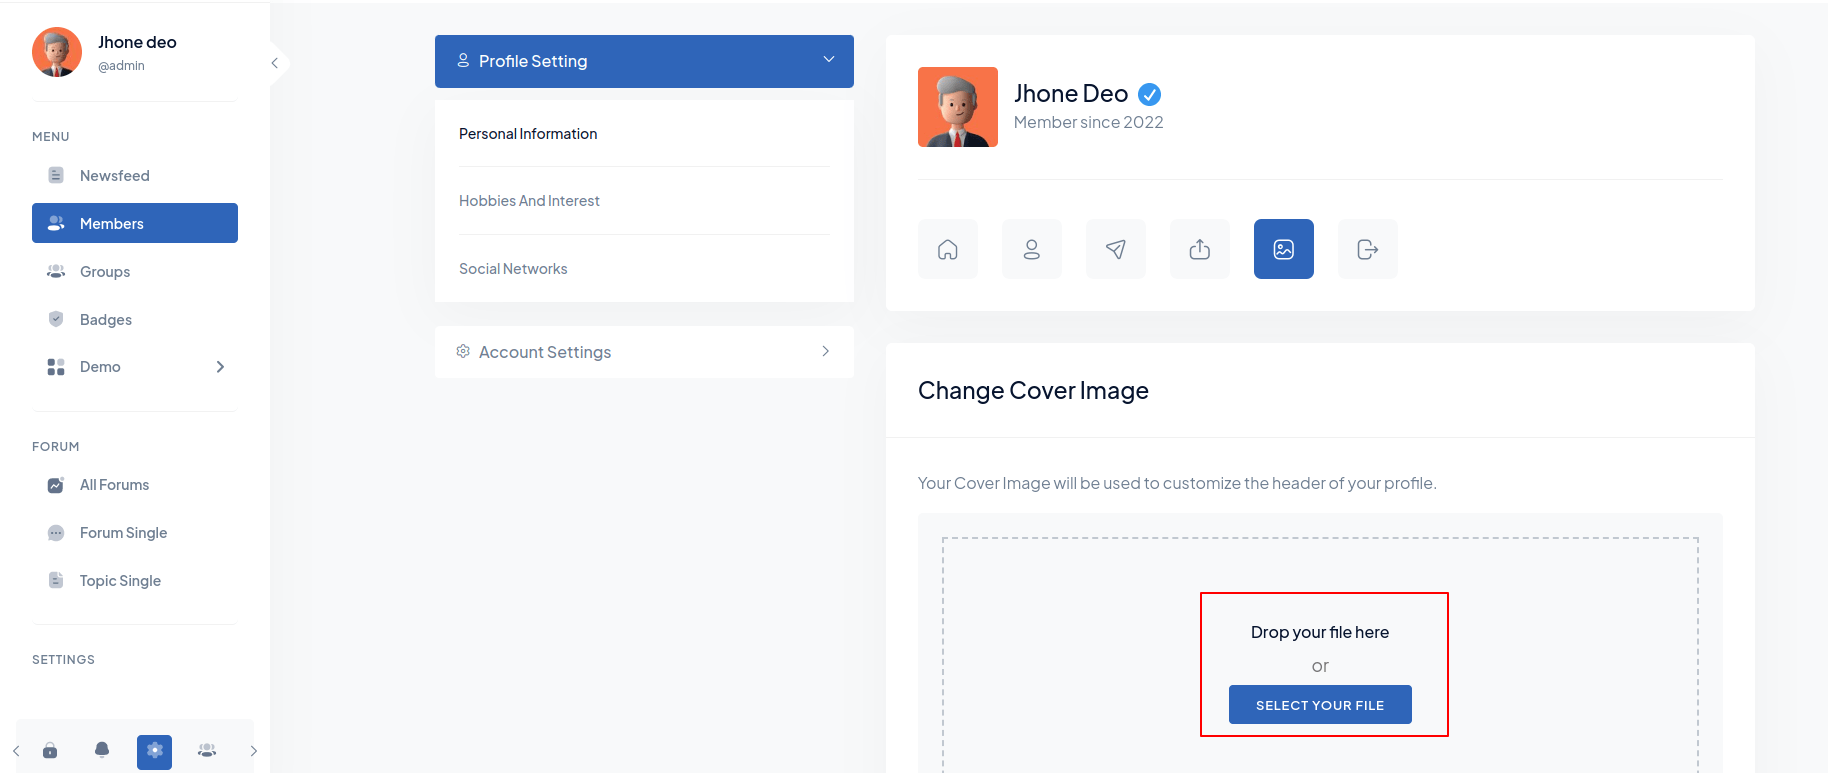
02. Cover Image settings
Step 1: Click on Edit icon on Top Right Corner. Step 2: Select/Upload Your
Cover Image.
Step 2: Select/Upload Your
Cover Image.
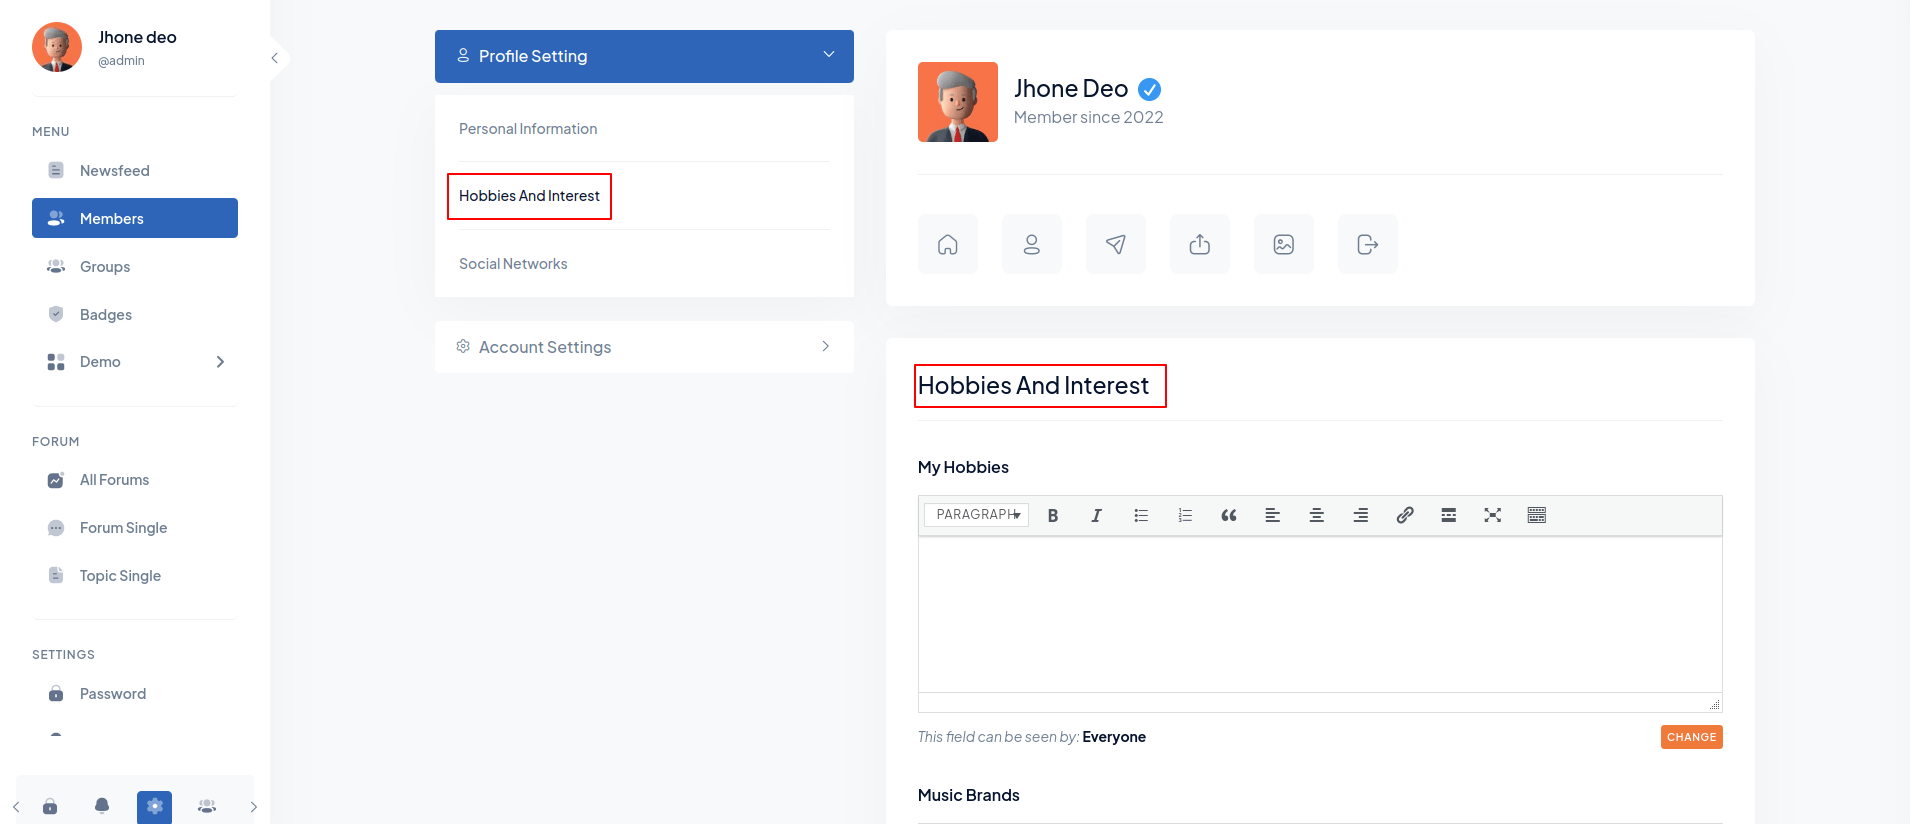
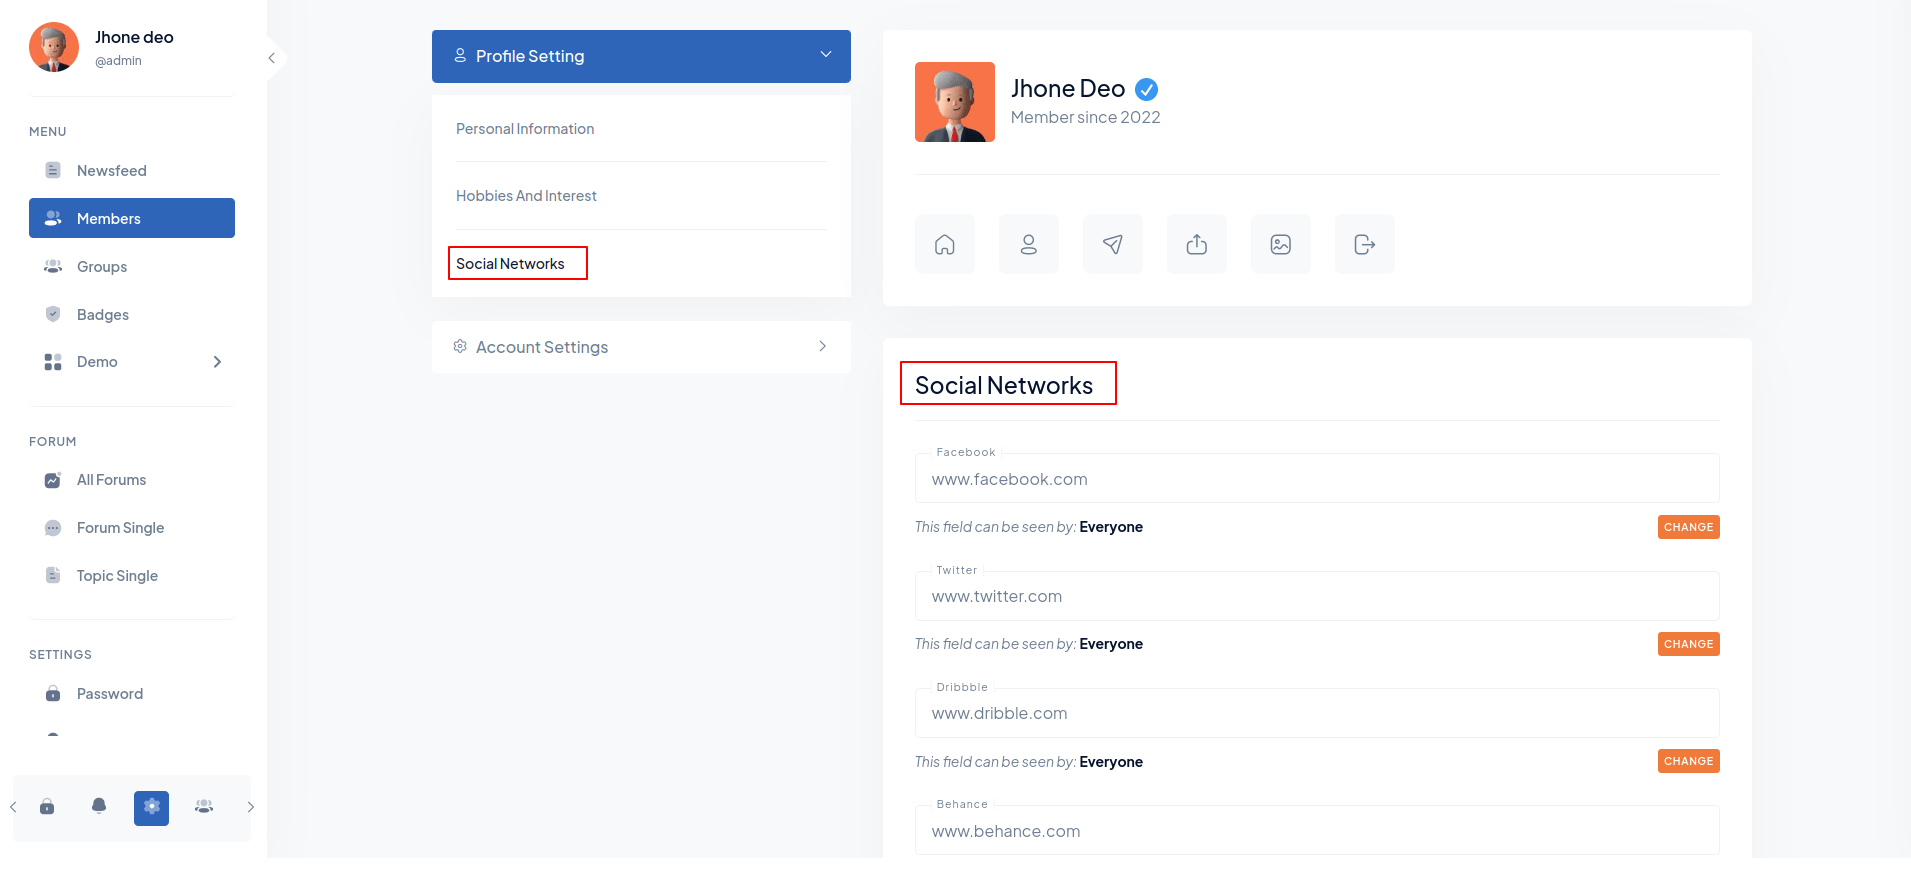
03. Other Informations settings
Personal Information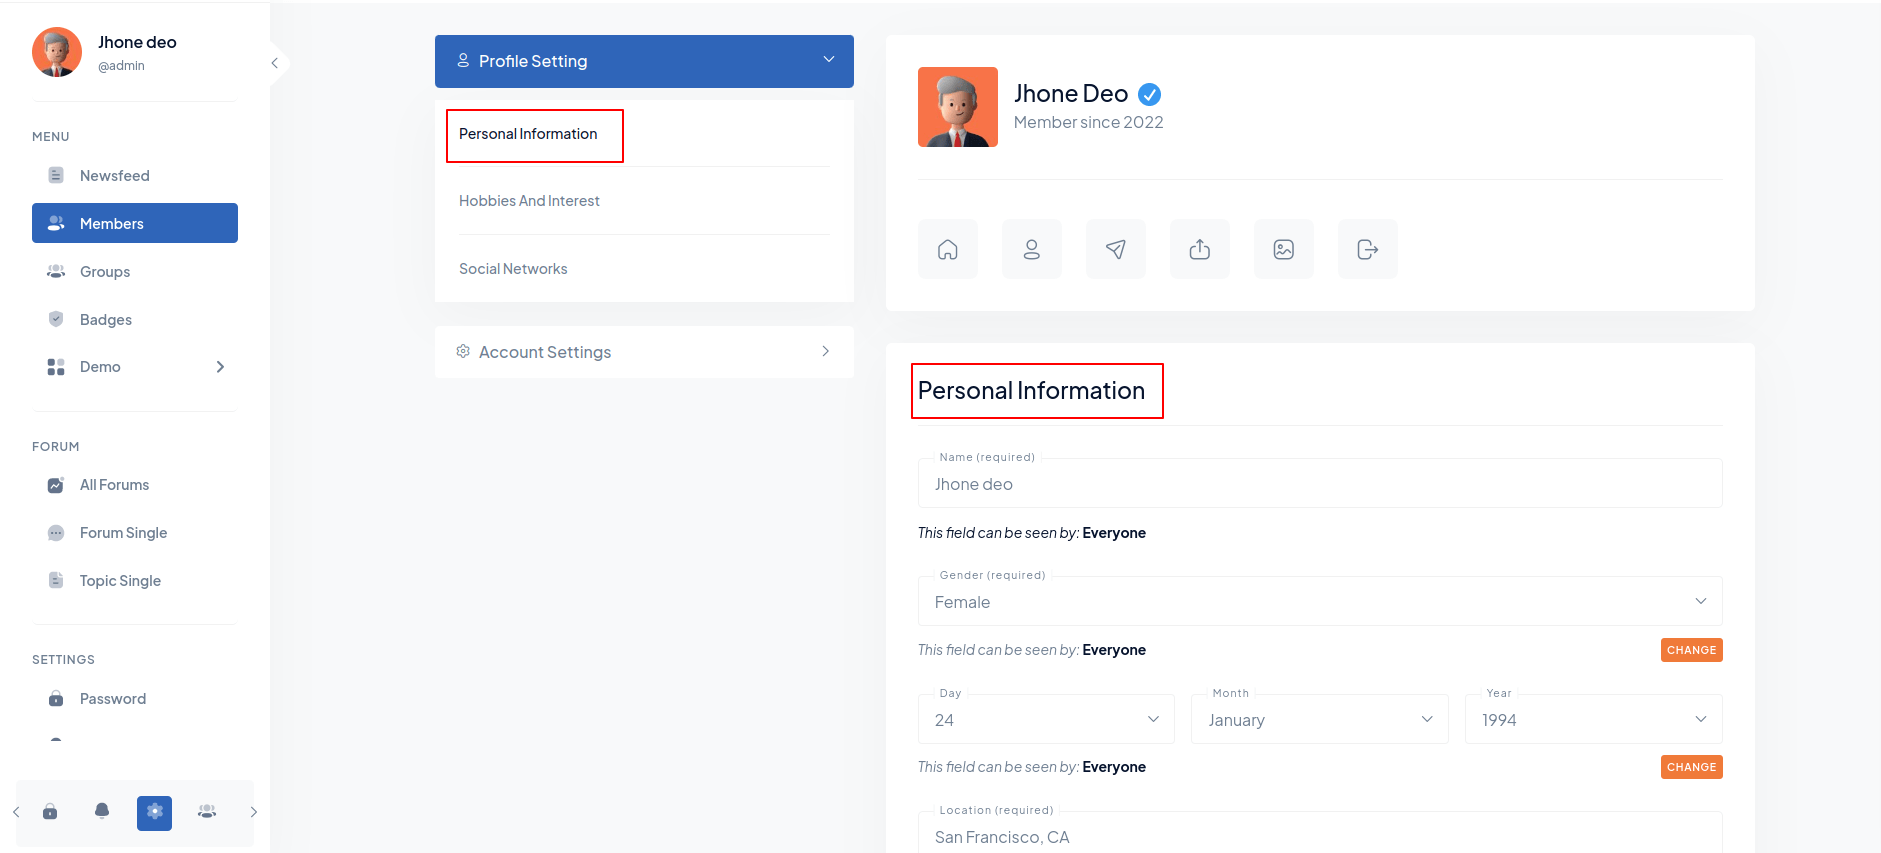 Hobbies And Interest
 Social
Networks
Social
Networks
04. Account settings
Email & Password Settings Notifications
Settings
Notifications
Settings
 Profile Visibility
Settings
Profile Visibility
Settings
 Privacy and
security
Privacy and
security
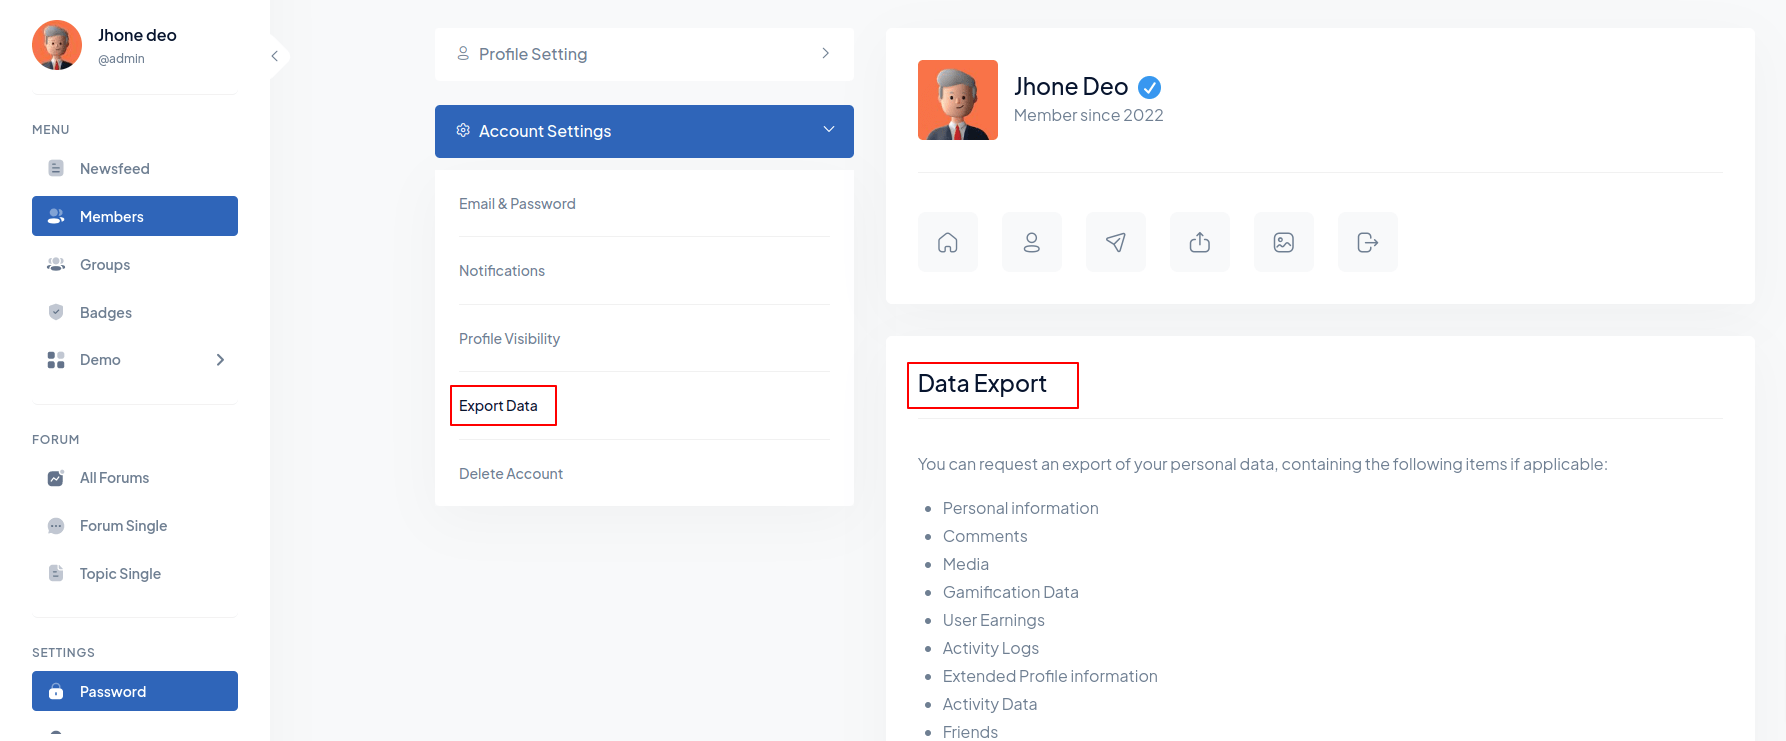
 Export data
 Delete Account

4). Add Friends
If you wish to add friends via friend request, go to the page for all members to see the member list and the "Add Friend" button.

5). Groups
1). Add Group
Create New Group (Admin Side)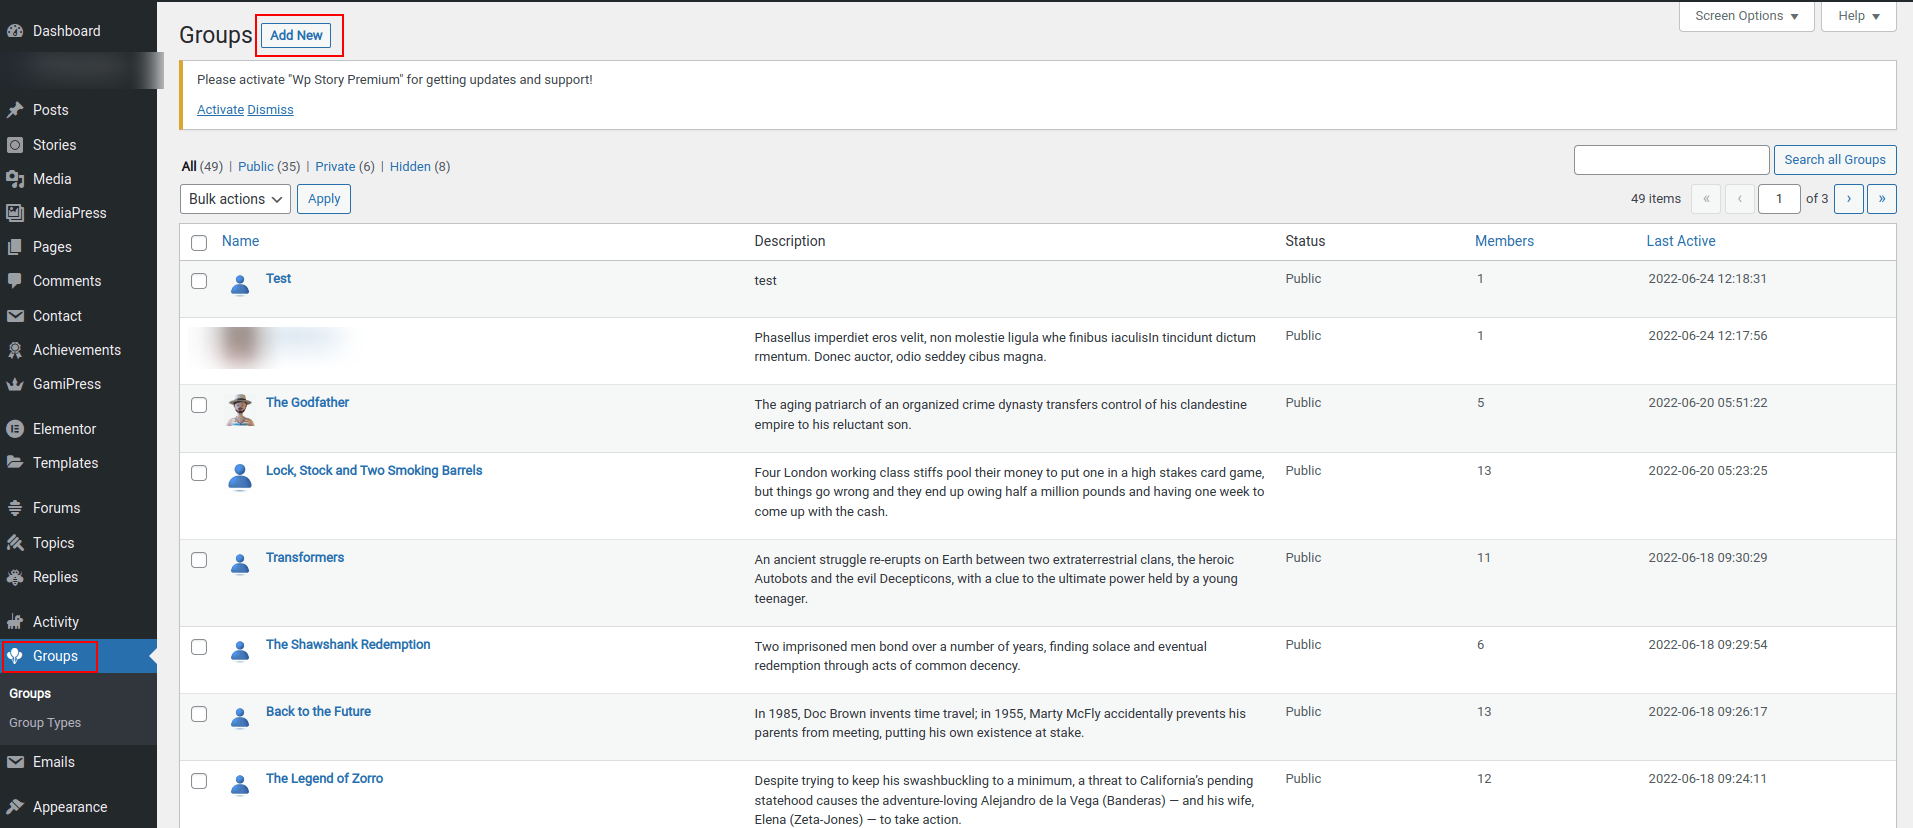 Create New Group (User Side)
 Enter Group Details
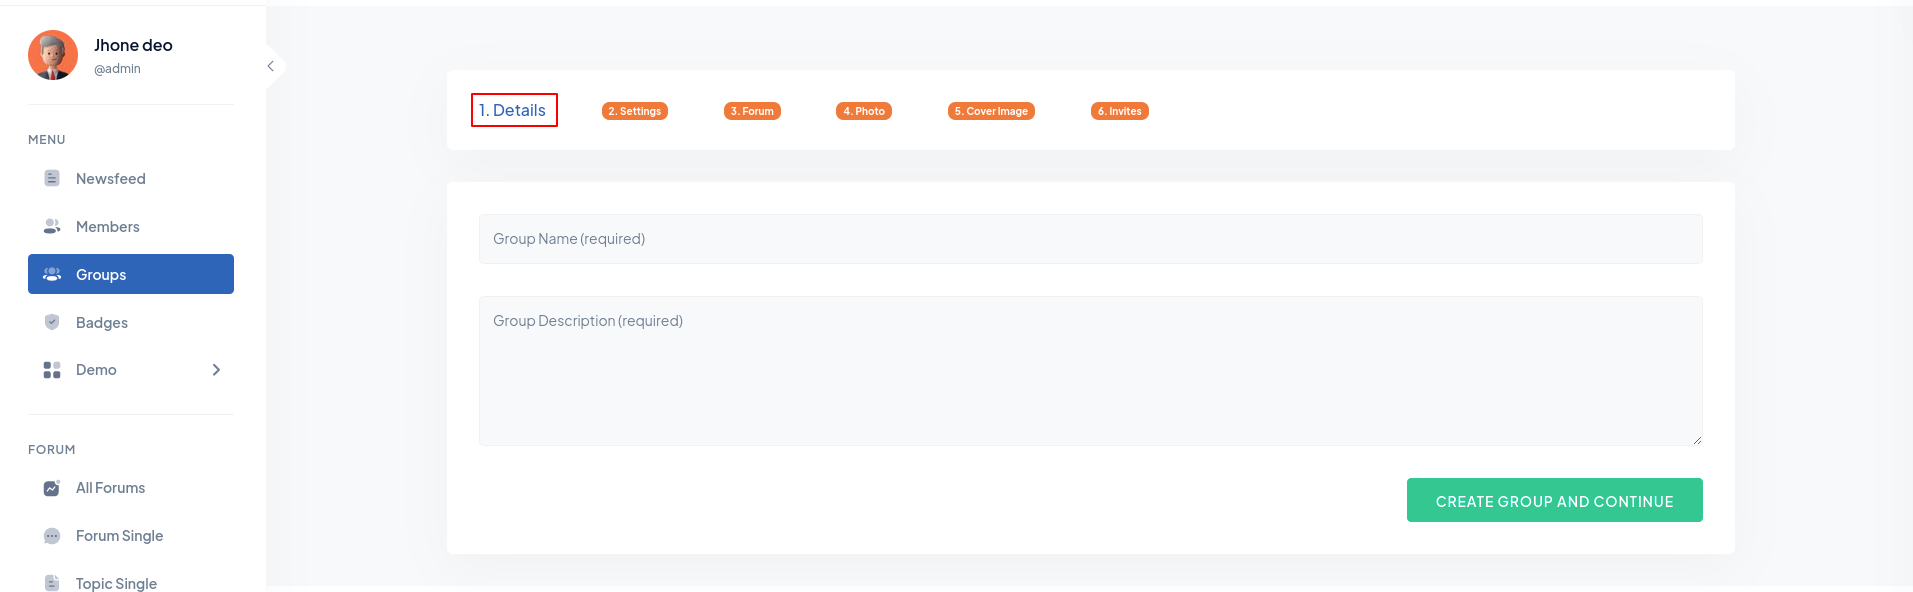 Group Setting

2). Joined Group
For Join Group Click on Groups Tab in Menu Then Click on Join Group button.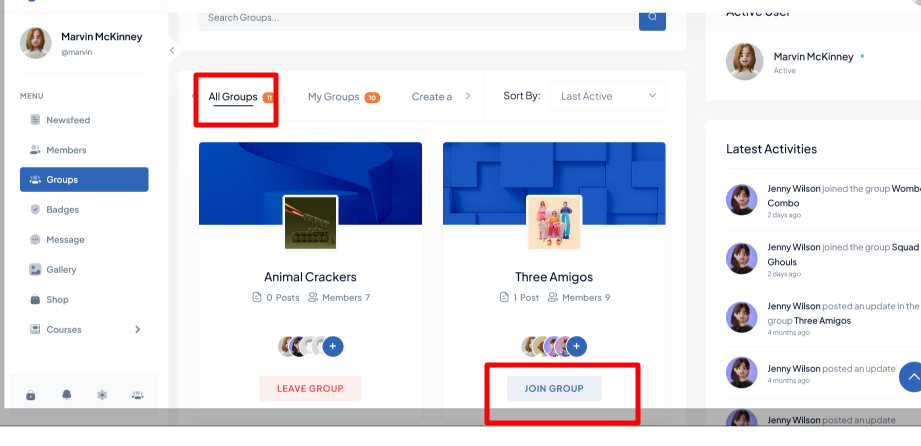
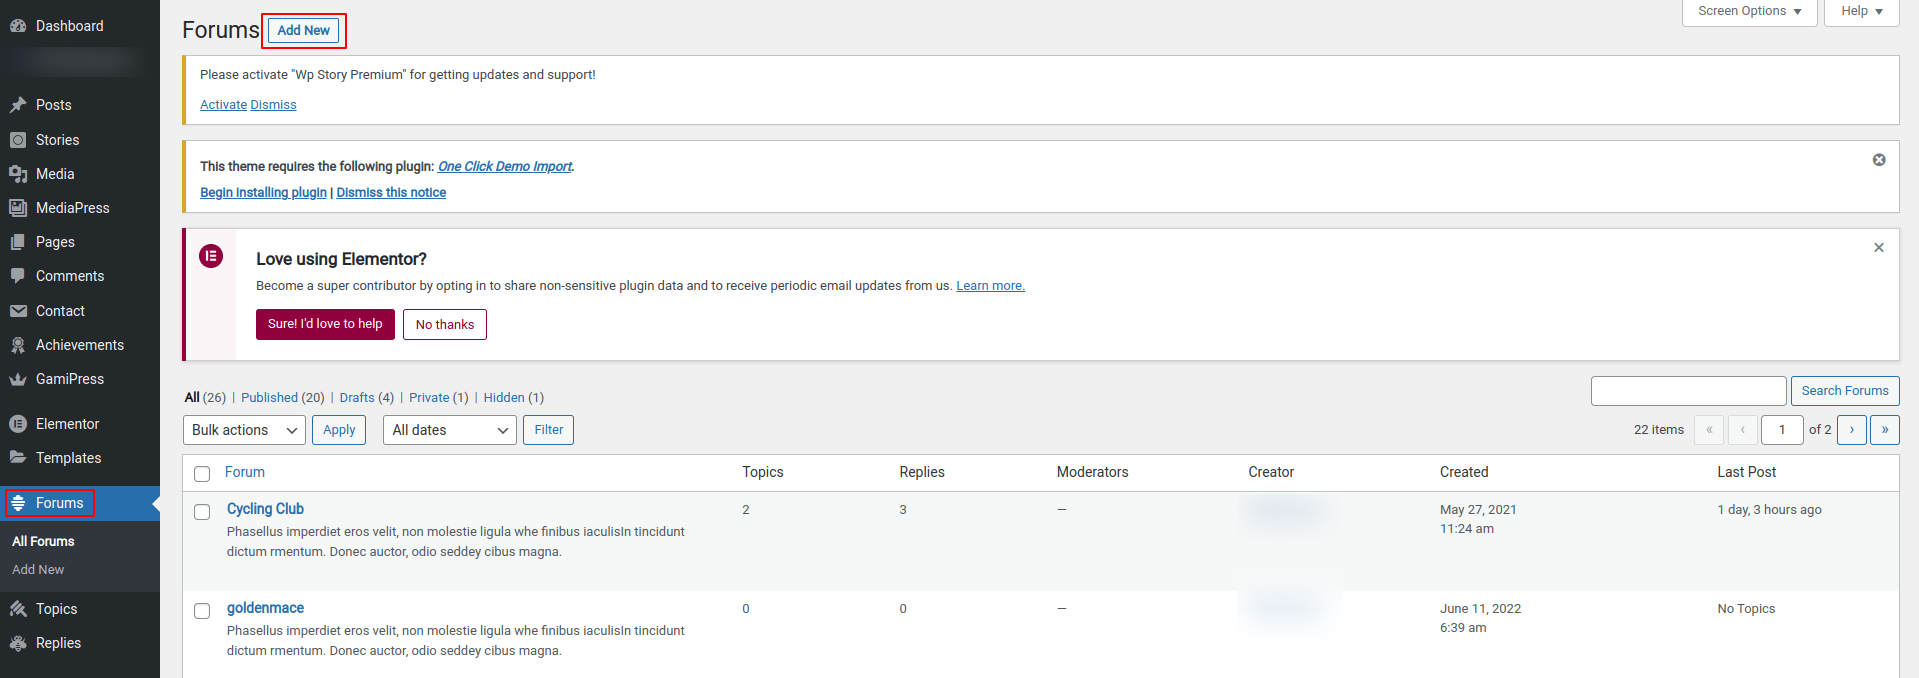
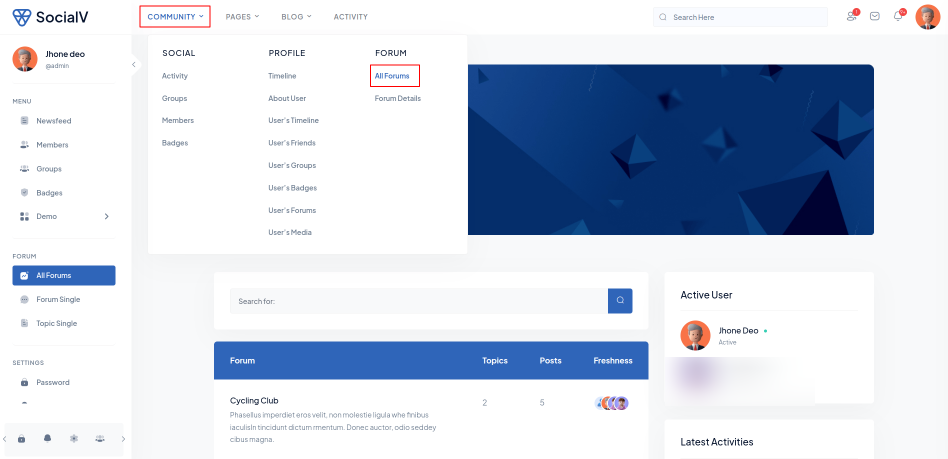
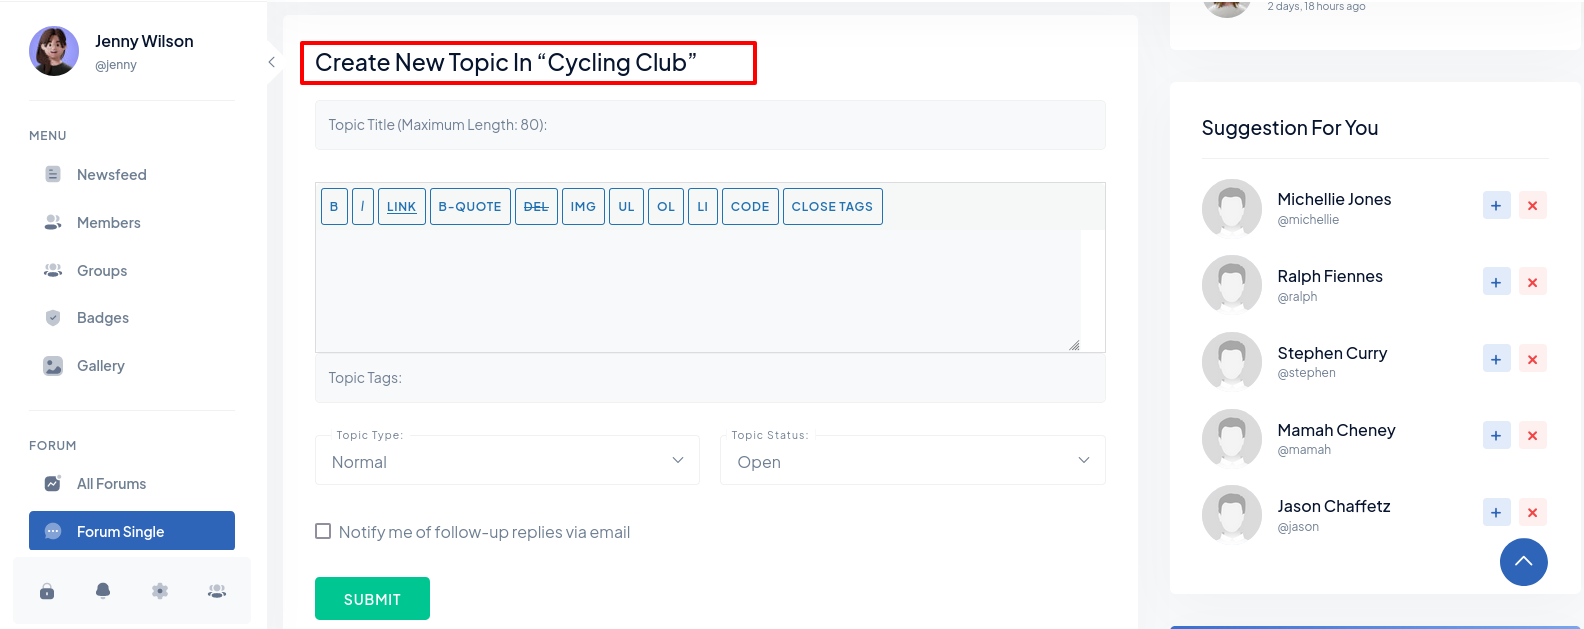
7). Topic
Step 1: Select All Forums in Forum. Then choose the forum. Step 2: After that, enter the
topic
title, description, and tag.
Step 2: After that, enter the
topic
title, description, and tag.
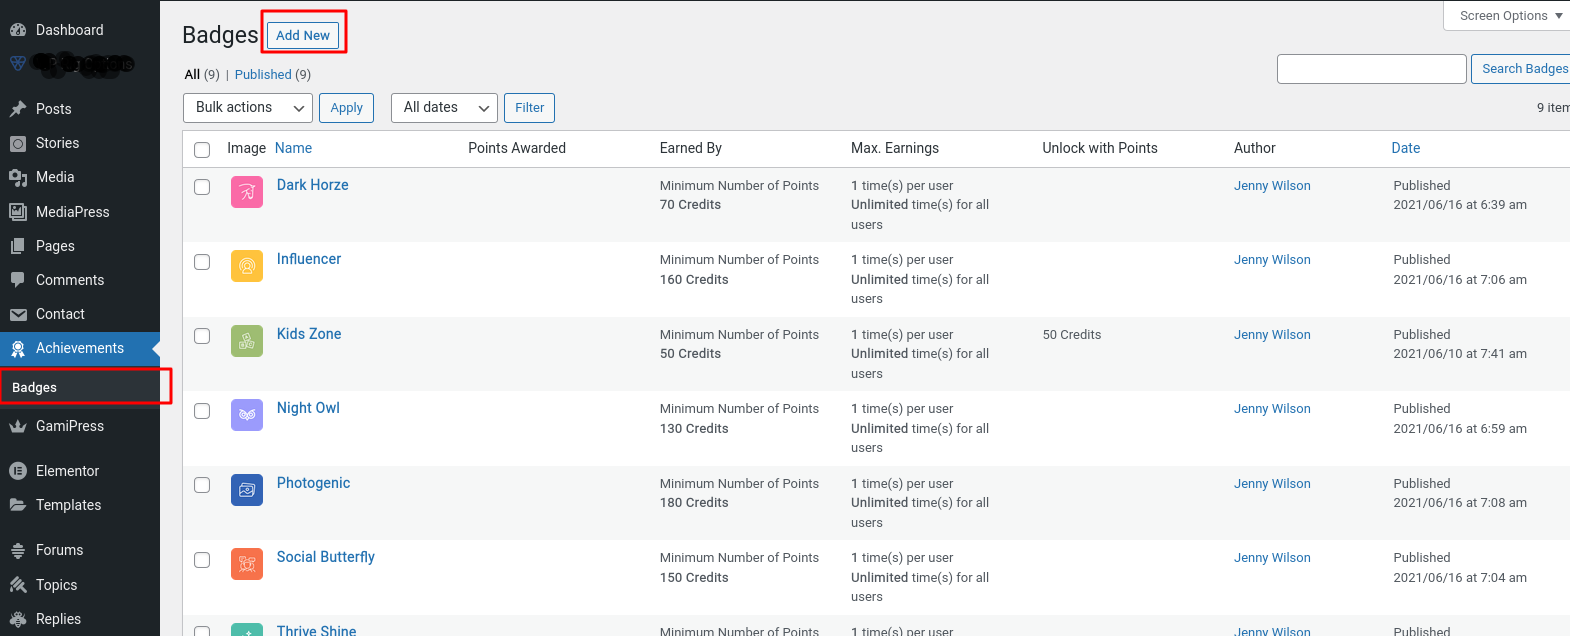
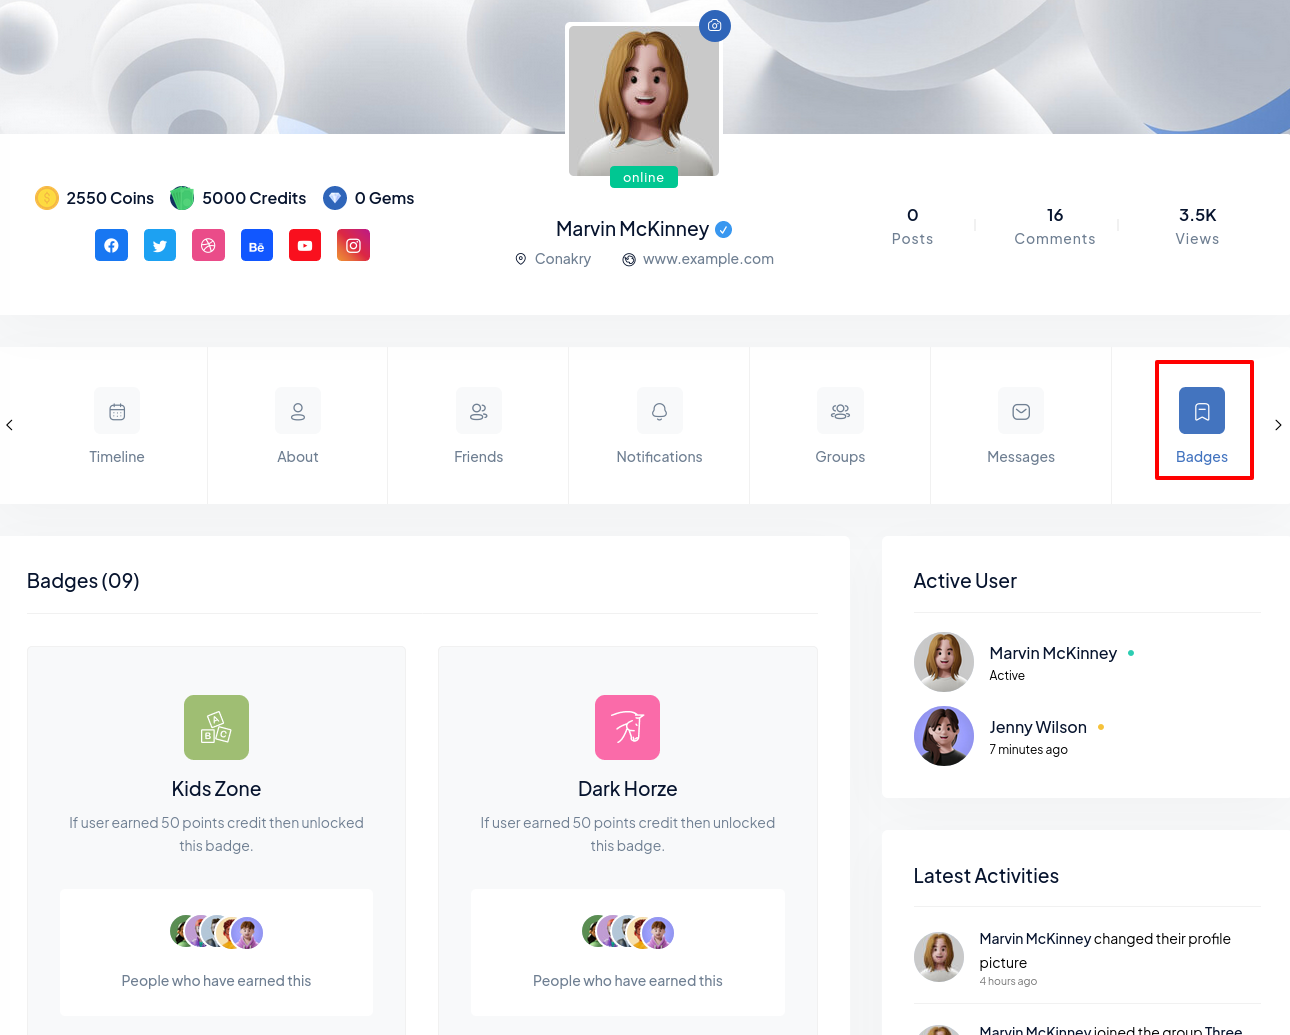
7). Badges
If you wish to set up user accomplishments, Please refer to the graphical approach below, To add the Achievements tab and display the achievements / Badges data on a user’s profile:
Step 1: Create Achievement Type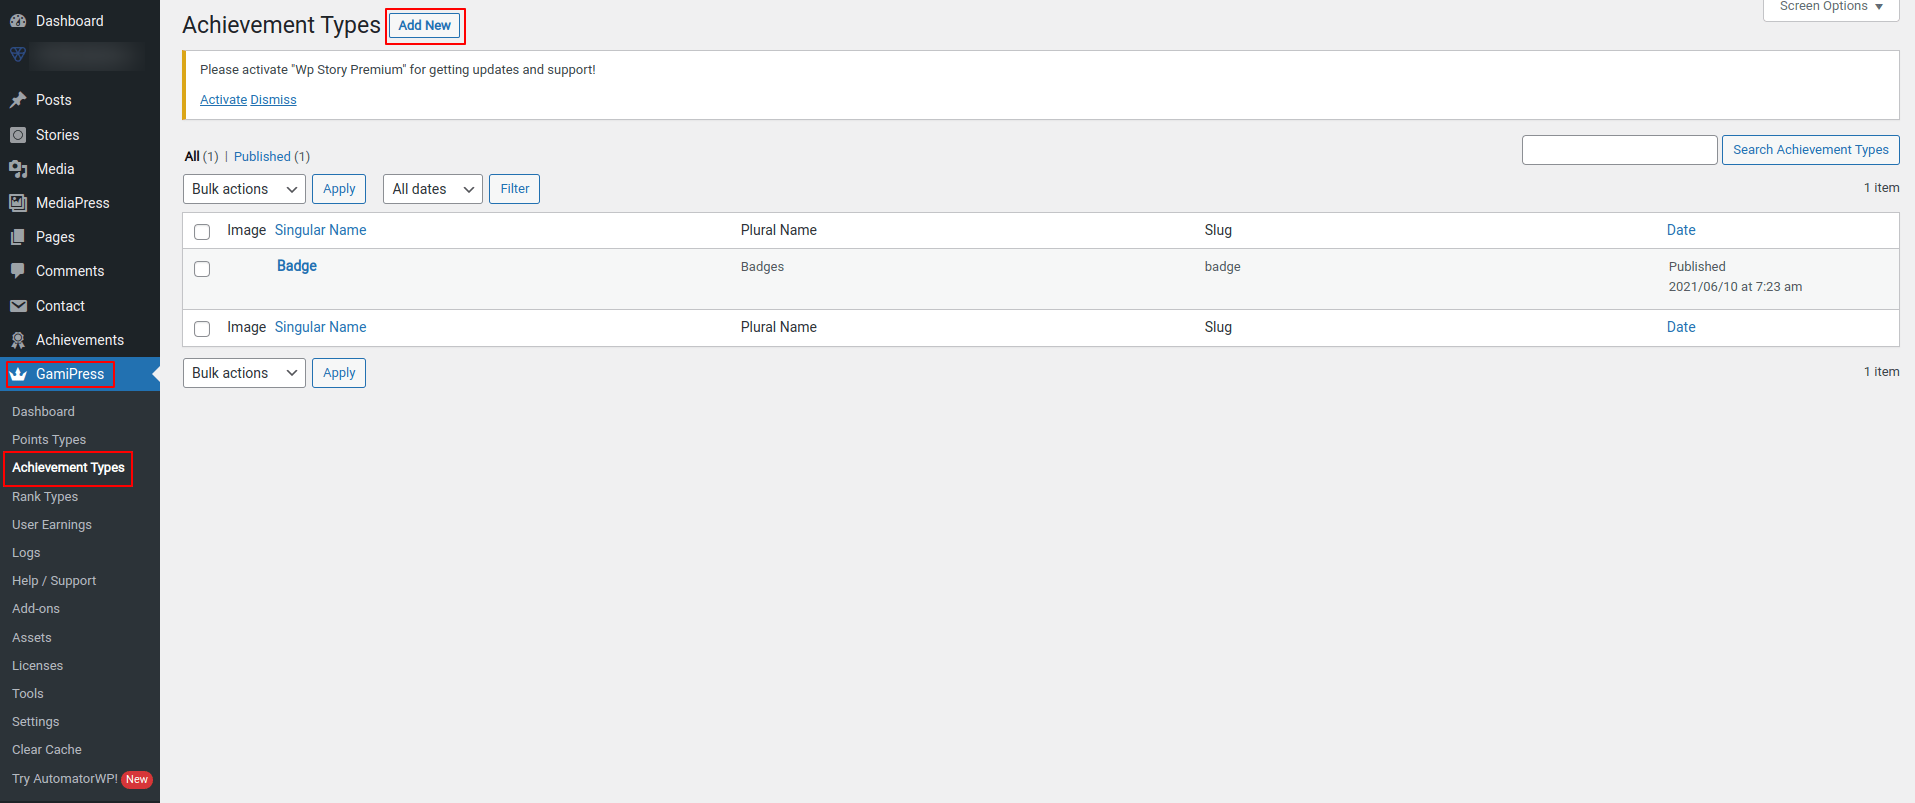 Step 2: Setup Achievement
Type
Step 2: Setup Achievement
Type
 Step 3: Now You Can Create
Badges
Step 3: Now You Can Create
Badges
 Step 4: Set the data of badges
and
select the badge image.
Step 4: Set the data of badges
and
select the badge image.

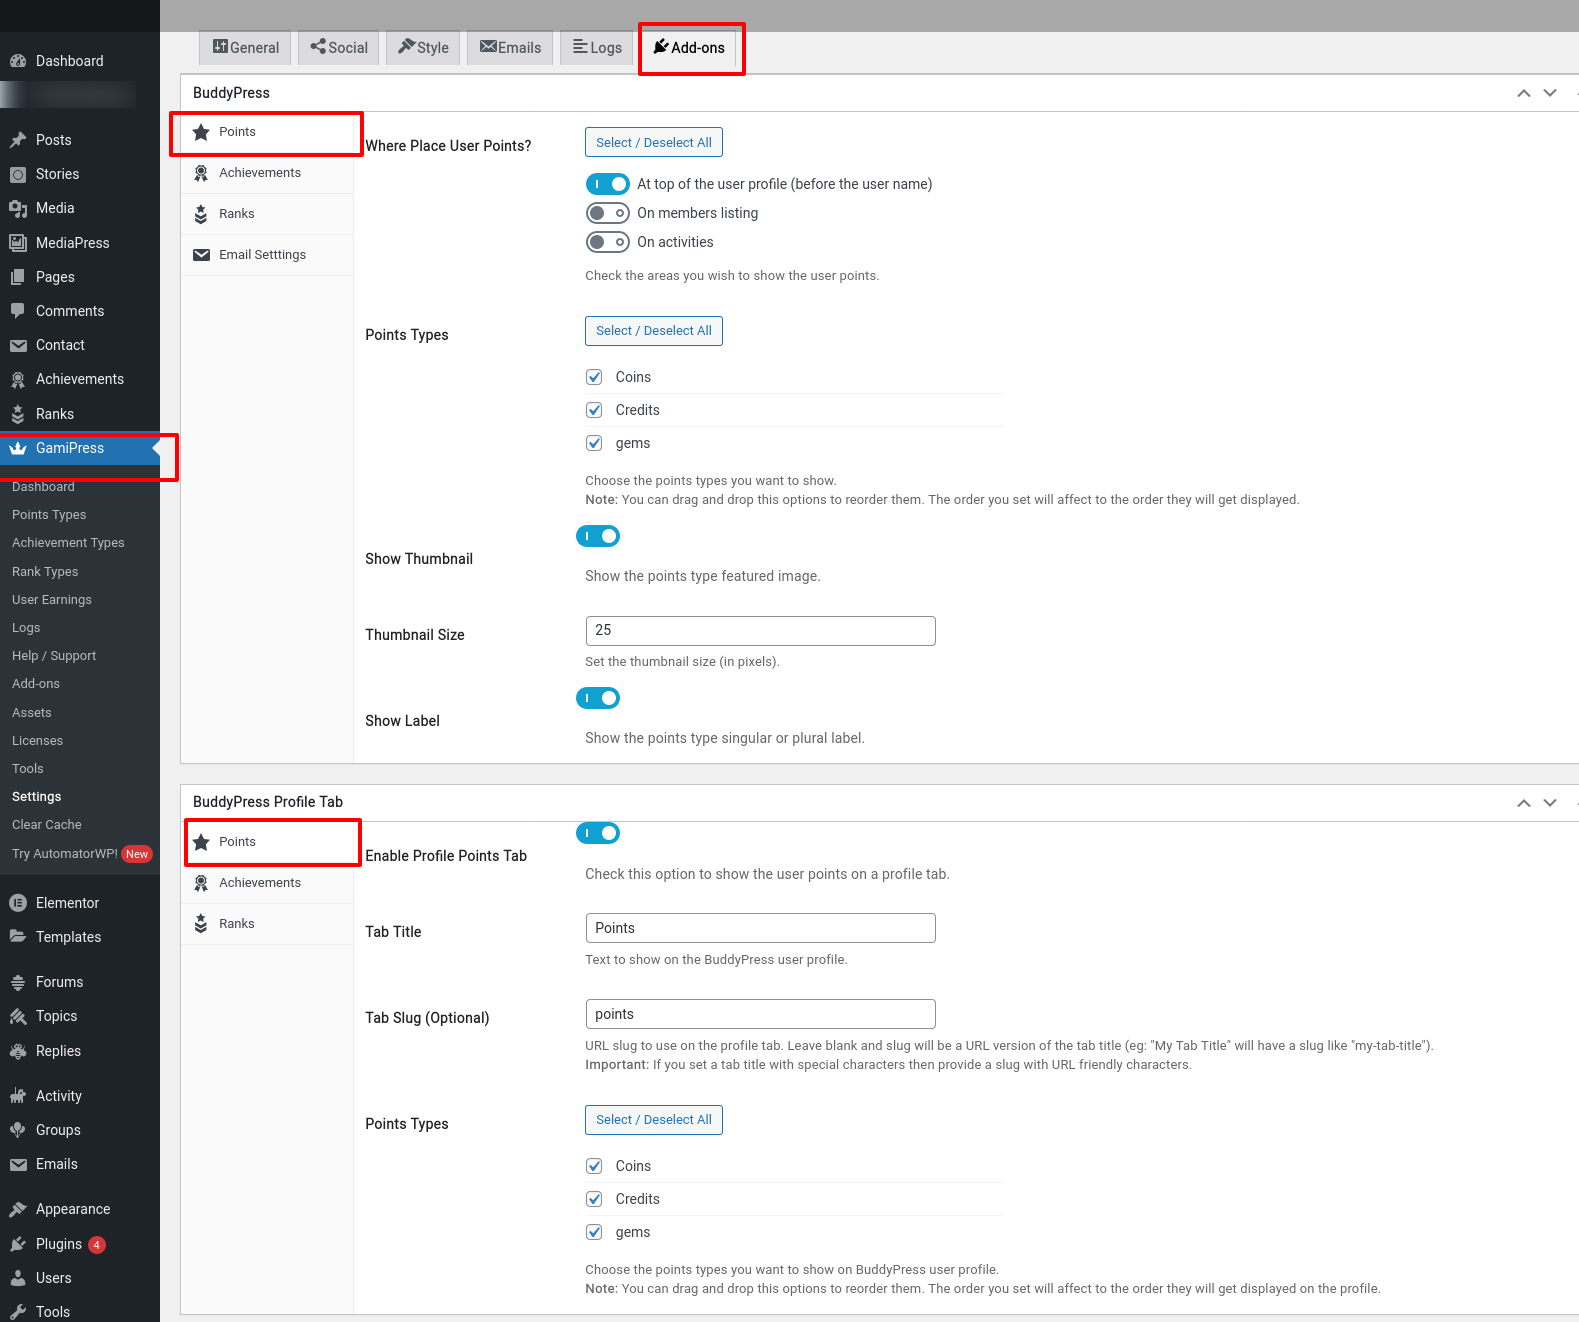
1:Go to WordPress Dashboard > GamiPress > Settings > Add-ons > BuddyPress.
2:In the Achievements tab, select where to place the Achievements on a user’s profile.
3:Make the preferred changes to the settings and then click the Save Settings button.
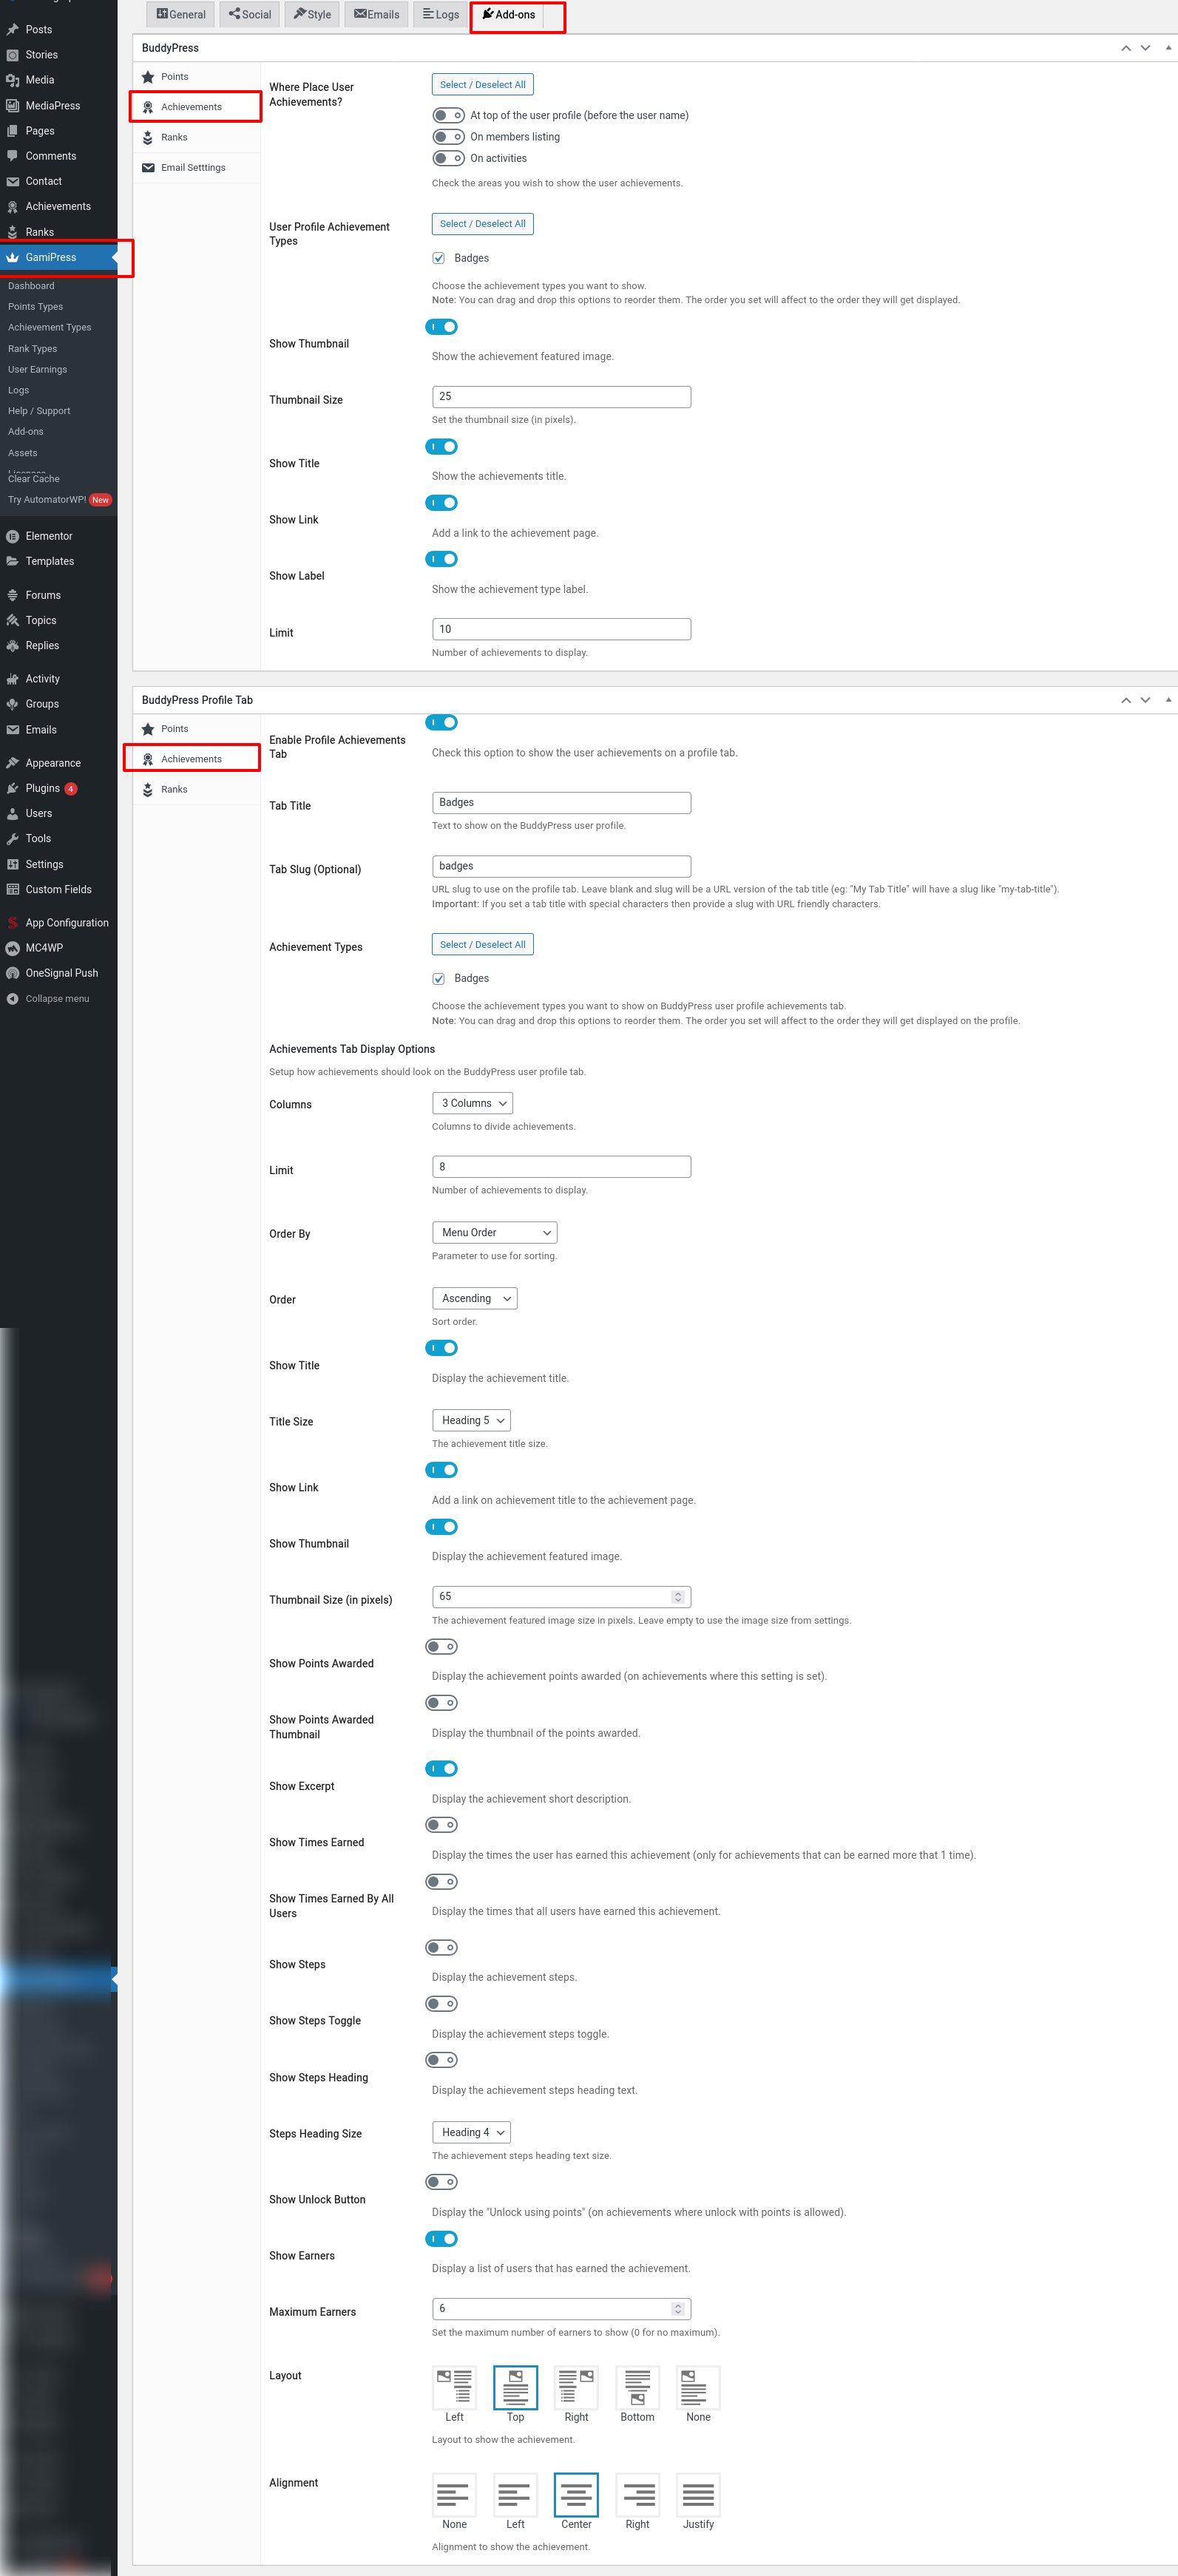 Step 1: Display Achievements on a
user’s profile
Step 1: Display Achievements on a
user’s profile
8). Points
If you wish to set up user accomplishments, Please refer to the graphical approach below, To add the Points tab and display the points data on a user’s profile:.
Step 1: Create Points Type Step 2: Setup Points Type
 Step 3: Displaying Points Tabs
1:Go to WordPress Dashboard > GamiPress > Settings > Add-ons > BuddyPress.
2:In the Points tab, select where to place the points on a user’s profile.
3:Make the preferred changes to the settings and then click the Save Settings button.
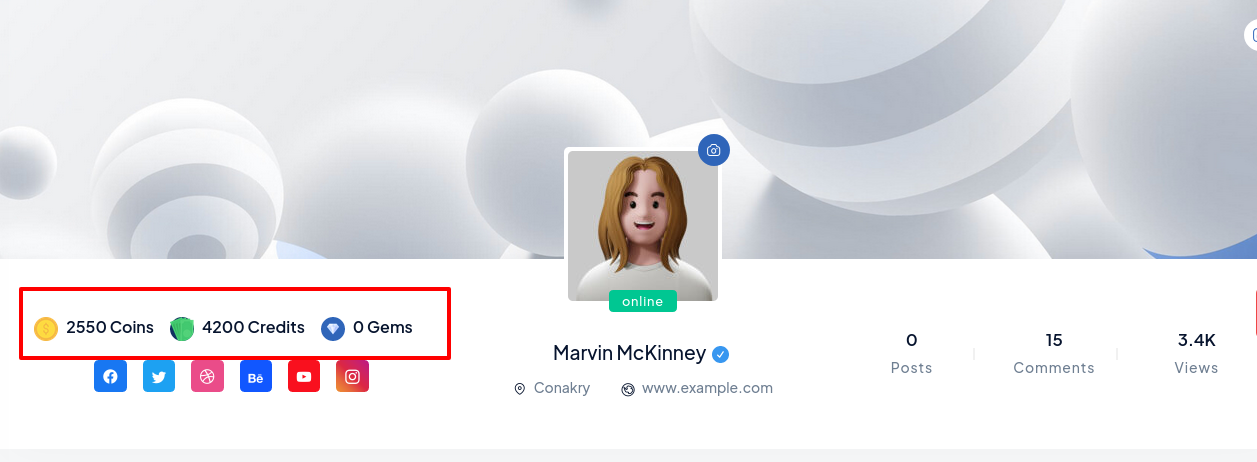
 Step 1: Display Points on a
user’s
profile
Step 1: Display Points on a
user’s
profile
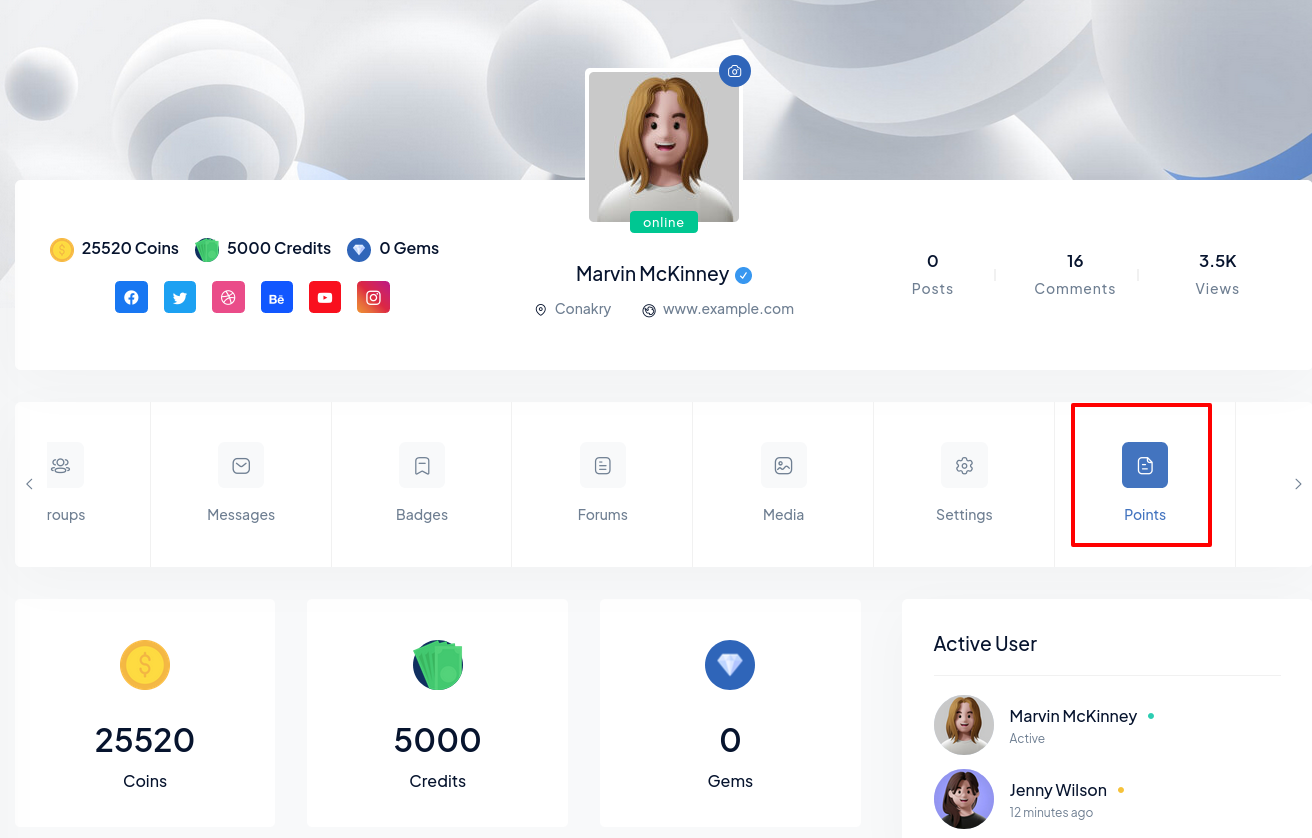
 Step 2: Points tab on a user’s
profile
Step 2: Points tab on a user’s
profile
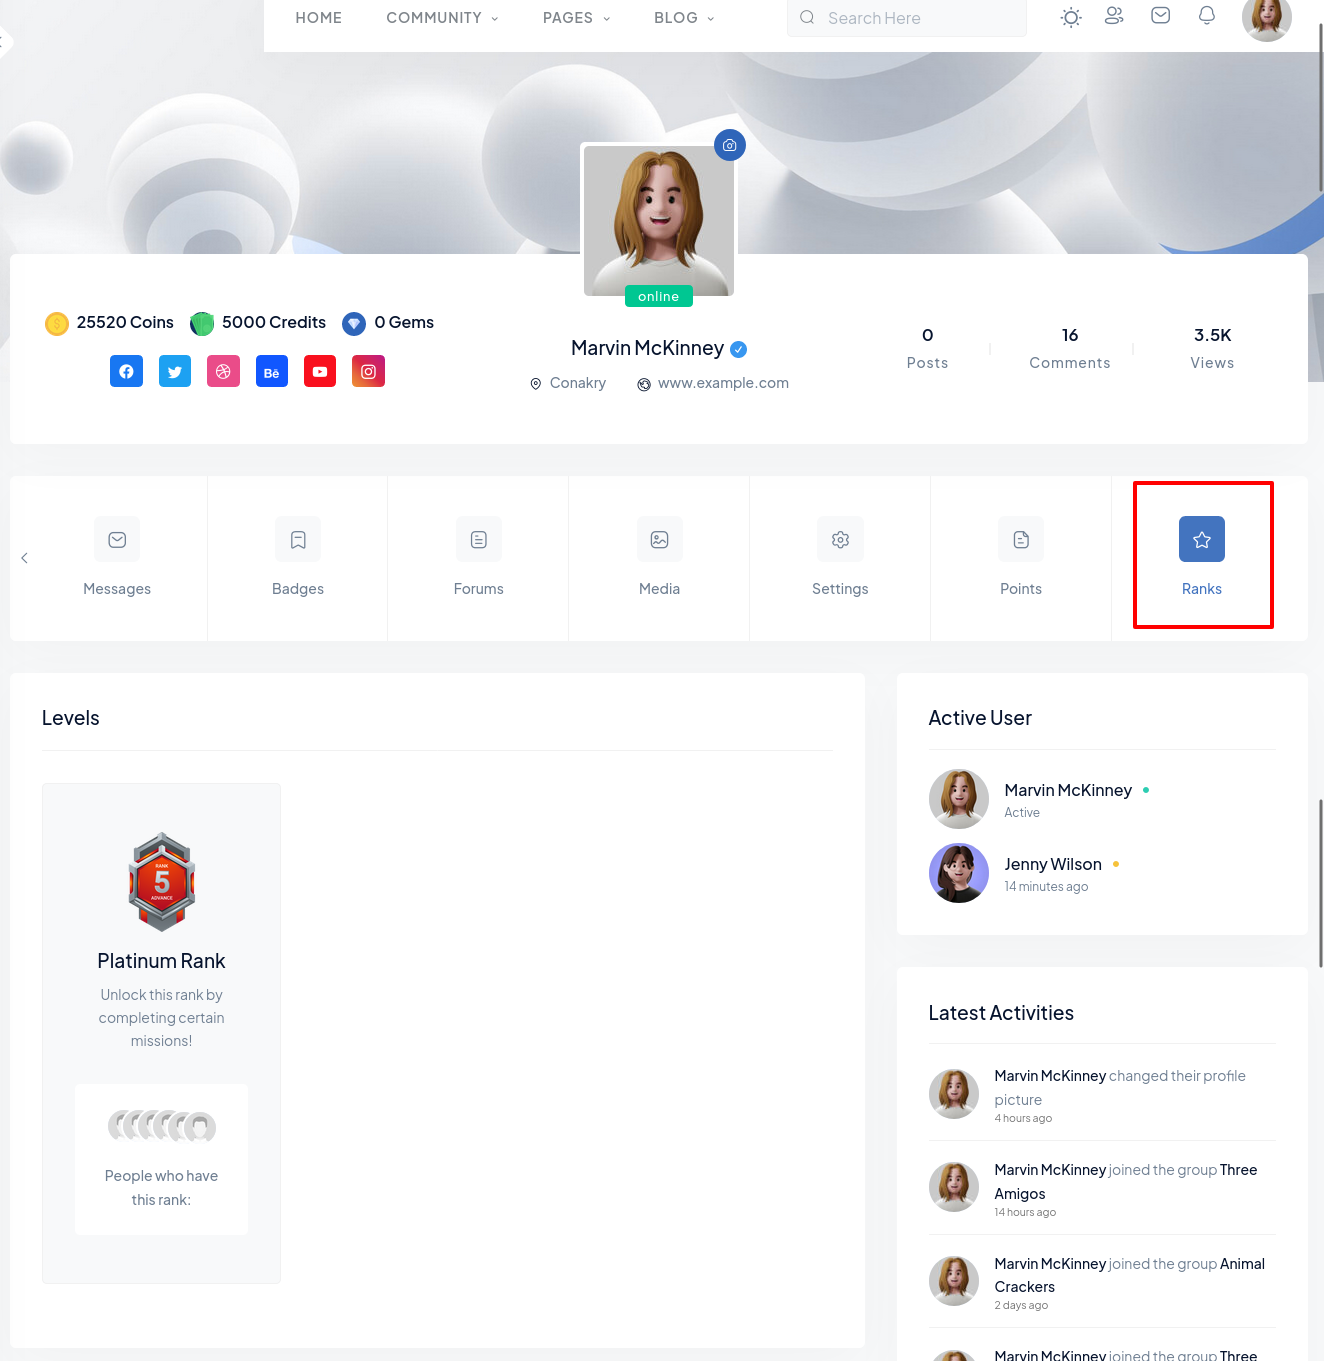
8). Ranks
If you wish to set up user accomplishments, Please refer to the graphical approach below, To add the Ranks tab and display the ranks data on a user’s profile: :.
Step 1: Create Ranks Type1:Go to WordPress Dashboard > GamiPress > Settings > Add-ons > BuddyPress.
2:In the Ranks tab, select where to place the Ranks on a user’s profile.
3:Make the preferred changes to the settings and then click the Save Settings button.
 Ranks tab on a user’s
profile
Ranks tab on a user’s
profile
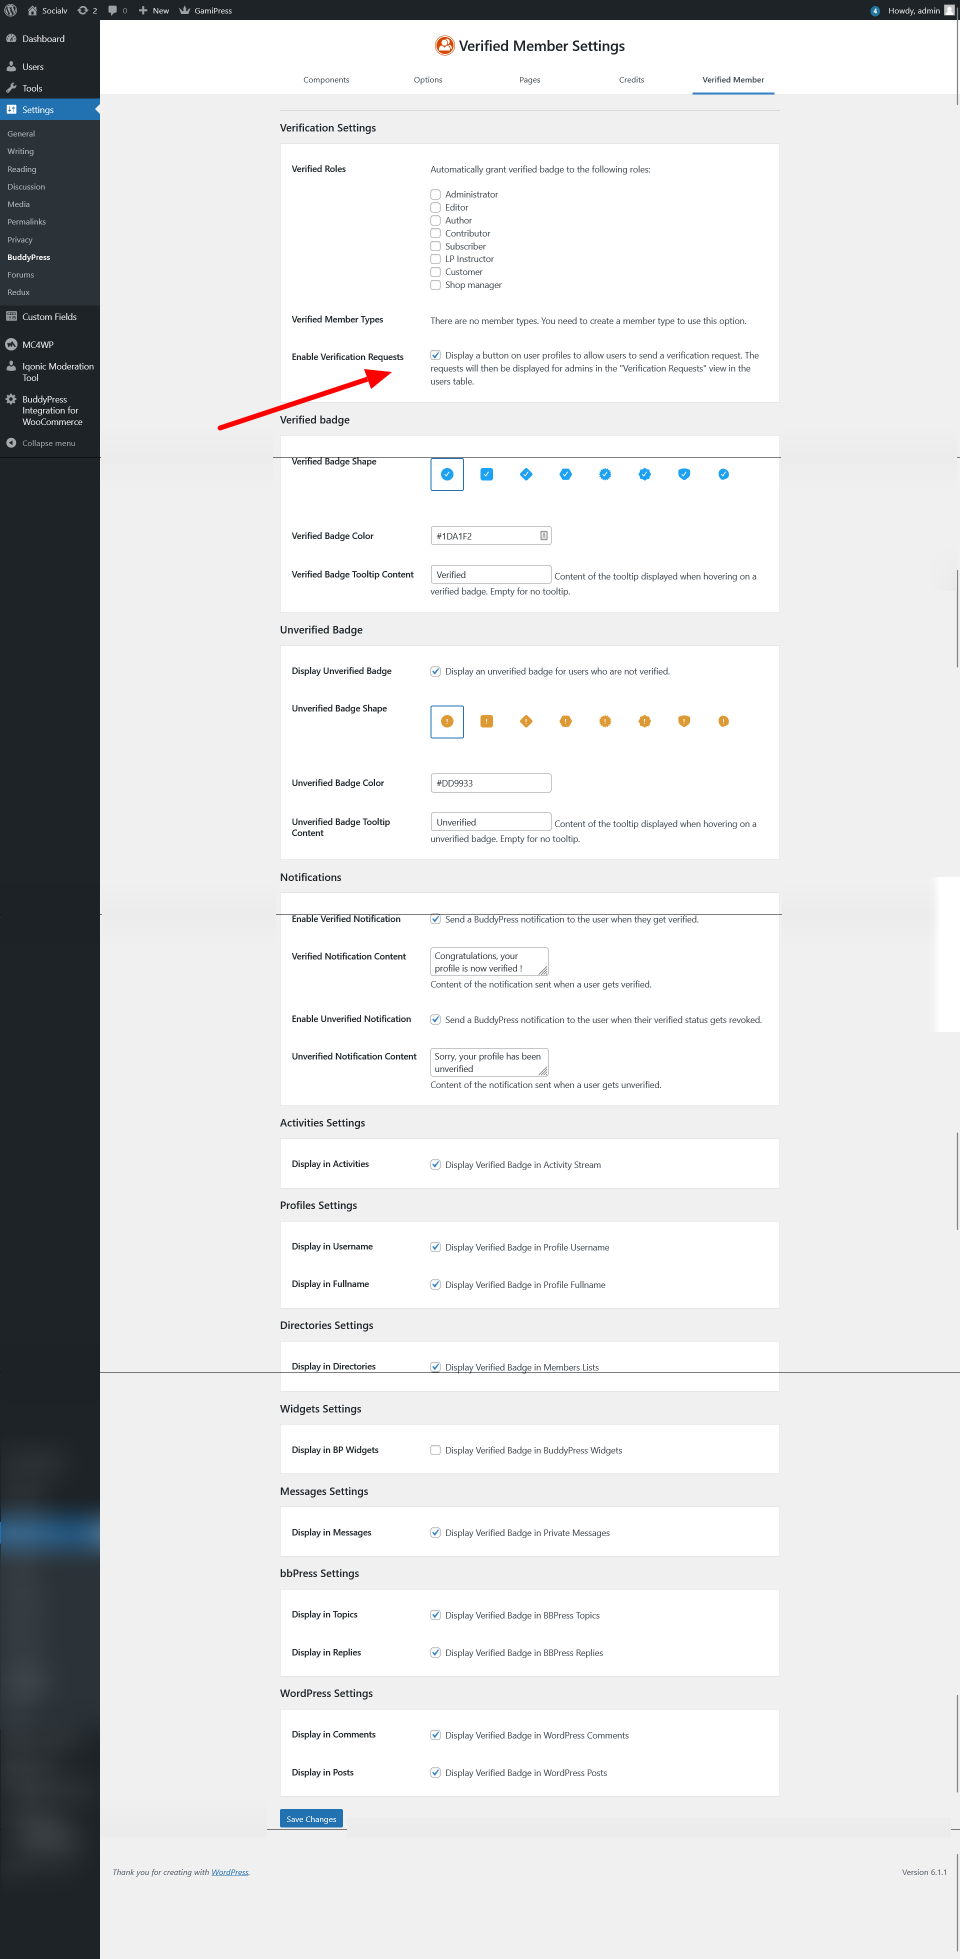
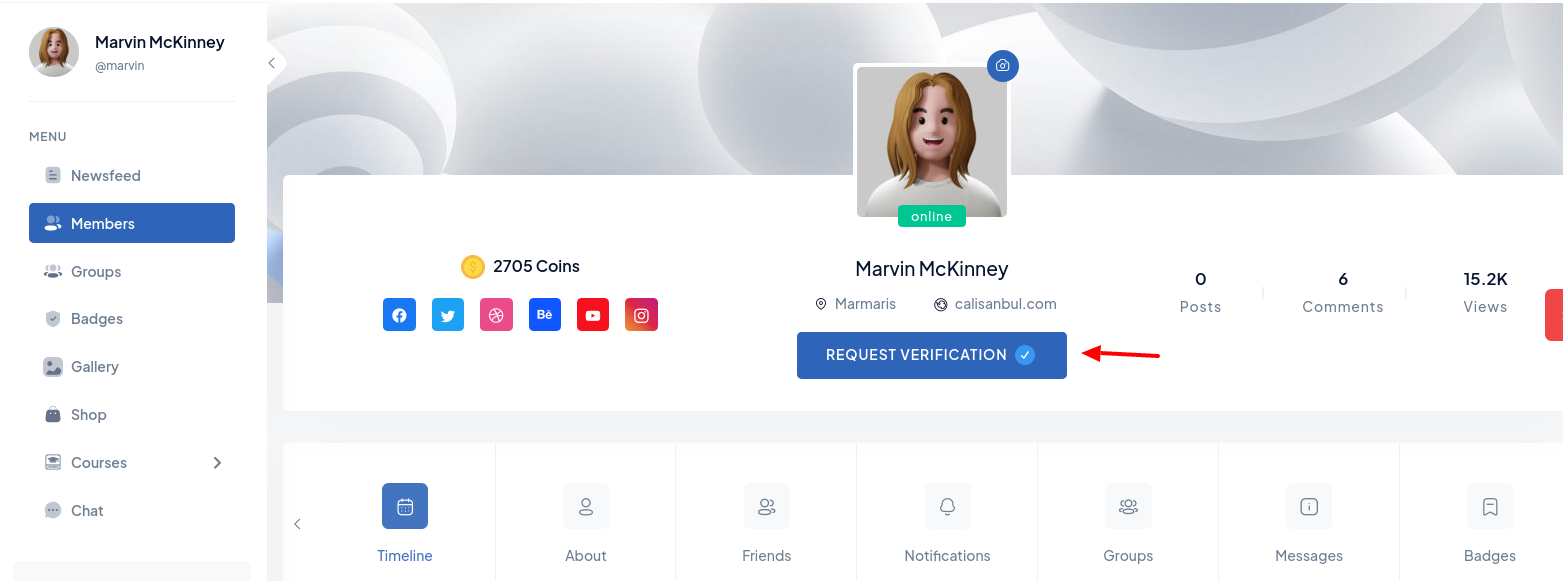
9). Verify Members
Step 1: Displaying Verify Request in user profile1:Go to WordPress Dashboard > Settings > BuddyPress > Verified Member.
2:Mark the checkboxes for the other preferred settings to display the verified request on a user’s profile.
3:Click the Save Changes button to apply the modifications to the settings.
 Request on a user’s
profile
Request on a user’s
profile
Step 2: Displaying Verification Request in administrator
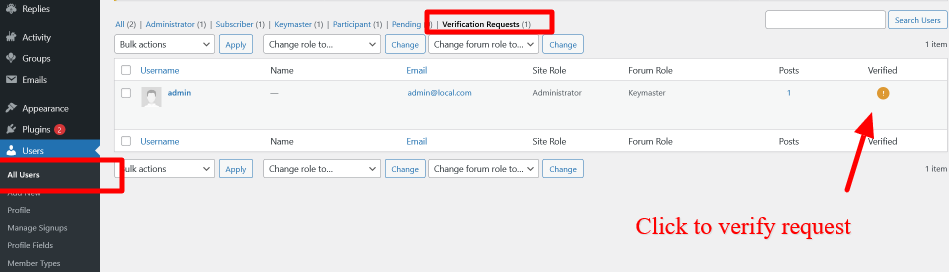
To mark a user as a ‘verified member’, edit a user’s profile as the site administrator and mark the checkbox in the Verify Member meta box. Click the Update Profile button.
Step 3: Showing Verified Member BadgeLearnPress
All settings for socials community website. You can add course, lesson, quiz with edits, customizations and other more settings.
1. Manual Import
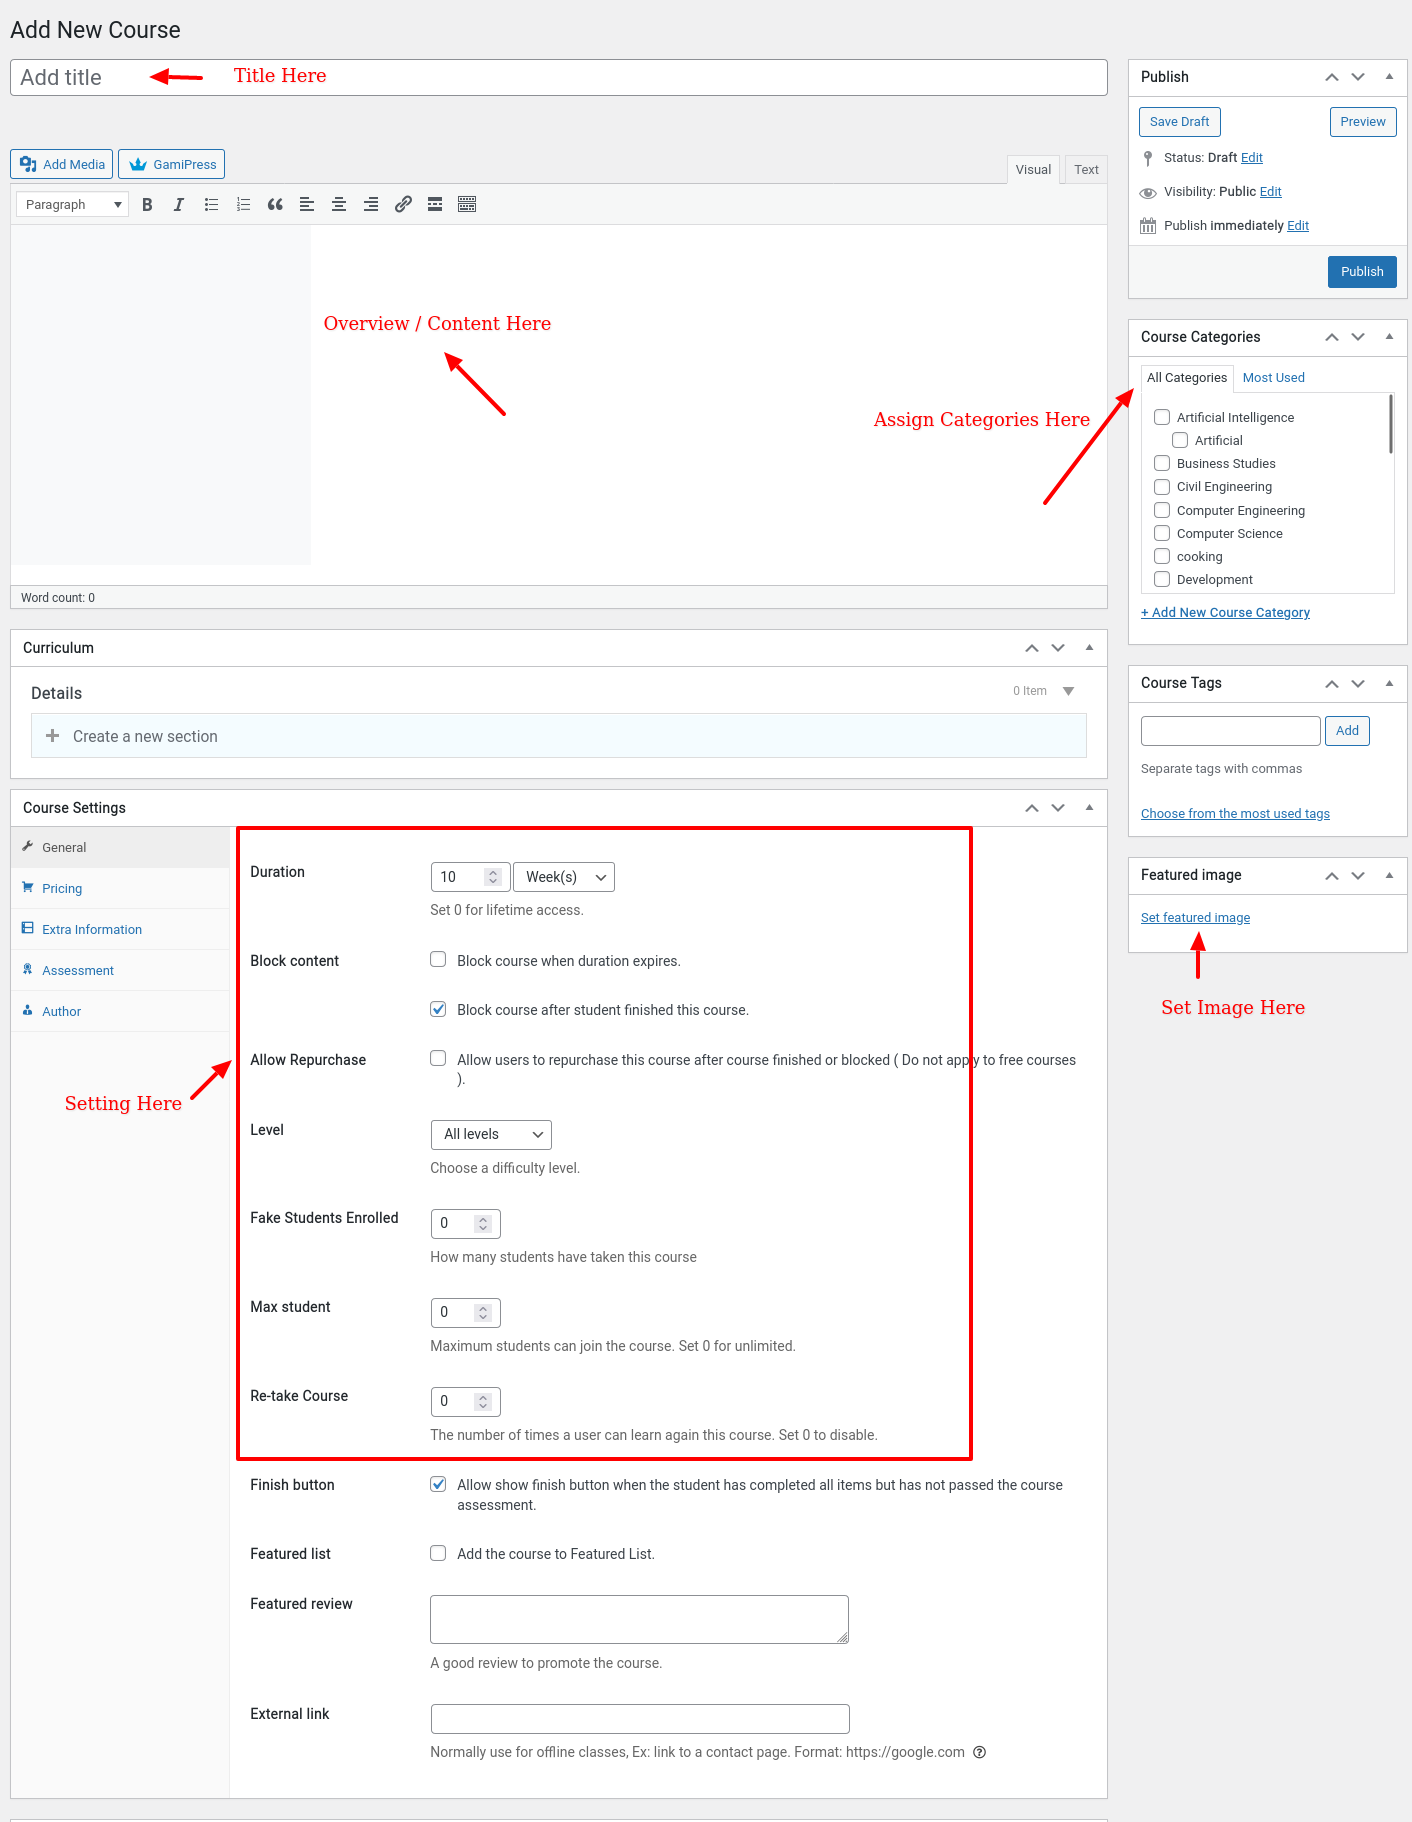
1) Create A Course
To create a course, you can go to your Dashboard -> LearnPress -> Course -> Add New

2) Course Overview
In the Course Overview section, you can set the content for the course, what you wrote will be displayed in the Overview tab on the single course page.
3) Course Curriculum
All the sections, lessons, quizzes of the course will be displayed here.
To create a section here.

To create a lesson here.
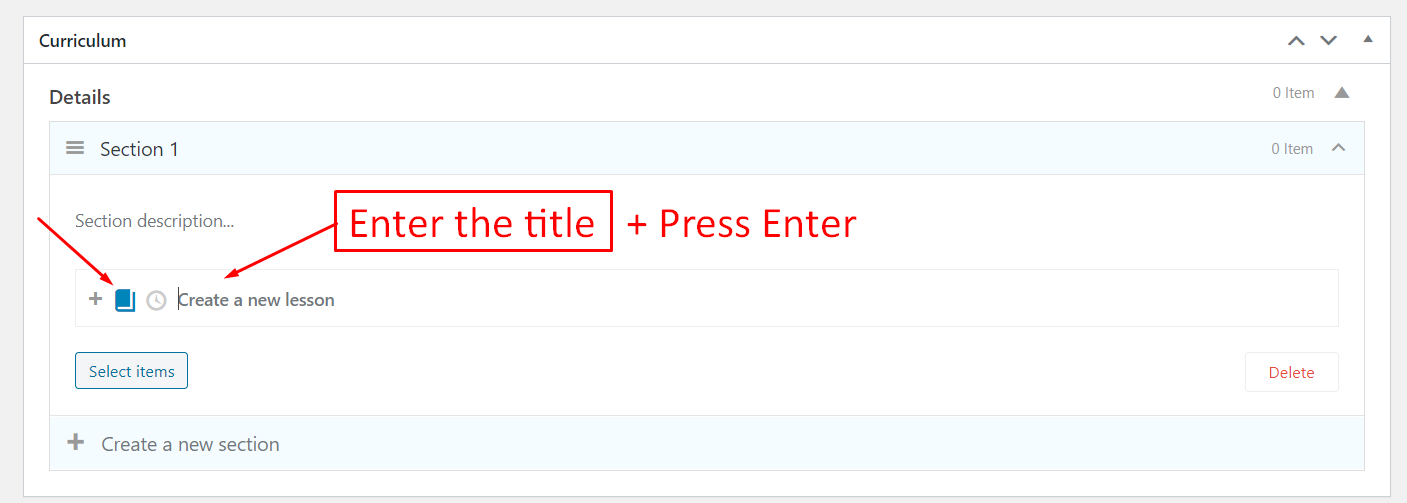
To create a quiz here.
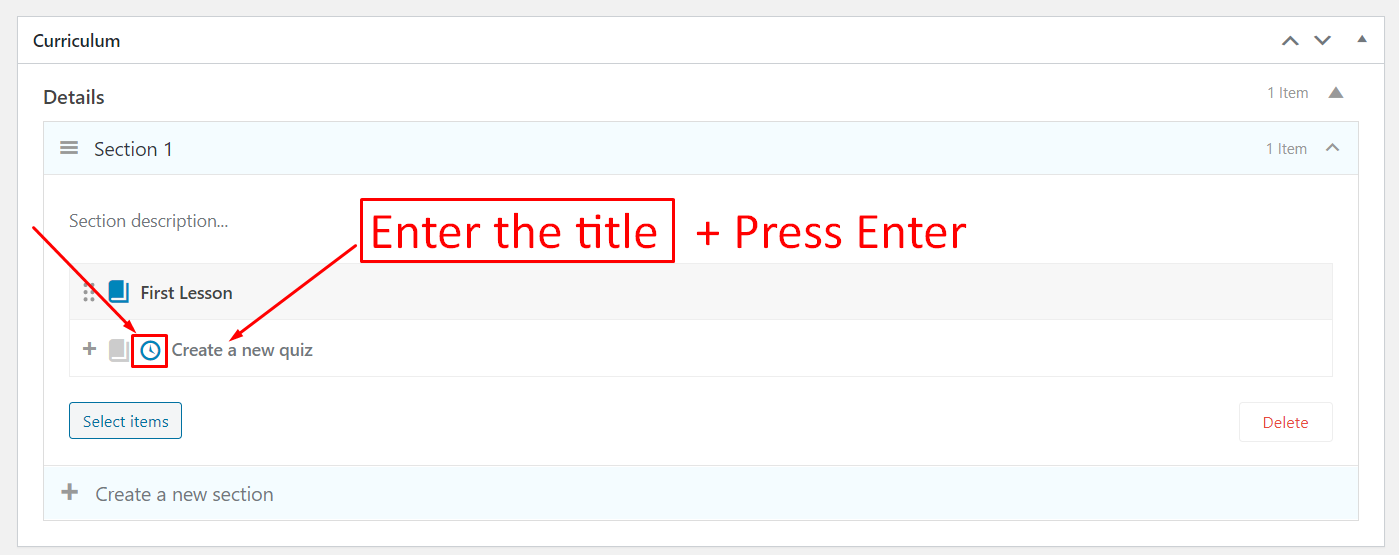
To edit the items in the course here.

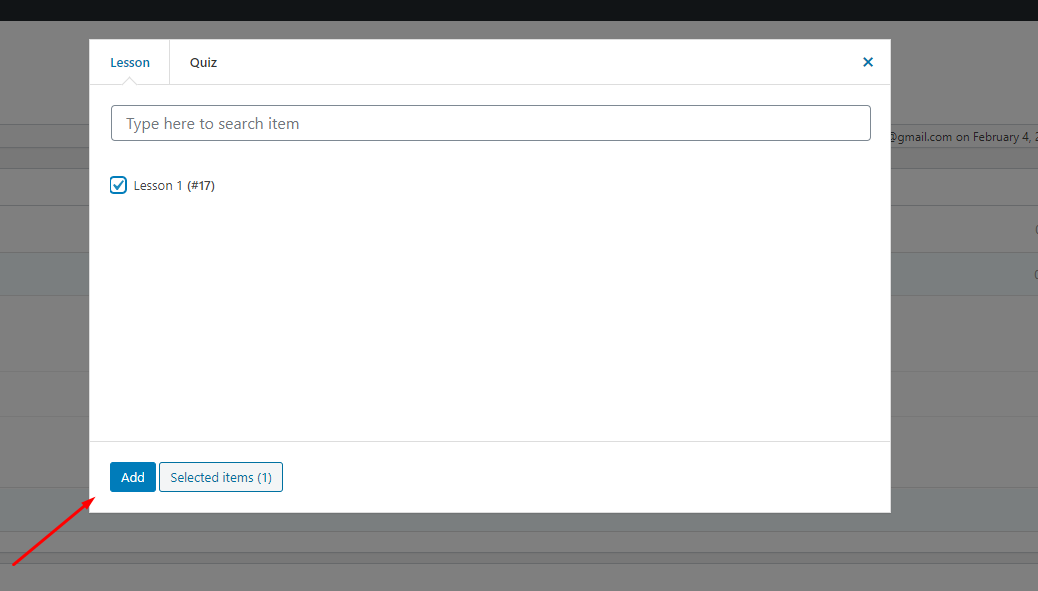
You can click on the “Select items” button to select the items (lessons, quizzes) you want to add to the course.
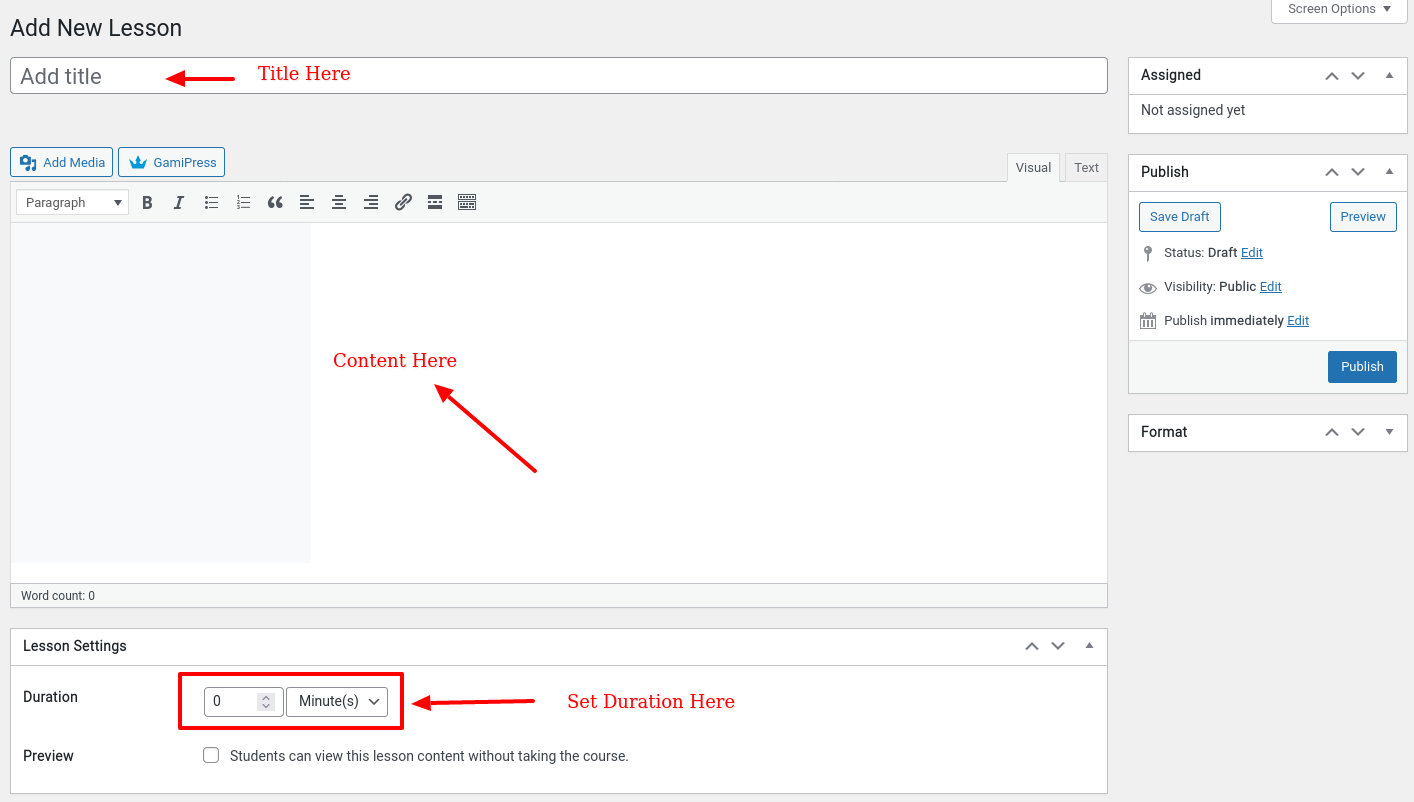
1) Create a new lesson
To create a course, you can go to your Dashboard -> LearnPress -> Lessons -> Add New

1) Create a new quiz
To create a quiz, you can go to your Dashboard -> LearnPress -> Quiz -> Add New


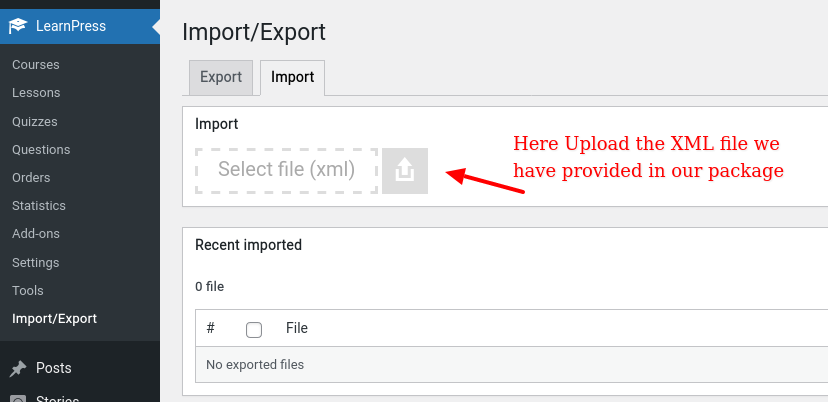
2. Dynamic Import
Step 1 - Login to your WordPress Admin Panel.
Step 2 - Go to Plugin. Click the Add Plugins.
Step 3 - Click on the Search "LearnPress - Export/Import Courses" Plugin and click Install Now.
Step 4 - After the successful installation,click on Activate.

WooCommerce
WooCommerce Settings from here. By Clicking Login to your WordPress Admin Panel > Go to WooCommerce > Settings > Products.

Wp Story Maker
WP Story is a simple and useful plugin where you can create instagram style stories. You can create multiple stories and display them in anywhere. No need to connect Instagram or other platforms. Just create your own stories in WordPress admin dashboard.
For More Information Click on the Link Below
Paid Memberships Pro
Paid Memberships Pro gives you all the tools you need to start, manage, and grow your membership site. Users can select a membership level, complete checkout, and immediately become members of your site. You decide what content your member can access. Members can log in, view payments, update billing info, or cancel their account directly on your site.
For More Information Click on the Link Below
Paid Memberships Pro Addon
There are numerous other addons available with Paid Membership Pro (PMP) that offer additional functionality and features. We recommend exploring these addons to find ones that align with your specific requirements and preferences. These addons can enhance your membership site by providing various capabilities and customization options. Feel free to browse through the available addons and choose the ones that best suit your needs. Here is the link to access the complete list of available addons: Addons List. This page provides detailed information about each addon and its respective functionalities.
1) Pricing Plan Settings
If you want to change/set a new pricing plan layout, follow the steps below:
-
Create a new page, e.g., PMP Pricing Plan.
-
Open the page for editing using Elementor.
-
Add the shortcode "PMP Pricing Plan."
If you can, set the option to auto apply a discount code directly at checkout page check this option Here:

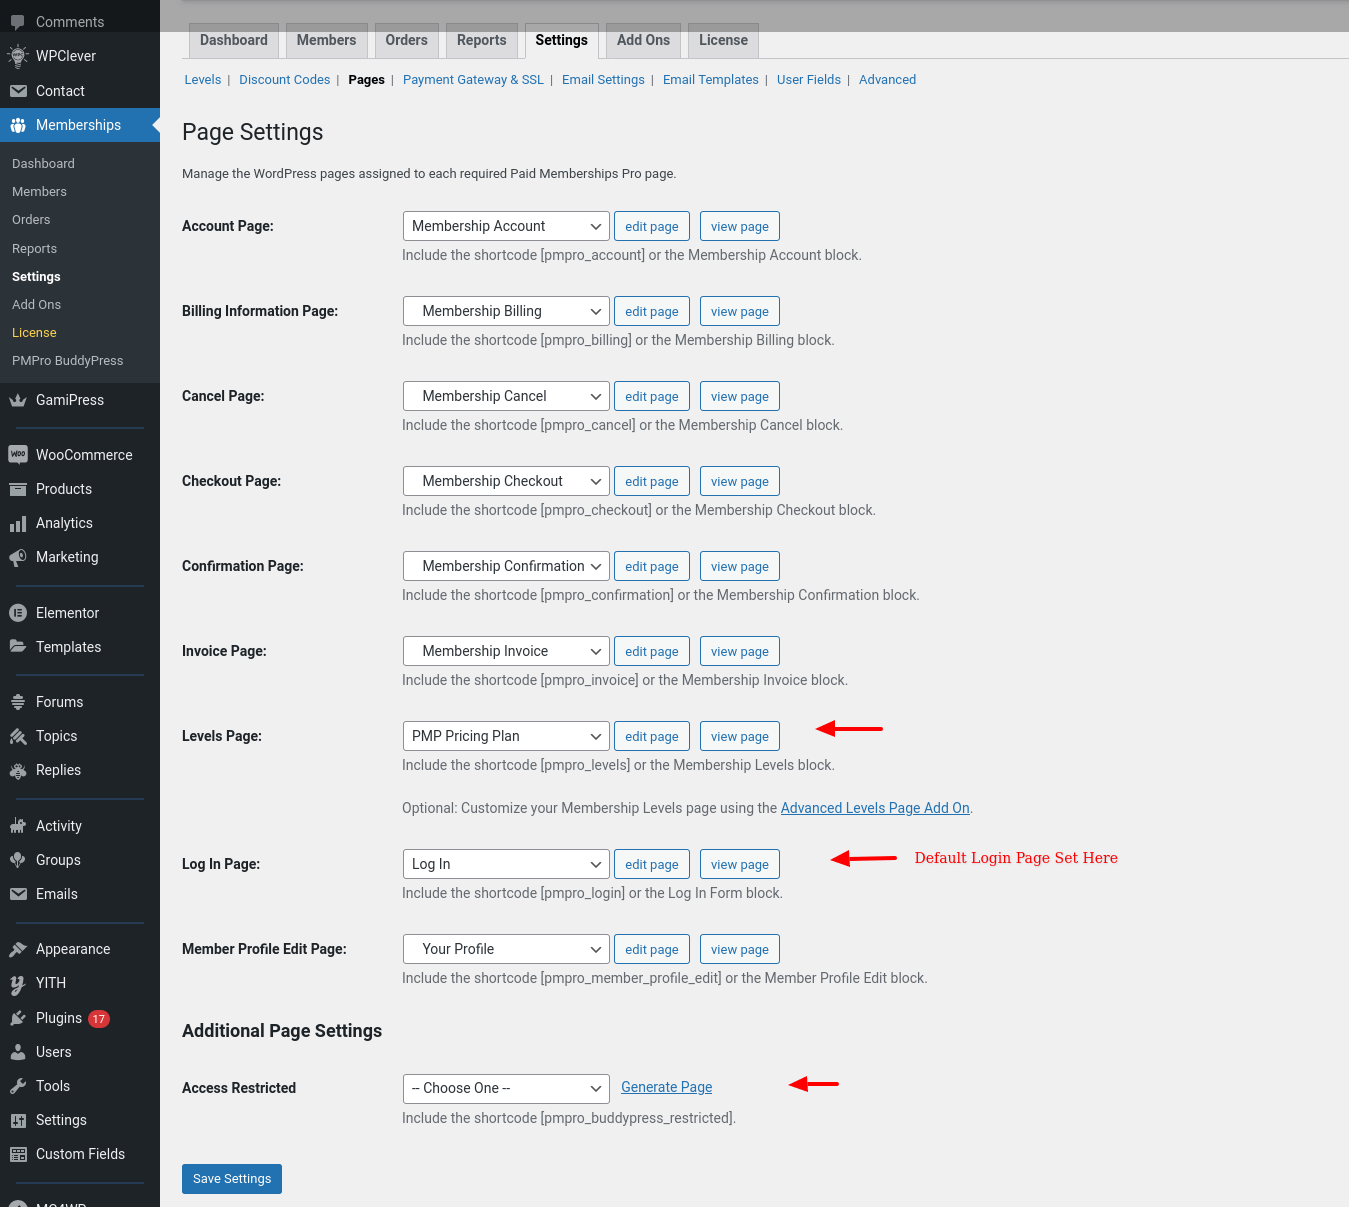
2) Page Settings
If you want to change or set any page settings, follow the steps below:
Sidebars and Widgets
This section shows a list of pre-defined widgets on a page, so that you will find it easier when pulling out widgets to set up your site.
- Blog Sidebar : You can add widgets here to appear in your sidebar on blog posts and archive pages.
- Footer Area 1 : This Widget Position will be shown in first footer area as first widget position.
- Footer Area 2 : This Widget Position will be shown in second footer area as second widget position.
- Footer Area 3 : This Widget Position will be shown in third footer area as third widget position.
- Footer Area 4 : This Widget Position will be shown in fourth footer area as fourth widget position.
- Footer Area 5 : This Widget Position will be shown in fourth footer area as fifth widget position.
- Main Sidebar : This Widget Position will be shown in all buddypress default pages side area.
- Group Sidebar : This Widget Position will be shown in all buddypress group detail page side area.
- Product Sidebar : This Widget Position will be shown in all woocommerce pages side area.
- All Courses Sidebar : This Widget Position will be shown in all LeanrPress pages side area.
- Sidebar Area : This Widget Position will be shown in header sidebar toggle panel in every buddypress page.

Translation
There are no ready language files, but you need to take only a few steps to translate your website to the needed language. You can translate the theme to any language, as well as RTL Language.
The first step you should take is create your own language file. To implement this you should install Poedit:
www.poedit.netCopy SocialV.pot file to your computer.
Note: You will find the language pot file in wp-content/themes/SocialV/languages.
Translate your website
Do you want to translate your WordPress site? You just need to follow few steps to get started. You can translate the theme to any language, as well as RTL Language.
Start by installing Poedit.
- Set your WordPress for the language so the admin section will be in your language
- Create language PO file for translation
- Modify the PO file using POEdit software and translate all strings in it. This will also generate MO file which is used by WordPress
Change Log
-
Version 2.1.6 - Apr 20, 2026
- [Fixed] - Resolved BuddyPress menu bug.
-
Version 2.1.5 - April 15, 2026
- [Compatibility] - Compatible with WooCommerce (v10.7.0).
- [Compatibility] - Compatible with LearnPress (v4.3.5).
- [Improved] - Enhanced the UI of the courses page.
- [Updated] - Included BuddyPress pages in demo import.
- [Fixed] - Resolved minor bugs.
-
Version 2.1.4 - Feb 21, 2026
- [New] - Introduced the new SocialV Toolkit plugin with a Post Scheduling feature, allowing users to schedule activity posts.
- [Updated] - Updated WooCommerce template files to the latest version for improved compatibility.
- [Compatibility] - Ensured compatibility with the latest version of LearnPress.
- [Fixed] - Resolved activity reaction-related bugs for improved performance and accuracy.
- [Improved] - Minor performance enhancements and stability improvements.
- [Fixed] - Addressed minor bugs and UI refinements.
-
Version 2.1.3 - Dec 20 2025
- [New] - Activity post edit feature added; users can now edit their activity posts.
- [New] - Comment edit feature added; users can now edit their comments.
- [Updated] - Improved highlight story feature to allow users to select highlight stories from their main stories.
- [Fixed] - Add to Wishlist button display issue resolved.
- [Fixed] - Block list button functionality issue resolved.
- [Updated] - Updated WooCommerce template files to the latest version for improved compatibility.
- [Compatibility] - Compatible with LearnPress (v4.3.2.2).
- [Compatibility] - Compatible with WooCommerce (v10.4.2).
- [Fixed] - Addressed minor bugs.
-
Version 2.1.2 - July 28 2025
- [Updated] Updated WooCommerce template files to latest version for compatibility with WooCommerce 10.0.4
- [Updated] Compatibility updates for LearnPress (v 4.2.8.7.4 )
-
Version 2.1.1 - Jun 28 2025
- [Updated] - Compatible with WooCommerce v9.9.5, LearnPress v4.2.8.7.2, and bbPress v2.6.13.
- [FIXED] - 404 error on dismissing friend and group suggestions.
- [FIXED] - Like button showing [object Object] error.
- [FIXED] - Friend request error on profile page.
-
Version 2.1.0 - may 2 2025
- [New] - Category Restriction Options.
- [New] - Advanced Google reCAPTCHA plugin compatible for security.
- [Updated] - Compatibility updates for Wordpress (v 6.8.1 ).
- [Updated] - Compatibility updates for WooCommerce (v 9.8.2 ).
- [Updated] - Compatibility updates for LearnPress (v 4.2.8.3 ).
- [FIXED] - Blog slider issue solved.
- [FIXED] - Addressed minor bugs.
-
Version 2.0.17 - March 21 2025
- [Updated] - Compatibility updates for WooCommerce (v9.7.1)
- [Updated] - Compatibility updates for LearnPress (v4.2.8.1)
- [FIXED] - Addressed minor bugs.
-
Version 2.0.16 - Jan 30 2025
- [Updated] - Compatibility updates for WooCommerce (v9.6.0)
- [FIXED] - Resolved security-related issues.
- [FIXED] - Addressed minor bugs.
-
Version 2.0.15 - Jan 06 2025
- [Updated] - Compatibility updates for: WooCommerce (v9.5.1) , Elementor (v3.26.3)
- [FIXED] - Addressed minor bugs.
-
Version 2.0.14 - Nov 13 2024
- [Updated] - Compatibility updates for: Wordpress (v6.7) , WooCommerce (v9.4.1)
-
Version 2.0.13 - Nov 13 2024
- [New] - Added option to stop activity action for "Group Action".
- [Updated] - Compatibility updates for BuddyPress (v14.2.1) , WooCommerce (v9.3.3) , Paid Memberships Pro (v3.3.1) , BBPress (v2.6.7)
- [Fixed] - Resolved minor bugs.
-
Version 2.0.12 - Oct 22 2024
- [Updated] - Updated outdated WooCommerce templates.
- [Fixed] - Minor bugs.
- [Compatibility] - Compatible with BuddyPress latest version.
- [Fixed] - Escapation issue.
-
Version 2.0.11 - Sep 28 2024
- [Fixed] Updated WooCommerce templates.
- [Fixed] Updated LearnPress templates to the latest version.
- [FIXED] Improved design of activity comments.
- [FIXED] Addressed minor bugs.
-
Version 2.0.10 - July 13 2024
- [New] - Reshare activity, also allowing you to add your own content.
- [Improvement] - Activity Posts open in popup with loading skeleton.
- [Compatibility] - Supports new Group Type feature of BuddyPress.
- [Updated] - compatible with the latest versions of WooCommerce (9.1.2), Paid Memberships Pro (3.0.6) and BBpress (2.6.7) .
- [Updated] Upgraded FontAwesome library.
- [Fixed] - Minor bugs.
-
Version 2.0.9 - May 20 2024
- [Compatibility] - compatible with BuddyPress 12.5.0.
- [Fixed] - Escapation issue.
- [Fixed] - Minor bugs.
-
Version 2.0.8 - Apr 22 2024
- [New] - Installation Wizard for Enhanced and Expedited Onboarding Experience.
- [New] - Option to modify the color of the comment form the dashboard.
- [New] - Copying Activity URLs within the platform.
- [Update] - Enhanced user interface for displaying comments, now view additional comments in a pop-up.
- [Update] - Improved reaction design for better visual appeal and user engagement.
- [Update] - Optimized Code for Improved Platform Efficiency and Performance.
- [Fixed] - Streamlined reaction list retrieval upon plugin activation.
- [Fixed] - Resolve sidebar panel issue in mobile view.
- [Fixed] - Fixed breadcrumb inconsistencies between Gamipress and forum sections.
- [Fixed] - Rectified friend suggestion functionality for smoother user interactions.
-
Version 2.0.7 - Feb 10 2024
- [New] - Button for re-sending the verification email key.
- [New] - Introducing a new button for reading all notifications.
- [New] - Stop Activity Action ['Register New user','Change User Avatar / Cover Image'].
- [Update] - Separate Pin Functionality ("Activity , Group, Profile Actions").
- [Compatibility] - WordPress Latest Version (6.4.3).
- [Compatibility] - BuddyPress Latest Version (12.2.0).
- [Compatibility] - LearnPress Latest Version ( 4.2.6).
- [Fixed] - Minor bug fixes.
-
Version 2.0.6 - Jan 18 2024
- [Update] - Buddypress new version (12.1.1) compatible.
- [Fixed] - Some bug fixed.
-
Version 2.0.5 - Jan 10 2024
- [Update] - Buddypress new version (12.0.0) compatible.
- [Update] - Better messages new version (2.4.6) compatible.
- [Update] - WP premiume story new version (3.5.0) compatible.
- [Update] - LearnPress new version (4.2.5.8 ) compatible.
- [New] - Logo Text color "Dark/Light"option.
- [New] - Registration method on default registration page : Auto / Manually / Verification Key.
- [New] - Share activity on telegrame option.
- [New] - Show Password ICON.
- [Fixed] - sidebar in mobile.
- [Fixed] - Other bug fixed.
-
Version 2.0.4 - Nov 15 2023
- [Improvement] - Code Optimization
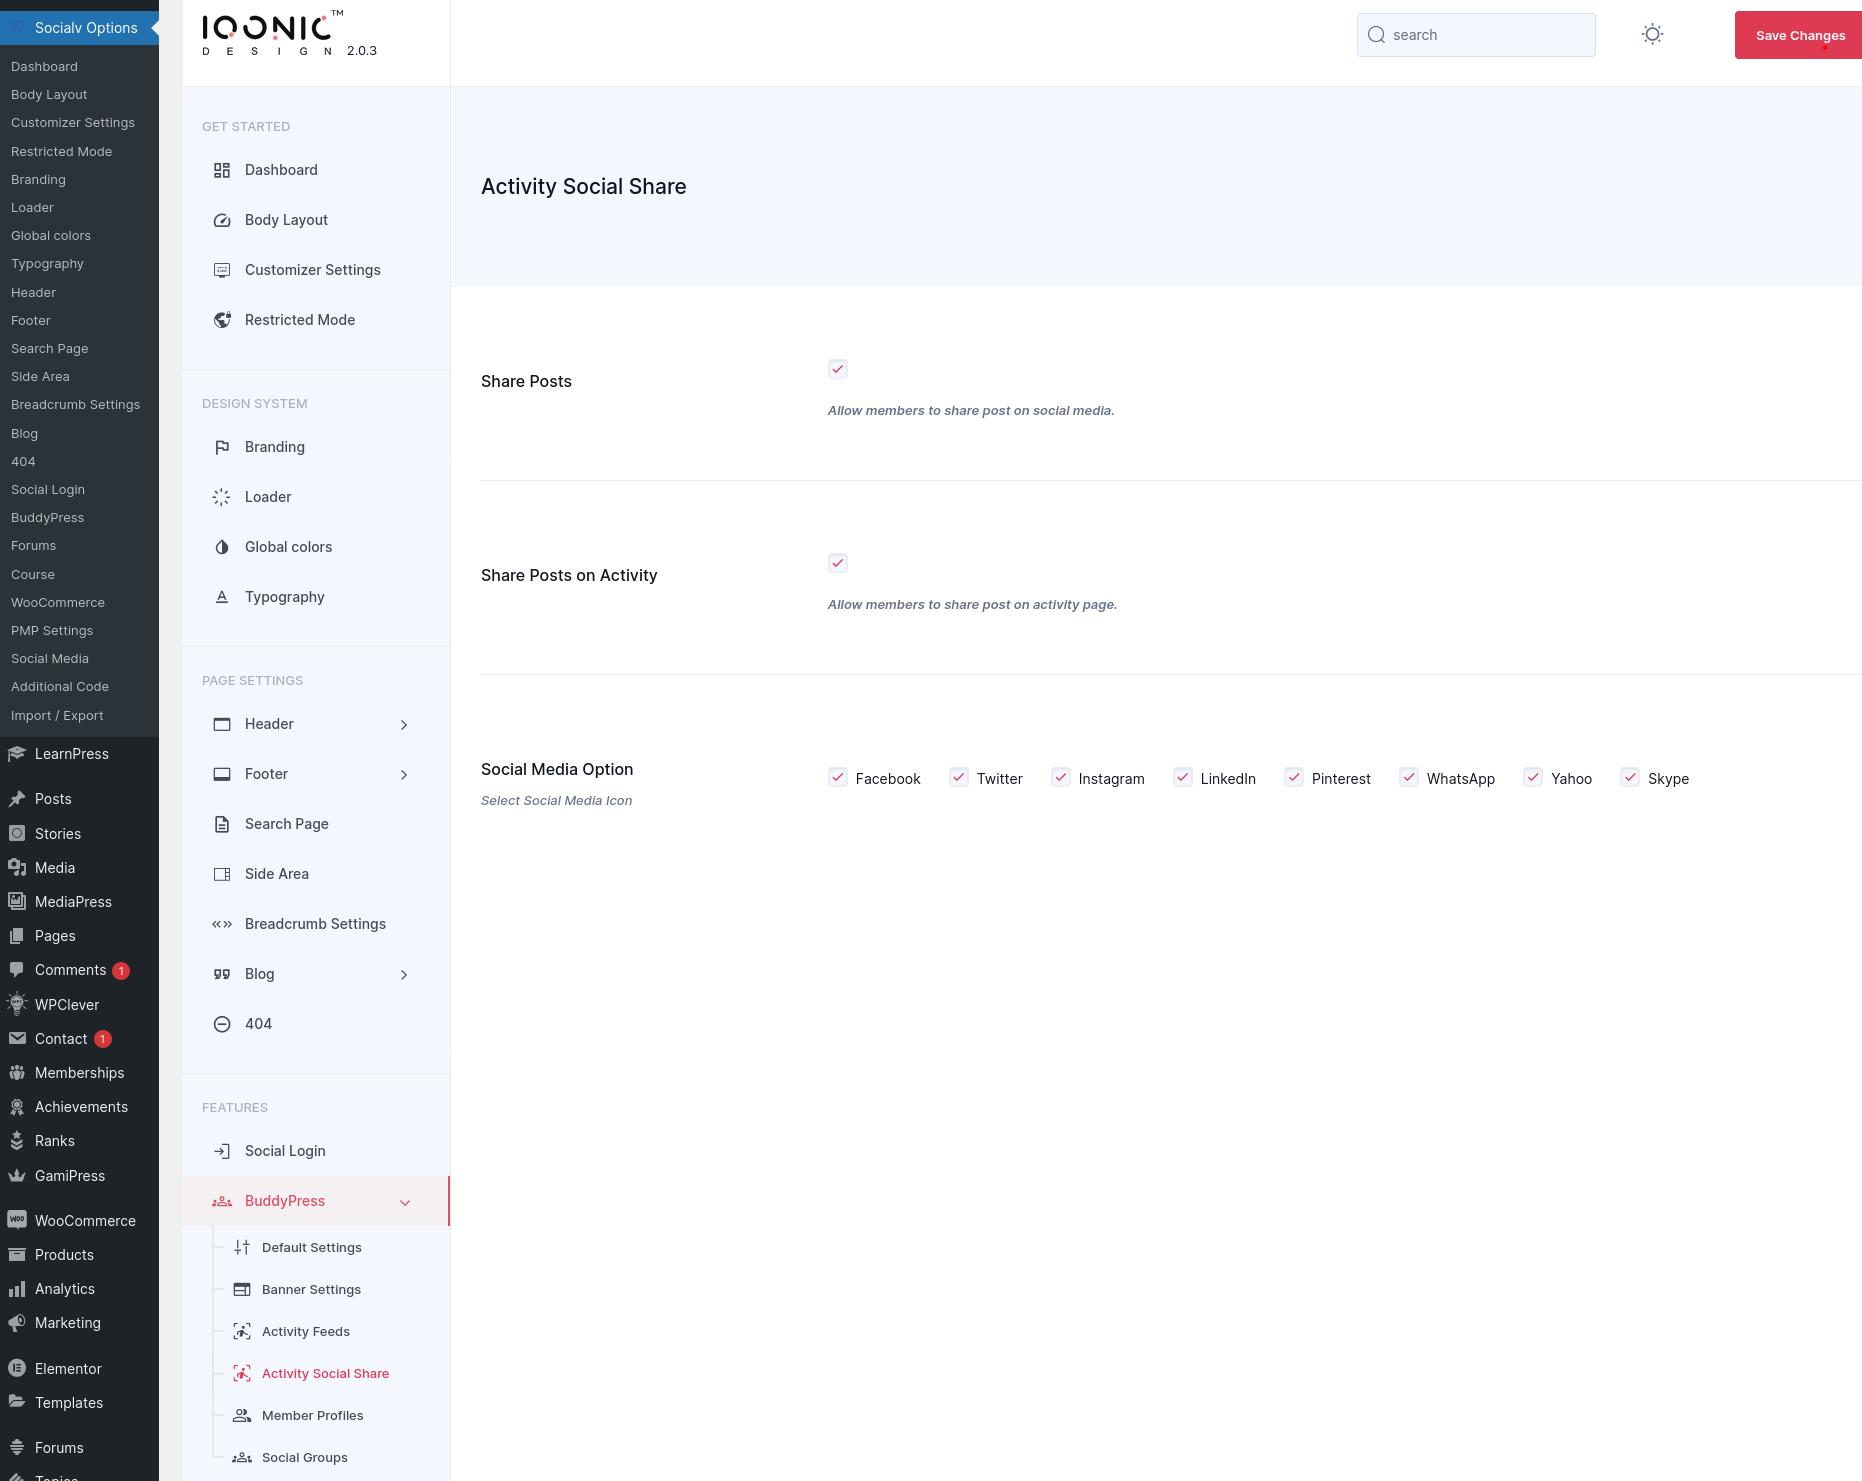
- [New] - Compatible with the BuddyPress Activity Social Share plugin.
- [New] - Groups Page: Enable or disable grid and list views on the frontend group page through options in the Redux panel.
- [New] - Search: Redux panel now includes post-specific search options.
- [Added] - Search Content: Three new search content options forums, replies, and topic content have been added also with pagination.
- [Added] - Social Sharing: Add more social media options, along with corresponding enable/disable settings in the Redux panel.
- [Update] - Ensured compatibility with the latest versions of LearnPress(4.2.5.3) and WooCommerce(8.2.1).
- [Fixed] - Live Style Customizer Option: Resolved color option refresh issue.
- [Fixed] - Mobile Sidebar Menu: Fixed the collapsed menu issue.
- [Fixed] - Miscellaneous bug fixes.
-
Version 2.0.3 - Sep 15 2023
- [New] - Integrated Wbcom Designs for BuddyPress Polls Plugin compatibility.
- [New] - Header Search: Added all post activity content data with AJAX search
- [New] - Search Page: Added all posts content-wise showing tabs data with pagination and UI improvement.
- [New] - Search Page: Added to Pagination Option in Redux Panel.
- [New] - LearnPress Tag widget added.
- [Added] Group Administrator Widget (Added option to set the order as the highest active user)
- [Fixed] - Header: Custom notification read/unread issue fixed.
- [Update] - LearnPress: Latest version compatibility.
- [Upgrade] - LearnPress Instructor Page UI improvement.
- [Fixed] - Live Style Customizer Option: Color option save issue fixed.
- [Fixed] - Minor bug fixes.
-
Version 2.0.2 - Aug 25 2023
- [New] - WPML Language Supported.
- [New] - WPML: Added Language Switches Dropdown in Header.
- [New] - Recaptcha Compatibility:
- - Supported: Wordfence Security Plugin.
- - Supported: Advanced Google Recaptcha Plugin.
- [New] - Two-Factor Authentication:
- - Supported: MiniOrange's Google Authenticator Plugin.
- [New] - Live Style Customizer Option: Added option to remove LTR/RTL direction option in Redux panel.
- [Upgrade] - Additional Post Types: Added to Unrestricted Select Post Type Option in Redux Panel.
- [Upgrade] - Group List Box: Total Members Count Links Updated.
- [Update] - LearnPress: Latest Version Compatible.
- [Fixed] - LTR/RTL Direction Issue Fixed.
- [Fixed] - Global Typography Option Issue Fixed.
- [Fixed] - Redux Setting RTL UI Design.
-
Version 2.0.1 - Aug 03 2023
- [New] - Added an External link option to User & Group Profile Gallery Page Media Upload.
- [New] - Wbcom Designs - Activity Link Preview for BuddyPress Plugin compatibility.
- [New] - Added an On/off option in Redux Panel to show all users or only friends on the Wp Story Activity page.
- [Fixed] - Resolved the issue of showing all pages without login.
- [Fixed] - Clicking anywhere else on the header remove the search area in the search, resolving the issue.
-
Version 2.0.0 - July 31 2023
- [New] - Paid Membership Pro Supported.
- [New] - Add PMP Pricing Plan Page.
- [New] - Elementor Widget Add in PMP Pricing Plan.
- [New] - Profile Page Forum Tab On/Off option add in Redux Panel.
- [New] - Activity post comments order Option add in Redux Panel.
- [Upgrade] - Header login button icon + text option add in desktop view.
- [Update] - WooCommerce latest version 7.9 compatible.
- [Update] - LearnPress latest version 4.2 compatible.
- [Fixed] - Minor bug fixes.
-
Version 1.9.0 - Jun 23 2023
- [New] - Added Activity Post Grid Style.
- [New] - Added Activity Post Blur / Full Image Option in the Redux panel.
- [New] - Added Hide / Undo Post option in activity posts.
- [New] - Added Forum Create Topic and Reply notification.
- [New] - Ajax for Activity Post deletion.
- [New] - Added confirmation message for Activity Post deletion with success message.
- [New] - Added verification badge icon for User Profile friends list.
- [New] - Added Non-Restricted Post type and Custom URL options in the Redux panel.
- [New] - Added Share Post Button On/Off option in the Redux panel.
- [New] - Added description field in Register form and Additional details.
- [New] - Added Header Sticky Background Option in the Redux Panel.
- [Update] - WooCommerce latest version 7.8 compatible.
- [Update] - Redesigned the Socket.
- [Upgrade] - Updated Header Friend Request Button Ajax Count Value Without Refresh Update.
- [Upgrade] - Implemented Redirect URL using Filter.
- [Upgrade] - Optimized the code for better performance.
- [Fixed] - Resolved the issue with Notification Comment Post link redirect.
- [Fixed] - Fixed the WPML Language switches redirect issue.
- [Fixed] - Resolved the issue with Blog Post visibility (private/public/protected).
- [Fixed] - Minor bug fixes.
-
Version 1.8.5 – 19 May 2023
- [New] - Reaction Plugin: added API
- [New] - Share activity post: added notification
- [New] - Login button: set icon in mobile view, added Redux option
- [New] - Sharing activity post, User Profile & Group Administrator widget, Reaction user like modal: added verification badge icon
- [New] - Default avatar/cover image change option in Redux panel
- [New] - Hidden Group, Private Group Profile with moderation
- [Update] - Better Messages: latest version 2.1.8 compatible
- [Update] - LearnPress: latest version 4.2.2.4 compatible
- [Upgrade] - Breadcrumb Title Text: added new hook to detect Text
- [Upgrade] - User Profile Menu: added code using Filter hook
- [Fixed] - User Group via add post disabled in Activity Feed
- [Fixed] - Logo set size mini sidebar
- [Fixed] - Group Create User Post and Update profile image content doesn't show in Activity Post
- [Fixed] - Online/Offline status Label and WooCommerce Some of text : translate issue
- [Fixed] - WooCommerce Shop Page: all Redux options not working
- [Fixed] - Favorites post: it doesn't show in "User profile" Post
- [Fixed] - Load New Post: Button it doesn't show in Mobile
- [Fixed] - Minor bug fixed.
-
Version 1.8.2 – 07 Apr 2023
- [Update] - User Profile Field Text Editor Block
- [Fixed] - Forget Password Issue Solved
-
Version 1.8.1 – 25 Mar 2023
- [Fixed] - Notification Warning
- [Fixed] - Moderation Warning
- [Fixed] - Minor Bug Fixed
-
Version 1.8.0 – 17 Mar 2023
- [New] - Reaction feature added on Comments & Posts
- [New] - Privacy Settings for Profile Private/Public
- [New] - User Profile Picture Show on Click
- [New] - User Profile Cover Picture Show on Click
- [New] - GamiPress Levels Unlock info Page.
- [New] - User Profile Widget added On/Off option for without login
- [New] - Full logo option add in redux settings
- [New] - Redux Setting UI Update
- [Update] - BuddyPress Latest Version 11.1.0 Compatibility
- [Update] - Woo-Commerce Latest Version 7.5.0 Compatibility
- [Update] - LearnPress Latest Version 4.2.2.2 Compatibility
- [Update] - LearnPress Courses Review Latest Version 4.0.6 Compatibility
- [Fix] - Restriction pages issue solve
- [Fix] - Responsive Side bar menu issue solve
- [Fix] - Minor Bug solve
-
Version 1.7.1 – 19 Jan 2023
- [Fixed] - Minor Bug Fixed.
-
Version 1.7.0 – 13 Jan 2023
- New : Login with other social media.
- New : Blog Post Option in activity feed.
- New : Share Activity Post features (post in post).
- New : Wbcom Designs - BuddyPress Giphy plugin Compatible.
- New : User Profile Personal information visibility settings.
- New : Friend suggestion refuse feature.
- New : More menu item redux option.
- New : Redux On/Off Option for User profile courses tab.
- Update: Social Share Ui/UX Optimize.
- Update : Wp Story Maker Latest version 3.2.1.2 Compatible & UI/UX Improvement.
- Update : BuddyPress Latest Version 11.0.0 Compatible.
- Update : WooCommerce Latest Version 7.3.0 Compatible.
- Update : LearnPress Latest Version 4.2.0 Compatible.
- Update : Elementor Latest Version 3.10.0 Compatible.
- Update : GamiPress Latest Version 2.5.1 Compatible.
- Fixed : Current user active status remove from recent active sidebar.
-
Version 1.6.3 – 14 Dec 2022
- [update] - Better Messages Latest version Compatible.
- [update] - Wp Story Maker Latest version Compatible.
- Added: New Facebook Style.
- Added: Reporting system.
- Added: Story deleting feature.
- Added: Story pause/unpause buttons.
- Added: Video mute/unmute buttons.
- [Fixed] - Minor Bug Fixed.
-
Version 1.6.2 – 21 Nov 2022
- [New] Verify Member Add Badge Notification
- [New] Verify Member Invitation Request Badge Notification Button Add In User profile
- [New] Online User Status Add In Header Notification
- [New] Add Show/Less Group Description In Group Detail Page
- [Fix] Live Style Customizer Admin Save Setting Issue Fixed
- [Fix] Redux Light/Dark Mode Color Issue Fixed
-
Version 1.6.1 – 04 Nov 2022
- [New] Compatible With WordPress 6.1.
- [New] Compatible with WooCommerece 7.0.
- [New] Using Ajax Based Showing List/Grid Courses (LMS)
-
Version 1.6.0 – 02 Nov 2022
- [New] Better Messages – Live Chat integration.
- [New] Live Chat Notification Bell.
- [New] Profile now includes more social media. eg: ( Skype, dribbal, )
- [New] Dark - Light Mode Logo Options
- [New] BP xProfile Location plugin supported.
- [New] Gamipress - you can display only selected points.
- [Fix] Emails sent to forgotten passwords have been fixed.
- [Fix] Redirect issue for new users registering for active accounts.
- [Fix] Video preview for ios fixed.
-
Version 1.5.0 – 30 Sep 2022
- [New] User Can Block & Report The Posts, Groups, People.
- [New] Admin Can Suspend Any User.
- [New] Comment Box On Click Opening Issue Fixed.
- [New] Photos, Videos Can Be Upload With External Link While Posting.
-
Version 1.4.0 – 23 Sep 2022
- [New] LearnPress - LMS Integration.
- [New] LearnPress - Courses Module added in Buddypress User Profile.
- [New] LearnPress - Courses page options in Redux.
- [New] LearnPress - Courses Category Widget Add.
- [New] LearnPress - Recent / Features Courses List Widget Add.
- [New] LearnPress with RTL & Dark Mode Supported.
- [New] Header Search bar Add Ajax Courses Data List
- [New] BuddyPress Login Form Redirect Using Ajax and Login link added on registration form.
- [New] Add Non-Restricted Multiple Post selection (Post , Page, Courses, Forums, Topic).
-
Version 1.3.1 – 22 Aug 2022
- [New] After Login Set Previous Page Option Added.
-
Version 1.3.0 – 10 Aug 2022
- [New] WooCommerce Supported and Shop Page Added.
- [New] Redux WooCommerce options added.
- [New] Redux Buddypress New options.
- [New] WooCommerce with RTL & Dark Mode Supported.
- [New] Message Option Set In User Profile.
- [New] Like Notification On / Off Option From User Profile
- [Fix] Notification Unread Count Issue Resolve.
- [Fix] Responsive Activity Sidebar Issue Resolve.
-
Version 1.2.0 – 01 Aug 2022
- [New] Add RTL Mode With Switch
- [New] WPML Language Supported
- [New] Live Customizer Page Selection Option In Redux
- [New] Iqonic Before/After Image ShortCode Add In Elementor
- [New] Iqonic IconBox And Iqonic ImageBox ShortCode Add In New Style
- [New] User Wise And Globally ( Non Friends ) Show Activity Option In Redux Side
-
Version 1.1.0 – 21 July 2022
- [New] GamiPress Points / Ranks Tab / Point Tab show In User Profile
- [New] Live Customizer Option
- [New] Add New System Mode In Dark Like Mode
- [New] Add New Panel To Show User Notification, Message, Request And Search Icon In Mobile View
-
Version 1.0.2 – 13 July 2022
- [New] Restricted - Non Restricted Page Options
- [New] Dark - Light Mode Color Customization Options
-
Version 1.0.1 – 09 July 2022
- [Add] New Feature Dark - Light Mode
- [Add] Child Theme
- [Change] Set Common Logo Functionality
-
Version 1.0 – 08 July 2022
- Initial release.
Help and Support
The expert team at Iqonic Design is always happy to help you with any questions or concerns you encounter. If you need any support with the item, please contact us through our dedicated support portal at Desky or email
- Support System: https://iqonic.desky.support/
- Support Email: [email protected]
Support Policy:
We request you to kindly read our documentation carefully. It will help you resolve most of your concerns with incorrect configuration. To get technical support and assistance, you need to have a valid purchase code. You will find this when you sign in your Themeforest “Download” page. Click on the theme’s download link.
PLEASE NOTE! Please be informed that theme-related features are only covered in technical support. Additional customization is not covered in support. Support does not include 3rd party plugins integration or any other compatibility issues that might arise. But, support is applied to plugin(s) we have developed and integrated ourselves.
If you have any questions that are beyond the scope of documentation, feel free to post them on our support portal at https://iqonic.desky.support/. Expect answer within 24-48 hours, usually as soon as possible in the order they were received.
PLEASE NOTE! Support requests are being processed on business days (Monday to Saturday) from 9:00 to 18:00 (GMT +05.30).We are in GMT+5:30 time zone. We address all the support queries 6 days weekly on the first-come, first-solve basis (Sundays off).
If any support ticket has no response from the item owner for 7 days, the ticket will be considered closed. If you need further assistance you can create another ticket.
Please be aware that before submitting a new ticket, please try searching the topic from our Articles and Knowledgebase for an answers.
Have pre-sales questions or concerns, please write to us via our website contact page or email us at [email protected] If you like our product and support then please drop a rate and write a review at https://themeforest.net/downloads
Third-party Extensions
Unfortunately, we do not provide support for third-party extensions. Please contact the author of the extension if needed. If you feel that you might have troubles with installing an extension, we advise you to order a professional installation service.
Thank you for purchasing our theme
Welcome and congratulations on being our premium item owner.
Congratulations, your websites is set to launch. If you have any questions or have a query, or simply wish to give us a suggestion or two, please reach us at our support portal and raise a ticket at https://iqonic.desky.support/
You get free 6 month support with this theme. You can write to us at [email protected] for any basic customization requests. Our support agents will guide you further on it. We wish you all success in your project.
Copyright iqonicdesign
Social Login
Select Social Login that you want to integrate with your website.
For More Information Click on the Link Below