General Information
Thank you for choosing our Plugin. We hope you enjoy building your project with us. It is a powerhouse of great features and powerful functionalities that would take months to develop. The plugin assured your project looks absolutely stunning on any types of screens.
Regular License
CodeCanyon regular license allows an item owner to create one single End Product (the final website customized with client's own content. This end product could be for item owner himself or for one of his client.
What is acceptable in single regular license:
- You are allowed to create 1 website (on a single domain) for yourself or for your client. You can then transfer that website to your client for any fee. Please note that your license also has to be transferred to your client.
- You can install the plugin on your test server for testing or for the development purposes (this installation should not be shared to the public).
- You can modify and customize the plugin, you can combine it with other works to create the End Product.
What is not acceptable:
- With a single regular license you are not allowed to create multiple websites. For multiple websites you will need multiple regular licenses.
- If you would like to resell the same website (Single End Product) to another clients. Mandatorily, you will need to purchase an extended license for this case.
Bundled Plug-ins
All the premium plugins that comes with the theme are full functional without any registration license key. If however, you wish to use the additional features or receive automatic updates and support from the plug-in party, you shall purchase the plug-in separately.
Help and Support
The expert team at Iqonic Design is always happy to help you with any questions or concerns you encounter. If you need any support with the item, please contact us through our dedicated support portal at Desky or email
- Support System: https://iqonic.desky.support/
- Support Email: [email protected]
Support Policy:
We request you to kindly read our documentation carefully. It will help you resolve most of your concerns with incorrect configuration. To get technical support and assistance, you need to have a valid purchase code. You will find this when you sign in your CodeCanyon “Download” page. Click on the plugin’s download link.
PLEASE NOTE! Please be informed that plugin-related features are only covered in technical support. Additional customization is not covered in support. Support does not include 3rd party plugins integration or any other compatibility issues that might arise. But, support is applied to plugin(s) we have developed and integrated ourselves.
If you have any questions that are beyond the scope of documentation, feel free to post them on our support portal at https://iqonic.desky.support/. Expect answer within 24-48 hours, usually as soon as possible in the order they were received.
PLEASE NOTE! Support requests are being processed on business days (Monday to Saturday) from 9:00 to 18:00 (GMT +05.30).We are in GMT+5:30 time zone. We address all the support queries 6 days weekly on the first-come, first-solve basis (Sundays off).
If any support ticket has no response from the item owner for 7 days, the ticket will be considered closed. If you need further assistance you can create another ticket.
Please be aware that before submitting a new ticket, please try searching the topic from our Articles and Knowledgebase for an answers.
Have pre-sales questions or concerns, please write to us via our website contact page or email us at [email protected] If you like our product and support then please drop a rate and write a review at https://themeforest.net/downloads
LiveStream WP
What is LiveStream ?
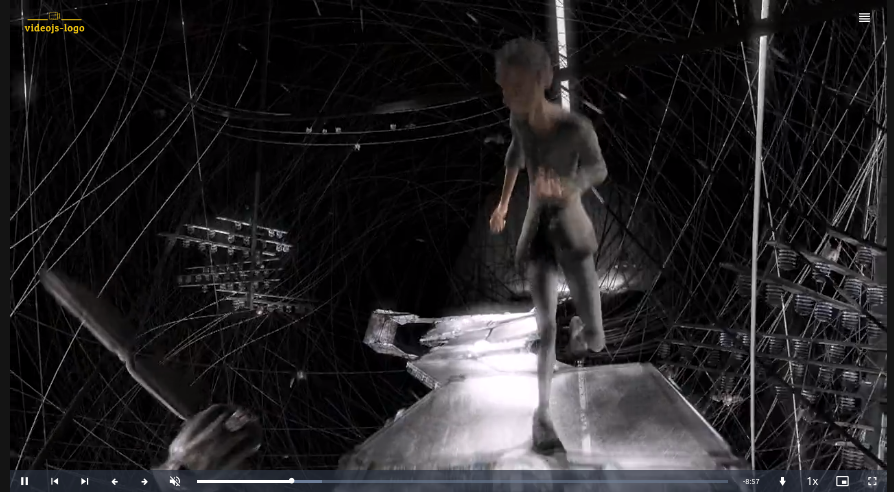
Live-Streaming is an impressive plugin for manage streaming and streaming ads you can playback your video and livestream over all browsers and devices. Based on modern videojs framework supports all videojs video format (https://videojs.com/html5-video-support/), HLS, mpd, Youtube and Vimeo video type.
Features:
- Video Autoplay
- Video Loop
- Video Playback Speed
- Video Quality
- Video Download
- Remember last playback (Will not work if ads enable and in vimeo video url)
- Video Seek Setting(forward and backward video)
- Vimeo Player Color
- Logo
- Preroll Ads(Preroll Ads will not work in vimeo video url)
- Vast Ads(Vast Ads will not work in vimeo video url)
- Add Custom CSS
- Create Single or Playlist Video Player
WordPress Information
For WordPress Installation you can check the Famous 5-Minutes Install here:
- Support System: https://wordpress.org/support/article/how-to-install-wordpress/
Plug-ins Requirements
To use Live Streamit pLugin, you must be running WordPress 4.9.1 or higher, PHP 7.1 or higher, and MySQL 5.6 or higher. We have tested it with Mac, Windows and Linux. Below is a list of items you should ensure your host can comply with.
Recommended PHP Configuration Limits
White screen, demo content fails when importing, empty page content and other similar issues are all related to low PHP configuration limits. The solution is to increase the PHP limits. You can do this on your own, or contact your web host and ask them to increase those limits to a minimum as follows:
- max_input_vars = 3000
- memory_limit = 128M
- max_execution_time = 300
- max_input_time = 300
- upload_max_filesize = 64M
- post_max_size = 64M
Installation
Installation of the Plugin through the WordPress Admin panel ( Recommended for most users )
Step 1 - First of all, open the WordPress admin area login page and log in into WordPress as Admin. To do this visit http://yoursitename/wp-admin
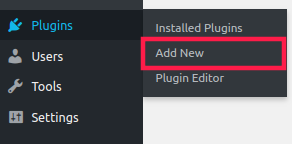
Step 2 - Go to Plugins > Add New
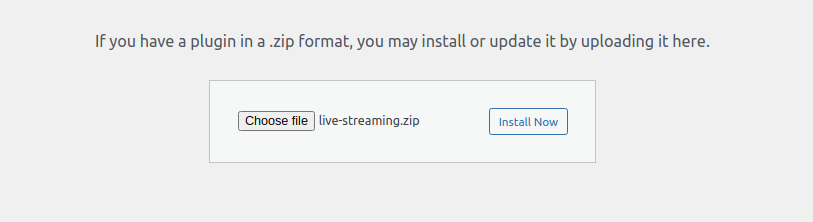
Step 3 -Click Upload Plugin Button and upload zip file
Step 4 - After Installing, click on Activate button
Installation the plugin through FTP or build-in File manager
Step 1 - Use Login and Password to connect to your web-server via FTP or use your hosting file manager. You can find out your username and password on the website of your hosting provider.
Step 2 - Upload archive with plugin to /wp-content/plugins
Step 3 - On next step Unzip the archive with the plugin
Step 4 - After Installing, click on Activate button

LiveStreaming Plugins Setting panel
Click on settings button

Click on Live Streaming in admin menu
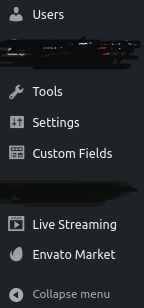
Setting page of plugin will open
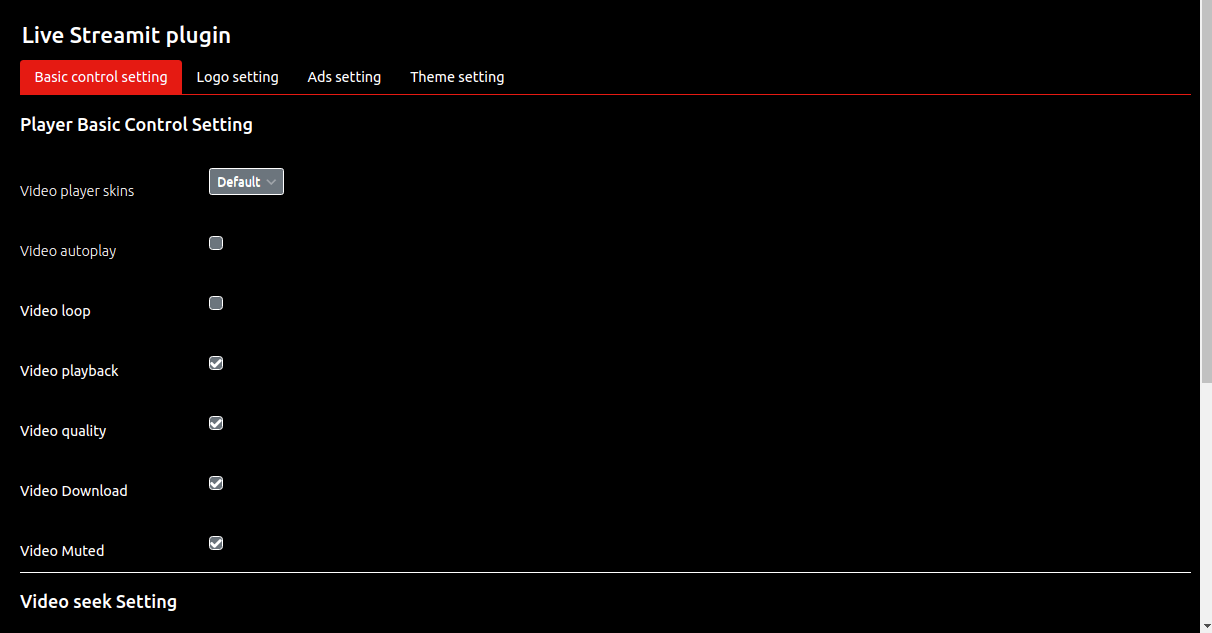
Basic Control of player setting
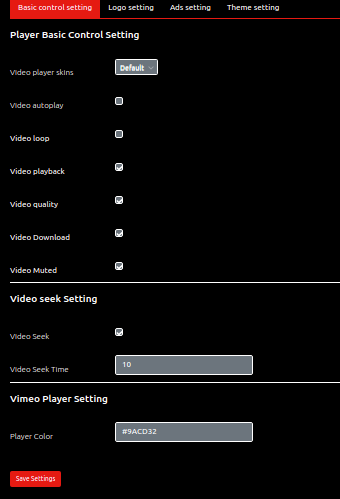
-> Video autoplay Enable video to autoplay
-> Video loop Enable video to start over as soon as it ends
-> Video playback Enable video playback rate
-> Video Download Enable to download the video inside the player
-> Video Muted Enable video to mute at starting
-> Video Seek Enable to video skip forward or back
-> Video Seek Time Enter time in second for video seek
-> Vimeo Player Color Enter the hex value of color to change vimeo player theme color
Logo setting of player
-> Video Logo Enable Logo to display in player
-> Video Logo Image Upload image of logo
-> Video Logo Url A url to be linked to from the logo. If the user clicks the logo the link will open in a new window
-> Video Logo Hide after (in sec) Time until fade-out begins. If null is specified, automatic fade-out is not performed.
-> Logo Width(px) The width of the logo image (px). If not specified, it will be the width of the original image.
-> Logo Height(px) The height of the logo image (px). If not specified, it will be the height of the original image.
-> Logo Padding(px) Padding around the logo image (px).
-> Logo Position The location to place the logo (top-left, top-right, bottom-left, or bottom-right).
Ads setting of player
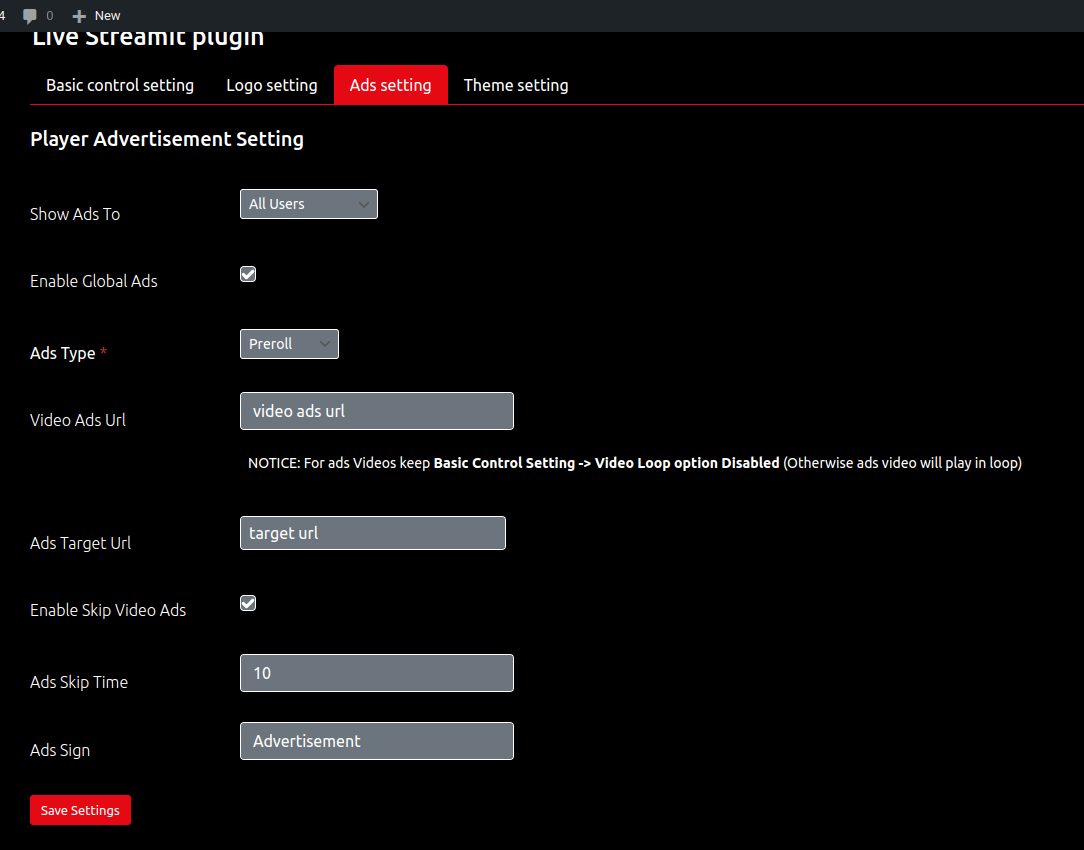
-> Video Ads Enable to play ads (NOTICE: For ads Videos keep Basic Control Setting-Video Loop option Disabled (Otherwise ads video will play in loop))
-> Ads Type Select the ads type vast or preroll
-> Video Ads Url Source ads video file to play
-> Skip Video Ads Enable to skip ads (work only in preroll)
-> Ads Skip Time Allow the user to skip the ad when it has played for a number of seconds( Default: 5 work only in preroll).
-> Ads Target Url Url to redirect to if user clicks on the ad. Can be left empty for no redirection.(work only in preroll)
-> Ads Sign Adds an "Advertisement" sign to the video.
Theme setting of player

-> Video Custom theme Enable to add custom theme to player
-> Video Big Play Button Color change the color big play button of player (enter name of color(white) not hex(#fff) value)
-> Video Player Control Color change the Video Player Control color of player (enter name of color(white) not hex(#fff) value)
-> Custom CSS Add custom css to the player.
Create Shortcode of single video or playlist video player
Click on Generate shortcode submenu of Live Streaming in admin menu
Create Single video shortcode
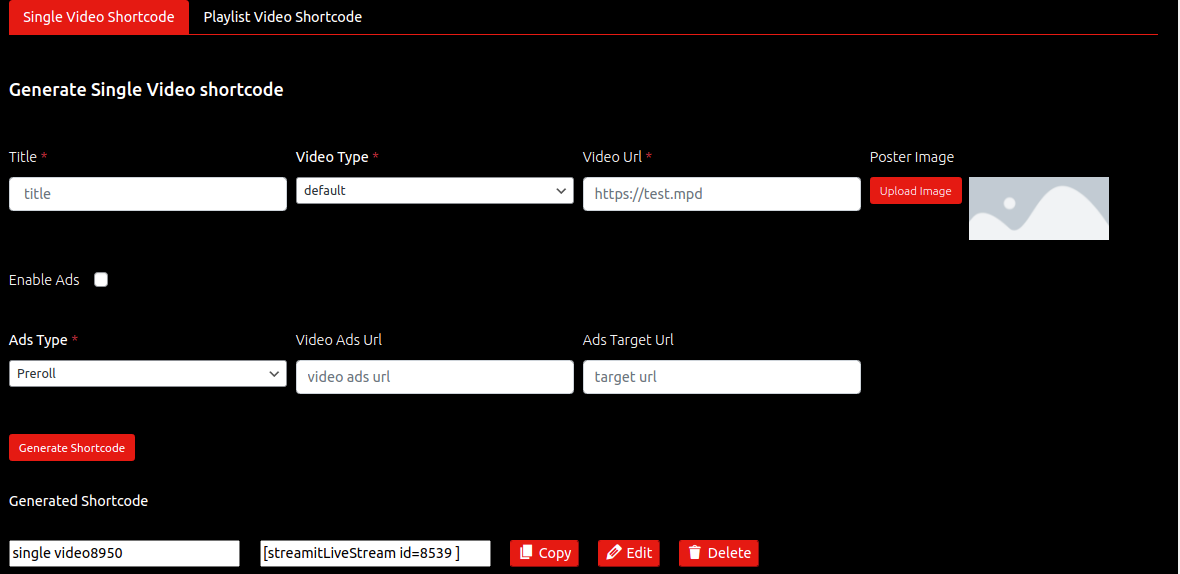
-> Title Title of video
-> Video Type Select type of video (options default, youtube, vimeo and google drive)
-> Video Url Url or source of video
-> Poster Image Upload poster of video (display when player video pause or end) Optional
-> Enable Ads Enable to play ads (NOTICE: For ads Videos keep Basic Control Setting-Video Loop option Disabled (Otherwise ads video will play in loop))
-> Ads Type Select the ads type vast or preroll
-> Video Ads Url Source ads video file to play (note : if video ads is enable and Video Ads Url is not provided then Ads setting url will consider as source of ads) Optional
-> Ads Target Url Url to redirect to if user clicks on the ad. Can be left empty for no redirection(note : if video ads is enable and Ads Target Url is not provided then Ads setting target url will consider as source of ads target url). Optional(work only in preroll)
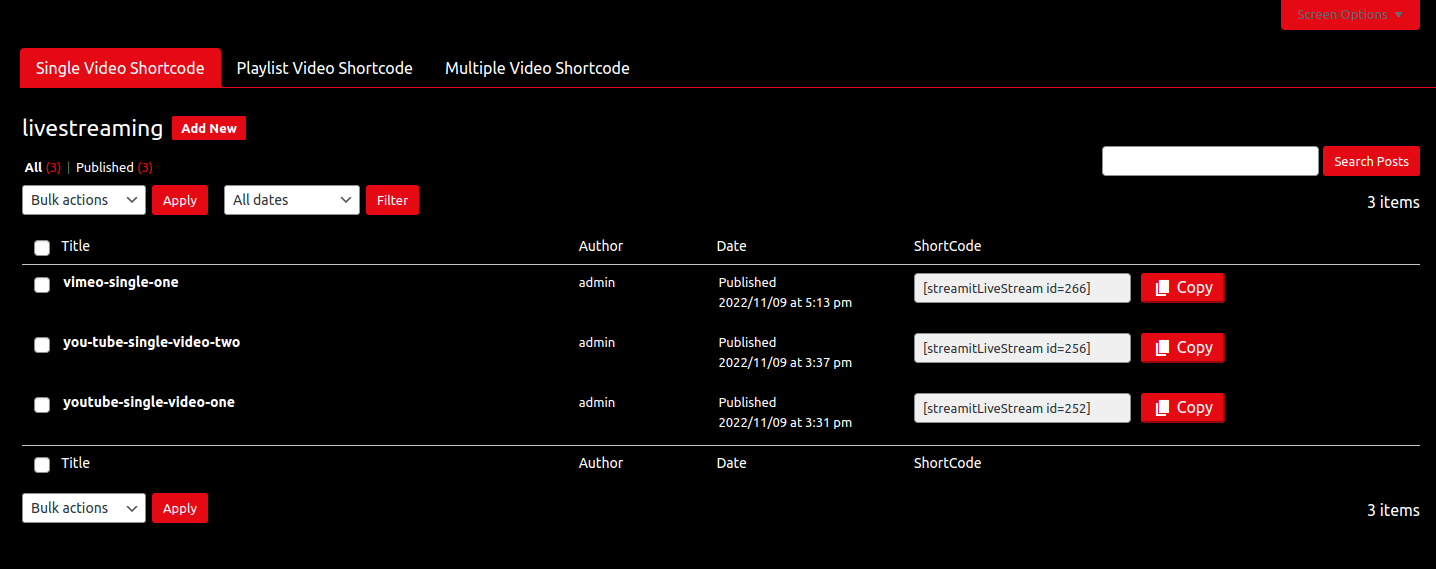
-> List of Generated Shortcode
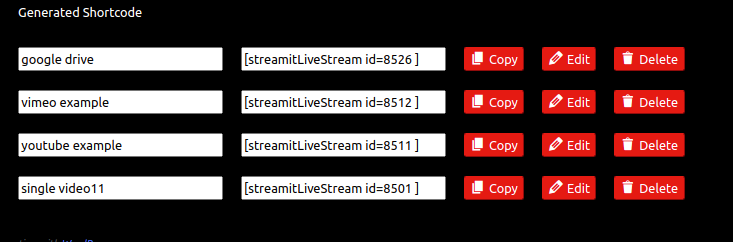
-> Edit shortcode click on edit button to update the shortcode

-> Delete shortcode click on delete button to delete the shortcode
-> copy shortcode click on copy button to copy the shortcode
-> add new post or page
-> add block add new shortcode block
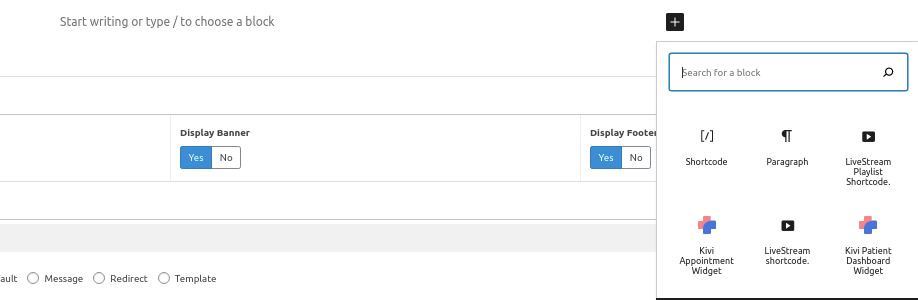
-> paste shortcode paste the copied shortcode in shortcode block

-> Save or Update Page/Post
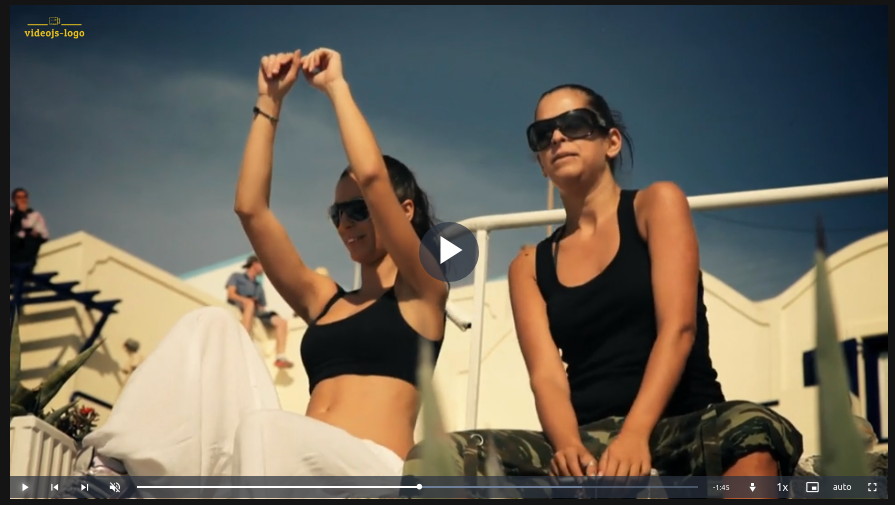
-> Output
Create Playlist video shortcode
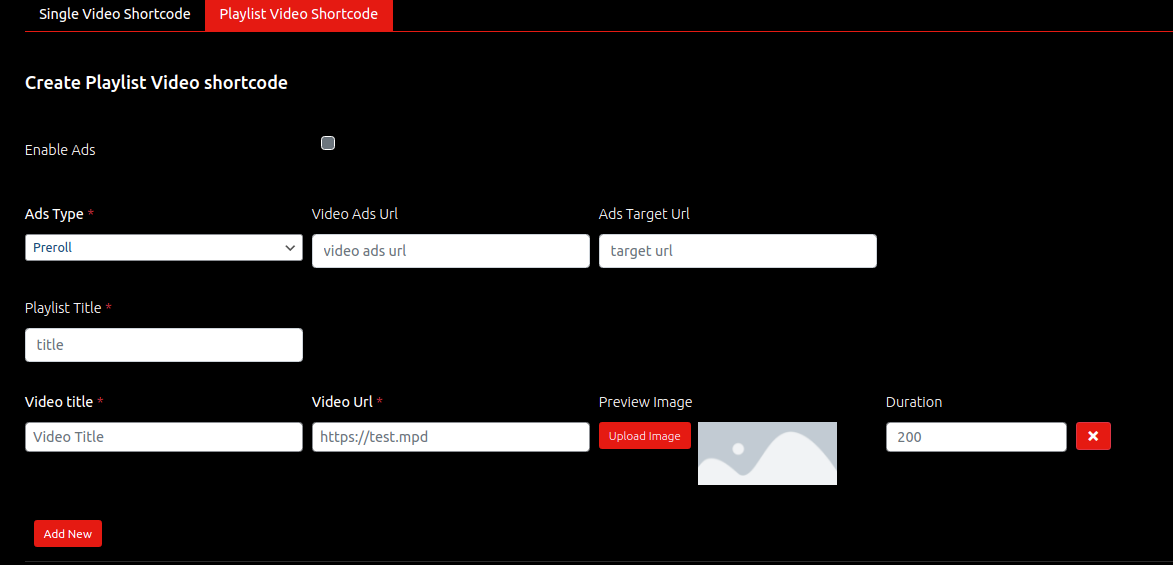
-> Enable Ads Enable to play ads (NOTICE: For ads Videos keep Basic Control Setting-Video Loop option Disabled (Otherwise ads video will play in loop))
-> Ads Type Select the ads type vast or preroll
-> Video Ads Url Source ads video file to play (note : if video ads is enable and Video Ads Url is not provided then Ads setting url will consider as source of ads) Optional
-> Ads Target Url Url to redirect to if user clicks on the ad. Can be left empty for no redirection(note : if video ads is enable and Ads Target Url is not provided then Ads setting target url will consider as source of ads target url). Optional( work only in preroll)
-> Title Title of video
-> Video Type Select type of video (options default, youtube, vimeo and google drive)
-> Video Url Url or source of video
-> Preview Image Upload poster of video (display when player video pause or end) Optional
-> Duration Duration of video
-> Add new Button click on add new button to add new video
-> X button click on X button to delete video
-> List of generated playlist shortcode

-> Edit shortcode click on edit button to update the shortcode

-> Delete shortcode click on delete button to delete the shortcode
-> copy shortcode click on copy button to copy the shortcode
-> add new post or page
-> add block add new shortcode block
-> paste shortcode paste the copied shortcode in shortcode block
-> Save or Update Page/Post
-> Output
-> Output

Live streaming with Streamit Theme
Install and activate streamit Theme

Demo video
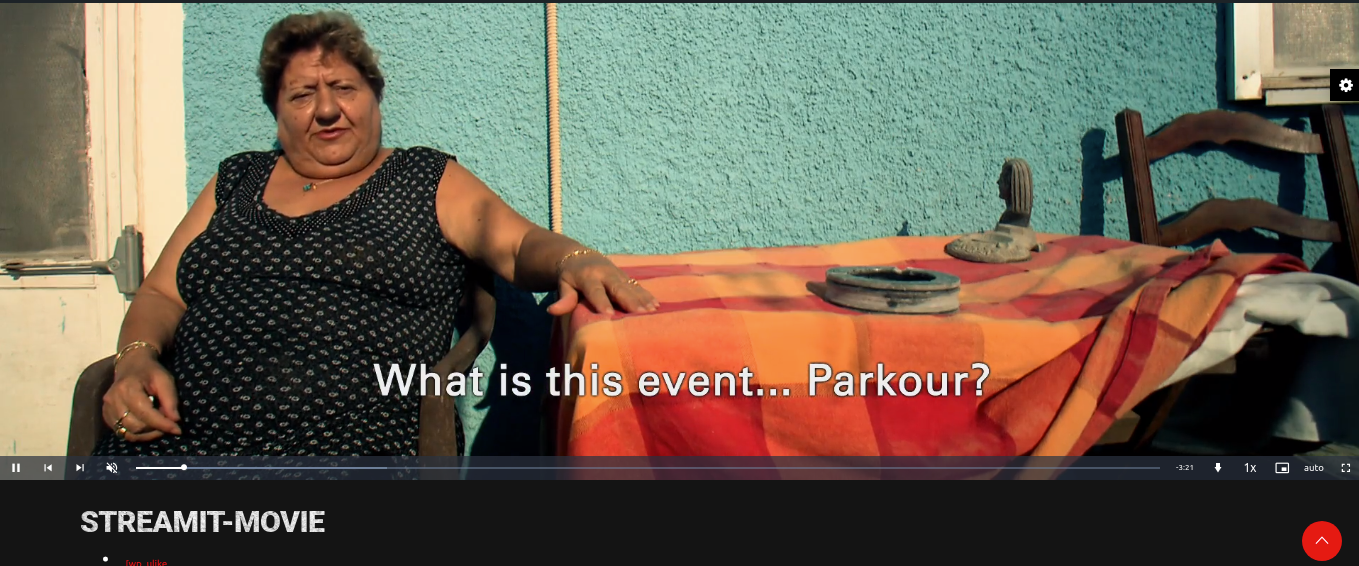
Streamit video
click on add new video button in submenu of video to add new video
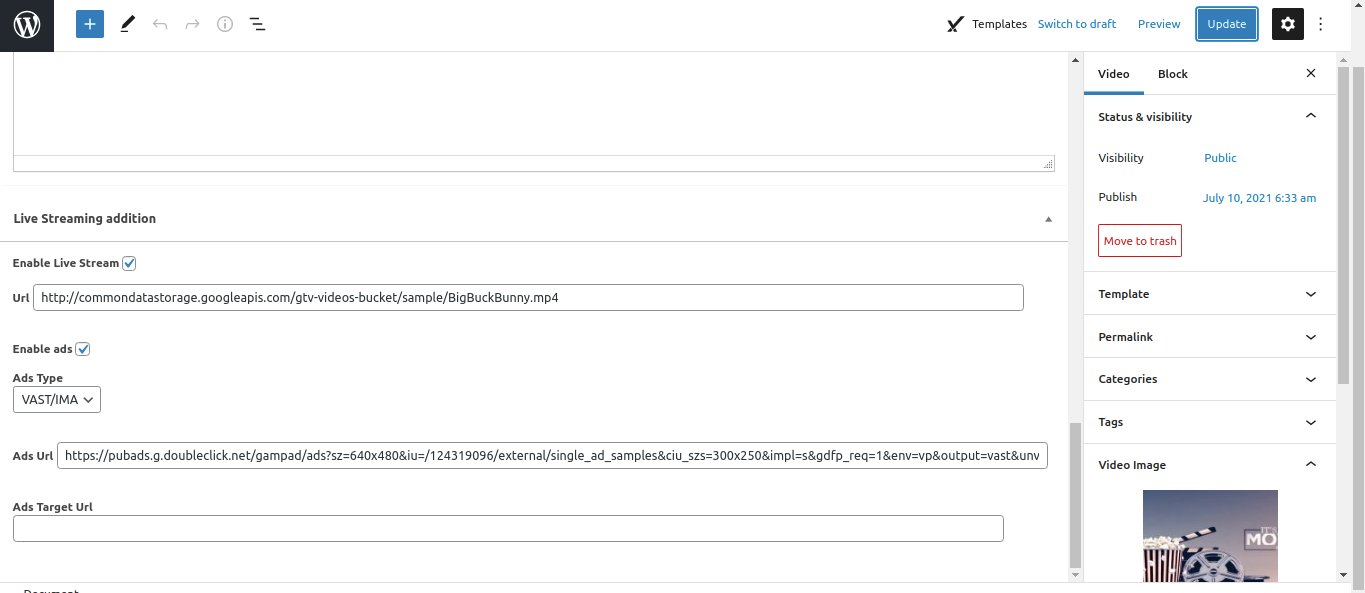
-> Enable Live Stream Enable live streaming
-> Url Url or source of video
-> Enable Ads Enable to play ads (NOTICE: For ads Videos keep Basic Control Setting-Video Loop option Disabled (Otherwise ads video will play in loop))
-> Ads Type Select the ads type vast or preroll
-> Ads Url Source ads video file to play (note : if video ads is enable and Ads Url is not provided then Ads setting url will consider as source of ads) Optional( work only in preroll)Optional
-> Ads Target Url Url to redirect to if user clicks on the ad. Can be left empty for no redirection(note : if video ads is enable and Ads Target Url is not provided then Ads setting target url will consider as source of ads target url). Optional
-> Video Image Upload poster of video (display when player video pause or end) Optional
-> Save or update post
-> Output

Streamit movie
click on add new movie button in submenu of movie to add new video
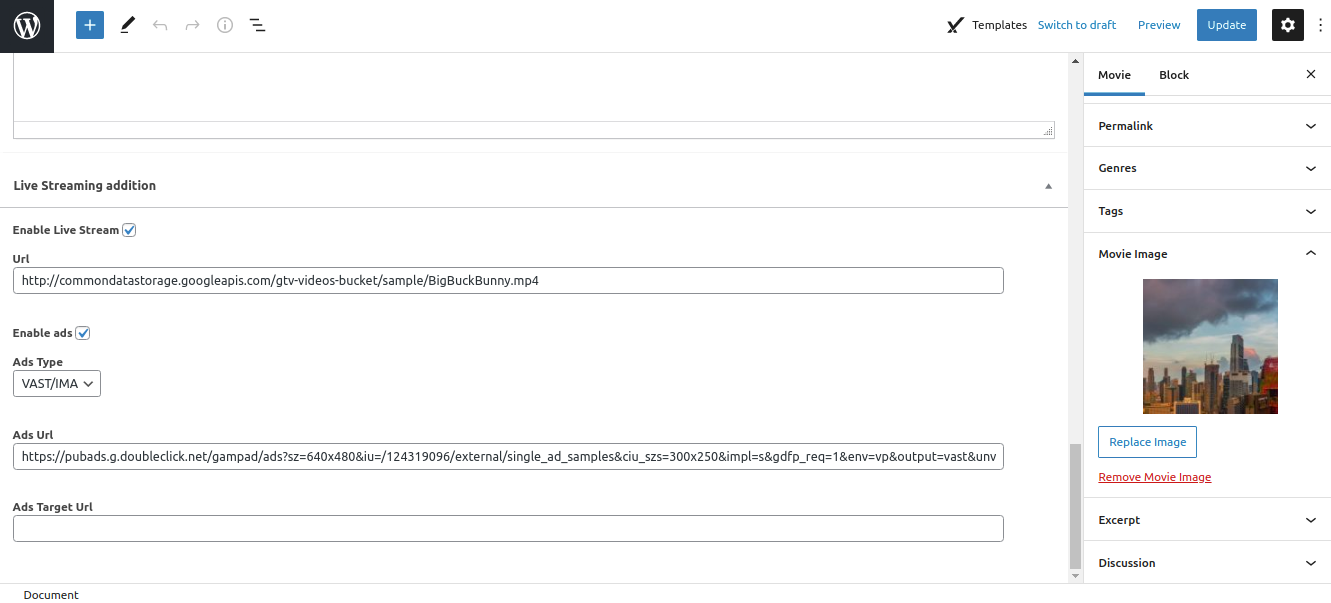
-> Enable Live Stream Enable live streaming
-> Url Url or source of video
-> Enable Ads Enable to play ads (NOTICE: For ads Videos keep Basic Control Setting-Video Loop option Disabled (Otherwise ads video will play in loop))
-> Ads Type Select the ads type vast or preroll
-> Ads Url Source ads video file to play (note : if video ads is enable and Ads Url is not provided then Ads setting url will consider as source of ads) Optional
-> Ads Target Url Url to redirect to if user clicks on the ad. Can be left empty for no redirection(note : if video ads is enable and Ads Target Url is not provided then Ads setting target url will consider as source of ads target url). Optional( work only in preroll)
-> Movie Image Upload poster of video (display when player video pause or end) Optional
-> Save or update post
-> Output
Use ShortCode In Movie/Video/TV-Shows
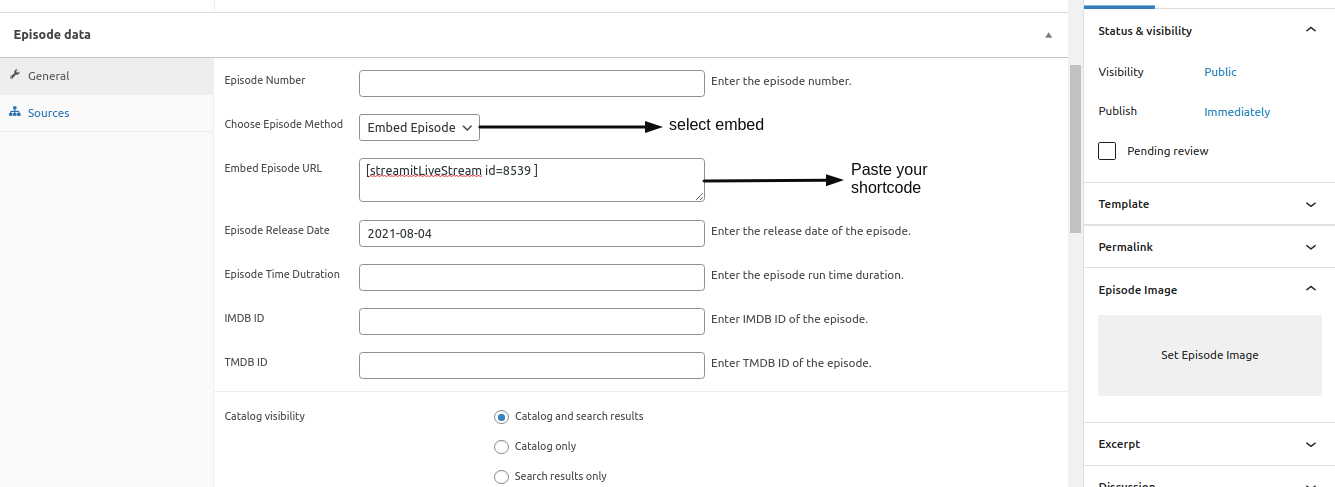
click on add new movie/new videos/new episode(all episode -> add new) button in submenu of movie/video/tv-shows to add new Movie/Video/Episode
-> Choose Movie/Video/Episode Method Select Embed Movie/Video/Episode
-> Paste your livestreaming Shortcode Paste your shortcode in Embed Movie/Video/Episode URL
-> Save or update post
Translation
There are no ready language files, but you need to take only a few steps to translate your website to the needed language. You can translate the Plugin to any language, as well as RTL Language.
The first step you should take is create your own language file. To implement this you should install Poedit:
www.poedit.netCopy qreate.pot file to your computer.
Note: You will find the language pot file in wp-content/Plug-ins/Plug-ins File/languages.
Translate your website
Do you want to translate your WordPress site? You just need to follow few steps to get started. You can translate the Plugin to any language, as well as RTL Language.
Start by installing Poedit.
- Set your WordPress for the language so the admin section will be in your language
- Create language PO file for translation
- Modify the PO file using POEdit software and translate all strings in it. This will also generate MO file which is used by WordPress
Thank you for purchasing our Plugin
Welcome and congratulations on being our premium item owner.
Congratulations, your websites is set to launch. If you have any questions or have a query, or simply wish to give us a suggestion or two, please reach us at our support portal and raise a ticket at https://iqonic.desky.support/
You get free 6 month support with this plugin. You can write to us at [email protected] for any basic customization requests. Our support agents will guide you further on it. We wish you all success in your project.
iqonicdesign copyright ©