General Information
- Product Name : Knost | Creative Agency WordPress Theme
- Author : Iqonic Design
- Support Ticket: https://iqonic.desky.support/
Thank you for choosing our theme. We hope you enjoy building your project with us. It is a powerhouse of great features and powerful functionalities that would take months to develop. The theme is fully responsive and be rest assured your project looks absolutely stunning on any types of screens.
Regular License
ThemeForest regular license allows an item owner to create one single End Product (the final website customized with client's own content. This end product could be for item owner himself or for one of his client.
What is acceptable in single regular license:
- You are allowed to create 1 website (on a single domain) for yourself or for your client. You can then transfer that website to your client for any fee. Please note that your license also has to be transferred to your client.
- You can install the theme on your test server for testing or for the development purposes (this installation should not be shared to the public).
- You can modify and customize the theme, you can combine it with other works to create the End Product.
What is not acceptable:
- With a single regular license you are not allowed to create multiple websites. For multiple websites you will need multiple regular licenses.
- If you would like to resell the same website (Single End Product) to another clients. Mandatorily, you will need to purchase an extended license for this case.
Bundled Plug-ins
All the premium plugins that comes with the theme are full functional without any registration license key. If however, you wish to use the additional features or receive automatic updates and support from the plug-in party, you shall purchase the plug-in separately.
Theme Installation
WordPress Information
For WordPress Installation you can check the Famous 5-Minutes Install here:
- Support System: https://wordpress.org/support/article/how-to-install-wordpress/
Theme Requirements
To use Knost, you must be running WordPress 4.9.1 or higher, PHP 7.1 or higher, and MySQL 5.6 or higher. We have tested it with Mac, Windows and Linux. Below is a list of items you should ensure your host can comply with.
Recommended PHP Configuration Limits
White screen, demo content fails when importing, empty page content and other similar issues are all related to low PHP configuration limits. The solution is to increase the PHP limits. You can do this on your own, or contact your web host and ask them to increase those limits to a minimum as follows:
- max_input_vars = 3000
- memory_limit = 128M
- max_execution_time = 300
- max_input_time = 300
- upload_max_filesize = 64M
- post_max_size = 64M
Theme Installation
There are 3 ways to install the theme:
Theme Installation via WordPress:
Step 1 - Login to your WordPress Admin Panel.
Step 2 - Go to Appearance > Themes. Click the Add New button.
Step 3 - Click on the Upload Theme button. Locate "knost.zip" and click Install Now.
Theme Installation via FTP :
Step 1 - Log into your Hosting server using an FTP client.(Ex: FileZilla)
Step 2 - Locate "knost.zip" that you found in your ThemeForest Package and unzip it. Once it is done you'll get a folder named knost with all theme files in it.
Step 3 - Locate your WordPress directory and upload knost folder (unzipped in the previous step) into ../wp-content/themes/
Step 4 - Click on the Activate button to activate Knost. Congratulations, you have now activated Knost! You can now proceed with Knost's Plugin Installation.
Theme Installation via Envato Market:
- If you already have the "Envato Market Plugin" installed on your site then just go to Admin > Envato Market and install theme from there. If not, than download the plugin by clicking on this link and install the plugin on your site. After installation, you just need to configure it (linking with your ThemeForest account). Click here for step-by-step tutorial.
- Then just go to Admin > Envato Market plugin menu and install the theme. The theme would be available to install so you can easily install it.
- NOTE: Plesae note that the "Iqonic Design for Knost Theme" is required plugin for this theme. So make sure you install that plugin after you install/activate the theme.
Plug-ins Installation
All required plugins are already added in your downloaded package.
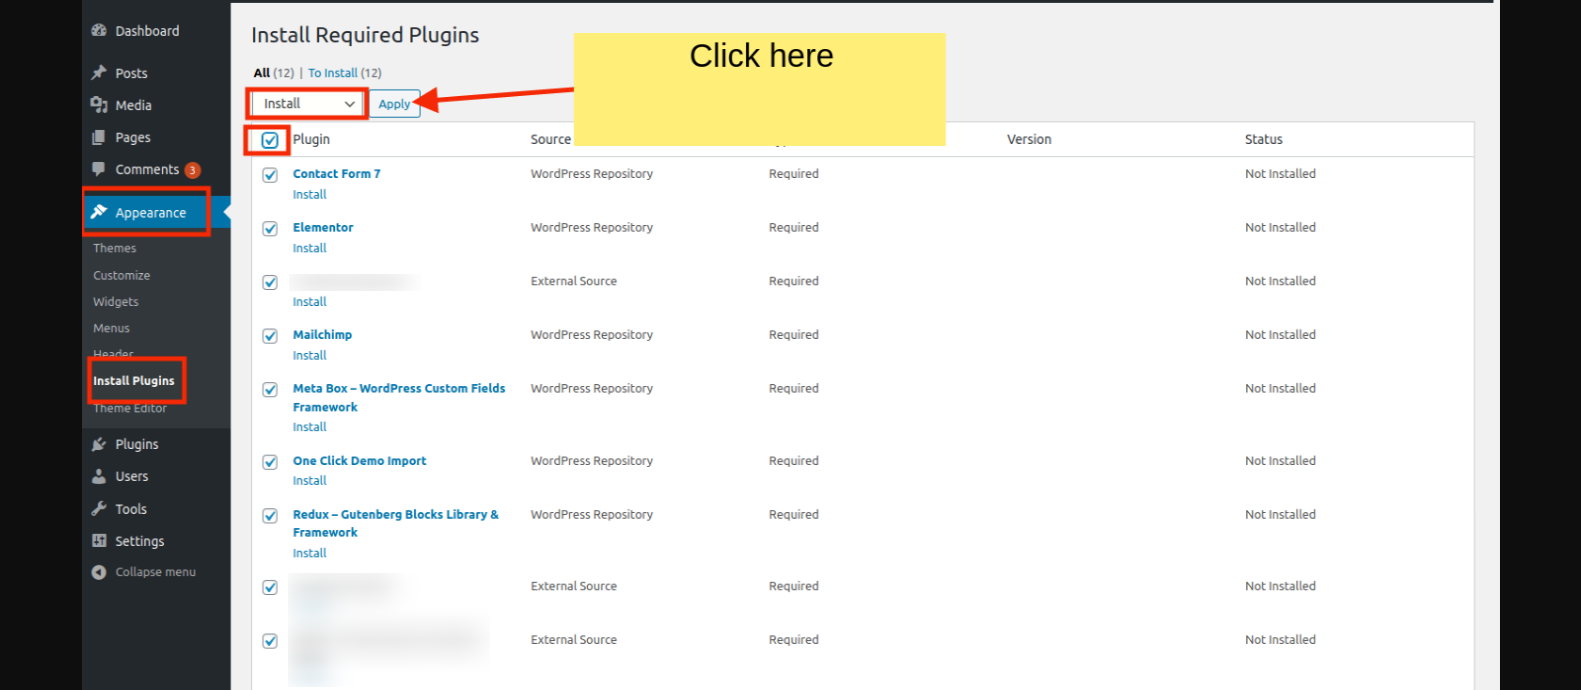
Step 1 - After theme installation you should be redirected to Install Required Plugins page, which shows list of plugins:
Step 2 - Now, Select all "plugins"
Note - The installation process may take few minutes. Proceed further after successful installation.
Step 3 - When "All installations have been completed" appears, click on "Return to Required Plugins Installer".
Step 4 - Now, Select all plugins and choose Activate from drop down box this time.
One Click Installation of Demo Data
With Knost, you can build a functioning website just by clicking a button and install our demo data or navigate to Create A New Page to step by step build your website from scratch. Your Knost installation will be ready with data on our demo site, and you can use it as a template to develop your own website.
Go to Appearance > Import Demo Data. Then, Click on import.

Here you can see so many options.

Note: Progress bar will appear while it is setting up demo data.
Also, if you import manually then select file(knost/inc/Demo/ocdi/).
Congratulations, Now you can visit your website to see the imported data.
Update Theme
There are 3 ways to Update the theme:
First of all, do a backup on your local computer. There is a lot of tool and plugins available to help you to do this. Just find one with a good rating and get it set up now, not later: https://wordpress.org/plugins/search.php?q=backup+wp
ALWAYS make a backup of your entire site before you update. Usually. the update installs within seconds and cause zero problems, but it's better to be safe than sorry.
How to upgrade?
The first thing to know is that if you have modified PHP, CSS, JS files into the core theme, the update will overwrite what you did.
The update will NOT affect your content such as your blog post, photos, videos, option theme settings, WordPress settings. Basically, the update replaces the PHP, JavaScript and CSS files of the theme, not your database, and not the WordPress core files.
OPTION 1 - AUTOMATIC UPDATE:
- Download and Install the official Envato Market WordPress plugin here
- Follow the instruction on the Envato Market WordPress plugin official page.
- When the theme update is done, please go to WP-Admin > Appearance > Install Plugin and click "update" for every plugin that requires an update.
- If for some reason you see some code on your front-end website after the theme update, make sure that all the required plugin are activated by going to WP-Admin > Plugins.
OPTION 2 - MANUAL UPDATE:
- Redownload the theme files on ThemeForest (ThemeForest always have the latest version of the theme). So login to your Envato account, then go to Downloads, and download "Installable WordPress file Only" package.
- Go to Wp-Admin > Appearance > Themes and activate another theme such Twenty Fifteen.
- Delete the Theme you want to update. (Yeah, you must delete the theme before re-uploading the same theme).
- Go to WP-Admin > Appearance > Themes > Add New and Upload the theme .ZIP file you've just downloaded from ThemeForest.
- Activate your theme by clicking the "Activate button".
- Make sure to reactivate the plugins by going to WP-Admin > Plugins.
- When the theme update is done, please go to WP-Admin > Appearance > Install Plugin and click "update" for every plugin that requires an update.
- If for some reason you see some code on your front-end website after the theme update, make sure that all the required plugin are activated by going to WP-Admin > Plugins.
- If one of your plugins has not been updated (ex: WPBakery Page Builder), go to WP-Admin > Plugins and delete the plugin then go to WP-Admin > Appearance > Install Plugins and reinstall the plugins. Make sure to "activate" it again.
If deleting a theme makes your nervous, or you have an issue when uploading the theme via the WordPress dashboard, you can upload it manually by FTP.
- Redownload the theme files on ThemeForest (ThemeForest always have the latest version of the theme). So login to your Envato account, then go to Downloads, and download "Installable WordPress file Only" package.
- Unzip the zip file on your computer
- Rename the root folder to something like "themename-new".
- By using an FTP software (such as FileZilla), connect to your FTP.
- Upload the folder to .../wp-content/themes/ (so you should have /wp-content/themes/themename-new/)
- Once everything has been uploaded, go to WP-Admin > Appearance > Themes and activate your new theme.
- Make sure to reactivate the plugins by going to WP-Admin > Plugins. If one of your plugins has not been updated (ex: Visual Composer), go to WP-Admin > Plugins and delete the old plugin.
- Go to WP-Admin > Appearance > Install Plugins and reinstall the plugins. Make sure to "activate" them again.
Theme Options
By clicking on the "Theme Options" menu, you'll be able to change all template specific settings.
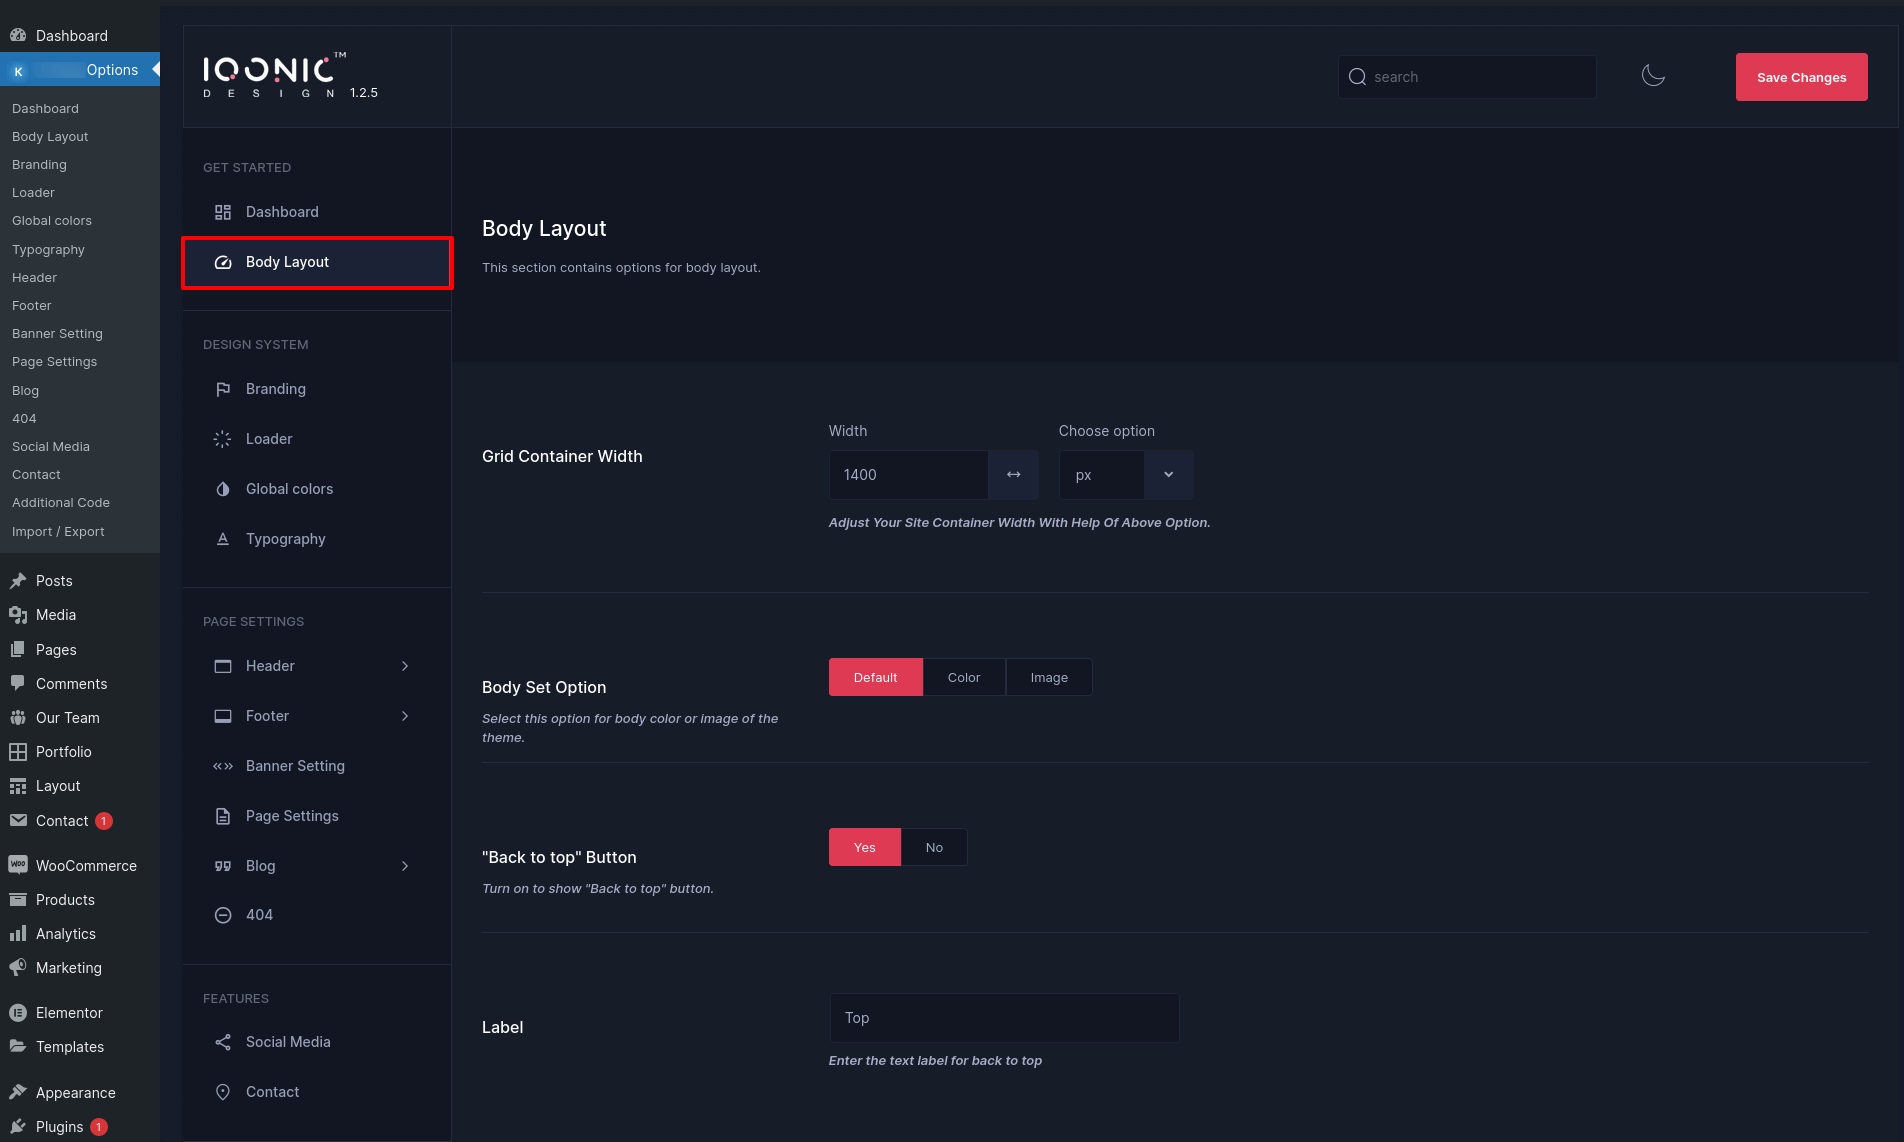
General Settings
You can change settings for General Option from here.
Loader Settings
You can change settings for Loader from here.

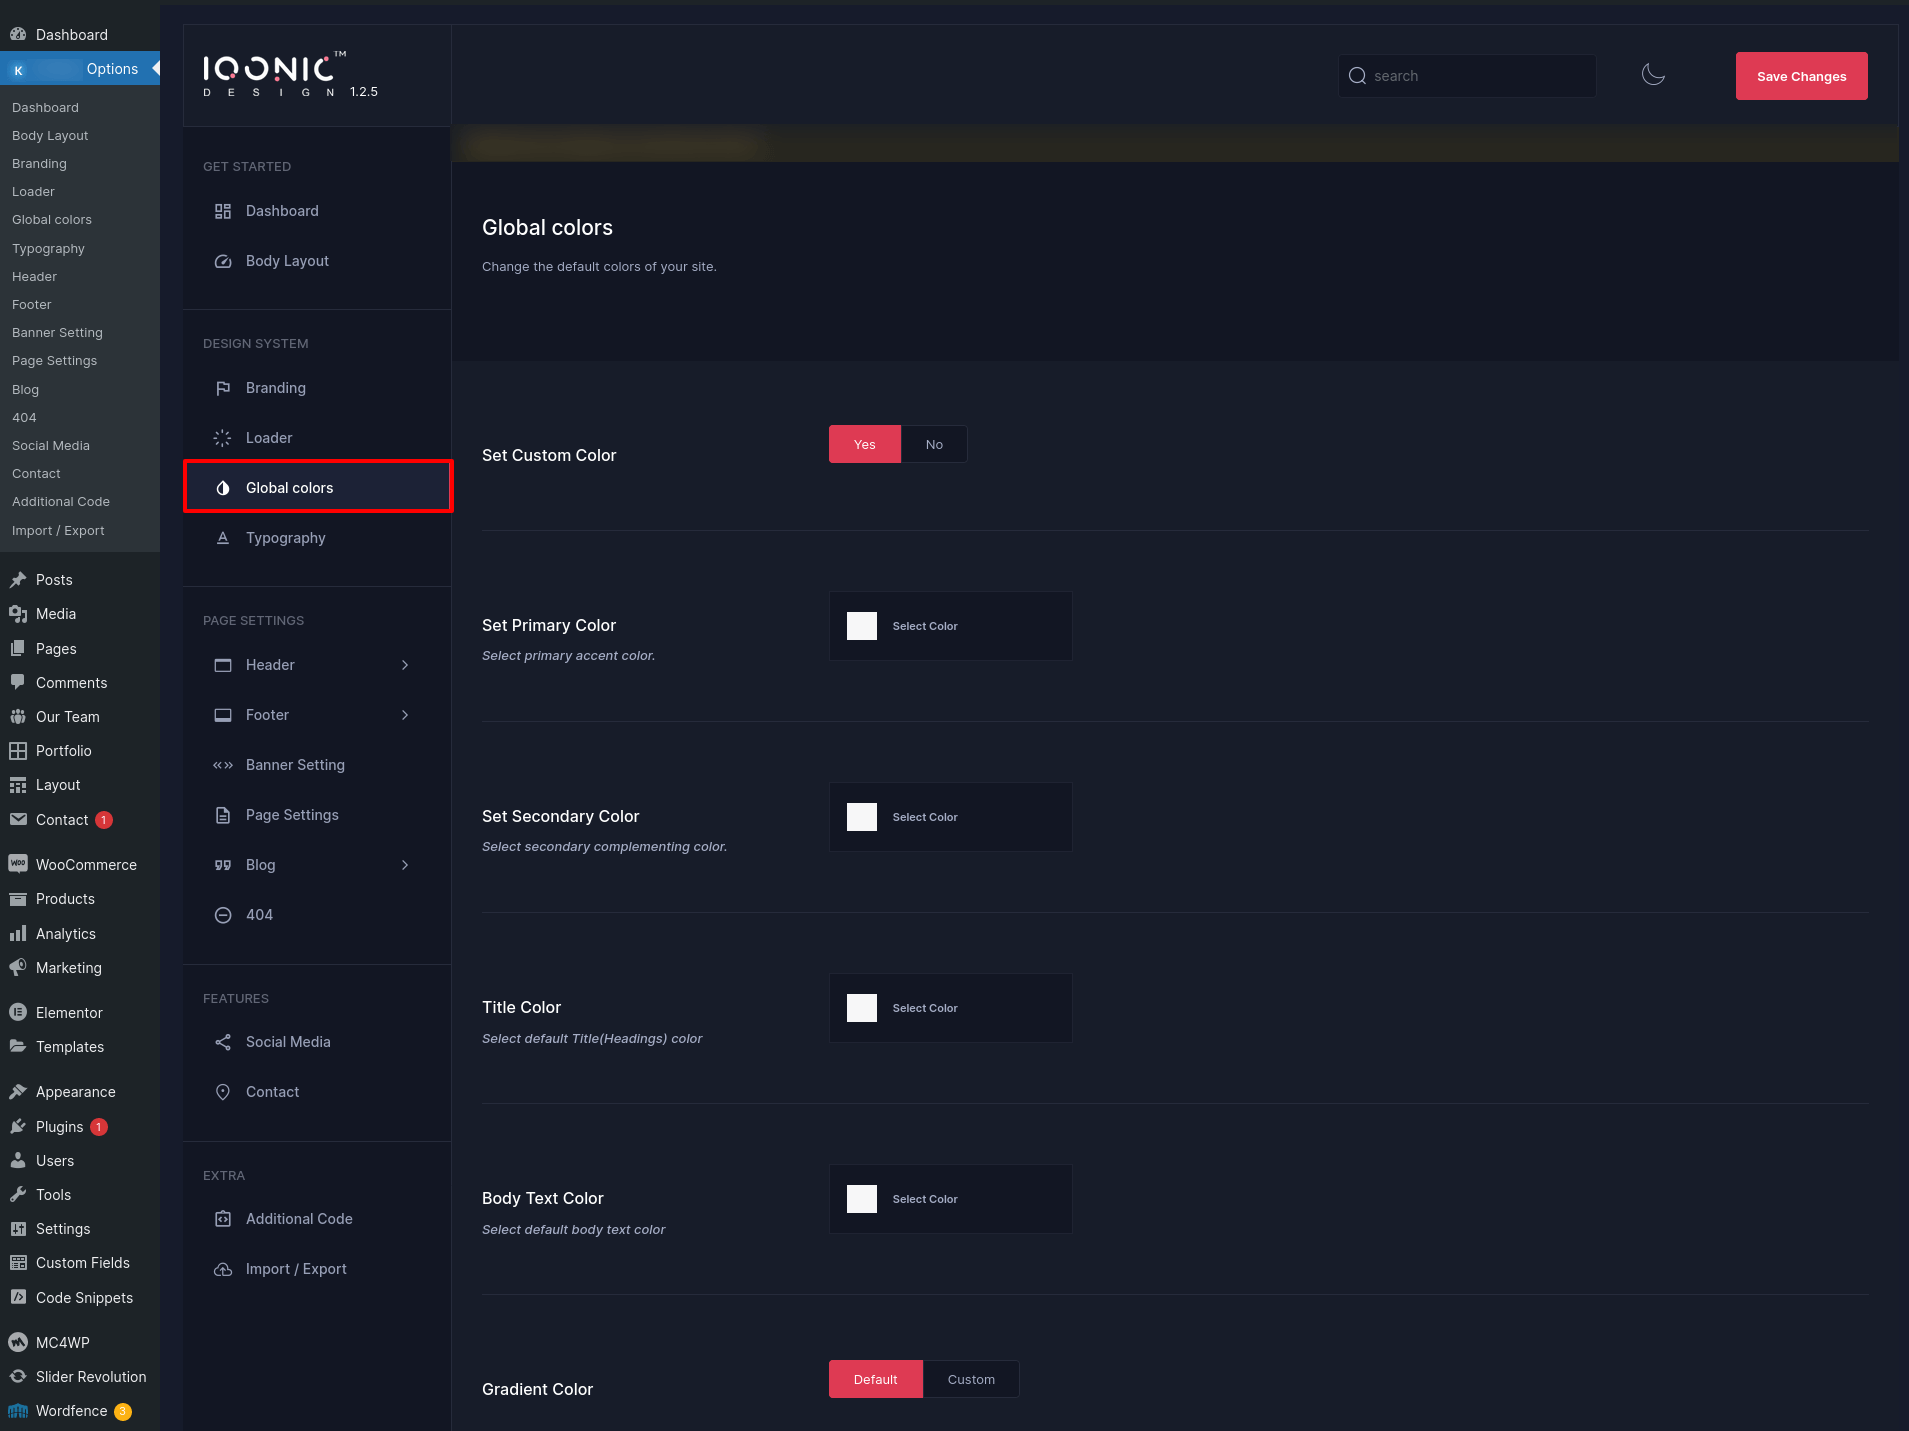
Color Settings
You can change settings for Page section from here.
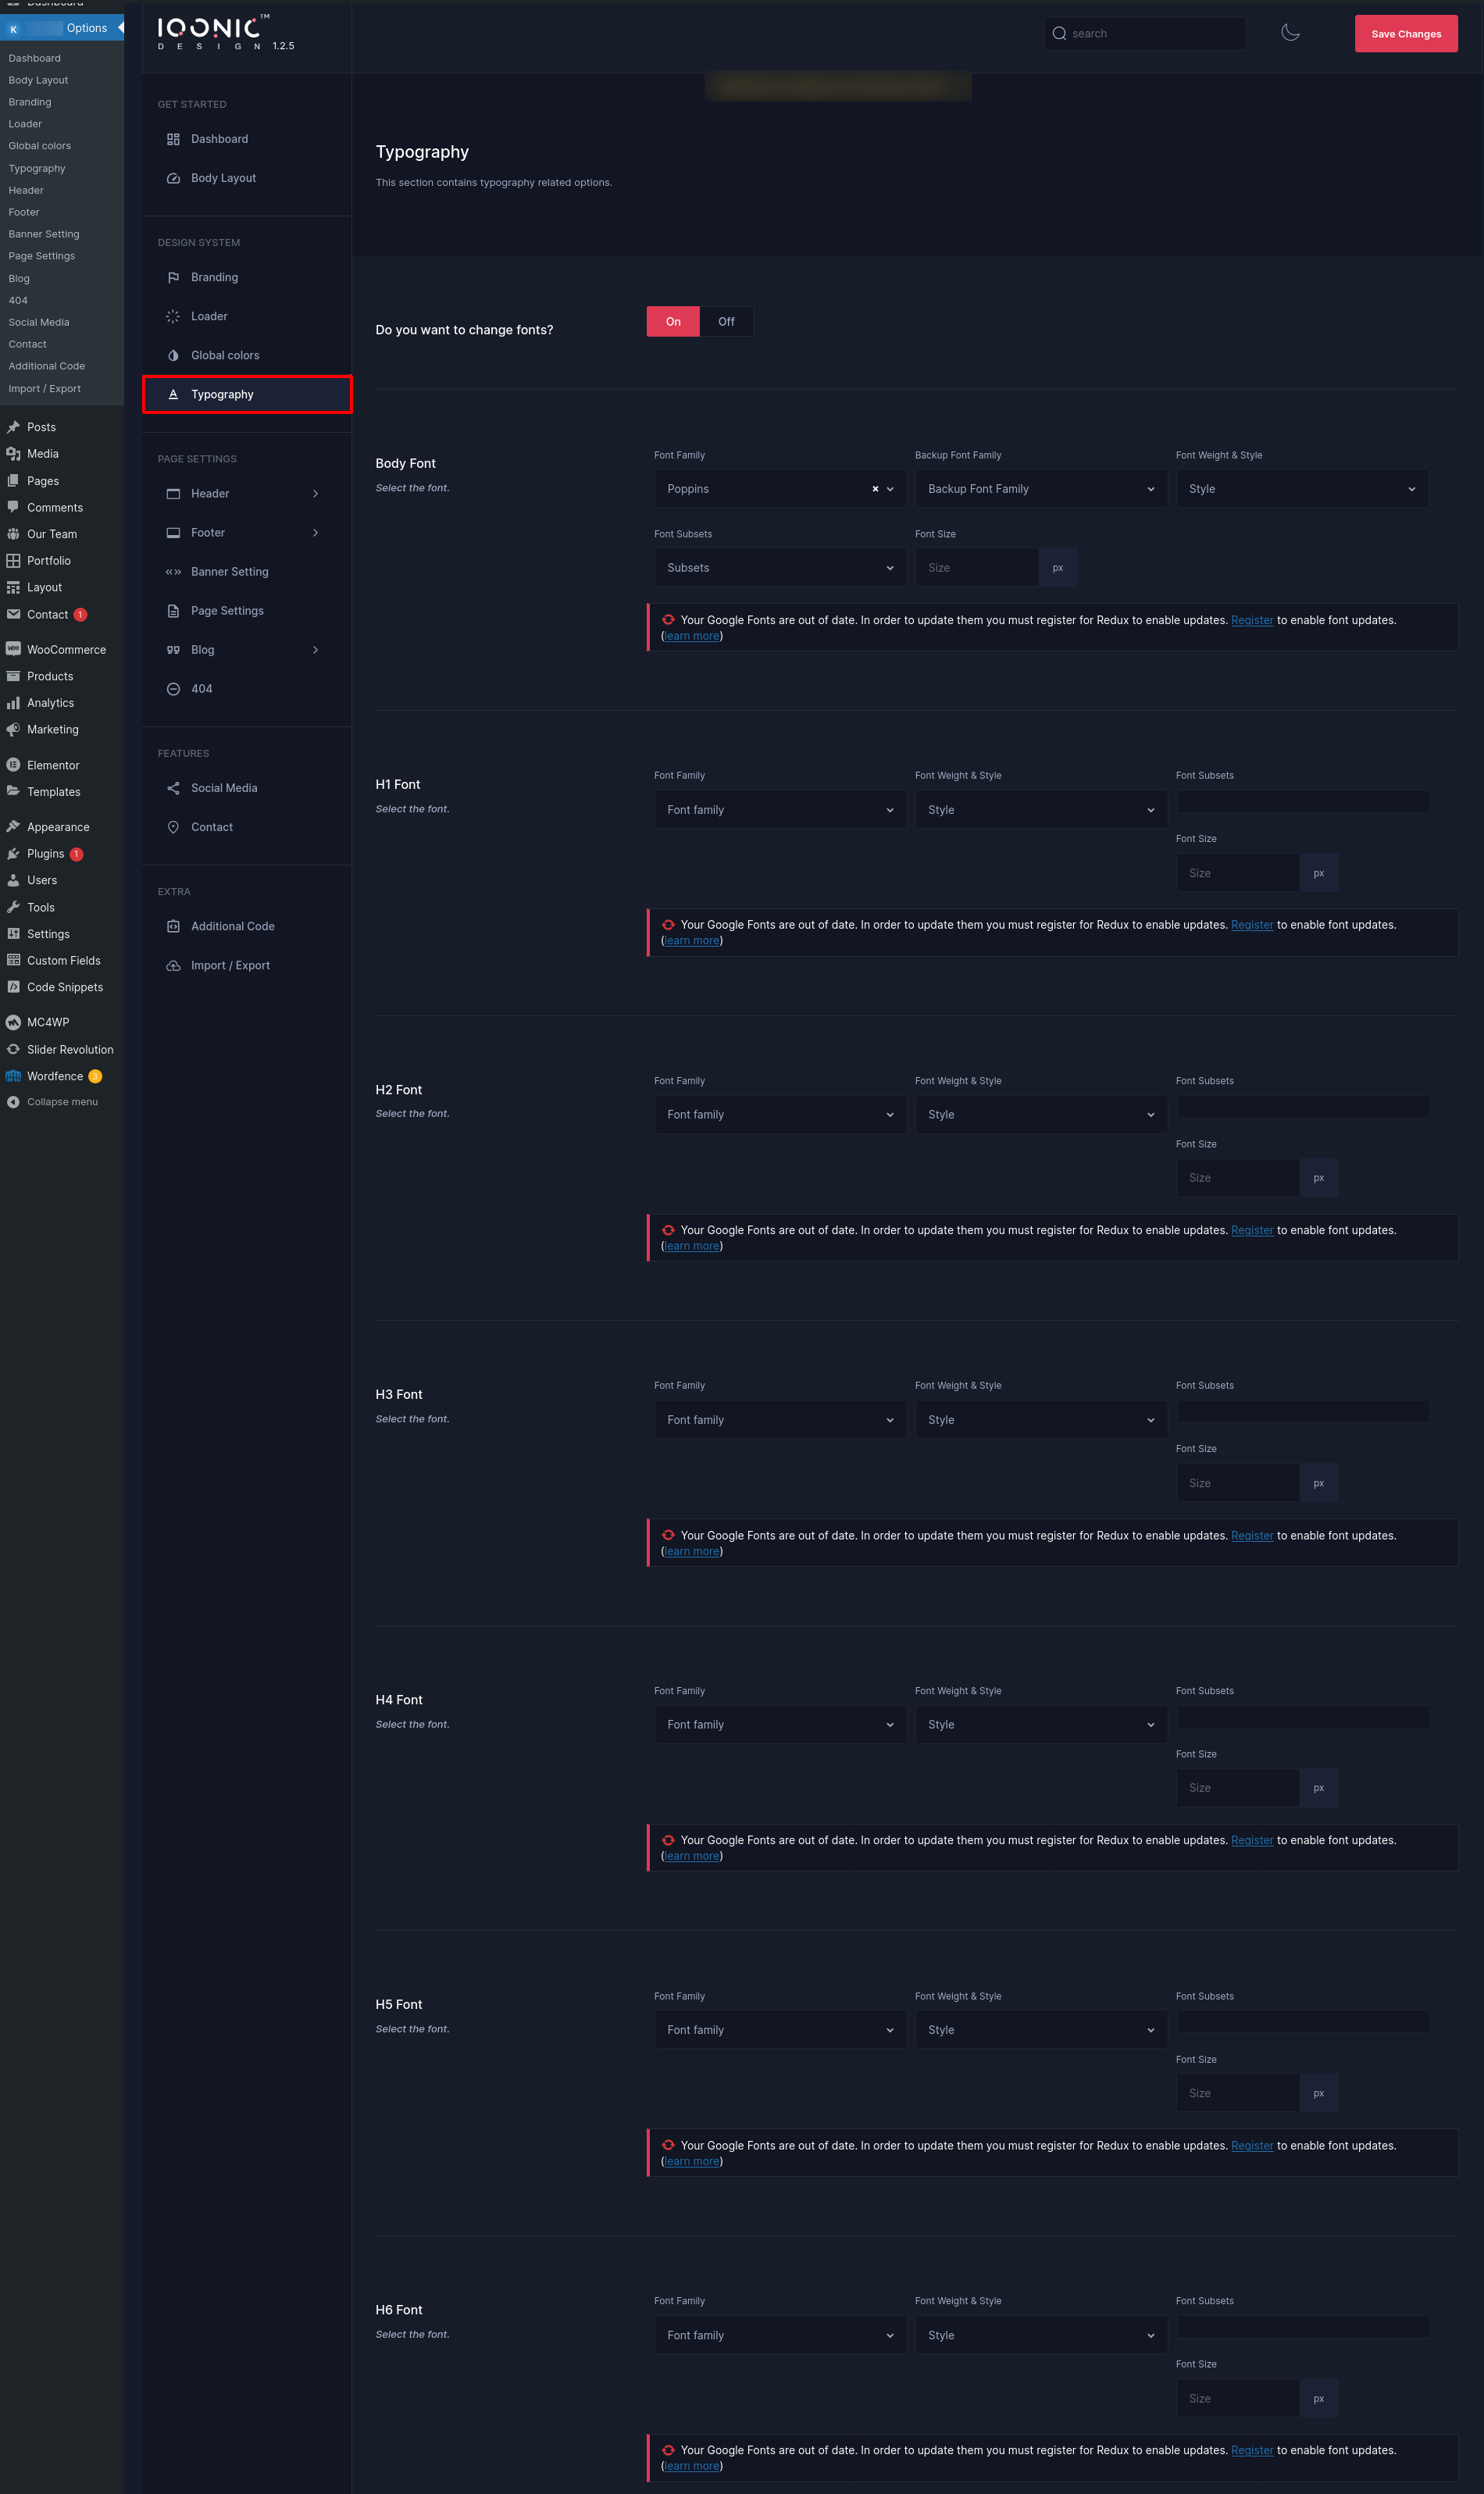
Typography
You can change settings for General Option from here.
Header Settings
By-default, Header functions from Theme Options -> Header Settings for all pages. You can change settings for Header from here.

In above example, 'Header Style 1' was selected. This means Header Setting would appear on ALL PAGES of your site.
Now, sometimes we receive requests from buyers where they want to show different Header style (for menu or appearance) for different pages. So we have come up with this option where you can display a different Header style for a particular page.
For example, if you want to display a different Header style for about page then go to Pages -> Select a page ->Edit . In below example about page was chosen.
On next screen, scroll down a bit and you'll see a section to choose Page settings styles. Refer to the screenshot below. You can now select any Header settings and save the page. Now, you have a new Header settings for your about page. You can do same for other pages also.

Link For the Custom Header Layouts is HERE
Logo Settings
You can change settings for Logo from here.
Page Banner Settings
By-default, Page Banner functions from Theme Options -> Page Banner Settings for all pages. You can change settings for Page Banner from here.
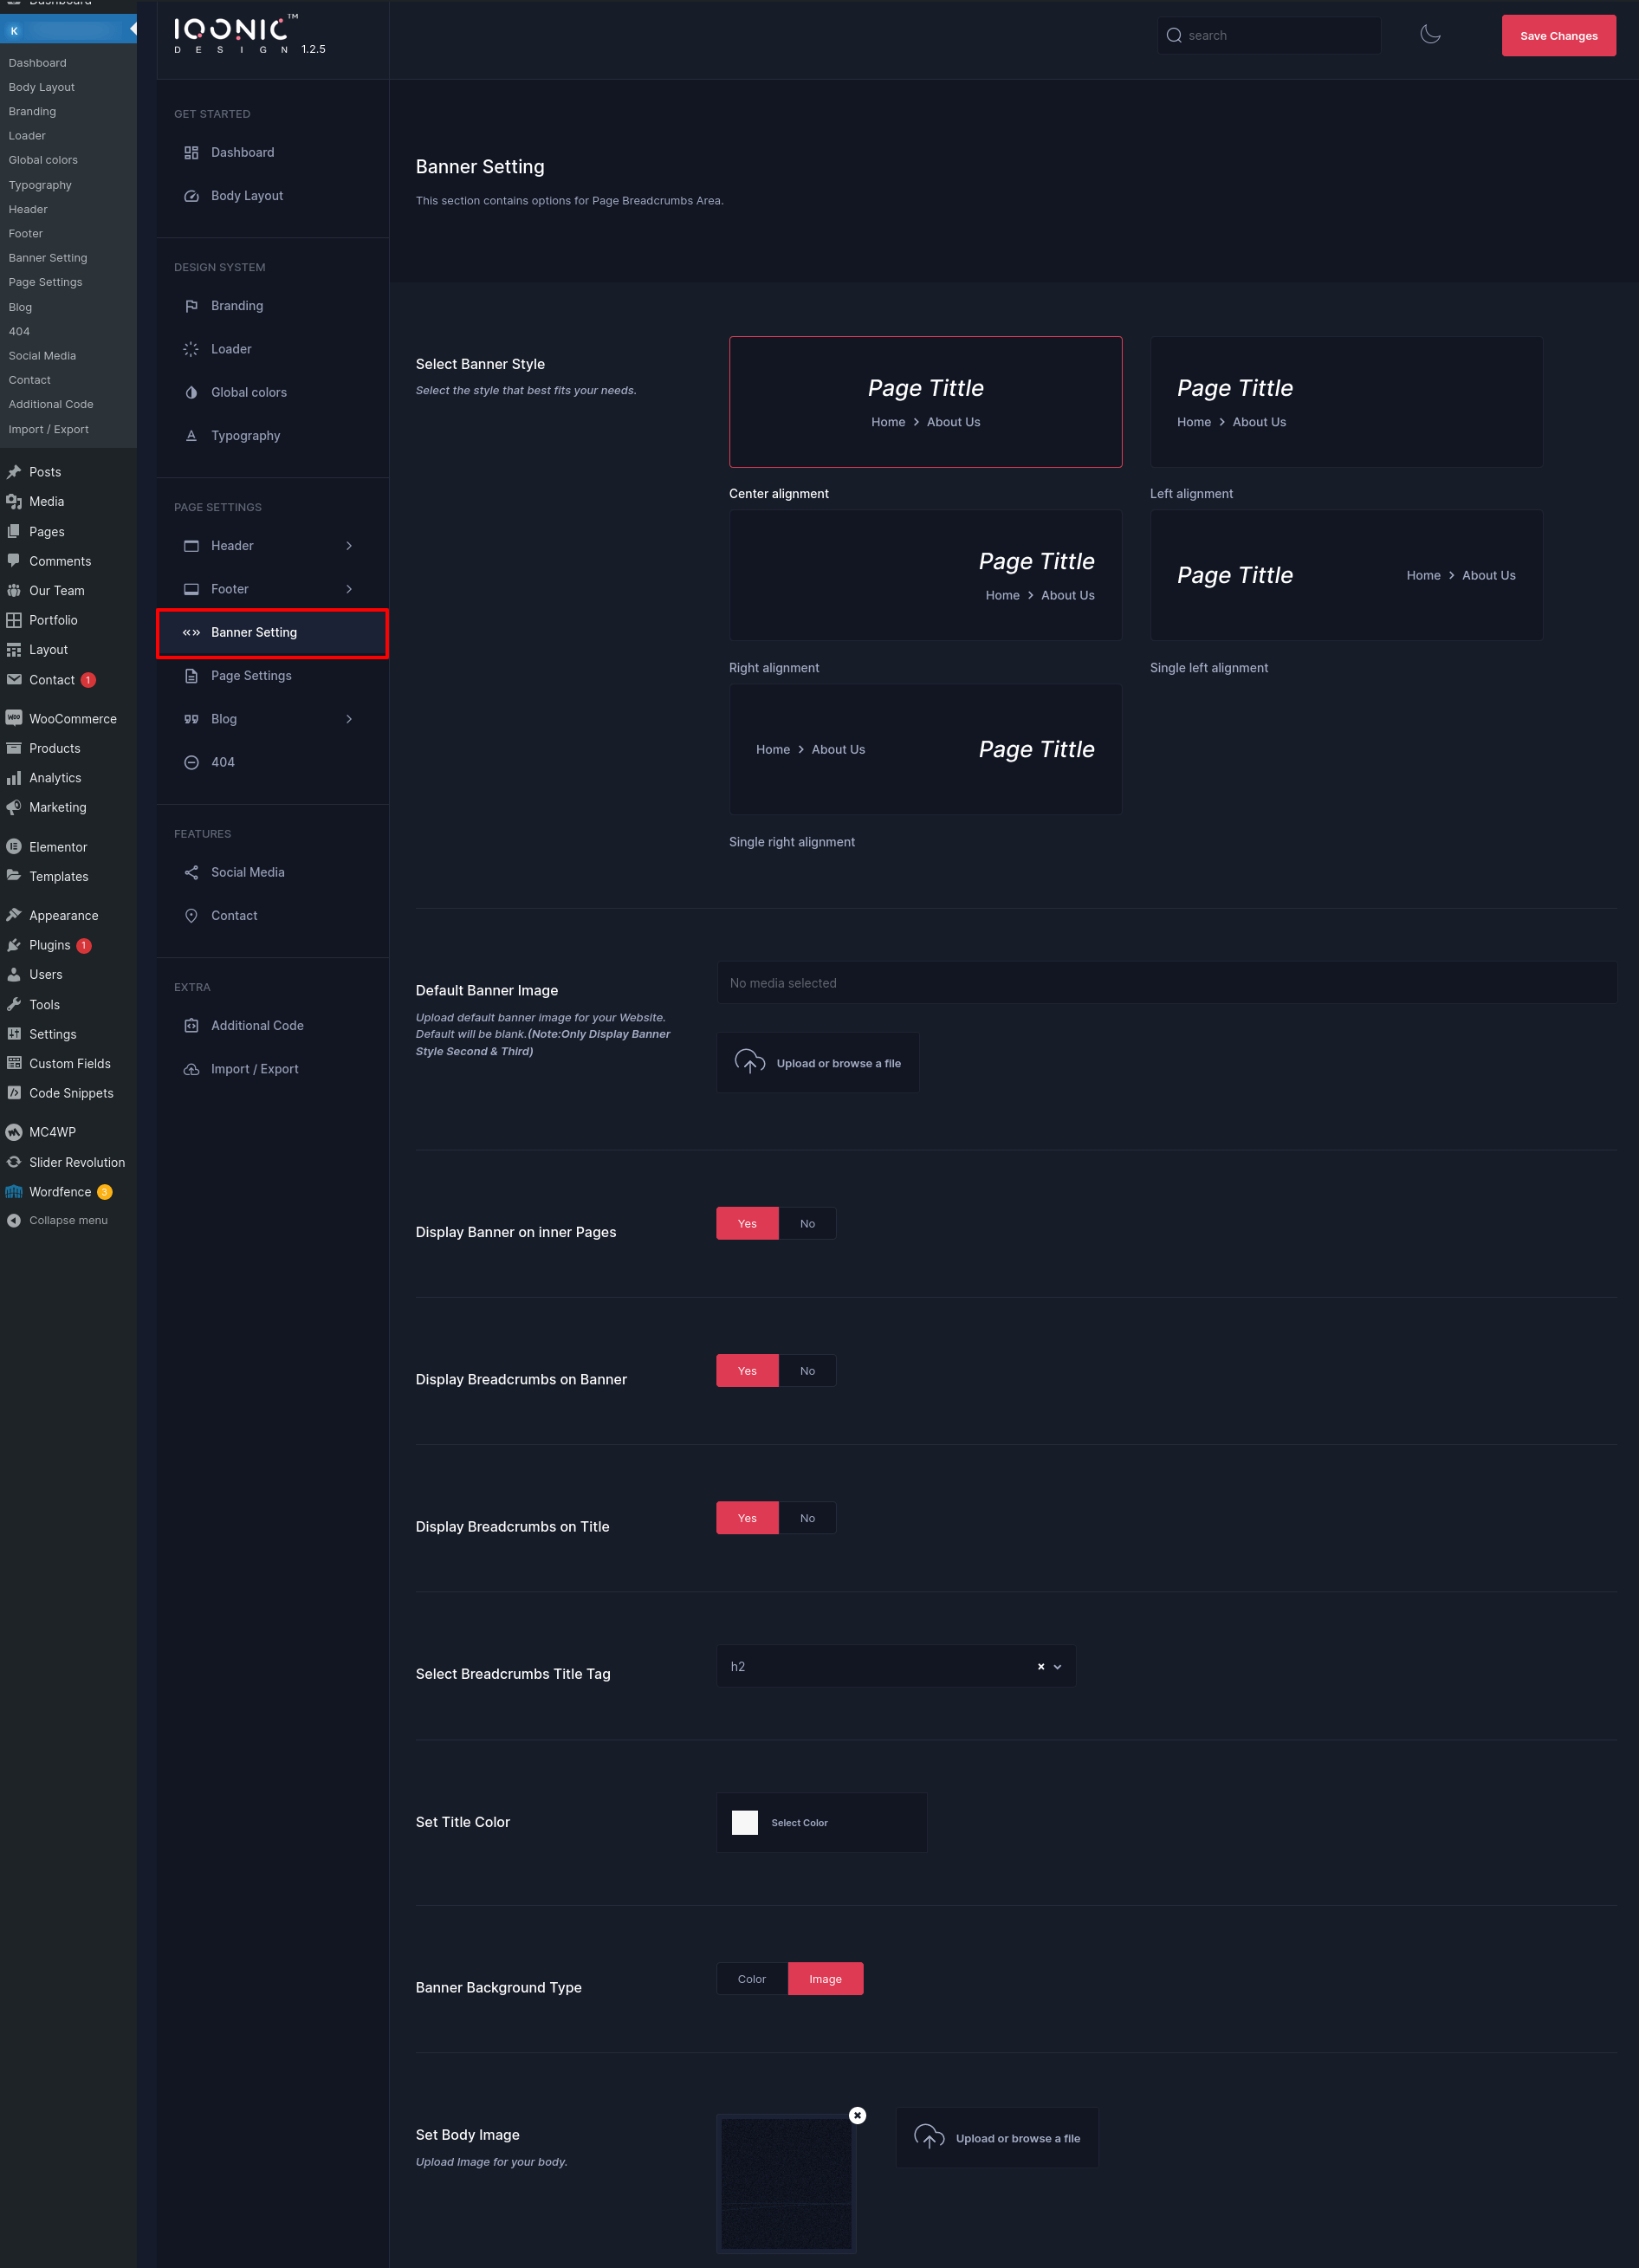
In above example, 'Banner Style 1' was selected. This means Banner Style 1 would appear on ALL PAGES of your site.
Now, sometimes we receive requests from buyers where they want to show different Banner style (for menu or appearance) for different pages. So we have come up with this option where you can display a different Banner style for a particular page.
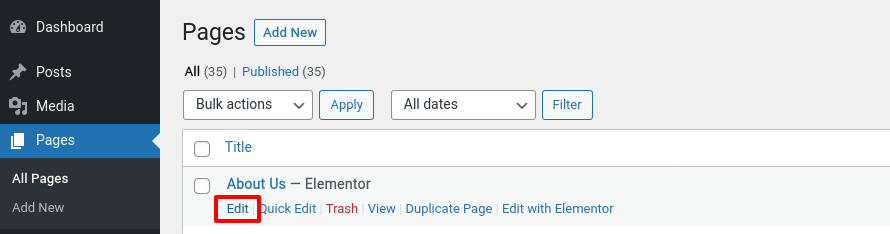
For example, if you want to display a different Banner style for about page then go to Pages -> Select a page ->Edit . In below example about page was chosen.
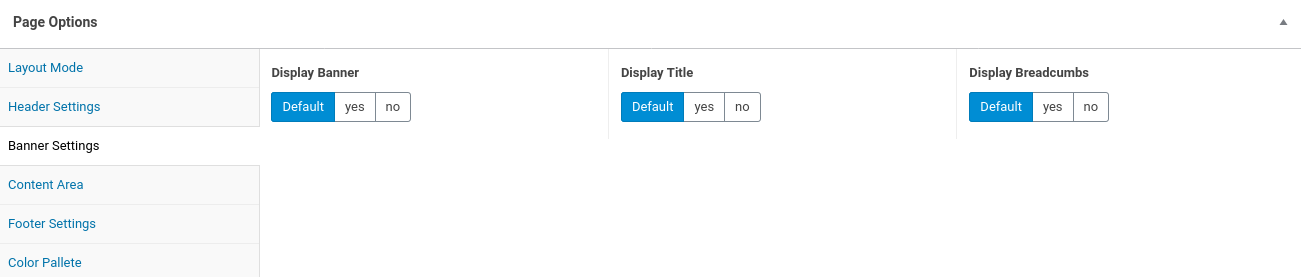
On next screen, scroll down a bit and you'll see a section to choose Page settings styles. Refer to the screenshot below. You can now select any banner settings and save the page. Now, you have a new banner settings for your about page. You can do same for other pages also.
Page Settings
You can change settings for Page section from here.

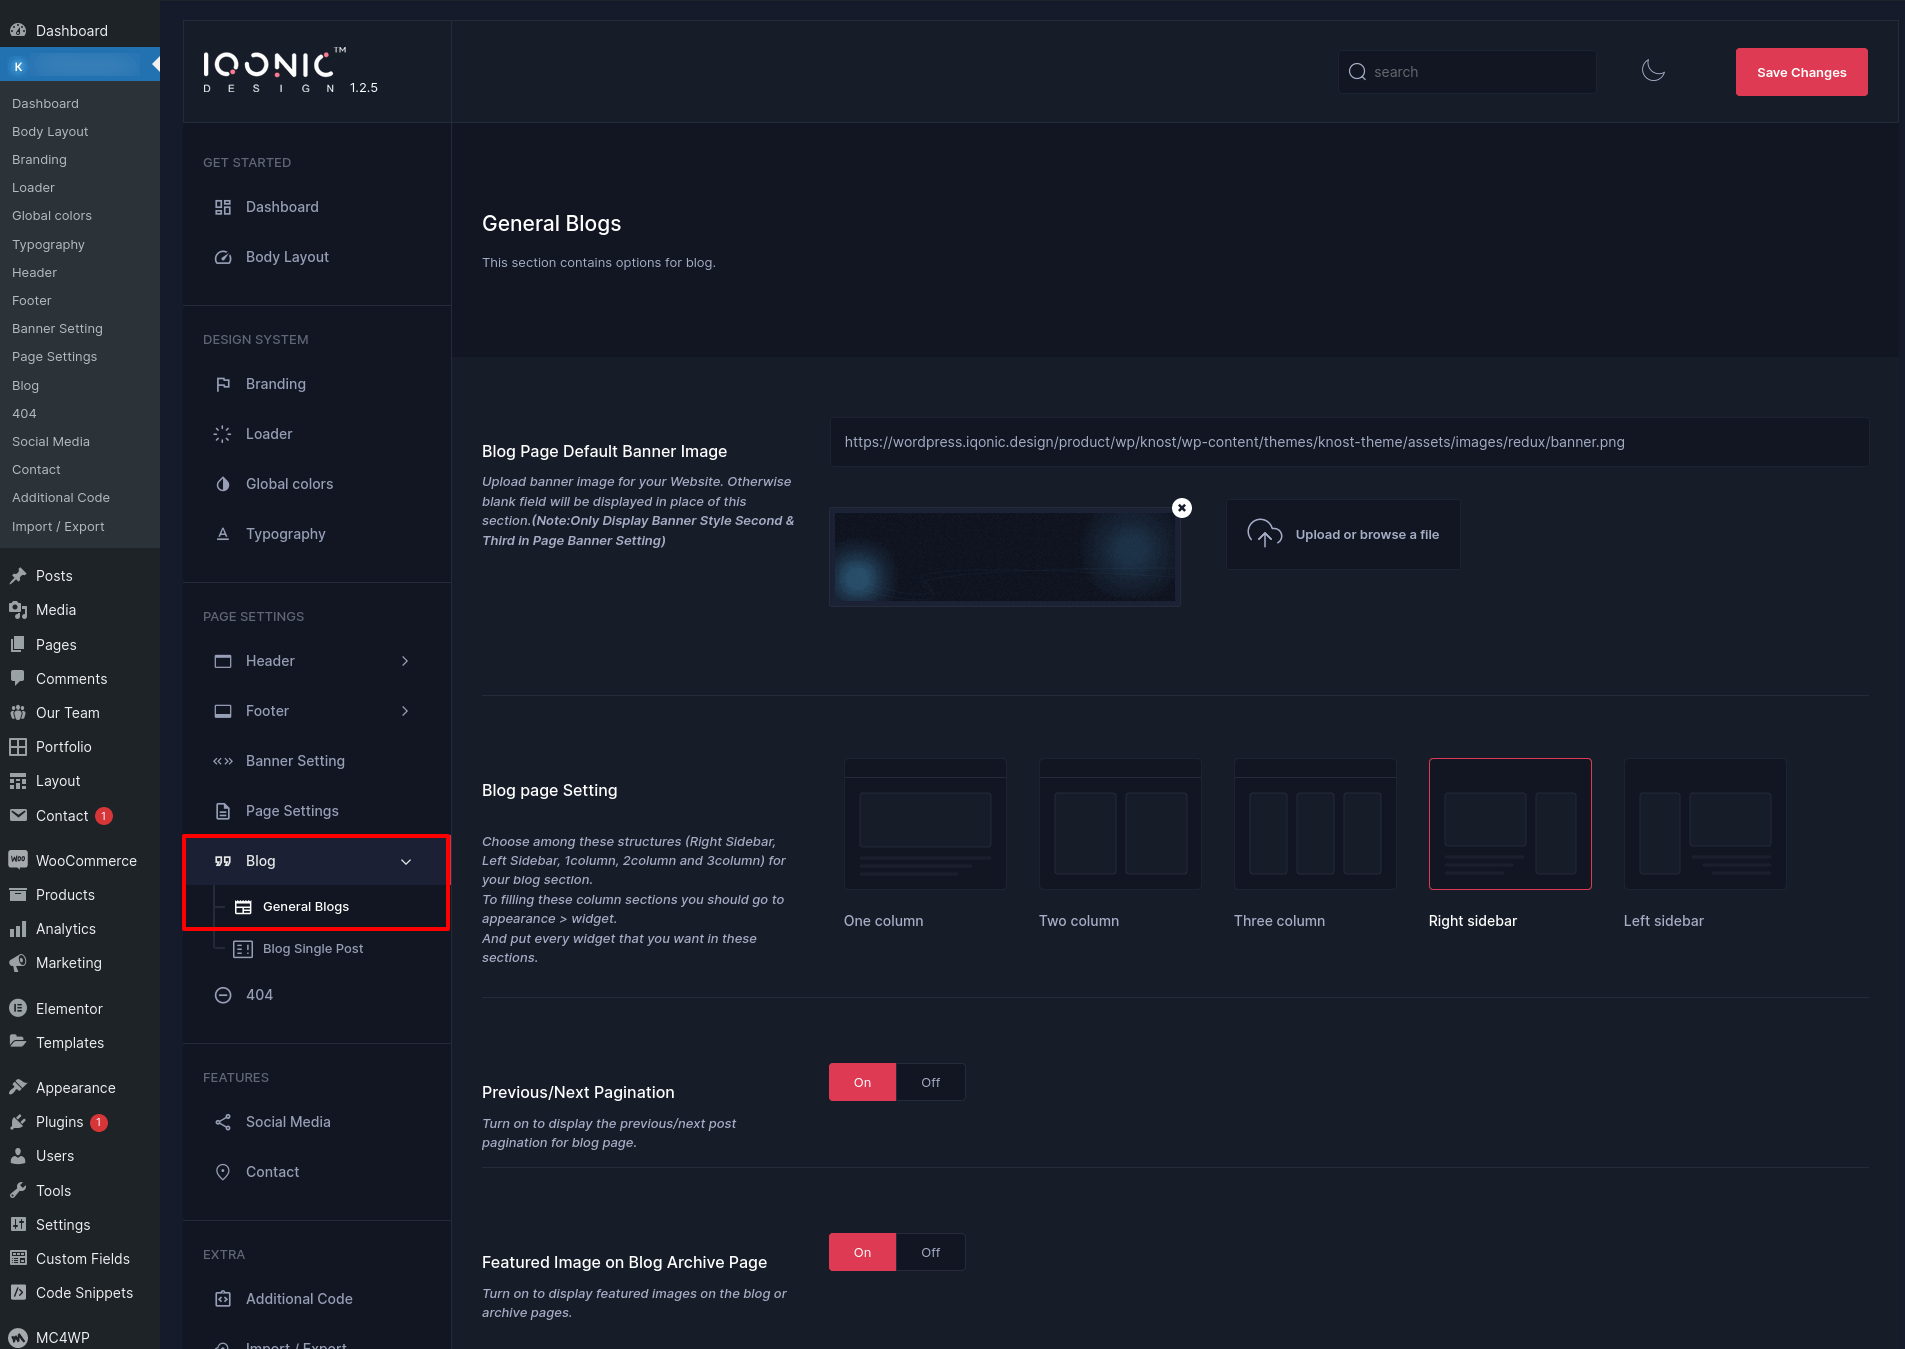
Blog Settings
You can change settings for Blog from here.
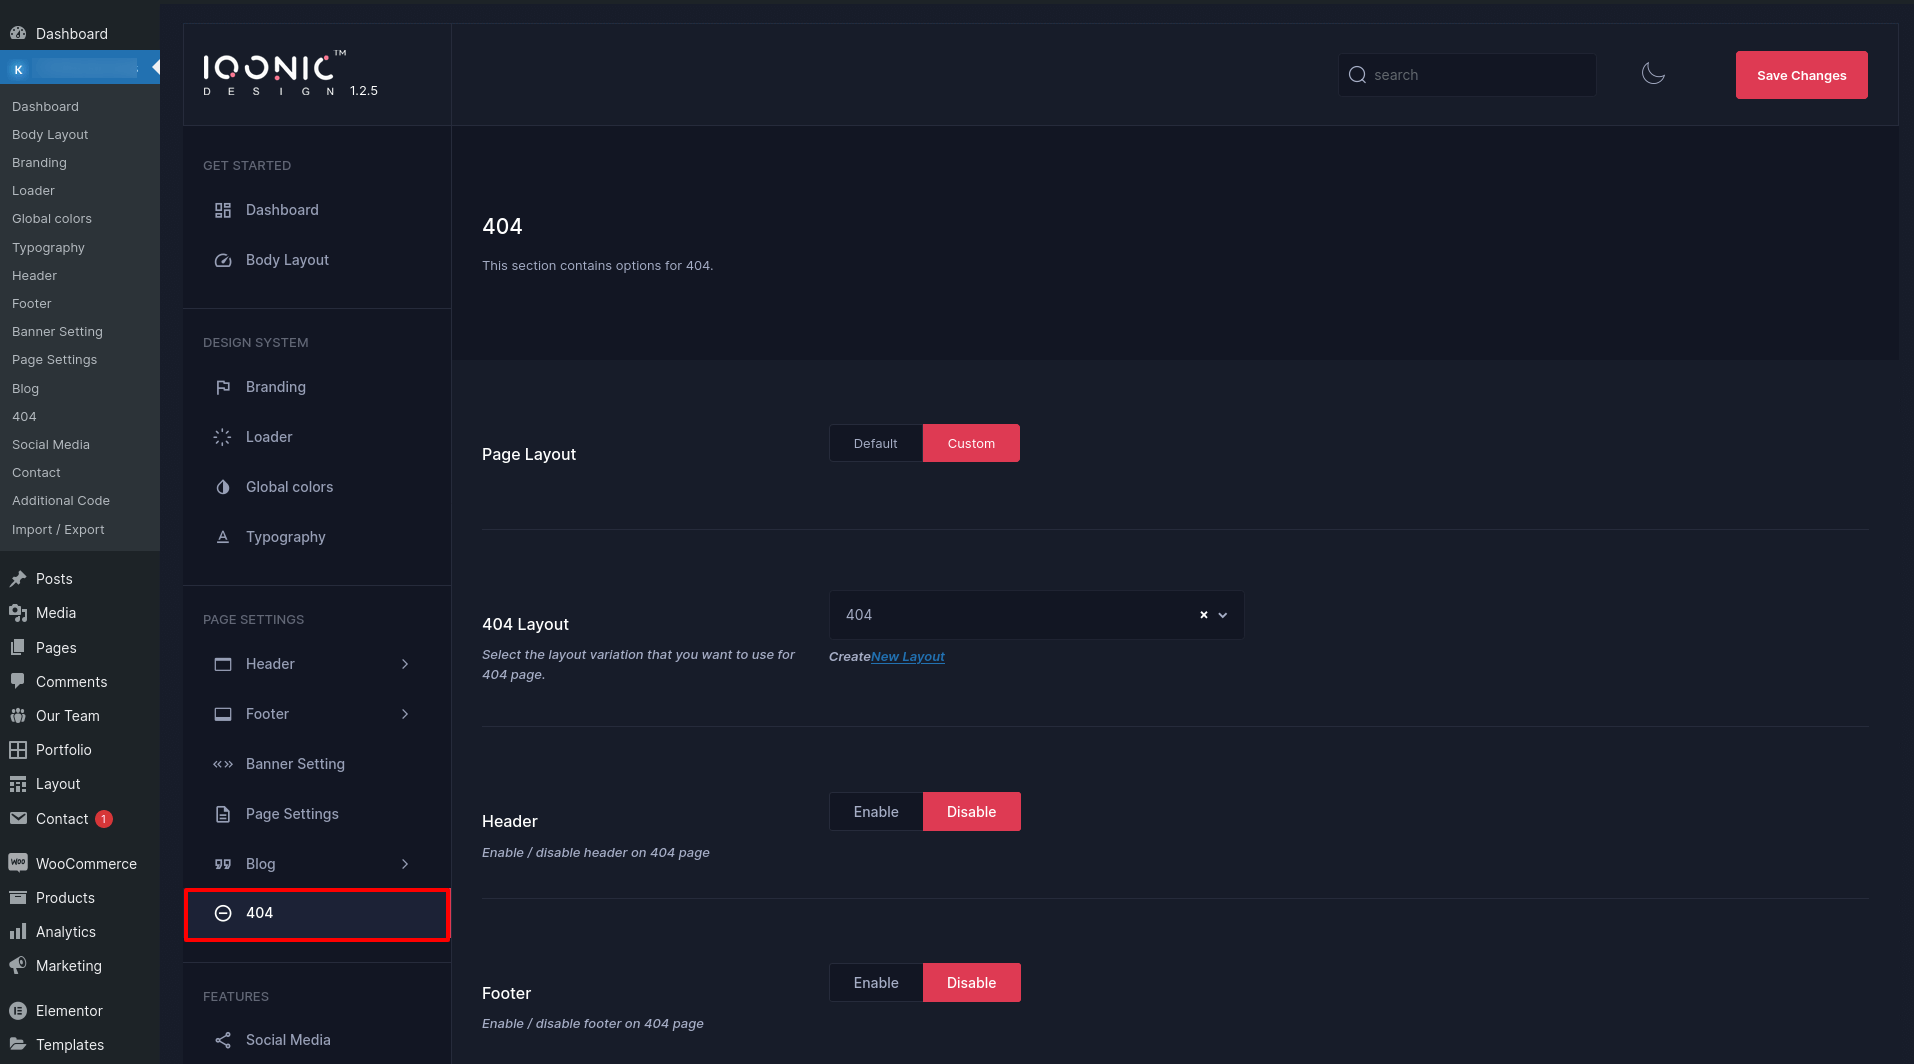
404 Settings
You can change settings for 404 Page not found from here.
Footer Settings
By-default, Footer functions from Theme Options -> Footer Settings for all pages. You can change settings for Footer from here.
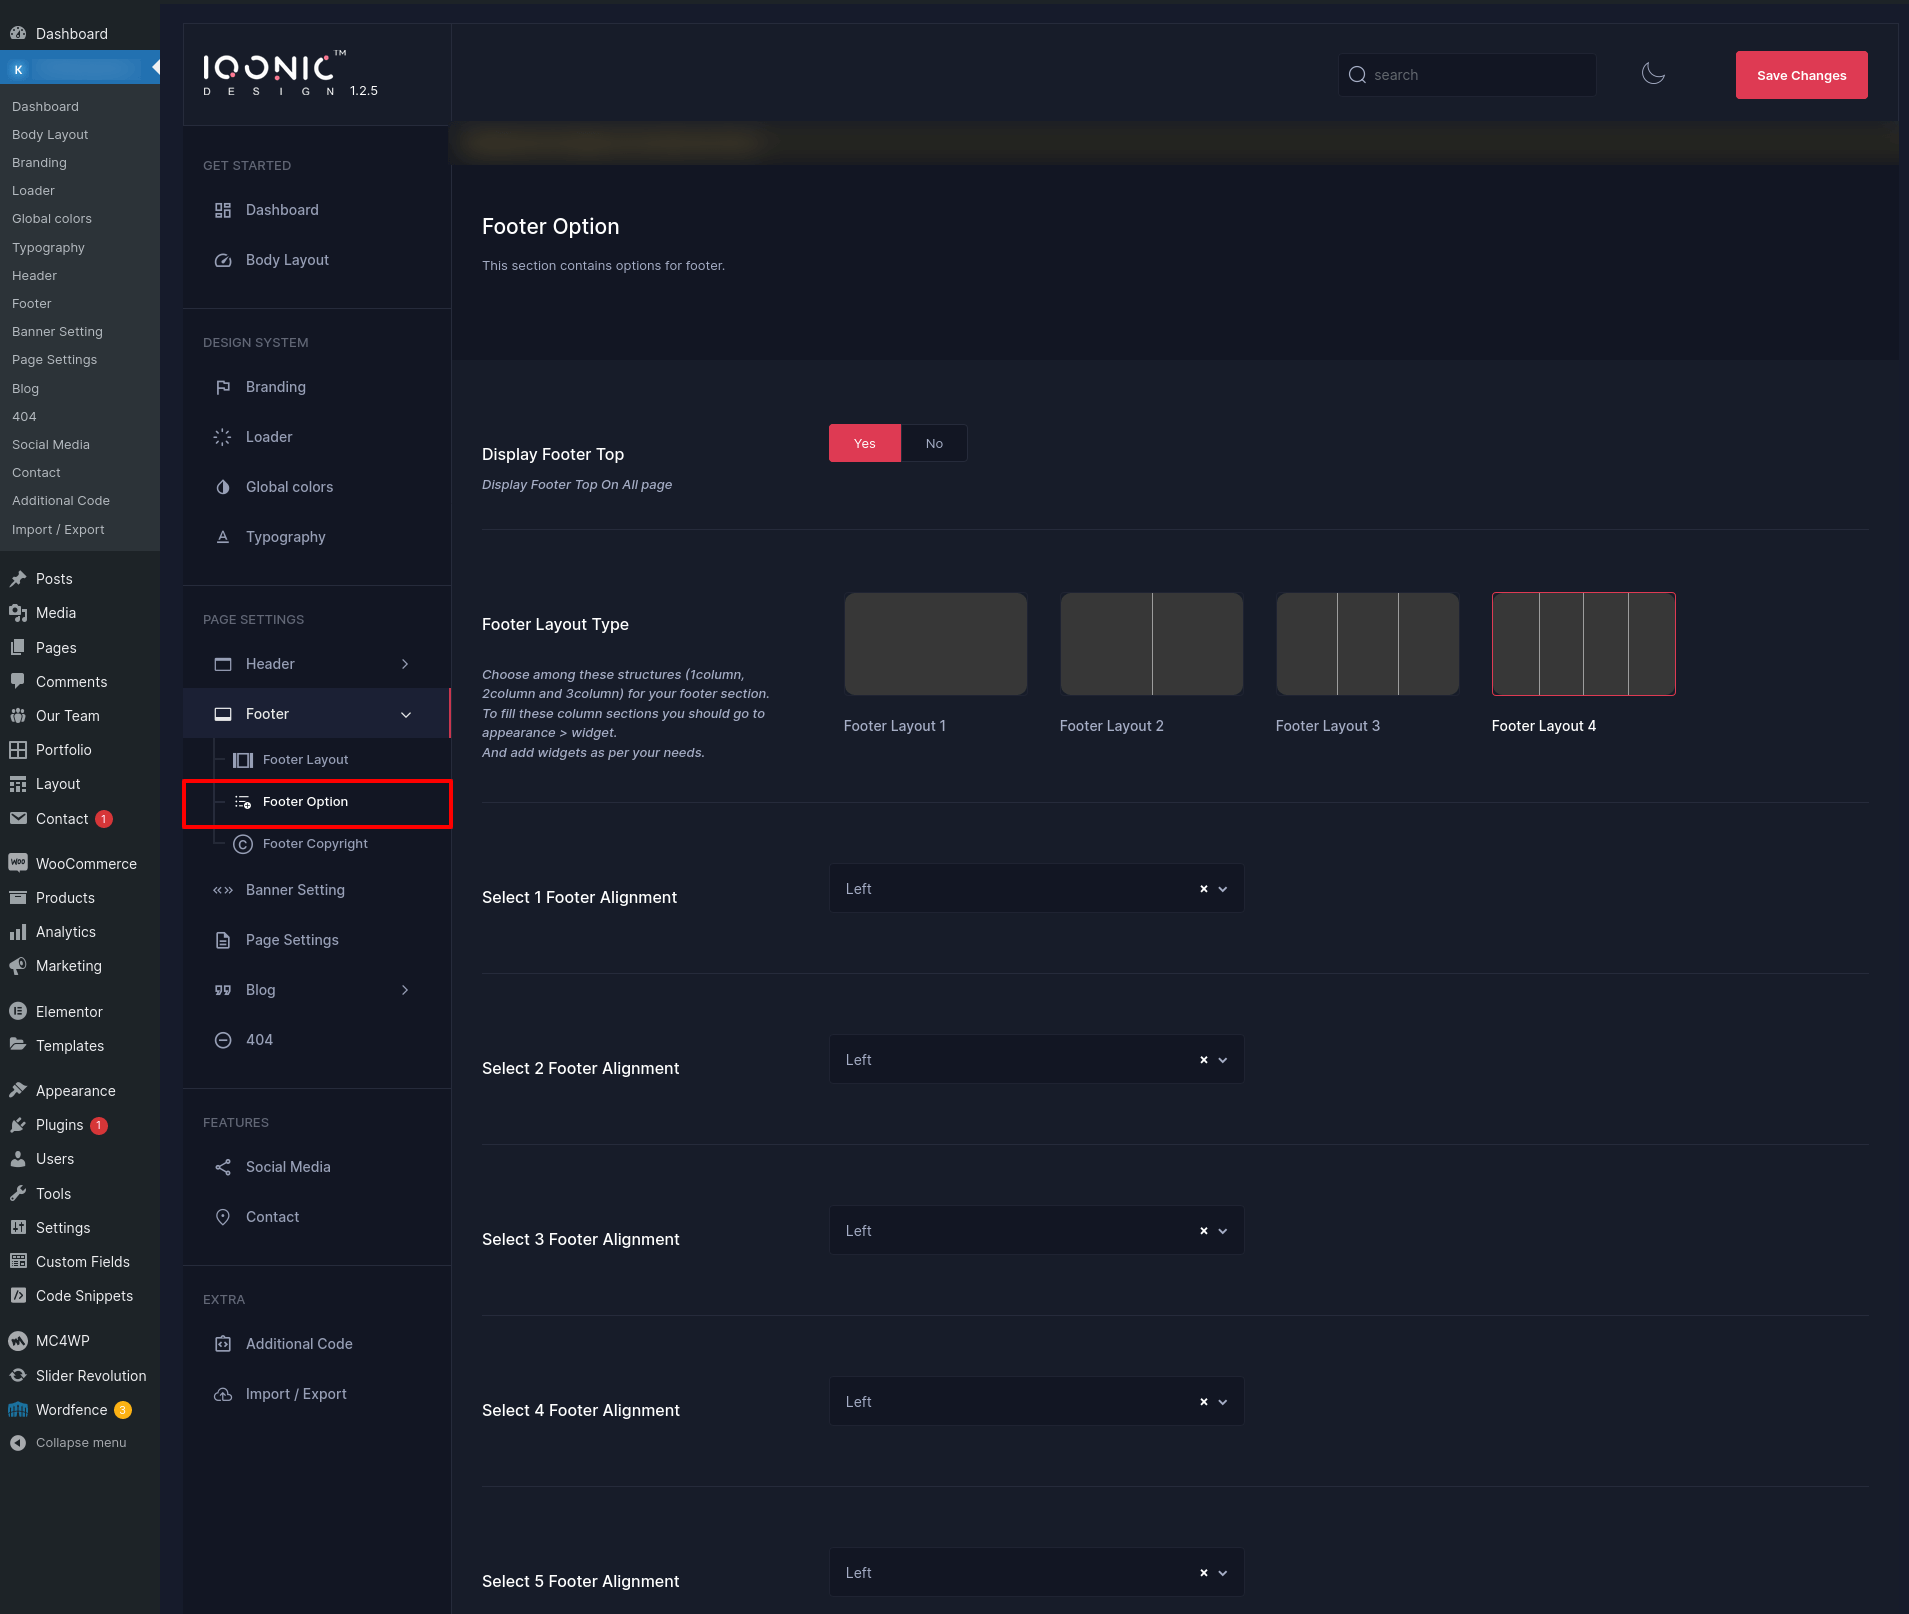
In above example, 'Footer Layout 4' was selected. This means Footer 4 Column would appear on ALL PAGES of your site.
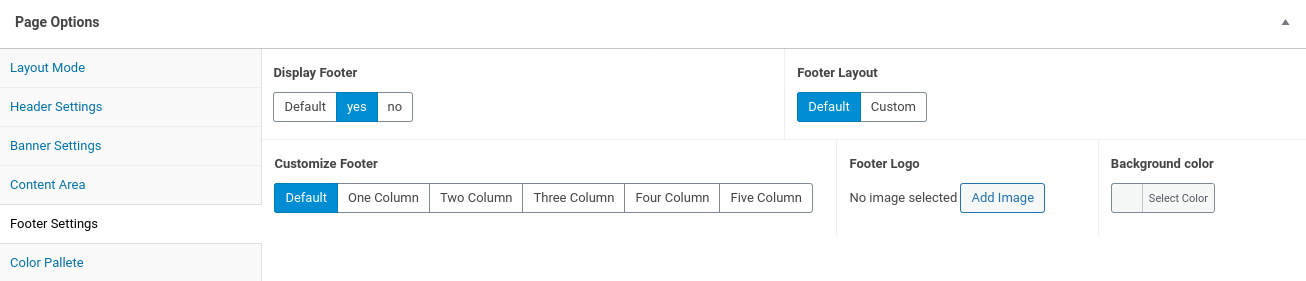
Now, sometimes we receive requests from buyers where they want to show different Footer style (for menu or appearance) for different pages. So we have come up with this option where you can display a different Footer style for a particular page.
For example, if you want to display a different Footer style for about page then go to Pages -> Select a page ->Edit . In below example about page was chosen.
On next screen, scroll down a bit and you'll see a section to choose Page settings styles. Refer to the screenshot below. You can now select any footer settings and save the page. Now, you have a new footer settings apply for your about page. You can do same for other pages also.
Link For the Custom Footer Layouts is HERE
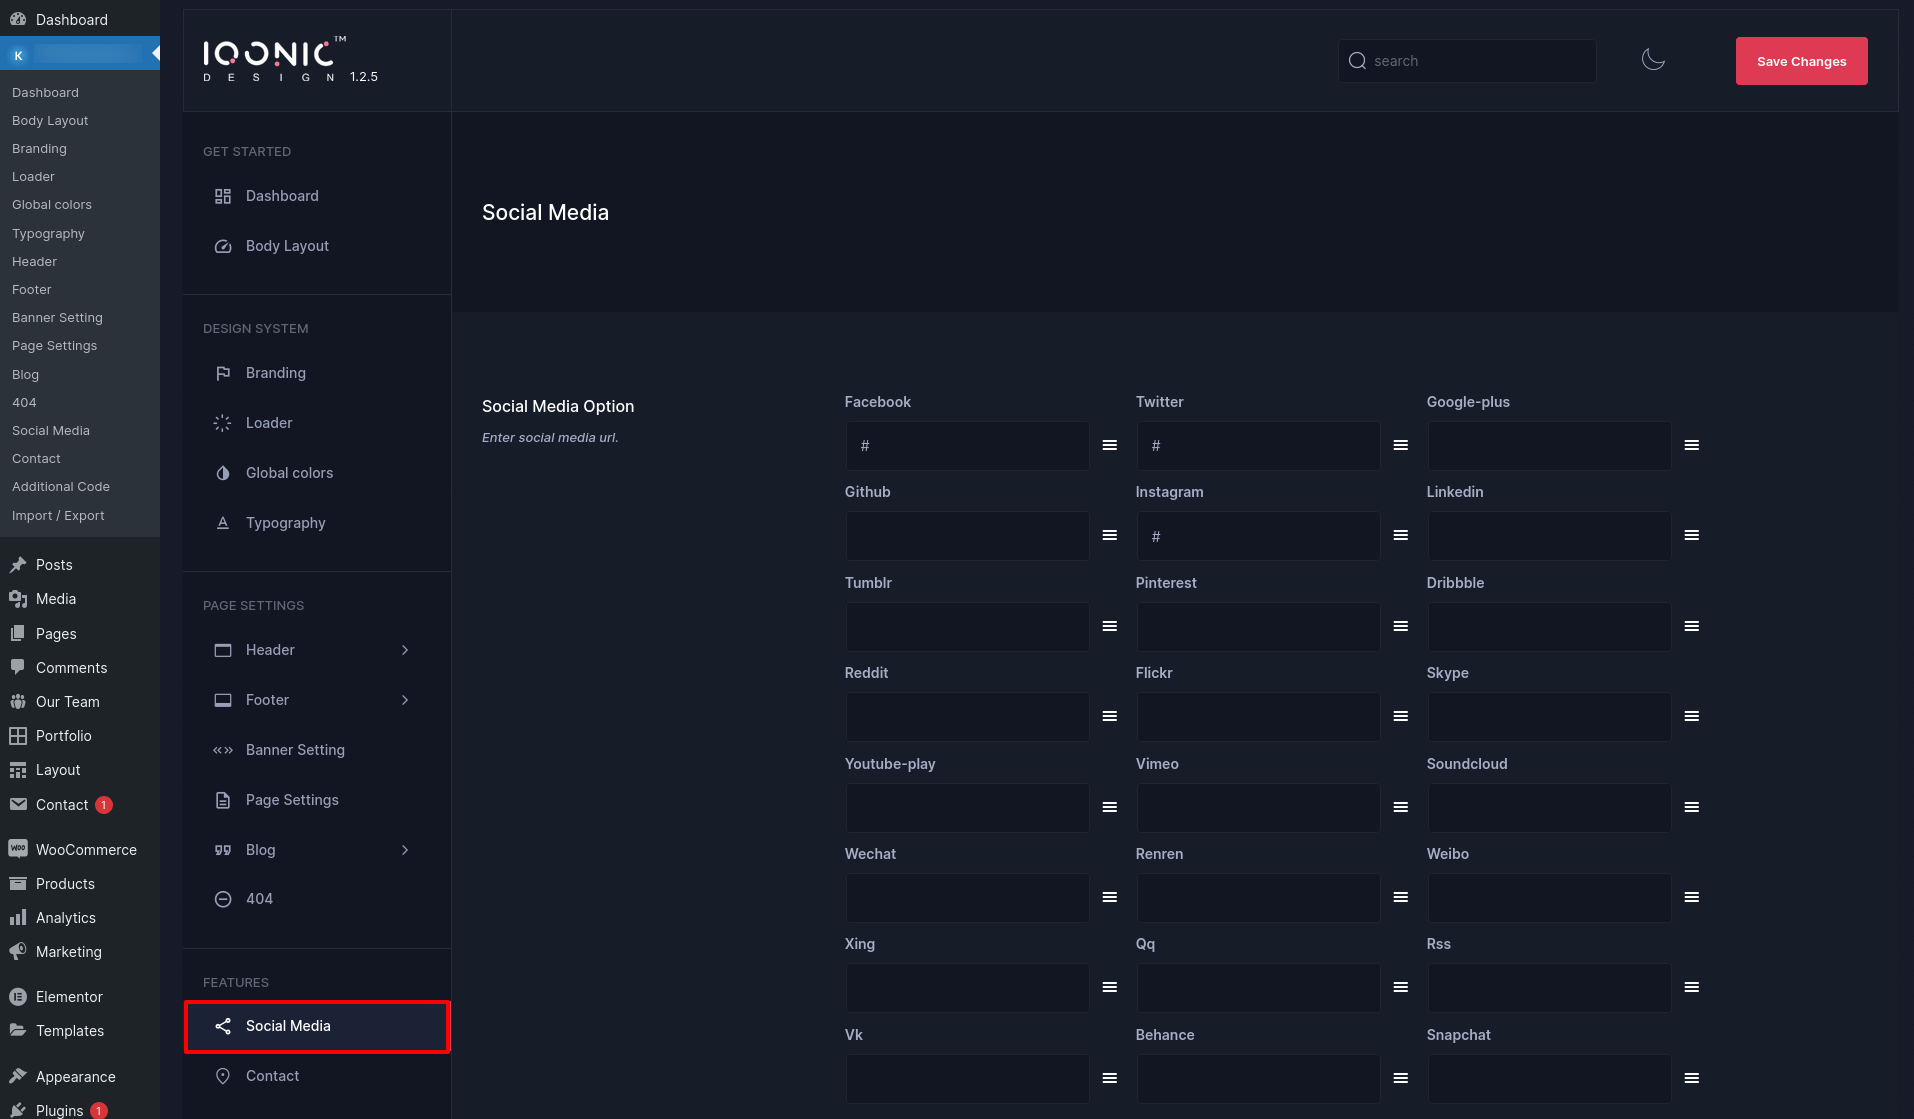
Social Media Settings
You can change settings for Social Media from here.
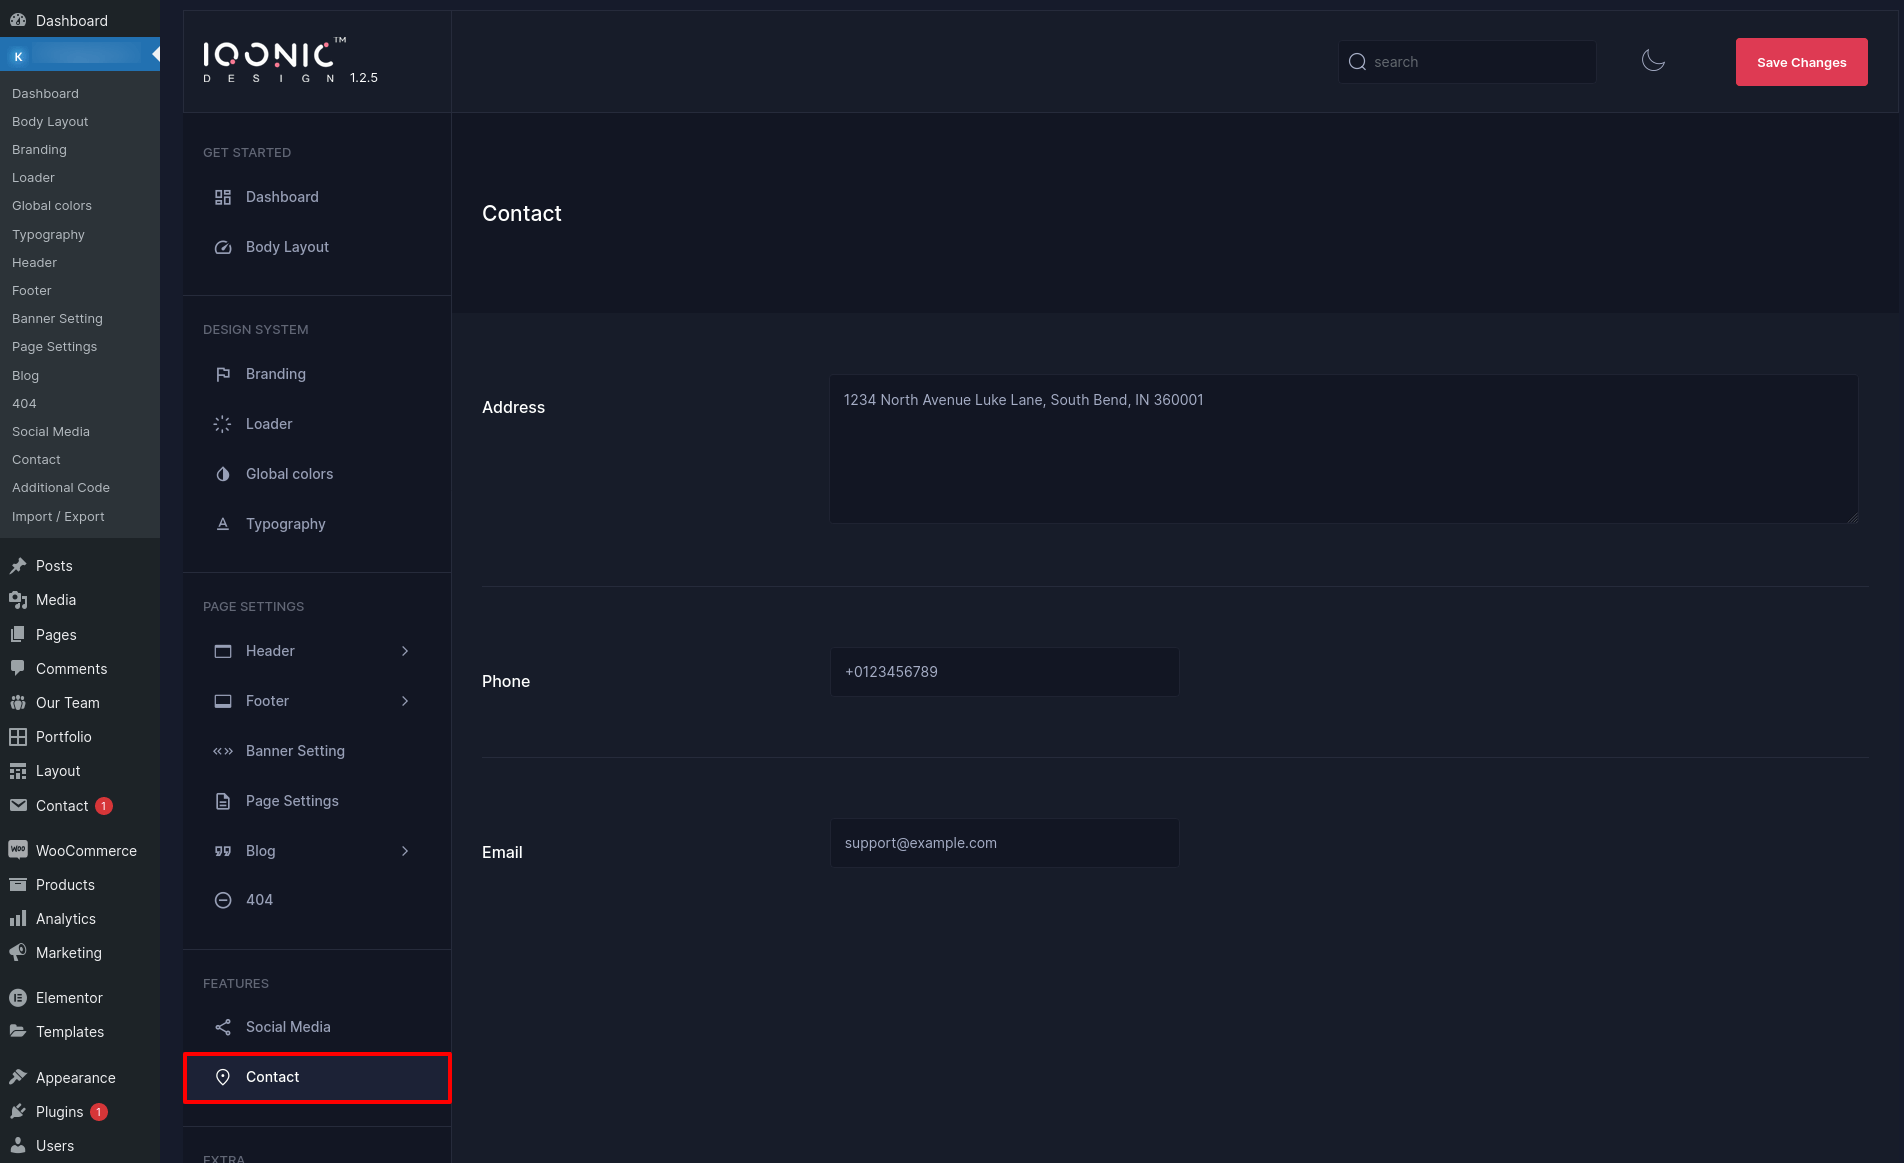
Contact Settings
You can change settings for Contact Information from here.
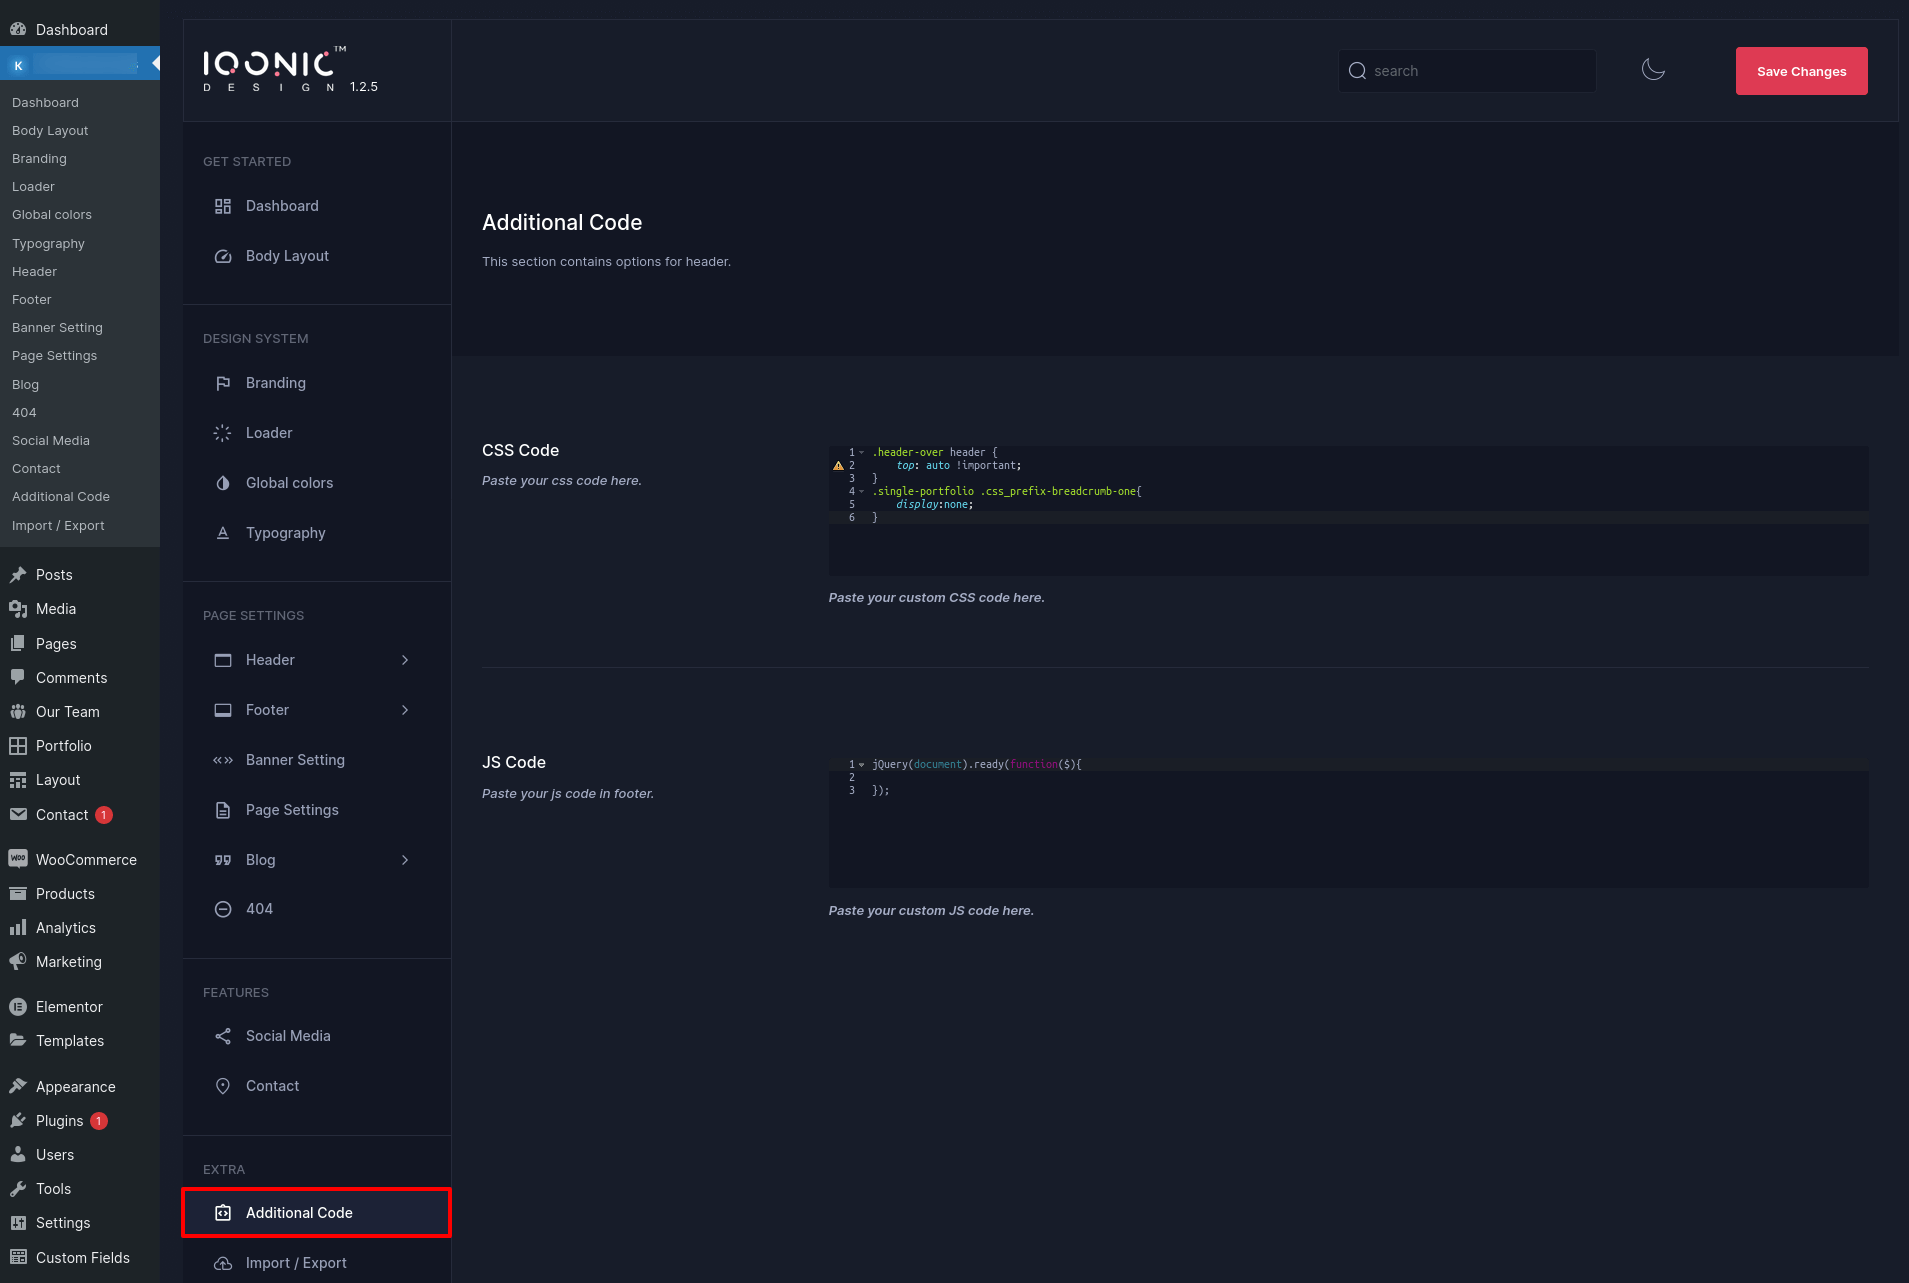
Additional Code Settings
You can change global css, js from here.
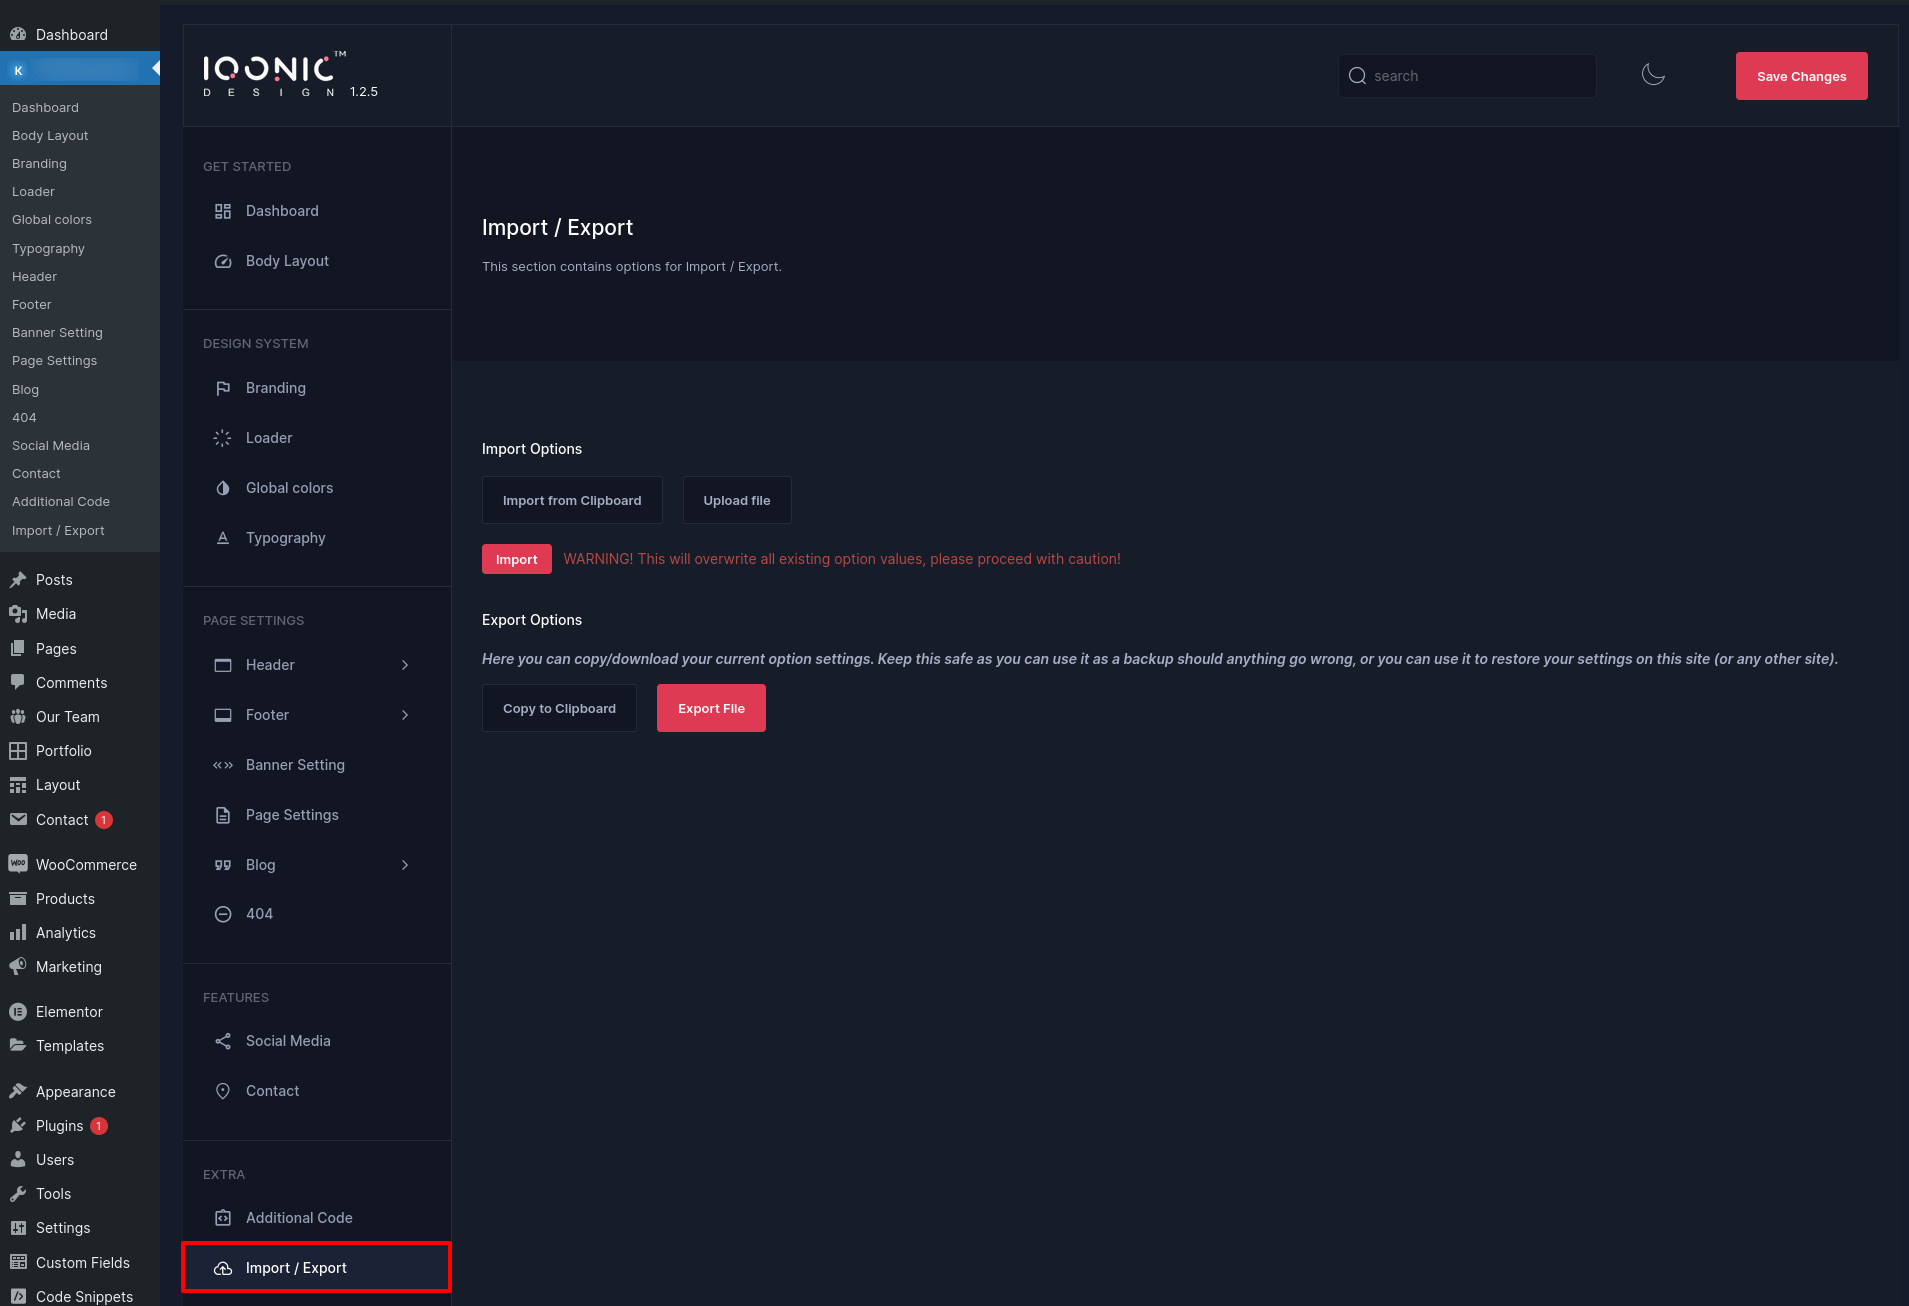
Import / Export
You can import or export theme settings from here. This will be usefull when you are developing your site on other server and want to move only theme settings. Just click "Download" button to export the settings and click "Import from file" button to import it.
Iqonic Extension Plugin
Shortcodes
Iqonic Layout Plugin
If you doesn't know Elementor , can read it's official documentation here
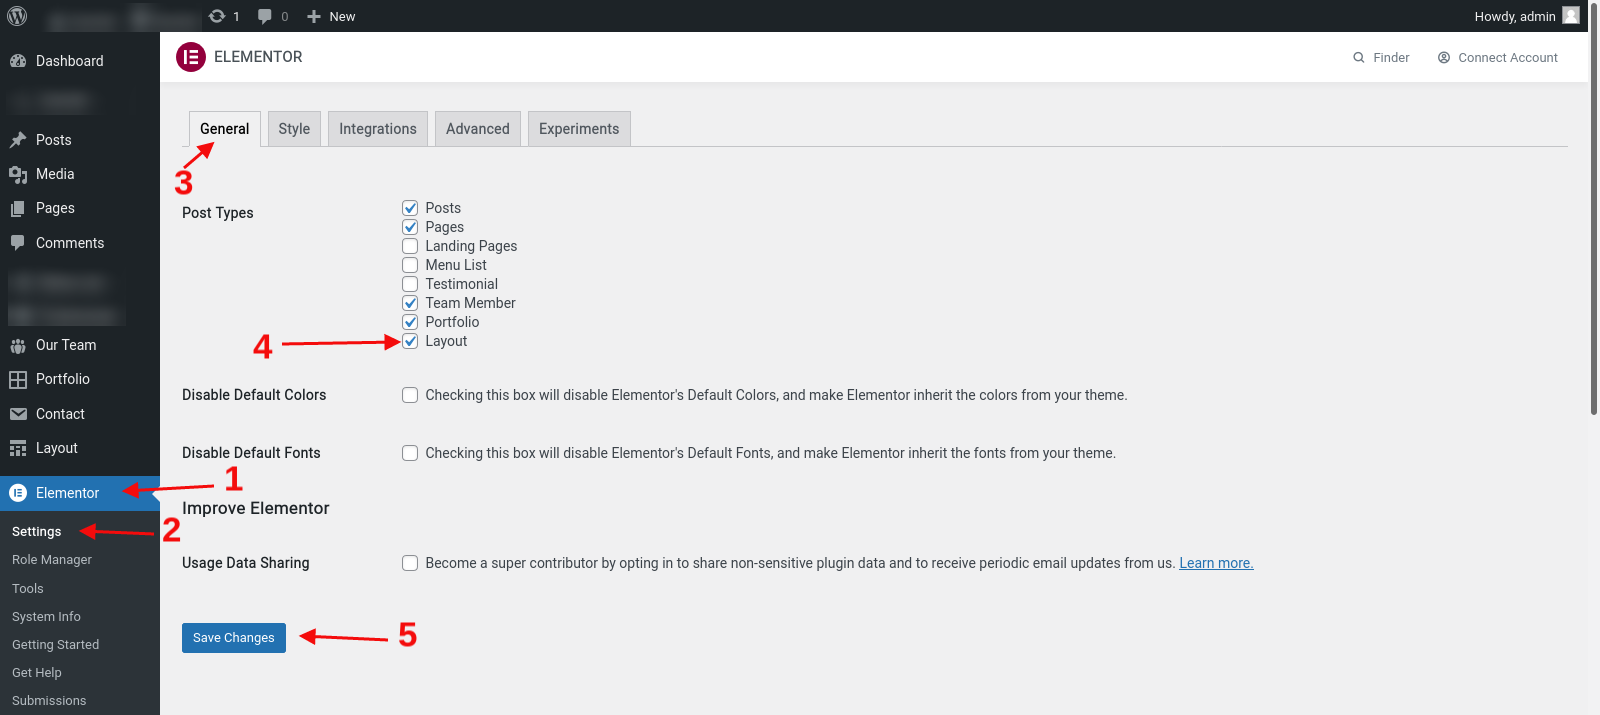
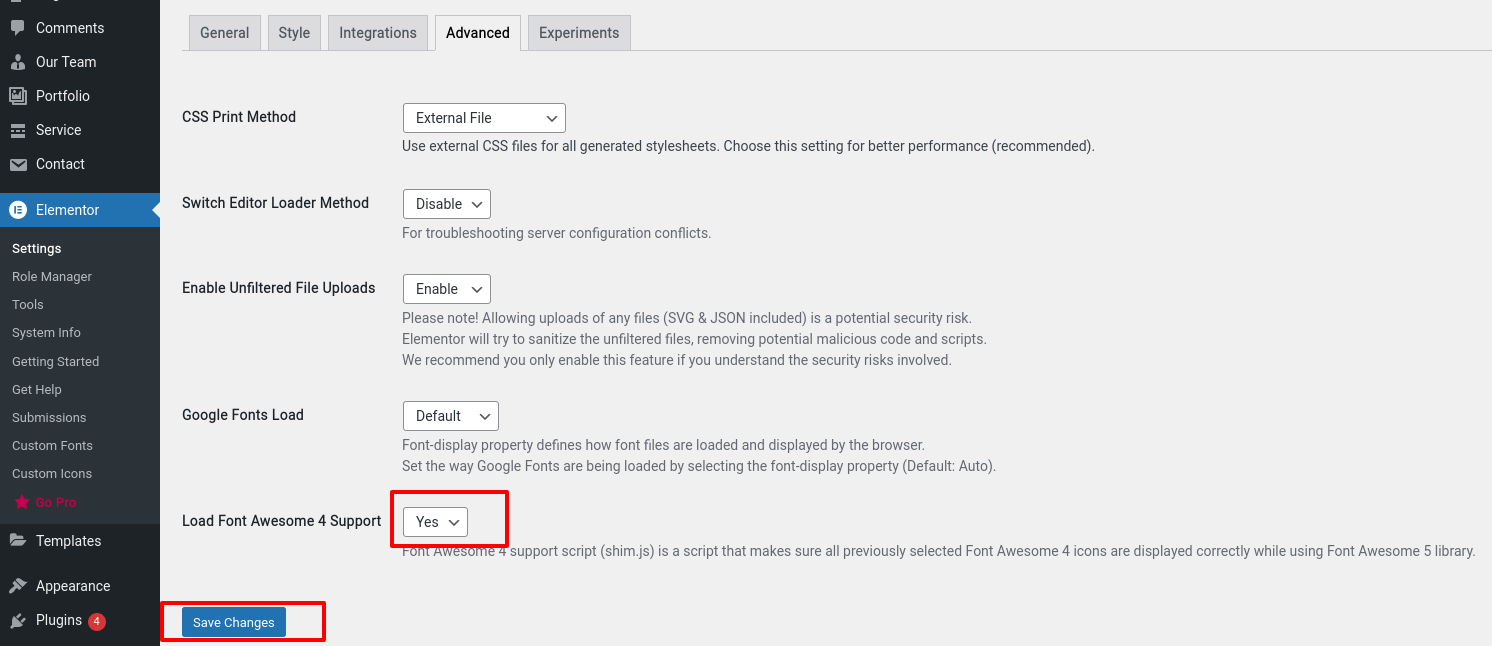
Now you can make header/footer on your own using Elementor.
Before you start using the Layout option, Enable Edit with Elementor option. To do so refer to the below image.
Layout
Now making a Header / Mega Menu / Footer / Custom / 404 is as easy as you make other things using Elementor.
Follow the steps to make and enable layouts for your site.
Create Layout
Step 1 - Got to the Layout > Add New which you can find at the left sidebar of admin panel.
Step 2 - Give a Title to your layout.
Step 3 - Select Type of your layout.(Types : Header / Mega Menu / Footer / Custom / 404)
Step 3 - Publish layout.
Step 4 - Edit layout with Elementor.

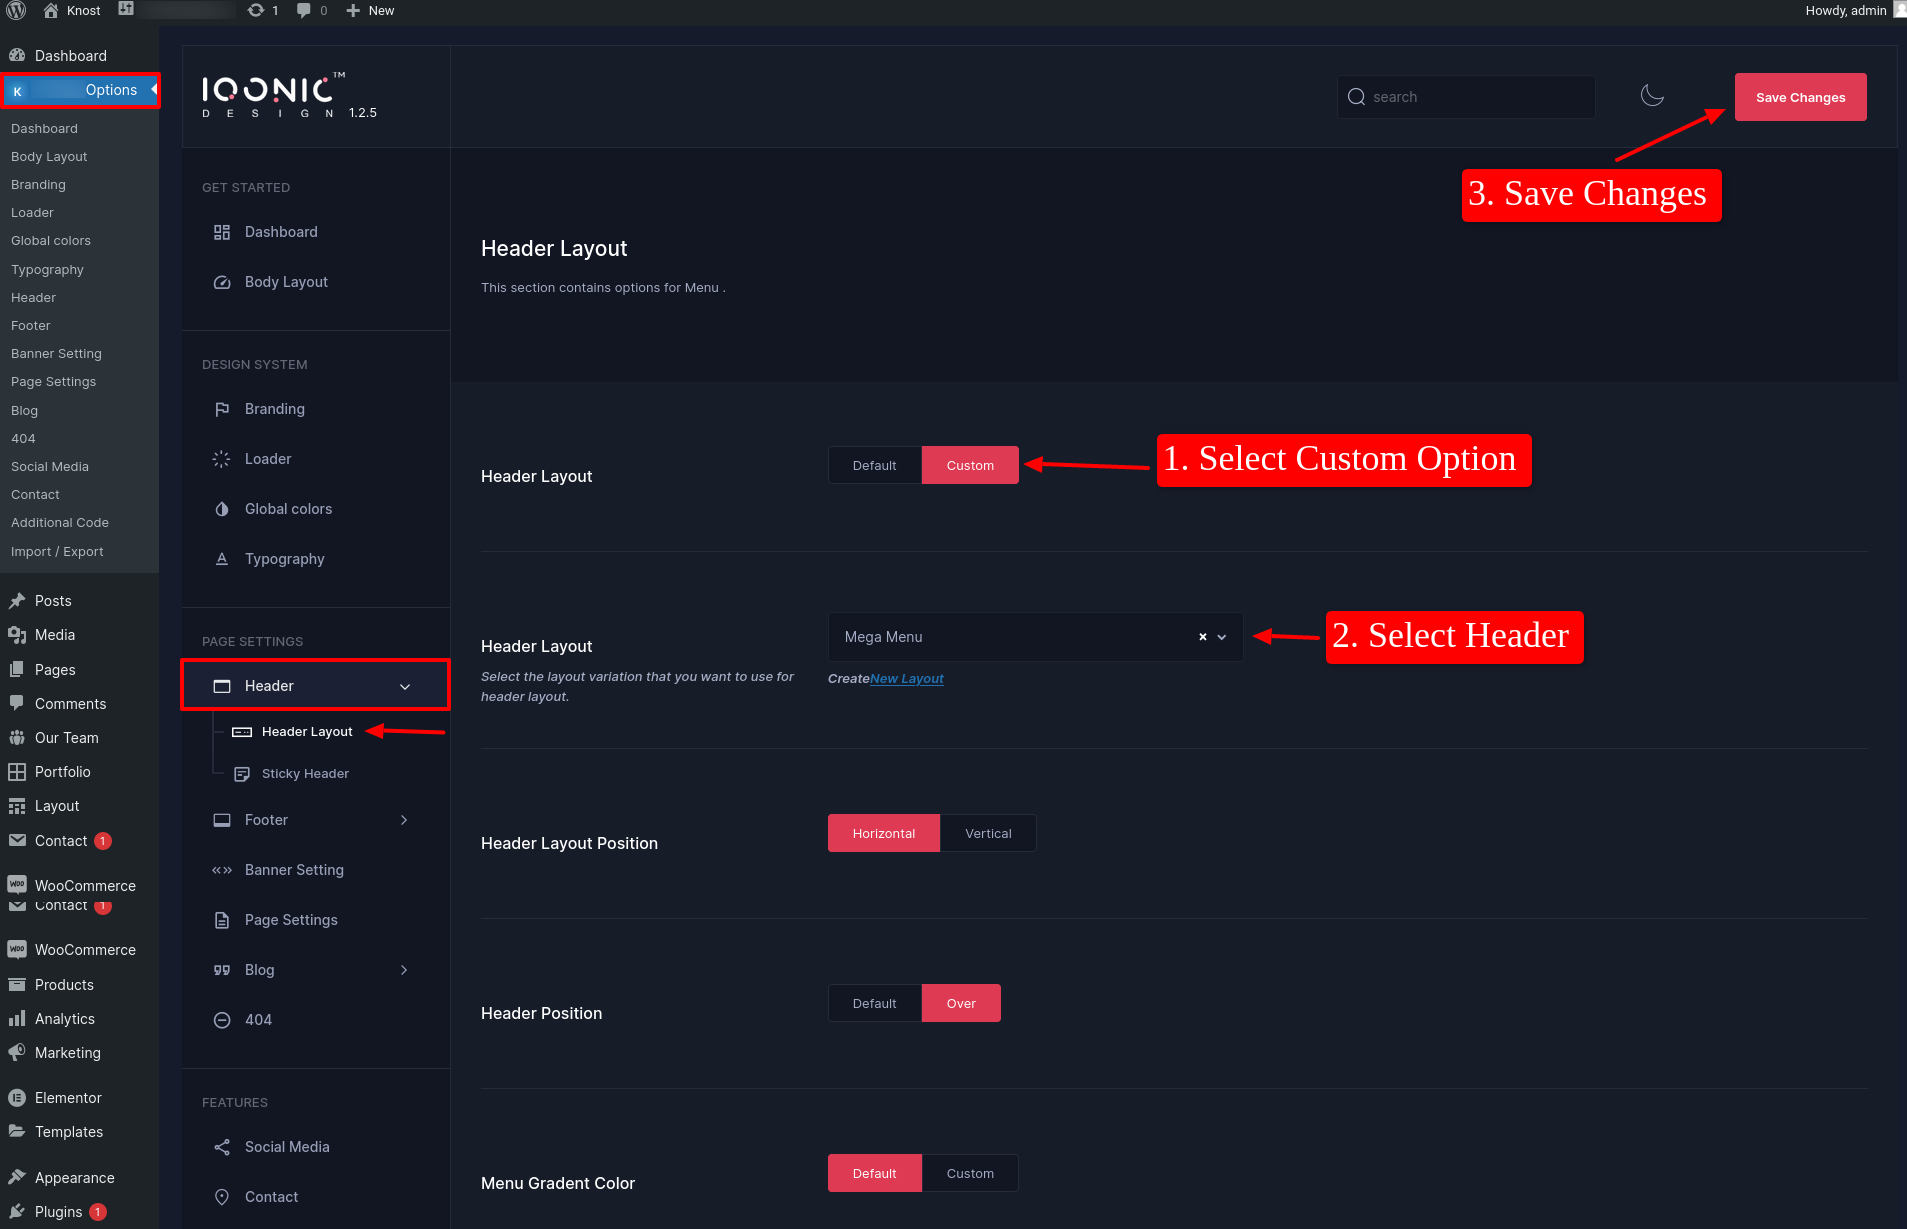
Header layout
Follow the steps to select Header layout for site/pages.
1 - Knost Options
Set header to all pages.
You can find Knost Header Options in Admin Dashboard > Knost Option > Header > Header Layout
Then after By Selecting custom option of the header you can get all the headers which you created with Elementor.
2 - Page Options
Set header to specific pages.
You can find Page Header Options in Admin Dashboard > Pages > Add / Edit Page > Page Settings > Header Settings
Then after By Selecting custom option of the header you can get all the headers which you created with Elementor.

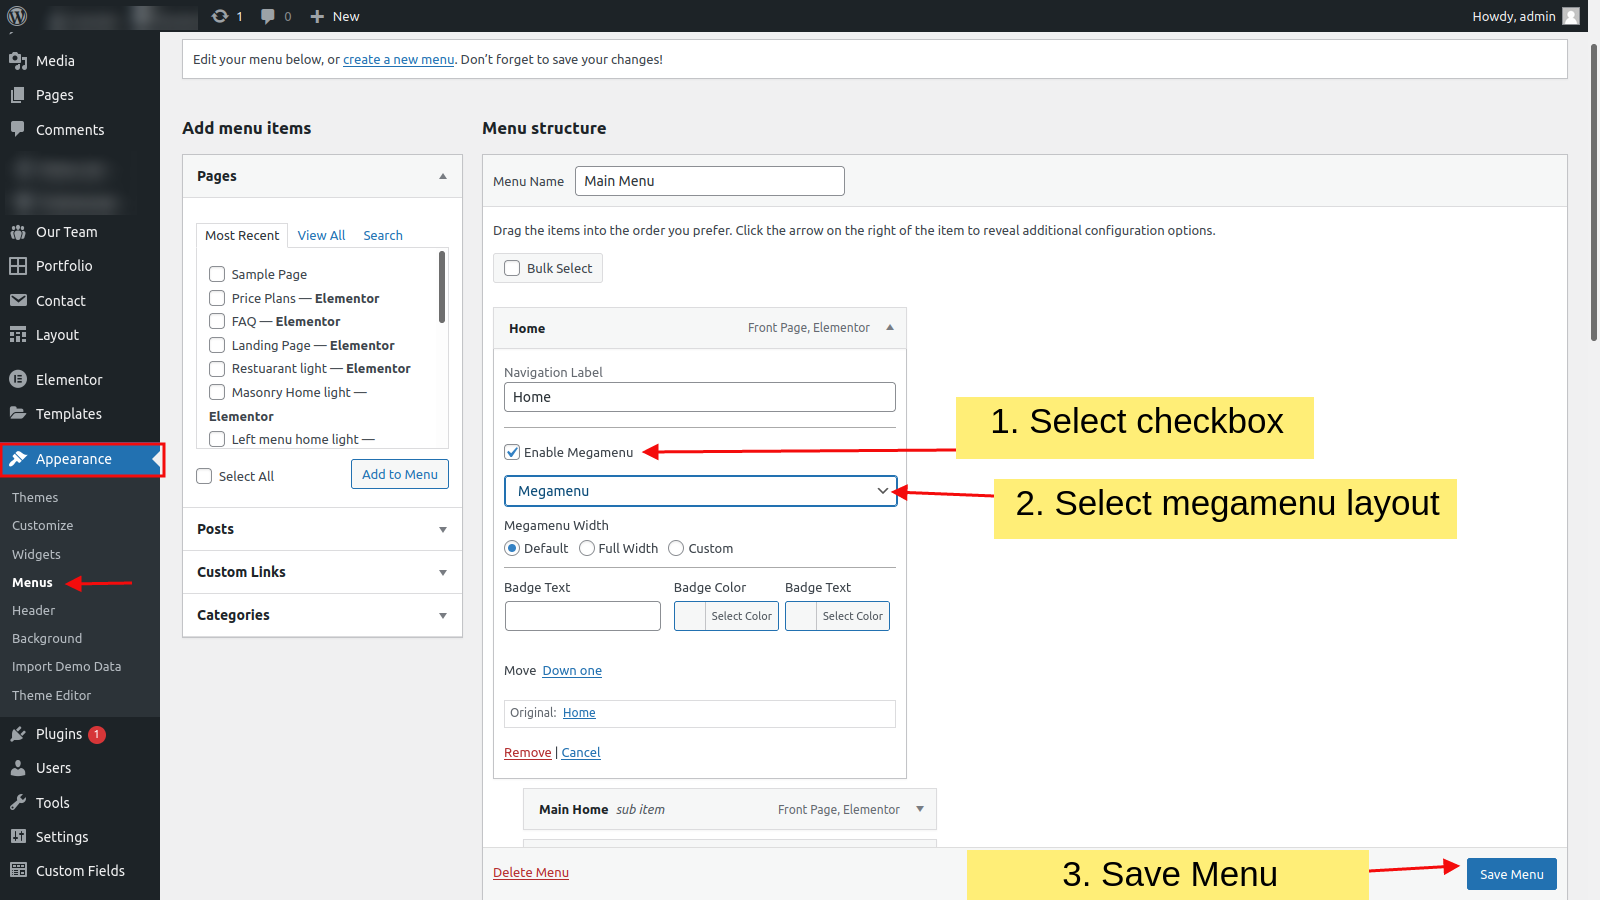
MegaMenu Layout
Follow the steps to select MegaMenu layout for the menu.
Step 1 - Got to the Appearance > Menus which you can find at the left sidebar of admin panel.
Step 2 - Add Custom Link.
Step 3 - Enable Megamenu.
Step 3 - Select Megamenu layout.
Step 4 - Save Menu.
Footer Layout
Follow the steps to select Footer layout for the site/pages.
1 - Knost Options
Set footer to all pages.
You can find Knost Footer Options in Admin Dashboard > Knost Option > Footer > Footer Layout
Then after By Selecting custom option of the footer you can get all the footers which you created with Elementor.

2 - Page Options
Set footer to specific pages.
You can find Knost Footer Settings in Admin Dashboard > Pages > Add / Edit Page > Page Settings > Footer Settings
Then after By Selecting custom option of the footer you can get all the footers which you created with Elementor.

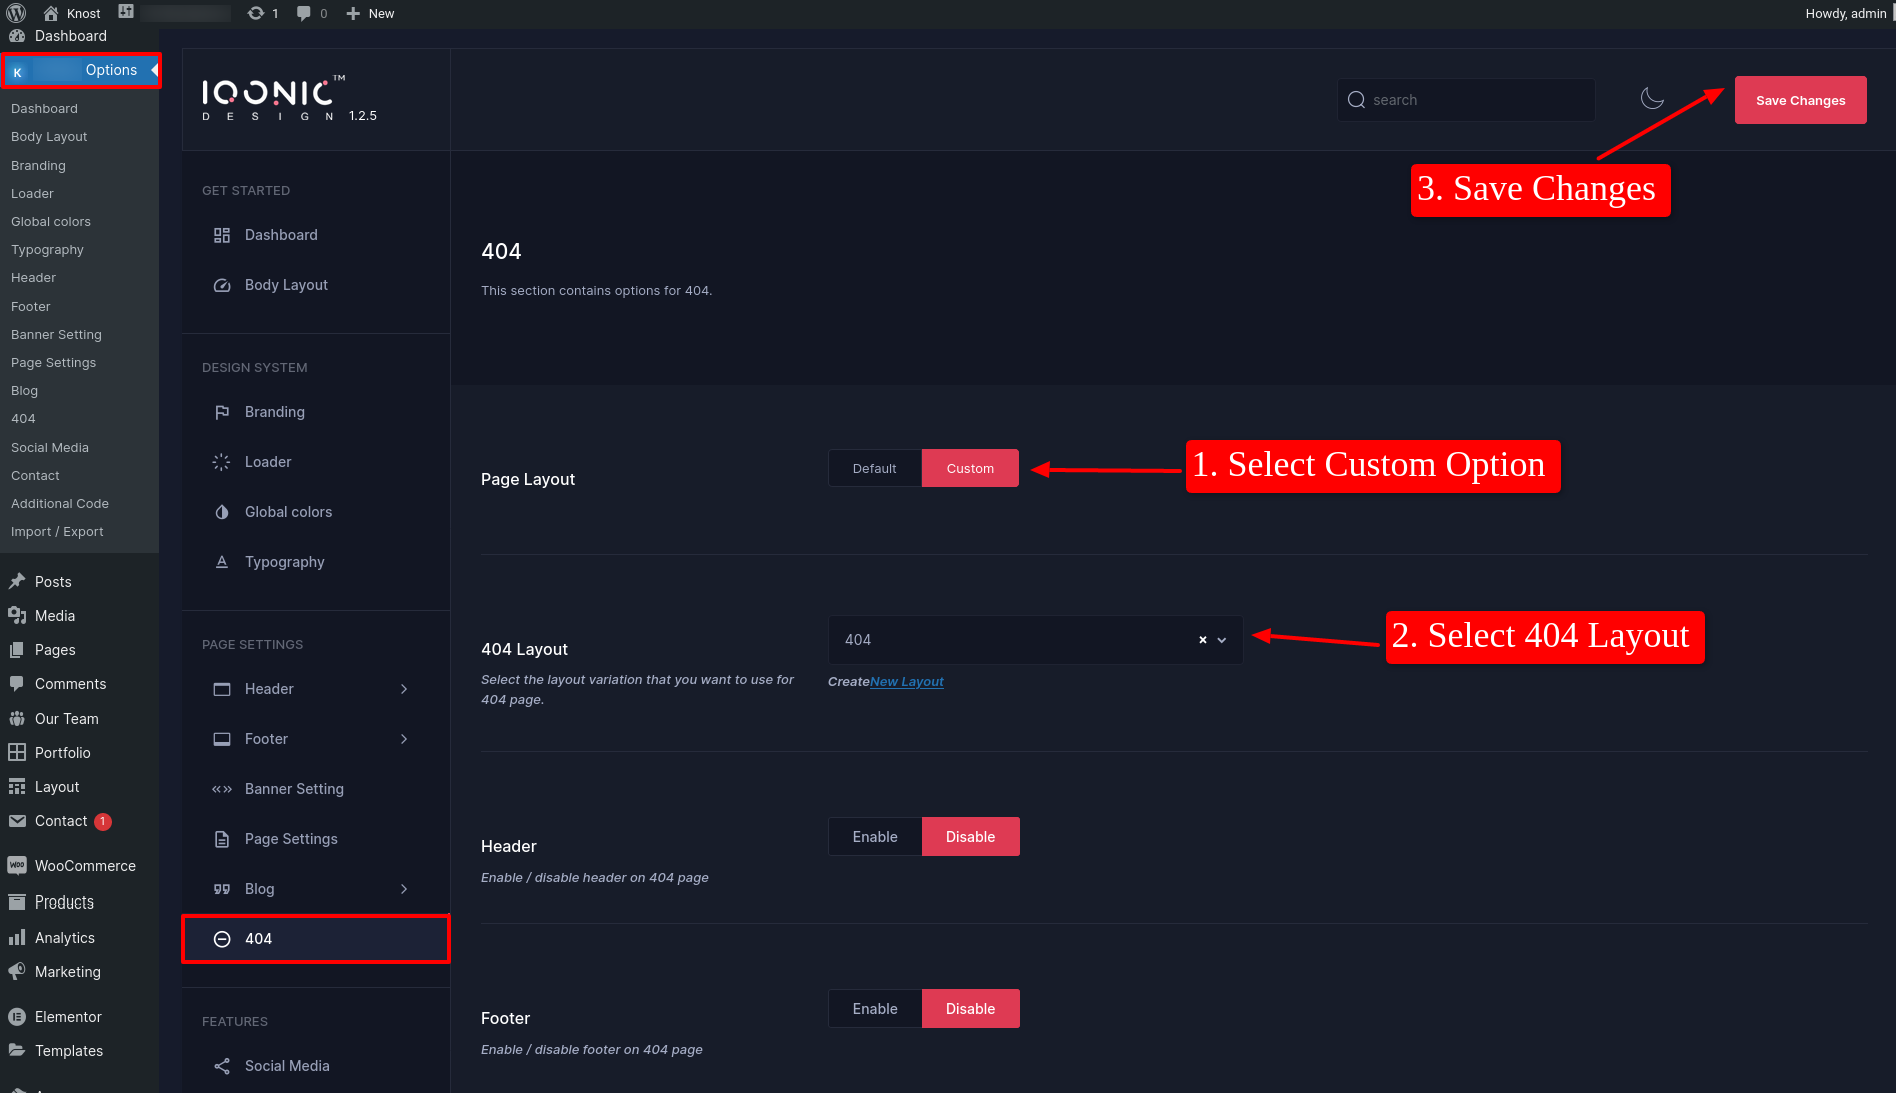
404 Layout
Follow the steps to select 404 layout.
Knost Options
You can find Knost 404 Options in Admin Dashboard > Knost Option > 404
Then after By Selecting custom option of the 404 page layout you can get all the 404 layouts which you created with Elementor.
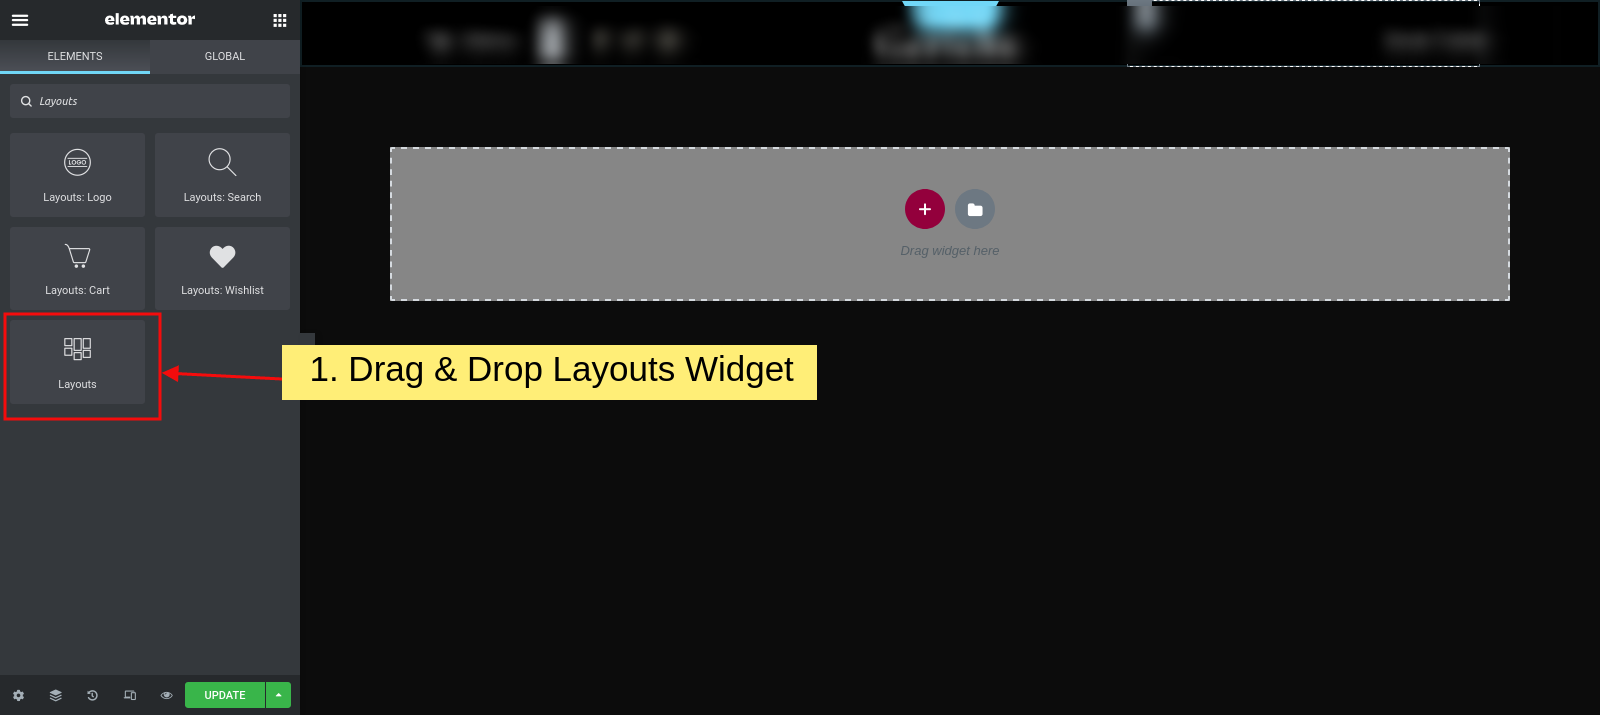
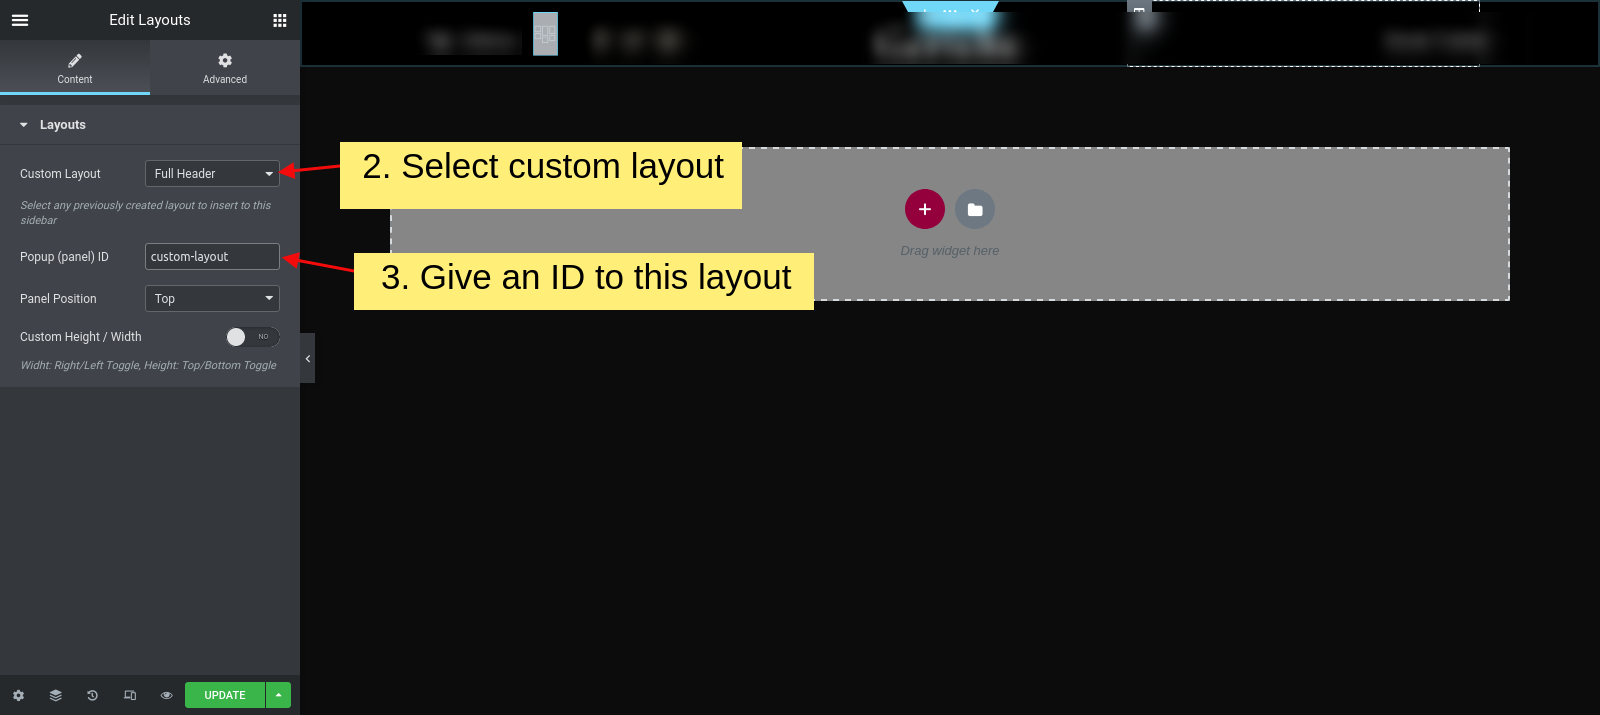
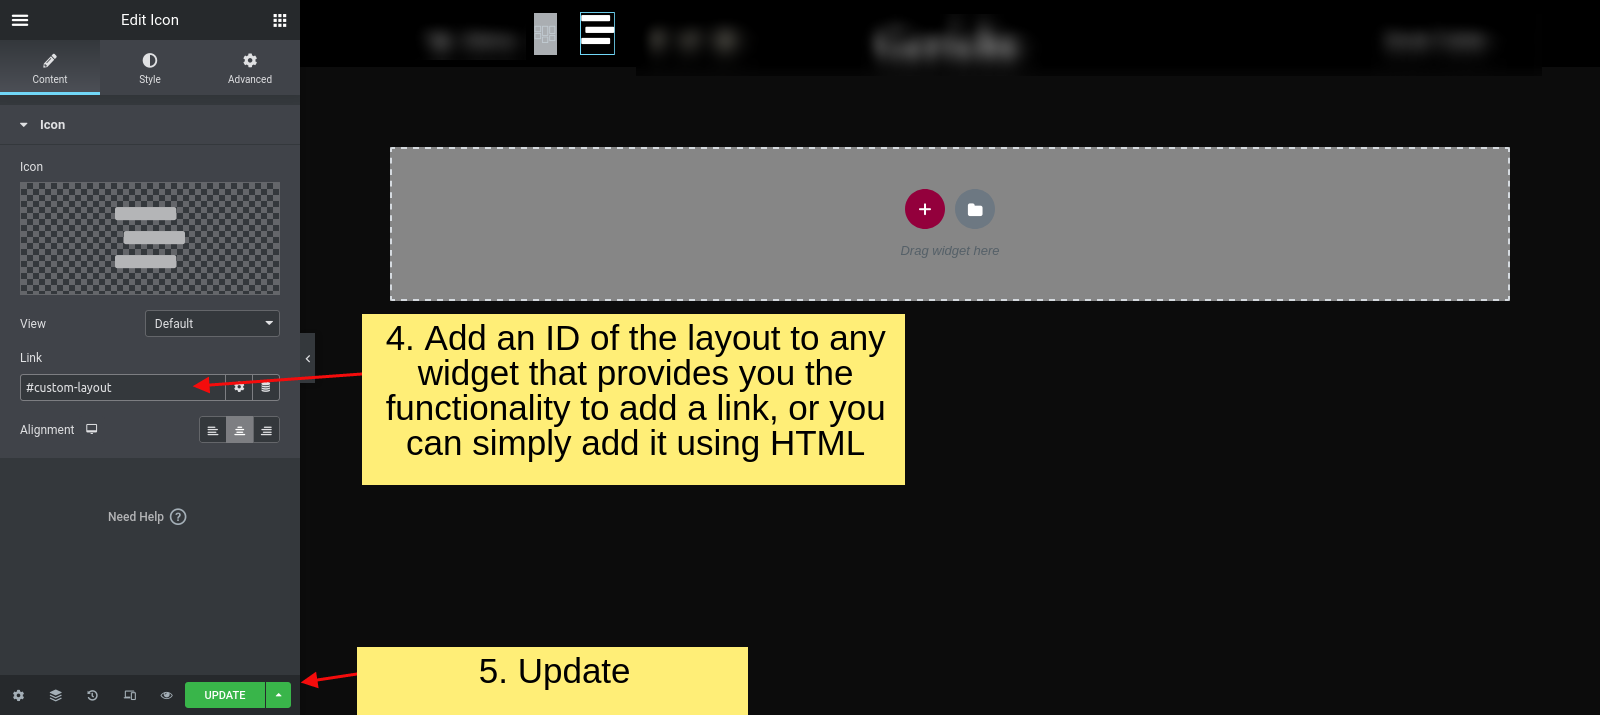
Custom Layout
You can add custom layout anywhere in page using Elementor.
Follow the steps to add and open a custom layouts.
Step 1 : Go to the Elementor Editor in any page/post.
Step 2 : Drag and drop Layout Widget from elementor side bar.
Step 3 : Select Custom Layout you created.
Step 4 : Give a ID to the layout.(i.e. id='custom-layout')
Step 5 : Add that ID into the any link.(i.e. href='#custom-layout')
Step 5 : Update
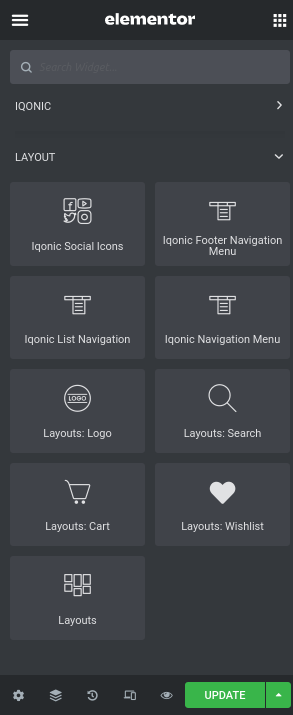
Layout Elementor Widgets
We provided some Elementor widgets with layout builder that helps you to make your header / footer / custom layouts.
Along with these you can use any other widgets also in layout builder.
Custom Post Type
A custom post type is an additional type of posts that is tailored for a specific kind of content. Custom post types are a part of the Addons plug-in, and you can use them after the plug-in activation.
Team
To display team members on your page, you need to create team posts first and then output them using an Elementor widget.
Add a new team member post by clicking Team > Add New.
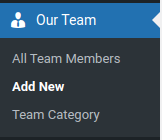
Please find the screenshot below with the back-end view of a team post.
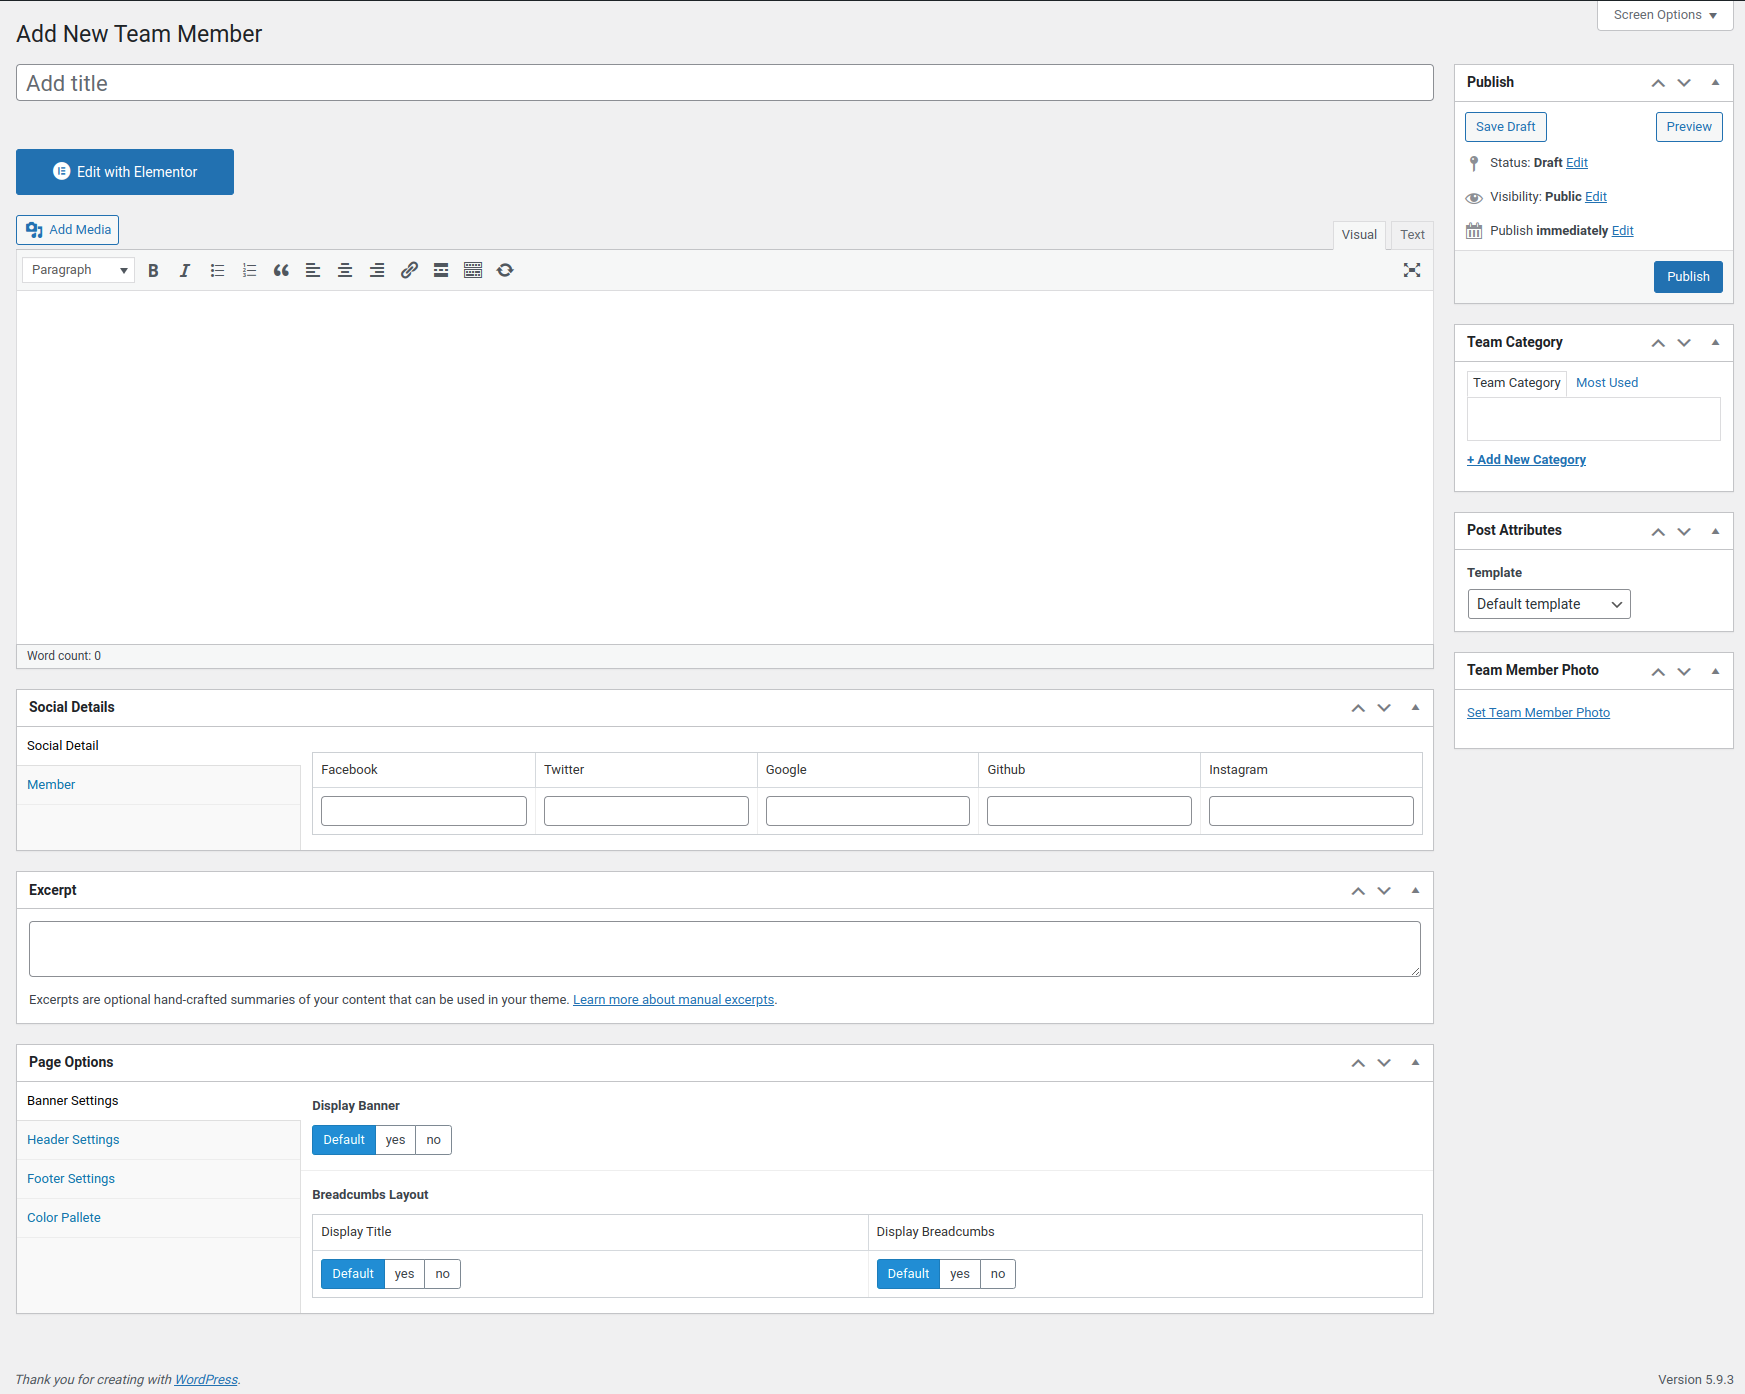
On a team member page, you can enter the team member's name, description, Team Member image, excerpt, Team Category, Social Icon.
- Link to WordPress user - select a WordPress user to display posts written by this team member.
- Team Category - a team's category , or any other subtitle text.
- Excerpt - a short summary that is displayed on a single team member page.
- Socials - links to social media profiles. Add as many links as needed.
Portfolio
If you want to add a portfolio section to your web page, you need to create the portfolio posts and display them using the Elementor Portfolio widget.

Below is an example of the back-end view of a single portfolio post.

Here you will get Portfolio Title, Description, Client Name, Portfolio Address, Excerpt ,Tag and Featured image.
Sidebars and Widgets
This section shows a list of pre-defined widgets on a page, so that you will find it easier when pulling out widgets to set up your site.
- Blog Sidebar : You can add widgets here to appear in your sidebar on blog posts and archive pages.
- Footer Area 1 : This Widget Position will be shown in first footer area as first widget position.
- Footer Area 2 : This Widget Position will be shown in second footer area as second widget position.
- Footer Area 3 : This Widget Position will be shown in third footer area as third widget position.
- Footer Area 4 : This Widget Position will be shown in fourth footer area as fourth widget position.
- Footer Bottom Area : This Widget Position will be shown in footer center area as bottom widget position.

Contact Form
To build contact form you can go step by step using screens given below.


Elementor Builder
If you doesn't know Elementor , can read it's official documentation here
You can add Elementor Settings from here.

Translation
There are no ready language files, but you need to take only a few steps to translate your website to the needed language. You can translate the theme to any language, as well as RTL Language.
The first step you should take is create your own language file. To implement this you should install Poedit:
www.poedit.netCopy knost.pot file to your computer.
Note: You will find the language pot file in wp-content/themes/knost/languages.
Translate your website
Do you want to translate your WordPress site? You just need to follow few steps to get started. You can translate the theme to any language, as well as RTL Language.
Start by installing Poedit.
- Set your WordPress for the language so the admin section will be in your language
- Create language PO file for translation
- Modify the PO file using POEdit software and translate all strings in it. This will also generate MO file which is used by WordPress
Change Log
-
Version 1.3.2 – 7 July 2025
- [UPDATED] Compatibility with Elementor Version 3.28.4
- [FIXED] Minor bugs
-
Version 1.3.1 – 30 April 2025
- [FIXED] Minor bugs
-
Version 1.3.0 – 13 March 2025
- [FIXED] Issue with editing pages using Elementor.
- [FIXED] Compatibility of ACF with the latest WordPress version.
- [UPDATED] Compatibility with WordPress version 6.7.1.
- [UPDATED] Compatibility with WooCommerce version 9.7.0.
- [UPDATED] Compatibility with Elementor version 3.27.6.
-
Version 1.2.9 – 20 Nov 2024
- [FIXED] Deprecation errors
- [FIXED] Minor bugs
- [UPDATED] Tested with WordPress version 6.7
-
Version 1.2.8 – 27 July 2024
- [FIXED] Deprecation Error Fixed
- [FIXED] Update New Font-awesome library
- [FIXED] Compatible with New woocommarce
- [FIXED] Woocommarce Template Update
- [FIXED] Minor bug fix
-
Version 1.2.7 – 10 feb 2024
- [FIXED] Minor bug fix
- [FIXED] Compatible with wordpress 6.4.3
-
Version 1.2.6 – 17 Nov 2023
- Compatible with latest wordpress version 6.4
- Compatible with PHP 8.1
- Woocommerce templates update
- [FIXED] Remove Elementor deprecated function
- [FIXED] Woocommarce add-to-cart header widget issue resolved
- [FIXED] Redux option & ACF option bug fix
- [FIXED] Minor bug fixing
-
Version 1.2.5 – 21 March 2023
- [Add] - New Home Pages
- [Add] - Full Page Slider
- [Add] - Portfolio Slider
- [Add] - New Redux Design
-
Version 1.2.4 – 30 Sep 2022
- [Fixed] - Bug Fixes
-
Version 1.2.3 – 18 Jun 2022
- [Add] - Mega Menu
- [Add] - portfolio Hover Style
- Hover Info
- Image Hover
- Image Overlay
- Portfolio Carousel
-
Version 1.2.2 – 08 Jun 2022
- [Add] - WordPress Version 6.0 Supported
- [Add] - Blog Single Layout
- Overlay Image
- Image First
- Title First
- [Add] - Portfolio List Style
- Portfolio Standard
- Portfolio Gallery
- Portfolio Gallery Joined
- Portfolio Masonry
- Portfolio Masonry Joined
- Portfolio Slider One
- Portfolio Slider Two
- Portfolio Slider Three
- [Add] - Portfolio Grid Style
- 5 columns
- 5 Columns Full Width
- 6 Columns
- [Add] - portfolio Single Type
- Centered Stack
- Centered Gallery
- Sidebar Slides
- Sidebar Gallery
- Sidebar Stack
- Masonry
- Sidebar Masonry
- Centered Details
-
Version 1.2.1 – 25 Mar 2022
- [Fix] Elementor Version 3.6.0 Supported
-
Version 1.2.0 – 16 Dec 2021
- [Add] - Woocommerce Mini Cart Design Added
- [Add] - New Pages Add
- Portfolio Grid 2 Columns
- Portfolio Grid 3 Columnns
- Portfolio Grid 4 Columns
- Portfolio Grid 4 Columns Full Width
- Portfolio Grid 6 Columns Full Width
- Portfolio Gallery
- Portfolio Masonry
- Portfolio Single
- Blog Listing
- Blog Grid 2 Column
- Blog Grid 2 Column + Left Sidebar
- Blog Grid 2 Column + Right Sidebar
- Blog Grid 3 Column
- Blog Grid 4 Column
- Blog Standard
- Blog Gallery
- Blog Video
- Blog Audio
- Blog Link
- Blog Quote
- [Fixed] - Minor Bug FIxing
-
Version 1.1.0 – 04 Dec 2021
- [Add] - Theme Gradiant Color Option
- [Add] - Woocommerce Support
- Shop Pages With Sidebar
- Product Inner Page
- Product Elementor Widget
- [Add] - 3 Light Home Pages
- [Add] - Child Theme
- [Fixed] - Known Bug Fixing
-
Version 1.0 – 09 Nov 2021
- [Add] - WooCommerce Payment Gateway Integration
-
Version 1.0 – 09 Nov 2021
- Initial Release
Help and Support
The expert team at Iqonic Design is always happy to help you with any questions or concerns you encounter. If you need any support with the item, please contact us through our dedicated support portal at Desky or email
- Support System: https://iqonic.desky.support/
- Support Email: [email protected]
Support Policy:
We request you to kindly read our documentation carefully. It will help you resolve most of your concerns with incorrect configuration. To get technical support and assistance, you need to have a valid purchase code. You will find this when you sign in your Themeforest “Download” page. Click on the theme’s download link.
PLEASE NOTE! Please be informed that theme-related features are only covered in technical support. Additional customization is not covered in support. Support does not include 3rd party plugins integration or any other compatibility issues that might arise. But, support is applied to plugin(s) we have developed and integrated ourselves.
If you have any questions that are beyond the scope of documentation, feel free to post them on our support portal at https://iqonic.desky.support/. Expect answer within 24-48 hours, usually as soon as possible in the order they were received.
PLEASE NOTE! Support requests are being processed on business days (Monday to Saturday) from 9:00 to 18:00 (GMT +05.30).We are in GMT+5:30 time zone. We address all the support queries 6 days weekly on the first-come, first-solve basis (Sundays off).
If any support ticket has no response from the item owner for 7 days, the ticket will be considered closed. If you need further assistance you can create another ticket.
Please be aware that before submitting a new ticket, please try searching the topic from our Articles and Knowledgebase for an answers.
Have pre-sales questions or concerns, please write to us via our website contact page or email us at [email protected] If you like our product and support then please drop a rate and write a review at https://themeforest.net/downloads
Third-party Extensions
Unfortunately, we do not provide support for third-party extensions. Please contact the author of the extension if needed. If you feel that you might have troubles with installing an extension, we advise you to order a professional installation service.
Thank you for purchasing our theme
Welcome and congratulations on being our premium item owner.
Congratulations, your websites is set to launch. If you have any questions or have a query, or simply wish to give us a suggestion or two, please reach us at our support portal and raise a ticket at https://iqonic.desky.support/
You get free 6 month support with this theme. You can write to us at [email protected] for any basic customization requests. Our support agents will guide you further on it. We wish you all success in your project.
copyright iqonicdesign 2023